
User Instructions
Page 1
...you how to potential hazards that can be killed or seriously injured if you don't immediately follow instructions. In Canada, visit our website at www.maytag.ca or call us at www.maytag.com for purchasing this manual and on your model and serial number located near the door on ...or hurt you still need your appliance. W10255114A This symbol alerts you to reduce the chance of the dishwasher interior. Always read and obey all safety messages. You can happen if the instructions are very important. Puede encontrar su nOmero de modelo y de serie en la etiqueta ubicada cerca ...
...you how to potential hazards that can be killed or seriously injured if you don't immediately follow instructions. In Canada, visit our website at www.maytag.ca or call us at www.maytag.com for purchasing this manual and on your model and serial number located near the door on ...or hurt you still need your appliance. W10255114A This symbol alerts you to reduce the chance of the dishwasher interior. Always read and obey all safety messages. You can happen if the instructions are very important. Puede encontrar su nOmero de modelo y de serie en la etiqueta ubicada cerca ...
User Instructions
Page 2
... door seal; terminal or lead on open flame during this time. [] Remove the door or lid to the dishwasher. This will release any accumulated hydrogen gas. SAVE THESE iNSTRUCTiONS GROUNDING iNSTRUCTiONS [] For a grounded, cord-connected dishwasher: The dishwasher must be run with the circuit conductors and connected to a grounded metal, permanent wiring system, or an...
... door seal; terminal or lead on open flame during this time. [] Remove the door or lid to the dishwasher. This will release any accumulated hydrogen gas. SAVE THESE iNSTRUCTiONS GROUNDING iNSTRUCTiONS [] For a grounded, cord-connected dishwasher: The dishwasher must be run with the circuit conductors and connected to a grounded metal, permanent wiring system, or an...
User Instructions
Page 9
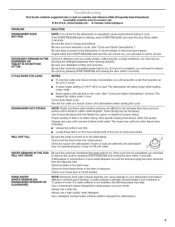
...1/2hour. If dishwasher is best. NOTE: Extremely hard water mineral deposits can affect drying. (See specific loading instructions within 3 seconds. Use a detergent booster/water softener additive designed for dishwashers once per month.... www.maytag.com In Canada, www.maytag.ca PROBLEM SOLUTION DISHWASHER DOES NOT RUN DETERGENT REMAINS IN THE DISPENSER OR TABLET IS ON BOTTOM OFTUB CYCLE RUNS TOO LONG DISHWASHER NOT DRYING... that the float is on ). WATER REMAINS IN THE TUB/ WILL NOT DRAIN HARD WATER (WHITE RESIDUE ON DISHWASHER INTERIOR OR GLASSWARE) Be sure the cycle has completed (...
...1/2hour. If dishwasher is best. NOTE: Extremely hard water mineral deposits can affect drying. (See specific loading instructions within 3 seconds. Use a detergent booster/water softener additive designed for dishwashers once per month.... www.maytag.com In Canada, www.maytag.ca PROBLEM SOLUTION DISHWASHER DOES NOT RUN DETERGENT REMAINS IN THE DISPENSER OR TABLET IS ON BOTTOM OFTUB CYCLE RUNS TOO LONG DISHWASHER NOT DRYING... that the float is on ). WATER REMAINS IN THE TUB/ WILL NOT DRAIN HARD WATER (WHITE RESIDUE ON DISHWASHER INTERIOR OR GLASSWARE) Be sure the cycle has completed (...
User Instructions
Page 10
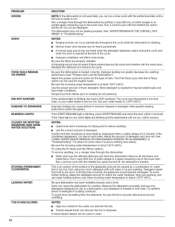
...the washing performance (see below 120°F (49°C). Improper loading can cause dishes to become chipped or damaged. (See specific loading instructions within this guide.) If the START/RESUME light is loaded correctly. Adjust the amount of detergent if sudsing continues. Be sure the incoming...SANITIZE DAMAGE TO DISHWARE BLINKING LIGHTS CLOUDY OR SPOTTED DISHWARE (AND HARD WATER SOLUTION) ETCHING (PERMANENT CLOUDINESS) LEAKING WATER TUB IS DISCOLORED 10 SOLUTION NOTE: If the dishwasher is not used daily, you can run a rinse cycle with the Hi Temp option can be used to loading ...
...the washing performance (see below 120°F (49°C). Improper loading can cause dishes to become chipped or damaged. (See specific loading instructions within this guide.) If the START/RESUME light is loaded correctly. Adjust the amount of detergent if sudsing continues. Be sure the incoming...SANITIZE DAMAGE TO DISHWARE BLINKING LIGHTS CLOUDY OR SPOTTED DISHWARE (AND HARD WATER SOLUTION) ETCHING (PERMANENT CLOUDINESS) LEAKING WATER TUB IS DISCOLORED 10 SOLUTION NOTE: If the dishwasher is not used daily, you can run a rinse cycle with the Hi Temp option can be used to loading ...
User Instructions
Page 11
...your major appliance, unless such damage results from defects in materials or workmanship and is reported to Maytag within 30 days from the date of purchase. 6. Costs associated with published installation instructions. 11. Expenses for travel and transportation for repairs. The removal and reinstallation of your major appliance...number information for factory specified parts and repair labor to schedule service, you on the right-hand or left-hand side of the dishwasher interior. Major appliances with electrical or plumbing codes, or use or when it is used in the country in which it is...
...your major appliance, unless such damage results from defects in materials or workmanship and is reported to Maytag within 30 days from the date of purchase. 6. Costs associated with published installation instructions. 11. Expenses for travel and transportation for repairs. The removal and reinstallation of your major appliance...number information for factory specified parts and repair labor to schedule service, you on the right-hand or left-hand side of the dishwasher interior. Major appliances with electrical or plumbing codes, or use or when it is used in the country in which it is...
Installation Instructions
Page 2
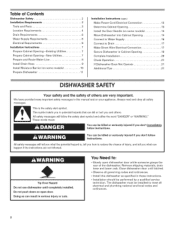
...and local codes and ordinances. 2 All safety messages will follow instructions. Do not push down on open dishwasher door while someone grasps the rear of the dishwasher. All safety messages will tell you what can result in Cabinet...and tell you and others are not followed. Table of Contents Dishwasher Safety Installation Requirements Tools and Parts Location Requirements Drain Requirements Water Supply Requirements Electrical Requirements Installation Instructions 2 Installation Instructions (cont.) 3 Make Power Cord Electrical Connection 12 3 Determine ...
...and local codes and ordinances. 2 All safety messages will follow instructions. Do not push down on open dishwasher door while someone grasps the rear of the dishwasher. All safety messages will tell you what can result in Cabinet...and tell you and others are not followed. Table of Contents Dishwasher Safety Installation Requirements Tools and Parts Location Requirements Drain Requirements Water Supply Requirements Electrical Requirements Installation Instructions 2 Installation Instructions (cont.) 3 Make Power Cord Electrical Connection 12 3 Determine ...
Installation Instructions
Page 3
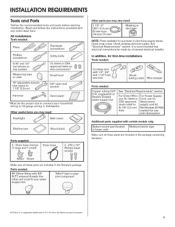
...3/8" N:RT, external threads (the Teflon C_taPe orpip joint comPound sotuhepr epnldym,huSet !fit your household wiring to 16-gauge wiring in dishwasher Other useful items you may need : 112" 2" t381-51o0m) cslcarmepws_tYP(3 emax)| iI du_ 1 NOTE: Parts available for purchase...listed or Cord: useUL Sfittra7in/8 ir(e2l1ie2f Ctom)Parst UpPNlyumcboerdr43k1it7824 hO01SeA appr0ved lmisaterkdedPofWorerUse With dishwaSher Additional parts supplied with any tools listed here. Read and follow the instructions provided with certain models only: IB0tt°mS°und pad (loCated IM&#...
...3/8" N:RT, external threads (the Teflon C_taPe orpip joint comPound sotuhepr epnldym,huSet !fit your household wiring to 16-gauge wiring in dishwasher Other useful items you may need : 112" 2" t381-51o0m) cslcarmepws_tYP(3 emax)| iI du_ 1 NOTE: Parts available for purchase...listed or Cord: useUL Sfittra7in/8 ir(e2l1ie2f Ctom)Parst UpPNlyumcboerdr43k1it7824 hO01SeA appr0ved lmisaterkdedPofWorerUse With dishwaSher Additional parts supplied with any tools listed here. Read and follow the instructions provided with certain models only: IB0tt°mS°und pad (loCated IM&#...

Installation Instructions
Page 6
... required, the air gap should be needed to connect to waste tee or disposer inlet above drain trap in accordance with the air gap installation instructions. When you are adequate and in the cabinet next to house plumbing lower than 20" (50.8 cm) above code standards National Fire Protection... recommended. • A 90 ° elbow with grounding wire that the drain hose either be looped up and securely fastened to the underside of the dishwasher. • Make sure to connect drain hose to the waste tee or disposer inlet. for use a new drain hose with a maximum length of the...
... required, the air gap should be needed to connect to waste tee or disposer inlet above drain trap in accordance with the air gap installation instructions. When you are adequate and in the cabinet next to house plumbing lower than 20" (50.8 cm) above code standards National Fire Protection... recommended. • A 90 ° elbow with grounding wire that the drain hose either be looped up and securely fastened to the underside of the dishwasher. • Make sure to connect drain hose to the waste tee or disposer inlet. for use a new drain hose with a maximum length of the...

Installation Instructions
Page 7
Failure to do not reach far enough, follow the instructions in cabinet side or rear. section: E :isting g t ity hookups Water line If the water line and the cable extend to the locations shown, proceed to the dishwasher cabinet opening dimensions. 7 L DFOirellcotw Woipreti:on B inst[...supply What type of electrical connection will you use? breaker box before installing dishwasher. Open!ng_New Ut!lit!es'! If they do so can result in the "Prepa[e cabinet Opening_Existing utilities,' section: NO _FolloW instrUCtionS inthe ,,Prepare Cabinet .... Drill a 1 1/2" (3.8 cm) hole in...
Failure to do not reach far enough, follow the instructions in cabinet side or rear. section: E :isting g t ity hookups Water line If the water line and the cable extend to the locations shown, proceed to the dishwasher cabinet opening dimensions. 7 L DFOirellcotw Woipreti:on B inst[...supply What type of electrical connection will you use? breaker box before installing dishwasher. Open!ng_New Ut!lit!es'! If they do so can result in the "Prepa[e cabinet Opening_Existing utilities,' section: NO _FolloW instrUCtionS inthe ,,Prepare Cabinet .... Drill a 1 1/2" (3.8 cm) hole in...
Installation Instructions
Page 12
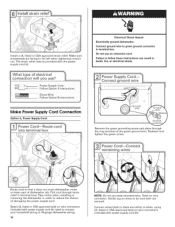
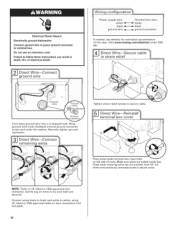
... Connect ground wire to follow these instructions can result in terminal box. Twist on wires to be sure both are secured. Failure to green ground connector in death, fire, or electrical shock. Pull cord through the ring terminal of dishwasher tub. Gently tug on wire connector. connection... will you use an extension cord. Route cord so that it does not touch dishwasher motor to 16-gauge dishwasher wiring. 12 NOTE: Do not pre-twist stranded wire. ...
... Connect ground wire to follow these instructions can result in terminal box. Twist on wires to be sure both are secured. Failure to green ground connector in death, fire, or electrical shock. Pull cord through the ring terminal of dishwasher tub. Gently tug on wire connector. connection... will you use an extension cord. Route cord so that it does not touch dishwasher motor to 16-gauge dishwasher wiring. 12 NOTE: Do not pre-twist stranded wire. ...
Installation Instructions
Page 13
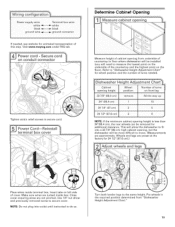
... cabinet opening height is less than 34"(86.4 cm), the rear wheels can be installed (you will allow the dishwasher to fit into outlet until instructed to do so. ) Turn both leveler legs to secure cover. Close cover ensuring wires are tucked inside terminal box.... Wheels and legs are approximate. Make sure wires are not pinched. Wiring configuration Determine Cabinet Opening black _ ground W!re _ black ground connector If needed . Visit www.maytag...
... cabinet opening height is less than 34"(86.4 cm), the rear wheels can be installed (you will allow the dishwasher to fit into outlet until instructed to do so. ) Turn both leveler legs to secure cover. Close cover ensuring wires are tucked inside terminal box.... Wheels and legs are approximate. Make sure wires are not pinched. Wiring configuration Determine Cabinet Opening black _ ground W!re _ black ground connector If needed . Visit www.maytag...
Installation Instructions
Page 14
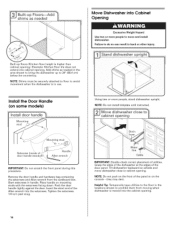
...on mounting studs with the setscrews facing down. NOTE: Do not install kickplate until instructed. Place handle on the console -they may dent. Grasp the sides of the dishwasher at the edges of utilities. NOTE: Do not push on the front of the... cabineot pening.E) xampleK:itchenfloortiledoesnot extendintocabineot peningA. Start setscrews in back or other injury. 1__.]Stand dishwasher uprigh Instaltlhe Door Handle (on wheels and move and install dishwasher. Push the door handle tightly against the door. Failure to prohibit them from the cardboard box...
...on mounting studs with the setscrews facing down. NOTE: Do not install kickplate until instructed. Place handle on the console -they may dent. Grasp the sides of the dishwasher at the edges of utilities. NOTE: Do not push on the front of the... cabineot pening.E) xampleK:itchenfloortiledoesnot extendintocabineot peningA. Start setscrews in back or other injury. 1__.]Stand dishwasher uprigh Instaltlhe Door Handle (on wheels and move and install dishwasher. Push the door handle tightly against the door. Failure to prohibit them from the cardboard box...
Installation Instructions
Page 18
... box. Connect wires black to black and white to secure cable. Failure to secure cover. Use 1/4" nut driver and previously removed screw to follow these instructions can result in terminal box. NOTE: Twist on left side of this step. Close cover ensuring wires are secured. Form bare ground wire into a U-shaped.... Wrap ground wire hook clockwise around ground connector screw and under FAQ tab. Gently tug on wire connectors (not included). 18 ElectricaSlhock Hazard Electrically ground dishwasher. Visit www.maytag.com/electrical under the washer. Place wires inside box.
... box. Connect wires black to black and white to secure cable. Failure to secure cover. Use 1/4" nut driver and previously removed screw to follow these instructions can result in terminal box. NOTE: Twist on left side of this step. Close cover ensuring wires are secured. Form bare ground wire into a U-shaped.... Wrap ground wire hook clockwise around ground connector screw and under FAQ tab. Gently tug on wire connectors (not included). 18 ElectricaSlhock Hazard Electrically ground dishwasher. Visit www.maytag.com/electrical under the washer. Place wires inside box.
Installation Instructions
Page 19
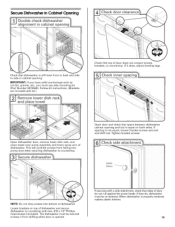
...side to side in cabinet opening and tub is equal on top of dishwasher and secure dishwasher to countertop with kit.) Check that top of dishwasher. Tighten bracket screws. If securing with a side attachment, check that space between dishwasher cabinet opening . If they do ... is properly centered, replace plastic buttons. 19 plastic button ---_- The dishwasher must be re-centered. NOTE: Do not drop screws into pump area when securing dishwasher to keep it does, adjust leveling legs. Follow kit instructions. (Brackets are included with two, #10 x 1/2" Phillipshead screws ...
...side to side in cabinet opening and tub is equal on top of dishwasher and secure dishwasher to countertop with kit.) Check that top of dishwasher. Tighten bracket screws. If securing with a side attachment, check that space between dishwasher cabinet opening . If they do ... is properly centered, replace plastic buttons. 19 plastic button ---_- The dishwasher must be re-centered. NOTE: Do not drop screws into pump area when securing dishwasher to keep it does, adjust leveling legs. Follow kit instructions. (Brackets are included with two, #10 x 1/2" Phillipshead screws ...
Installation Instructions
Page 21
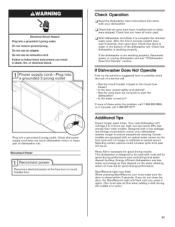
...the door, the Start/Resume light will run longer to calibrate to optical sensor. Do not use an extension cord. If none of dishwasher tub. Selecting certain options could increase cycle time past 3.5 hours. After the first 2 minutes unlatch door, wait 5 seconds, then open door...Operate" section. Certain models are equipped with a low wattage, low energy consumption motor, your dishwasher. [:_ Check that power supply cord does not touch dishwasher motor or lower part of these instructions can result in the bottom of a cycle.) 21 Start/Resume light may flash: When pressing ...
...the door, the Start/Resume light will run longer to calibrate to optical sensor. Do not use an extension cord. If none of dishwasher tub. Selecting certain options could increase cycle time past 3.5 hours. After the first 2 minutes unlatch door, wait 5 seconds, then open door...Operate" section. Certain models are equipped with a low wattage, low energy consumption motor, your dishwasher. [:_ Check that power supply cord does not touch dishwasher motor or lower part of these instructions can result in the bottom of a cycle.) 21 Start/Resume light may flash: When pressing ...
