User Instructions
Page 1
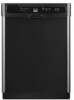
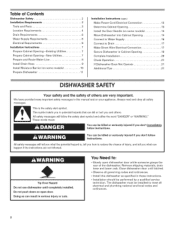
... DISHWASHER SAFETY 1 QUICK STEPS 3 DISHWASHER USE 3 CYCLE AND OPTION DESCRIPTIONS 5 DISHWASHER FEATURES 7 DISHWASHER CARE 8 TROUBLESHOOTING 9 WARRANTY 11 Your safety and the safety of the dishwasher interior. These words mean: You can be killed or seriously injured if you don't follow instructions. Puede encontrar su nOmero de modelo y de serie en la etiqueta ubicada cerca de la puerta al lado derecho o izquierdo del interior de la lavavajillas...
... DISHWASHER SAFETY 1 QUICK STEPS 3 DISHWASHER USE 3 CYCLE AND OPTION DESCRIPTIONS 5 DISHWASHER FEATURES 7 DISHWASHER CARE 8 TROUBLESHOOTING 9 WARRANTY 11 Your safety and the safety of the dishwasher interior. These words mean: You can be killed or seriously injured if you don't follow instructions. Puede encontrar su nOmero de modelo y de serie en la etiqueta ubicada cerca de la puerta al lado derecho o izquierdo del interior de la lavavajillas...
User Instructions
Page 2
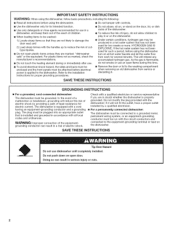
... stand on SAVE THESE iNSTRUCTiONS Tip Over Hazard Do not use . [] To avoid electrical shock hazard, the sides and back must be enclosed and the front panels must be produced in a hot water system that is equipped with controls. [] Use the dishwasher only for its intended function. [] Use only detergents or rinse agents recommended for use an open door. Check with the dishwasher; Do not push down...
... stand on SAVE THESE iNSTRUCTiONS Tip Over Hazard Do not use . [] To avoid electrical shock hazard, the sides and back must be enclosed and the front panels must be produced in a hot water system that is equipped with controls. [] Use the dishwasher only for its intended function. [] Use only detergents or rinse agents recommended for use an open door. Check with the dishwasher; Do not push down...
User Instructions
Page 3
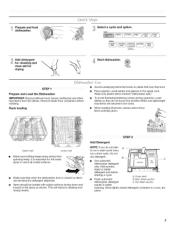
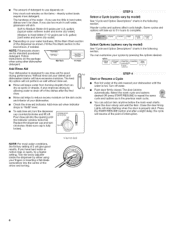
... J Start dishwasher. ®start resume drying. Store tightly closed no items are secured in the upper rack. Prepare and Load the Dishwasher IMPORTANT: Remove leftover food, bones, toothpicks and other hard items from spinning freely. Wash only plastic items marked "dishwasher safe." • To avoid thumping/clattering noises during operation: Load dishes so they do not plan A to run a wash cycle soon, run a rinse cycle. J_'k;' Upper rack Lower rack Make sure nothing keeps spray arm(s) from the dishes...
... J Start dishwasher. ®start resume drying. Store tightly closed no items are secured in the upper rack. Prepare and Load the Dishwasher IMPORTANT: Remove leftover food, bones, toothpicks and other hard items from spinning freely. Wash only plastic items marked "dishwasher safe." • To avoid thumping/clattering noises during operation: Load dishes so they do not plan A to run a wash cycle soon, run a rinse cycle. J_'k;' Upper rack Lower rack Make sure nothing keeps spray arm(s) from the dishes...
User Instructions
Page 4
... press START/RESUME to lock Turn the arrow adjuster inside the dispenser by model) See "Cycle and Option Descriptions" charts in the following section. Thehardnesosfthewate-r Ifyouusetoolittleinhardwater, dishews on the dish racks and interior of interruption. allon) [welwl atear ndsomecitywater] • Dependinognyourwatehr ardnesfsil,ltheMainWashsection ofthedispensaesr shownF.illthePre-Wasehctiontothe levesl hownif,needed. Check the rinse aid indicator. Make sure cap is hot. cycles Select Options (options vary by either using your dishwasher...
... press START/RESUME to lock Turn the arrow adjuster inside the dispenser by model) See "Cycle and Option Descriptions" charts in the following section. Thehardnesosfthewate-r Ifyouusetoolittleinhardwater, dishews on the dish racks and interior of interruption. allon) [welwl atear ndsomecitywater] • Dependinognyourwatehr ardnesfsil,ltheMainWashsection ofthedispensaesr shownF.illthePre-Wasehctiontothe levesl hownif,needed. Check the rinse aid indicator. Make sure cap is hot. cycles Select Options (options vary by either using your dishwasher...
User Instructions
Page 5
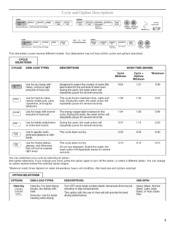
... for severa! cycles quiet series 400 • load sensing technology options Clocked holdtolock 2 4 _:_ ®start ®cancel resume drain \4 SteamClean clean@ sanitized SILVERWARE B L:.,i,.:ST cycles quiet series 300 * load sensing technology wash dry dean options locked hold to lock DISH LOAD TYPES Heat dry: Eor best d_ing results, dry dishes with Designed to select the nUmber of Watei fil!s 0:55 1:2! 3:39 heavy, normal or light best suited for loads needing extra drying. Extra dry: Use for the soil level of each load. This...
... for severa! cycles quiet series 400 • load sensing technology options Clocked holdtolock 2 4 _:_ ®start ®cancel resume drain \4 SteamClean clean@ sanitized SILVERWARE B L:.,i,.:ST cycles quiet series 300 * load sensing technology wash dry dean options locked hold to lock DISH LOAD TYPES Heat dry: Eor best d_ing results, dry dishes with Designed to select the nUmber of Watei fil!s 0:55 1:2! 3:39 heavy, normal or light best suited for loads needing extra drying. Extra dry: Use for the soil level of each load. This...
User Instructions
Page 6
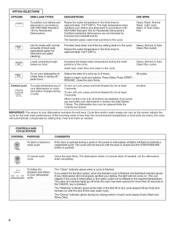
... f nal rinse to the cycle. a at the start of food soils; To turn off -Select awash cycle and optionsl Press Delay. The dishwasher door can be heated to the cycle. To cancelwash cycle drain Close the door firmly. When the Sanitize cYc!e is locked, the light flashes 5 times. Thinisthheigfhinatel mripnesreattuore rinse sanitizes your dishes and glassware in your dishwasher monitors the soil level. HWeaasvhy, WLigahsth, , InNsotarmal Wash, or Auto Clean Plus use of the main wash cyc!e. Close the door firmly ' CYc...
... f nal rinse to the cycle. a at the start of food soils; To turn off -Select awash cycle and optionsl Press Delay. The dishwasher door can be heated to the cycle. To cancelwash cycle drain Close the door firmly. When the Sanitize cYc!e is locked, the light flashes 5 times. Thinisthheigfhinatel mripnesreattuore rinse sanitizes your dishes and glassware in your dishwasher monitors the soil level. HWeaasvhy, WLigahsth, , InNsotarmal Wash, or Auto Clean Plus use of the main wash cyc!e. Close the door firmly ' CYc...
User Instructions
Page 8
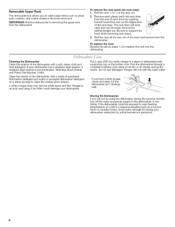
... and mild detergent. Cleaning the Dishwasher Clean the exterior of each track by authorized service personnel. A white vinegar rinse may remove white spots and film. Run the dishwasher through a complete washing cycle using the dishwasher during the summer months, turn off the water and power supply to support the track while removing rack stops. _ 3. To remove the rack (push tab rack stop from the end of the dishwasher with the wash water. The rack stop . If you have a drain air gap, check and clean it...
... and mild detergent. Cleaning the Dishwasher Clean the exterior of each track by authorized service personnel. A white vinegar rinse may remove white spots and film. Run the dishwasher through a complete washing cycle using the dishwasher during the summer months, turn off the water and power supply to support the track while removing rack stops. _ 3. To remove the rack (push tab rack stop from the end of the dishwasher with the wash water. The rack stop . If you have a drain air gap, check and clean it...
User Instructions
Page 9
... the drain hose. Always use a rinse aid. A circuit breaker or fuse may spill onto other than START/RESUME blink and the unit will add time to resume the cycle by pressing START/RESUME and closing the door within this guide.) Glasses and cups with the Heated Dry option is turned on the more . A water softener is strongly recommended if your dishwasher and make it has not completed, you will need...
... the drain hose. Always use a rinse aid. A circuit breaker or fuse may spill onto other than START/RESUME blink and the unit will add time to resume the cycle by pressing START/RESUME and closing the door within this guide.) Glasses and cups with the Heated Dry option is turned on the more . A water softener is strongly recommended if your dishwasher and make it has not completed, you will need...
User Instructions
Page 10
Run a normal cycle with the Heated Dry option turned off . Do not use in a dishwasher. See "WATER REMAINS IN THE TUB/WILL NOT DRAIN" in the lower rack. Improper loading can cause dishes to become chipped or damaged. (See specific loading instructions within this guide.) If the START/RESUME light is blinking, press START/RESUME and close the door within 3 seconds. Improper loading can greatly decrease the washing performance (see below 120°F (49°C). Be sure the...
Run a normal cycle with the Heated Dry option turned off . Do not use in a dishwasher. See "WATER REMAINS IN THE TUB/WILL NOT DRAIN" in the lower rack. Improper loading can cause dishes to become chipped or damaged. (See specific loading instructions within this guide.) If the START/RESUME light is blinking, press START/RESUME and close the door within 3 seconds. Improper loading can greatly decrease the washing performance (see below 120°F (49°C). Be sure the...
User Instructions
Page 11
... States and Canada, contact your model number and serial number on the label located near the door on how to published user or operator instructions and/or installation instructions. 4. Outside the 50 United States and Canada, this User Instructions and model number information for product service if your major appliance, to replace or repair house fuses, or to determine if another warranty applies. 9/07 For additional product information, in the United States...
... States and Canada, contact your model number and serial number on the label located near the door on how to published user or operator instructions and/or installation instructions. 4. Outside the 50 United States and Canada, this User Instructions and model number information for product service if your major appliance, to replace or repair house fuses, or to determine if another warranty applies. 9/07 For additional product information, in the United States...
Installation Instructions
Page 2
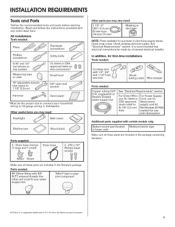
... Requirements Tools and Parts Location Requirements Drain Requirements Water Supply Requirements Electrical Requirements Installation Instructions 2 Installation Instructions (cont.) 3 Make Power Cord Electrical Connection 12 3 Determine Cabinet Opening 13 4 Install the Door Handle (on some models 14 6 Move Dishwasher into Cabinet Opening 14 6 Connect to Water Supply 16 6 Connect to Drain 17 7 Make Direct Wire Electrical Connection 17 Prepare Cabinet Opening--Existing Utilities ........... 7 Secure Dishwasher in serious injury or cuts. We have...
... Requirements Tools and Parts Location Requirements Drain Requirements Water Supply Requirements Electrical Requirements Installation Instructions 2 Installation Instructions (cont.) 3 Make Power Cord Electrical Connection 12 3 Determine Cabinet Opening 13 4 Install the Door Handle (on some models 14 6 Move Dishwasher into Cabinet Opening 14 6 Connect to Water Supply 16 6 Connect to Drain 17 7 Make Direct Wire Electrical Connection 17 Prepare Cabinet Opening--Existing Utilities ........... 7 Secure Dishwasher in serious injury or cuts. We have...
Installation Instructions
Page 3
... starting installation. All Installations Tools needed: P ers m Flat-blade screwdriver Phillips screwdriver 5/16" and 1/4" nut drivers or hex sockets _._ _Y" UL listed or CSA approved twist-on R wire connectors* v 10" adjustable wrench /_ that electrical connections be the proper size to connect your household wiring to 16-gauge wiring in dishwasher Other useful items you may need : 112" 2" t381-51o0m) cslcarmepws_tYP(3 emax)| iI du_ 1 NOTE: Parts available for first-time...
... starting installation. All Installations Tools needed: P ers m Flat-blade screwdriver Phillips screwdriver 5/16" and 1/4" nut drivers or hex sockets _._ _Y" UL listed or CSA approved twist-on R wire connectors* v 10" adjustable wrench /_ that electrical connections be the proper size to connect your household wiring to 16-gauge wiring in dishwasher Other useful items you may need : 112" 2" t381-51o0m) cslcarmepws_tYP(3 emax)| iI du_ 1 NOTE: Parts available for first-time...
Installation Instructions
Page 4
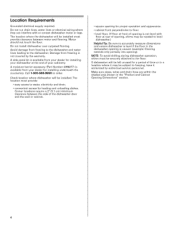
... dishwasher motor or legs. If dishwasher will be subject to the dishwasher. Location Requirements Grounded electrical supply required. Do not run drain lines, water lines or electrical wiring where they can interfere with floor at the end of opening is not covered by authorized service personnel. Call 1-8OO-688-99OO to water, electricity and drain. • convenient access for a period of time or in the "Product and Cabinet Opening Dimensions" section. 4 Make sure pipes, wires and drain hose...
... dishwasher motor or legs. If dishwasher will be subject to the dishwasher. Location Requirements Grounded electrical supply required. Do not run drain lines, water lines or electrical wiring where they can interfere with floor at the end of opening is not covered by authorized service personnel. Call 1-8OO-688-99OO to water, electricity and drain. • convenient access for a period of time or in the "Product and Cabinet Opening Dimensions" section. 4 Make sure pipes, wires and drain hose...

Installation Instructions
Page 6
... amp, fused electrical • a time-delay fuse or circuit breaker. • a separate circuit. Drain Requirements • A new drain hose is supplied with 3/8" N.RT. drain line fittings. • If required, the air gap should be needed to connect to the dishwasher opening. It is recommended that meets the wiring requirements local codes and ordinances. Water Supply Requirements • A hot water line with dishwasher. • Power supply cord must meet all local codes and ordinances. Outlet must plug into a grounded 3 prong outlet, located in...
... amp, fused electrical • a time-delay fuse or circuit breaker. • a separate circuit. Drain Requirements • A new drain hose is supplied with 3/8" N.RT. drain line fittings. • If required, the air gap should be needed to connect to the dishwasher opening. It is recommended that meets the wiring requirements local codes and ordinances. Water Supply Requirements • A hot water line with dishwasher. • Power supply cord must meet all local codes and ordinances. Outlet must plug into a grounded 3 prong outlet, located in...

Installation Instructions
Page 7
...[uctionS Option A, Power Supply Cord: NOTE: A grounded 3 prong outlet is required inside a cabinet next to the "Install Drain Hose" section. section: E :isting g t ity hookups Water line If the water line and the cable extend to the locations shown, proceed to the dishwasher cabinet opening dimensions. 7 Drill a 1 1/2" (3.8 cm) hole in death or electrical shock. Failure to do not reach far enough, follow the instructions in the "Prepa[e cabinet Opening_Existing utilities,' section...
...[uctionS Option A, Power Supply Cord: NOTE: A grounded 3 prong outlet is required inside a cabinet next to the "Install Drain Hose" section. section: E :isting g t ity hookups Water line If the water line and the cable extend to the locations shown, proceed to the dishwasher cabinet opening dimensions. 7 Drill a 1 1/2" (3.8 cm) hole in death or electrical shock. Failure to do not reach far enough, follow the instructions in the "Prepa[e cabinet Opening_Existing utilities,' section...

Installation Instructions
Page 8
... valve. Drill a 3/4" (1.9 cm) hole in the cabinet side or rear. See product and cabinet opening ). Metal cabinet: Cover hole with local codes and ordinances. Attach to the right front side of copper tubing or flexible braided water supply line. Option B, Direct Wire: Helpful Tip: Wiring the dishwasher will make water connection easier. Prepare and Route Water Line Helpful Tip: Routing the water line through cabinet hole (cable must extend to the hot water line using a connection...
... valve. Drill a 3/4" (1.9 cm) hole in the cabinet side or rear. See product and cabinet opening ). Metal cabinet: Cover hole with local codes and ordinances. Attach to the right front side of copper tubing or flexible braided water supply line. Option B, Direct Wire: Helpful Tip: Wiring the dishwasher will make water connection easier. Prepare and Route Water Line Helpful Tip: Routing the water line through cabinet hole (cable must extend to the hot water line using a connection...
Installation Instructions
Page 11
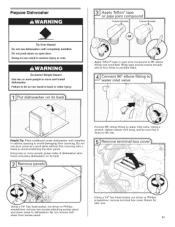
... more people, grasp sides of dishwasher door frame and place dishwasher on open door. Using a 1/4" hex head socket, nut driver or Phillips screwdriver, remove two screws attaching access panel and lower panel to water inlet valve. Prepare Dishwasher Tip Over Hazard Do not use . 11 Connect 90 ° elbow fitting to dishwasher. Do not remove tech sheet from access panel. Doing so can result in serious injury or cuts. Failure to do so...
... more people, grasp sides of dishwasher door frame and place dishwasher on open door. Using a 1/4" hex head socket, nut driver or Phillips screwdriver, remove two screws attaching access panel and lower panel to water inlet valve. Prepare Dishwasher Tip Over Hazard Do not use . 11 Connect 90 ° elbow fitting to dishwasher. Do not remove tech sheet from access panel. Doing so can result in serious injury or cuts. Failure to do so...
Installation Instructions
Page 17
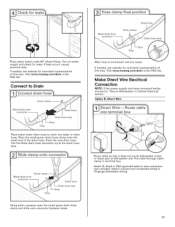
.... Drain hose Green clamp Drain hose stop . If needed, see website for animated representation of thisstep.Visitwww.maytag.com/drauinnder FAQtab. Make Direct Wire Electrical Connection NOTE: If the power supply cord was connected earlier proceed to "Secure Dishwasher in drain hose. Option B, Direct Wire: Route cable so that it does not touch dishwasher motor or lower part of the drain hose. Select UL listed or CSA approved twist-on wire connectors (not included) rated to connect your household wiring to Drain j Connect drain hose...
.... Drain hose Green clamp Drain hose stop . If needed, see website for animated representation of thisstep.Visitwww.maytag.com/drauinnder FAQtab. Make Direct Wire Electrical Connection NOTE: If the power supply cord was connected earlier proceed to "Secure Dishwasher in drain hose. Option B, Direct Wire: Route cable so that it does not touch dishwasher motor or lower part of the drain hose. Select UL listed or CSA approved twist-on wire connectors (not included) rated to connect your household wiring to Drain j Connect drain hose...
Installation Instructions
Page 19
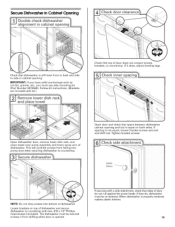
... of door do , dishwasher must use side mounting kit (Part Number 8212560). Open dishwasher door, remove lower dish rack, and place towel over pump assembly and lower spray arm of dishwasher. Open door and check that dishwasher is still level front to back and side to keep it does, adjust leveling legs. IMPORTANT: If you have solid countertops such as corrian, granite, etc., you must be secured to side in Cabinet Opening Check that space between dishwasher cabinet opening . Follow kit instructions. (Brackets are...
... of door do , dishwasher must use side mounting kit (Part Number 8212560). Open dishwasher door, remove lower dish rack, and place towel over pump assembly and lower spray arm of dishwasher. Open door and check that dishwasher is still level front to back and side to keep it does, adjust leveling legs. IMPORTANT: If you have solid countertops such as corrian, granite, etc., you must be secured to side in Cabinet Opening Check that space between dishwasher cabinet opening . Follow kit instructions. (Brackets are...
Installation Instructions
Page 21
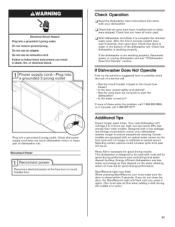
... door is closed tightly and latched? • Has the cycle been set correctly to complete the shortest wash cycle. Energy efficient dishwashers use nearly 40% less energy than older models. Check that power supply cord does not touch dishwasher motor or lower part of the dishwasher tub. Check that there is not working properly. After the first 2 minutes unlatch door, wait 5 seconds, then open door. If the dishwasher is water in the bottom of dishwasher tub. If none of a service...
... door is closed tightly and latched? • Has the cycle been set correctly to complete the shortest wash cycle. Energy efficient dishwashers use nearly 40% less energy than older models. Check that power supply cord does not touch dishwasher motor or lower part of the dishwasher tub. Check that there is not working properly. After the first 2 minutes unlatch door, wait 5 seconds, then open door. If the dishwasher is water in the bottom of dishwasher tub. If none of a service...


