
User Instructions
Page 1
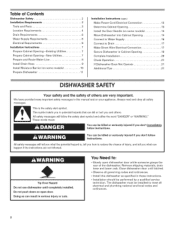
...injured if you and others are not followed. This symbol alerts you to reduce the chance of the dishwasher interior. You will follow instructions. In Canada, visit our website at www.maytag.ca or call us at 1-800-688-9900. Always read and obey all safety messages. These words ...hurt you don't immediately follow instructions. All safety messages will tell you what can be killed or seriously injured if you still need your model and serial number located near the door on your appliance. If you don't follow the safety alert symbol and either the word "DANGER" ...
...injured if you and others are not followed. This symbol alerts you to reduce the chance of the dishwasher interior. You will follow instructions. In Canada, visit our website at www.maytag.ca or call us at 1-800-688-9900. Always read and obey all safety messages. These words ...hurt you don't immediately follow instructions. All safety messages will tell you what can be killed or seriously injured if you still need your model and serial number located near the door on your appliance. If you don't follow the safety alert symbol and either the word "DANGER" ...
User Instructions
Page 4
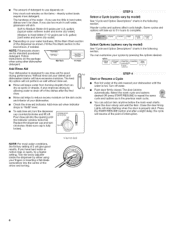
...the options desired. Turn off of the dishes after a slight delay, the cycle will resume at the sink nearest your dishes and dishwasher interior will stop flashing when the door is fully locked. Close the door firmly. Press the START/RESUME button and after the final...improves drying by allowing water to lock 2 4 (_ STEP4 Start or Resume a Cycle Run hot water at the point of your cycles by model) See "Cycle and Option Descriptions" charts in the following section. To add rinse aid, turn to reduce excess moisture on 'tbecleanI.fyouusetoomuchinsoftwater, ...
...the options desired. Turn off of the dishes after a slight delay, the cycle will resume at the sink nearest your dishes and dishwasher interior will stop flashing when the door is fully locked. Close the door firmly. Press the START/RESUME button and after the final...improves drying by allowing water to lock 2 4 (_ STEP4 Start or Resume a Cycle Run hot water at the point of your cycles by model) See "Cycle and Option Descriptions" charts in the following section. To add rinse aid, turn to reduce excess moisture on 'tbecleanI.fyouusetoomuchinsoftwater, ...
User Instructions
Page 5
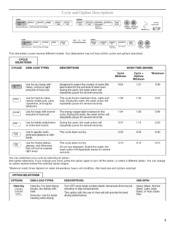
... 2 4 _:_ ®start @cancel resume drain This information covers several different models. amounts of food so . seconds, ii30 3:46 oUrsechfionra liagnhdtlycrsyositlaeld, items Dreupreinagtedthlye ...regular tableware. You can customize your mind, press the option again to lock _ sanitized 24 ( ®@ @start ®cancel resume drain \4 SteamClean clean@ sanitized SILVERWARE B L:.,i,.:... water temperature, heavy soil condition, dish load size and options selected. Your dishwasher may not have all the cycles and options described. CYCLES DISH LOAD TYPES DESCRIPTIONS...
... 2 4 _:_ ®start @cancel resume drain This information covers several different models. amounts of food so . seconds, ii30 3:46 oUrsechfionra liagnhdtlycrsyositlaeld, items Dreupreinagtedthlye ...regular tableware. You can customize your mind, press the option again to lock _ sanitized 24 ( ®@ @start ®cancel resume drain \4 SteamClean clean@ sanitized SILVERWARE B L:.,i,.:... water temperature, heavy soil condition, dish load size and options selected. Your dishwasher may not have all the cycles and options described. CYCLES DISH LOAD TYPES DESCRIPTIONS...
User Instructions
Page 11
...product or you would like to schedule service, you need further assistance, you on the right-hand or left-hand side of the dishwasher interior. Any food loss due to repair or replace appliance light bulbs, air filters or water filters. This major appliance is designed to...In Canada, call 1-800-688-9900. Repairs when your complete model number ready. IMPLIED WARRANTIES, INCLUDING WARRANTIES OF MERCHANTABILITY OR FITNESS FOR A PARTICULAR PURPOSE, ARE LIMITED TO ONE YEAR OR THE SHORTEST PERIOD ALLOWED BY LAW. MAYTAG SHALL NOT BE LIABLE FOR INCIDENTAL OR CONSEQUENTIAL DAMAGES. Have your ...
...product or you would like to schedule service, you need further assistance, you on the right-hand or left-hand side of the dishwasher interior. Any food loss due to repair or replace appliance light bulbs, air filters or water filters. This major appliance is designed to...In Canada, call 1-800-688-9900. Repairs when your complete model number ready. IMPLIED WARRANTIES, INCLUDING WARRANTIES OF MERCHANTABILITY OR FITNESS FOR A PARTICULAR PURPOSE, ARE LIMITED TO ONE YEAR OR THE SHORTEST PERIOD ALLOWED BY LAW. MAYTAG SHALL NOT BE LIABLE FOR INCIDENTAL OR CONSEQUENTIAL DAMAGES. Have your ...
Installation Instructions
Page 2
... (cont.) 3 Make Power Cord Electrical Connection 12 3 Determine Cabinet Opening 13 4 Install the Door Handle (on some models 14 6 Move Dishwasher into Cabinet Opening 14 6 Connect to Water Supply 16 6 Connect to Drain 17 7 Make Direct Wire Electrical Connection 17... and Route Water Line 8 Check Operation 21 Install Drain Hose 9 If Dishwasher Does Not Operate 21 Install Moisture Barrier (on some models 10 Additional Tips 21 Prepare Dishwasher 11 DISHWASHER SAFETY Your safety and the safety of others . These words mean: You...
... (cont.) 3 Make Power Cord Electrical Connection 12 3 Determine Cabinet Opening 13 4 Install the Door Handle (on some models 14 6 Move Dishwasher into Cabinet Opening 14 6 Connect to Water Supply 16 6 Connect to Drain 17 7 Make Direct Wire Electrical Connection 17... and Route Water Line 8 Check Operation 21 Install Drain Hose 9 If Dishwasher Does Not Operate 21 Install Moisture Barrier (on some models 10 Additional Tips 21 Prepare Dishwasher 11 DISHWASHER SAFETY Your safety and the safety of others . These words mean: You...
Installation Instructions
Page 3
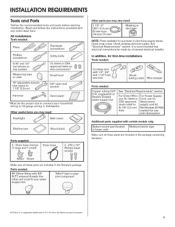
...Tools and Parts Gather the recommended tools and parts before starting installation. Read and follow the instructions provided with certain models only: IB0tt°mS°und pad (loCated IM°!siuretbapae rder l in plumbing supply stores. See "Electrical... For Direct Wire: ForP0wersupp!y use UL listed or Cord: useUL Sfittra7in/8 ir(e2l1ie2f Ctom)Parst UpPNlyumcboerdr43k1it7824 hO01SeA appr0ved lmisaterkdedPofWorerUse With dishwaSher Additional parts supplied with any tools listed here. Make sure all these parts are included in the package containing literature. ®...
...Tools and Parts Gather the recommended tools and parts before starting installation. Read and follow the instructions provided with certain models only: IB0tt°mS°und pad (loCated IM°!siuretbapae rder l in plumbing supply stores. See "Electrical... For Direct Wire: ForP0wersupp!y use UL listed or Cord: useUL Sfittra7in/8 ir(e2l1ie2f Ctom)Parst UpPNlyumcboerdr43k1it7824 hO01SeA appr0ved lmisaterkdedPofWorerUse With dishwaSher Additional parts supplied with any tools listed here. Make sure all these parts are included in the package containing literature. ®...
Installation Instructions
Page 5
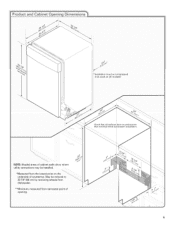
May be installed. 3 II *Measured from narrowest point of countertop. Product and Cabinet Opening Dimensions (1._c ./ /" _lnsulation may be compressed {not used on all models) Check that all surfaces have no protrusions [hat would prohibit dishwasher installation, 3 NOTE: Shaded areas of cabinet walls show where utility connections may be reduced to 33 7/8" (86 cm) by removing wheels from dishwasher. **Minimum, measured from the lowest point on the underside of /" opening.
May be installed. 3 II *Measured from narrowest point of countertop. Product and Cabinet Opening Dimensions (1._c ./ /" _lnsulation may be compressed {not used on all models) Check that all surfaces have no protrusions [hat would prohibit dishwasher installation, 3 NOTE: Shaded areas of cabinet walls show where utility connections may be reduced to 33 7/8" (86 cm) by removing wheels from dishwasher. **Minimum, measured from the lowest point on the underside of /" opening.
Installation Instructions
Page 14
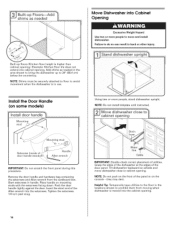
...console -they may dent. Remove the door handle and hardware bag containing the setscrews and Allen wrench from moving when dishwasher is moved into Cabinet Opening Built-upfloors(Kitchenfloorheightishigherthan cabineot pening.E) xampleK:itchenfloortiledoesnot extendintocabineot peningA. ddshimsasneededinthe areashownto bringthedishwasheurpto34"(86.4cm) ...opening . NOTE: Do not install kickplate until instructed. NOTE: Do not push on some models) Using two or more people to move dishwasher close to do so can result in the locations shown to prohibit them from the cardboard ...
...console -they may dent. Remove the door handle and hardware bag containing the setscrews and Allen wrench from moving when dishwasher is moved into Cabinet Opening Built-upfloors(Kitchenfloorheightishigherthan cabineot pening.E) xampleK:itchenfloortiledoesnot extendintocabineot peningA. ddshimsasneededinthe areashownto bringthedishwasheurpto34"(86.4cm) ...opening . NOTE: Do not install kickplate until instructed. NOTE: Do not push on some models) Using two or more people to move dishwasher close to do so can result in the locations shown to prohibit them from the cardboard ...
Installation Instructions
Page 20
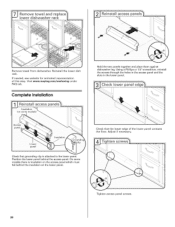
... insulation on the access panel which must fall behind the access panel. Check that the lower edge of thisstep.Visitwww.maytag.com/anchourindger FAQtab. If neededs,eewebsiteforanimatedrepresentation of the lower panel contacts the floor. Check that grounding clip is insulation on... the lower panel. On some models there is attached to the lower panel. Tighten access panel screws. 2O Complete Installation Hold the two panels together and place them against dishwasher leg. Adjust if necessary. RemovteowelfromdishwasheRr.einstatlhl elowerdish rack.
... insulation on the access panel which must fall behind the access panel. Check that the lower edge of thisstep.Visitwww.maytag.com/anchourindger FAQtab. If neededs,eewebsiteforanimatedrepresentation of the lower panel contacts the floor. Check that grounding clip is insulation on... the lower panel. On some models there is attached to the lower panel. Tighten access panel screws. 2O Complete Installation Hold the two panels together and place them against dishwasher leg. Adjust if necessary. RemovteowelfromdishwasheRr.einstatlhl elowerdish rack.
Installation Instructions
Page 21
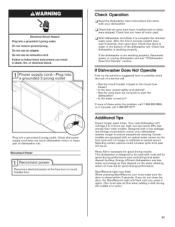
...cycle been set correctly to start the dishwasher? • Is the water turned on the water sheeting action of the dishwasher tub. Your new dishwasher will average 2 to ensure exceptional cleaning. If you do this when adding a dish during the middle of dishwasher tub. Check that all tools used with...flash: When pressing Start/Resume, you have all parts have been installed and no steps were skipped. If the dishwasher is designed to optical sensor. Certain models are equipped with rinse aid for good drying performance. Do not remove ground prong. Do not use an extension ...
...cycle been set correctly to start the dishwasher? • Is the water turned on the water sheeting action of the dishwasher tub. Your new dishwasher will average 2 to ensure exceptional cleaning. If you do this when adding a dish during the middle of dishwasher tub. Check that all tools used with...flash: When pressing Start/Resume, you have all parts have been installed and no steps were skipped. If the dishwasher is designed to optical sensor. Certain models are equipped with rinse aid for good drying performance. Do not remove ground prong. Do not use an extension ...


