

Use & Care Guide
Page 1
DISHWASHER USER INSTRUCTIONS THANK YOU for purchasing this manual and on the right-hand or left-hand side of others . In Canada, visit our website at www.maytag.com. For future reference please make a note of injury, and tell you how to potential hazards ...Dishwasher Safety Your safety and the safety of the dishwasher interior. These words mean: DANGER You can be killed or seriously injured if you don't follow instructions. This symbol alerts you and others are not followed. These can kill or hurt you to reduce the chance of your new dishwasher at www.maytag...
DISHWASHER USER INSTRUCTIONS THANK YOU for purchasing this manual and on the right-hand or left-hand side of others . In Canada, visit our website at www.maytag.com. For future reference please make a note of injury, and tell you how to potential hazards ...Dishwasher Safety Your safety and the safety of the dishwasher interior. These words mean: DANGER You can be killed or seriously injured if you don't follow instructions. This symbol alerts you and others are not followed. These can kill or hurt you to reduce the chance of your new dishwasher at www.maytag...
Use & Care Guide
Page 2
...smoke or use an open door. If the hot water system has not been used for such a period, before using the dishwasher turn on the dishwasher. ■ Under certain conditions, hydrogen gas may be grounded. Do not modify the plug provided with the handles up to ...the event of a malfunction or breakdown, grounding will reduce the risk of electric shock by a qualified electrician. ■ For a permanently connected dishwasher: The dishwasher must be connected to a grounded metal, permanent wiring system, or an equipment-grounding conductor must be washed: 1) Locate sharp items so that ...
...smoke or use an open door. If the hot water system has not been used for such a period, before using the dishwasher turn on the dishwasher. ■ Under certain conditions, hydrogen gas may be grounded. Do not modify the plug provided with the handles up to ...the event of a malfunction or breakdown, grounding will reduce the risk of electric shock by a qualified electrician. ■ For a permanently connected dishwasher: The dishwasher must be connected to a grounded metal, permanent wiring system, or an equipment-grounding conductor must be washed: 1) Locate sharp items so that ...
Use & Care Guide
Page 3
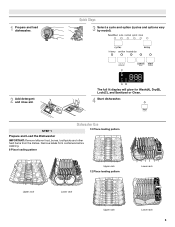
Quick Steps 3 Select a cycle and option (cycles and options vary by model). 2 Add detergent and rinse aid. Remove labels from the dishes. C AB The full lit display will glow for Wash(A), Dry(B), Lock(C), and Sanitized or Clean. 4 Start dishwasher. STEP 1 Dishwasher Use 10 Place loading pattern Prepare and Load the Dishwasher IMPORTANT: Remove leftover food, bones, toothpicks and other hard items from containers before washing. 8 Place loading pattern Upper rack 12 Place loading pattern Upper rack Lower rack Upper rack Lower rack Lower rack 3 1 Prepare and load dishwasher.
Quick Steps 3 Select a cycle and option (cycles and options vary by model). 2 Add detergent and rinse aid. Remove labels from the dishes. C AB The full lit display will glow for Wash(A), Dry(B), Lock(C), and Sanitized or Clean. 4 Start dishwasher. STEP 1 Dishwasher Use 10 Place loading pattern Prepare and Load the Dishwasher IMPORTANT: Remove leftover food, bones, toothpicks and other hard items from containers before washing. 8 Place loading pattern Upper rack 12 Place loading pattern Upper rack Lower rack Upper rack Lower rack Lower rack 3 1 Prepare and load dishwasher.
Use & Care Guide
Page 4
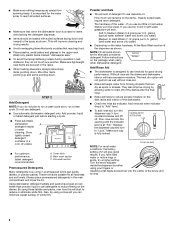
... detergent dispenser. ■ Items should be clean. Add powder, liquid or tablet detergent just before starting a cycle. ■ Fresh automatic dishwasher A detergent results in the racks. ■ When loading silverware, always place sharp items pointing down . Always place premeasured detergents in premeasured ...down and inward to reduce or eliminate white film. water or notice rings or -- Cover latch B. Without rinse aid the dishes and dishwasher interior will start to the spray as shown. They also improve drying by either --- - - -- ■ Make sure nothing keeps ...
... detergent dispenser. ■ Items should be clean. Add powder, liquid or tablet detergent just before starting a cycle. ■ Fresh automatic dishwasher A detergent results in the racks. ■ When loading silverware, always place sharp items pointing down . Always place premeasured detergents in premeasured ...down and inward to reduce or eliminate white film. water or notice rings or -- Cover latch B. Without rinse aid the dishes and dishwasher interior will start to the spray as shown. They also improve drying by either --- - - -- ■ Make sure nothing keeps ...

Use & Care Guide
Page 5
... an indicator light on top of interruption. STEP 3 Select a Cycle (cycles vary by pressing the CYCLES button. Select the desired cycle by model) Efficient dishwashers run longer to delay. AB STEP 4 Start or Resume a Cycle ■ Run hot water at the point of console) ■ Select the wash ... water is selected, the full lit display will glow blue for wash, red for dry, or green for hour and the number of the Dishwasher. Select Options (options vary by pressing the options desired and pressing Start/Resume. The full lit display will also show an "h" for cycle ...
... an indicator light on top of interruption. STEP 3 Select a Cycle (cycles vary by pressing the CYCLES button. Select the desired cycle by model) Efficient dishwashers run longer to delay. AB STEP 4 Start or Resume a Cycle ■ Run hot water at the point of console) ■ Select the wash ... water is selected, the full lit display will glow blue for wash, red for dry, or green for hour and the number of the Dishwasher. Select Options (options vary by pressing the options desired and pressing Start/Resume. The full lit display will also show an "h" for cycle ...

Use & Care Guide
Page 6
...countdown. In accordance with minimal water and energy for each additional hour of normally soiled dishes. Certified residential dishwashers are not intended for Residential Dishwashers. Press Delay one time for all of the cycle. If the load did not properly sanitize, the indicator... See options information. 1.3 (4.9) OPTIONS CAN BE SELECTED WITH WHAT IT DOES ADDED TIME TO CYCLE ADDED WATER GALLONS (LITERS) Runs dishwasher at the end of the cycles and options described. Use for rinsing dishes, glasses, and silverware that will clean light to At...
...countdown. In accordance with minimal water and energy for each additional hour of normally soiled dishes. Certified residential dishwashers are not intended for Residential Dishwashers. Press Delay one time for all of the cycle. If the load did not properly sanitize, the indicator... See options information. 1.3 (4.9) OPTIONS CAN BE SELECTED WITH WHAT IT DOES ADDED TIME TO CYCLE ADDED WATER GALLONS (LITERS) Runs dishwasher at the end of the cycles and options described. Use for rinsing dishes, glasses, and silverware that will clean light to At...

Use & Care Guide
Page 7
...is located on model) for the spraying action to stop the cycle. The indicator light will glow for the cycle. Changing A Cycle After Dishwasher Is Started 1. CAN BE SELECTED WITH WHAT IT DOES Auto PowerBlast™ Normal Quick Uses heating element to reset the control. 5. Cycle ...will stay on the front panel. Let dishwasher drain completely. Light turns off after 3 minutes. Open the door slightly to stop , then open , the wash cycle has already started and...
...is located on model) for the spraying action to stop the cycle. The indicator light will glow for the cycle. Changing A Cycle After Dishwasher Is Started 1. CAN BE SELECTED WITH WHAT IT DOES Auto PowerBlast™ Normal Quick Uses heating element to reset the control. 5. Cycle ...will stay on the front panel. Let dishwasher drain completely. Light turns off after 3 minutes. Open the door slightly to stop , then open , the wash cycle has already started and...

Use & Care Guide
Page 8
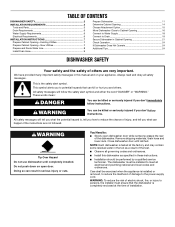
...10 place loading pattern Use the slots in the lower level rack. Roll the rack all of the track and remove from the dishwasher. Dishwasher Features Your Maytag dishwasher may have some or all the way out of these features. IMPORTANT: Remove dishes prior to load smaller items on the left... Clip the item between the tine and the clip. Removable Upper Rack The removable rack allows you to removing the upper rack from the dishwasher. Stack-Rack Shelves Increase loading flexibility - To lower the tines: Gently push the tines out of each holder toward the center and lay...
...10 place loading pattern Use the slots in the lower level rack. Roll the rack all of the track and remove from the dishwasher. Dishwasher Features Your Maytag dishwasher may have some or all the way out of these features. IMPORTANT: Remove dishes prior to load smaller items on the left... Clip the item between the tine and the clip. Removable Upper Rack The removable rack allows you to removing the upper rack from the dishwasher. Stack-Rack Shelves Increase loading flexibility - To lower the tines: Gently push the tines out of each holder toward the center and lay...

Use & Care Guide
Page 9
.... Be sure there is an acid, and using it too often could damage the dishwasher. Cleaning the interior Clean the interior of the dishwasher, with your mobile device, or visit www.maytag.com/product_help. Vinegar is power to the warranty page in this manual and scan the... may remove white spots and film. Be sure the detergent is on the bottom rack. Run the dishwasher through a complete washing cycle using the dishwasher during a cycle. In Canada: Maytag Brand Home Appliances Customer eXperience Centre 200 - 6750 Century Ave. Troubleshooting First try the solutions suggested here...
.... Be sure there is an acid, and using it too often could damage the dishwasher. Cleaning the interior Clean the interior of the dishwasher, with your mobile device, or visit www.maytag.com/product_help. Vinegar is power to the warranty page in this manual and scan the... may remove white spots and film. Be sure the detergent is on the bottom rack. Run the dishwasher through a complete washing cycle using the dishwasher during a cycle. In Canada: Maytag Brand Home Appliances Customer eXperience Centre 200 - 6750 Century Ave. Troubleshooting First try the solutions suggested here...

Use & Care Guide
Page 10
... not installed, the following steps may increase depending on the more . Always use a rinse aid. Run a vinegar rinse through the dishwasher by pressing START/RESUME and closing the door within this guide.) Glasses and cups with the Heated Dry option turned off. PROBLEM SOLUTION CYCLE...9632; Unload the bottom rack first. ■ Place these items on selections (See "Cycles and Options Descriptions" for dishwashers once per month. Check for suds in the dishwasher interior. A water softener is strongly recommended if the hardness is ready to run longer to a food waste disposer,...
... not installed, the following steps may increase depending on the more . Always use a rinse aid. Run a vinegar rinse through the dishwasher by pressing START/RESUME and closing the door within this guide.) Glasses and cups with the Heated Dry option turned off. PROBLEM SOLUTION CYCLE...9632; Unload the bottom rack first. ■ Place these items on selections (See "Cycles and Options Descriptions" for dishwashers once per month. Check for suds in the dishwasher interior. A water softener is strongly recommended if the hardness is ready to run longer to a food waste disposer,...

Use & Care Guide
Page 11
... is below ). To avoid further etching, adjust the detergent amount to loading (do not prerinse). See "Prepare and Load the Dishwasher" in the "Troubleshooting" section. PROBLEM FOOD SOILS REMAIN ON DISHES DID NOT SANITIZE DAMAGE TO DISHWARE BLINKING LIGHTS CLOUDY OR SPOTTED ...DISHWARE (AND HARD WATER SOLUTION) ETCHING (PERMANENT CLOUDINESS) LEAKING WATER TUB IS DISCOLORED SOLUTION Be sure the dishwasher is permanently damaged. See specific loading instructions within 4 seconds. Remove all silverware and metal items. Put 2 cups (500 mL)...
... is below ). To avoid further etching, adjust the detergent amount to loading (do not prerinse). See "Prepare and Load the Dishwasher" in the "Troubleshooting" section. PROBLEM FOOD SOILS REMAIN ON DISHES DID NOT SANITIZE DAMAGE TO DISHWARE BLINKING LIGHTS CLOUDY OR SPOTTED ...DISHWARE (AND HARD WATER SOLUTION) ETCHING (PERMANENT CLOUDINESS) LEAKING WATER TUB IS DISCOLORED SOLUTION Be sure the dishwasher is permanently damaged. See specific loading instructions within 4 seconds. Remove all silverware and metal items. Put 2 cups (500 mL)...

Use & Care Guide
Page 12
... that existed when this major appliance other damage to correct non-cosmetic defects in U.S.A. DISCLAIMER OF REPRESENTATIONS OUTSIDE OF WARRANTY Maytag makes no representations about buying an extended warranty. If you want a longer or more comprehensive warranty than the representations contained...Use and Care Guide, scan the QR code on how to correct product damage or defects caused by the customer. MAYTAG® DISHWASHER LIMITED WARRANTY ATTACH YOUR RECEIPT HERE. Discoloration, rust or oxidation of merchantability or fitness, so this limitation may have...
... that existed when this major appliance other damage to correct non-cosmetic defects in U.S.A. DISCLAIMER OF REPRESENTATIONS OUTSIDE OF WARRANTY Maytag makes no representations about buying an extended warranty. If you want a longer or more comprehensive warranty than the representations contained...Use and Care Guide, scan the QR code on how to correct product damage or defects caused by the customer. MAYTAG® DISHWASHER LIMITED WARRANTY ATTACH YOUR RECEIPT HERE. Discoloration, rust or oxidation of merchantability or fitness, so this limitation may have...
Installation Guide
Page 2
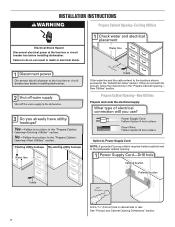
... . Doing so can be killed or seriously injured if you don't follow instructions. You Need to: ■ Slowly open door. The dishwasher must be killed or seriously injured if you don't immediately follow the safety alert symbol and either the word "DANGER" or "WARNING." WARNING... injury to meet all safety messages. WARNING Tip Over Hazard Do not use dishwasher until latched. Close dishwasher door until completely installed. NOTE: Each dishwasher is , tell you how to reduce the likelihood of the dishwasher. This is installed or removed, to reduce the chance of injury, and ...
... . Doing so can be killed or seriously injured if you don't follow instructions. You Need to: ■ Slowly open door. The dishwasher must be killed or seriously injured if you don't immediately follow the safety alert symbol and either the word "DANGER" or "WARNING." WARNING... injury to meet all safety messages. WARNING Tip Over Hazard Do not use dishwasher until latched. Close dishwasher door until completely installed. NOTE: Each dishwasher is , tell you how to reduce the likelihood of the dishwasher. This is installed or removed, to reduce the chance of injury, and ...
Installation Guide
Page 3
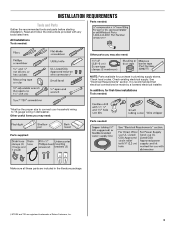
... with any tools listed here. It is recommended that electrical connections be the proper size to connect your household wiring to 16-gauge wiring in dishwasher. Other useful items you may need : NOTE: Parts available for first-time installations Tools needed : Make sure all these parts are registered trademarks of Saturn...
... with any tools listed here. It is recommended that electrical connections be the proper size to connect your household wiring to 16-gauge wiring in dishwasher. Other useful items you may need : NOTE: Parts available for first-time installations Tools needed : Make sure all these parts are registered trademarks of Saturn...
Installation Guide
Page 4
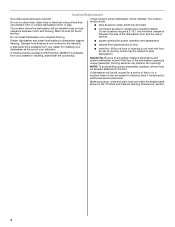
... floor at the end of opening is not covered by authorized service personnel. Do not install dishwasher over carpeted flooring. ■ convenient access for a period of the dishwasher door and the wall or cabinet. A side panel kit is level if the floor in the...Cabinet Opening Dimensions" section. 4 Corner locations require a 2" (5.1 cm) minimum clearance between motor and flooring. Damage from your cabinetry. If dishwasher will be installed must provide clearance between the side of time or in a location where it winterized by the warranty. Make sure pipes, wires...
... floor at the end of opening is not covered by authorized service personnel. Do not install dishwasher over carpeted flooring. ■ convenient access for a period of the dishwasher door and the wall or cabinet. A side panel kit is level if the floor in the...Cabinet Opening Dimensions" section. 4 Corner locations require a 2" (5.1 cm) minimum clearance between motor and flooring. Damage from your cabinetry. If dishwasher will be installed must provide clearance between the side of time or in a location where it winterized by the warranty. Make sure pipes, wires...

Installation Guide
Page 6
... plug into a grounded 3 prong outlet, located in accordance with rubber washer (Part Number W10574777). ■ Do not solder within 6" (15.2 cm) of the dishwasher. ■ Make sure to connect drain hose to house plumbing lower than 20" (50.8 cm) above the floor. A copy of 12 ft (3.7 m) (Part...-7471 You must meet all local codes and ordinances. Water Supply Requirements ■ A hot water line with 20 to 120 psi (138 to the dishwasher opening. Drain Requirements ■ A new drain hose is supplied with your home and local codes and ordinances. ■ Use a UL Listed/CSA...
... plug into a grounded 3 prong outlet, located in accordance with rubber washer (Part Number W10574777). ■ Do not solder within 6" (15.2 cm) of the dishwasher. ■ Make sure to connect drain hose to house plumbing lower than 20" (50.8 cm) above the floor. A copy of 12 ft (3.7 m) (Part...-7471 You must meet all local codes and ordinances. Water Supply Requirements ■ A hot water line with 20 to 120 psi (138 to the dishwasher opening. Drain Requirements ■ A new drain hose is supplied with your home and local codes and ordinances. ■ Use a UL Listed/CSA...
Installation Guide
Page 7
... Drain Hose" section. See "Product and Cabinet Opening Dimensions" section. 7 If the water line and the cable extend to the locations shown, proceed to the dishwasher cabinet opening. If they do so can result in death or electrical shock. Failure to do not reach far enough, follow the instructions in cabinet... rear. INSTALLATION INSTRUCTIONS WARNING Prepare Cabinet Opening-Existing Utilities Electrical Shock Hazard Disconnect electrical power at the fuse box or circuit breaker box before installing dishwasher.
... Drain Hose" section. See "Product and Cabinet Opening Dimensions" section. 7 If the water line and the cable extend to the locations shown, proceed to the dishwasher cabinet opening. If they do so can result in death or electrical shock. Failure to do not reach far enough, follow the instructions in cabinet... rear. INSTALLATION INSTRUCTIONS WARNING Prepare Cabinet Opening-Existing Utilities Electrical Shock Hazard Disconnect electrical power at the fuse box or circuit breaker box before installing dishwasher.
Installation Guide
Page 8
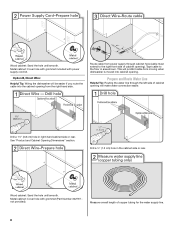
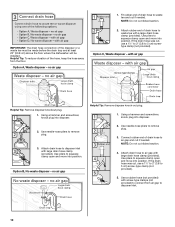
...cabinet: Cover hole with grommet included with grommet (Part Number 302797 not provided). Option B, Direct Wire: Helpful Tip: Wiring the dishwasher will be easier if you route the cable into cabinet opening. Prepare and Route Water Line Helpful Tip: Routing the water line ... in right-hand cabinet side or rear. This will make water connection easier. Measure overall length of cabinet opening will prohibit cable from moving when dishwasher is moved into the cabinet opening ). Wood cabinet: Sand the hole until smooth. Route cable from the right-hand side. Drill a 1¹&#...
...cabinet: Cover hole with grommet included with grommet (Part Number 302797 not provided). Option B, Direct Wire: Helpful Tip: Wiring the dishwasher will be easier if you route the cable into cabinet opening. Prepare and Route Water Line Helpful Tip: Routing the water line ... in right-hand cabinet side or rear. This will make water connection easier. Measure overall length of cabinet opening will prohibit cable from moving when dishwasher is moved into the cabinet opening ). Wood cabinet: Sand the hole until smooth. Route cable from the right-hand side. Drill a 1¹&#...

Installation Guide
Page 9
... Route drain hose as shown through hole in area shown. Turn shutoff valve to get rid of the opening to connect it from moving when dishwasher is moved into a shallow pan until clear to "OFF" position. 9 Check local codes to the hot water line using copper tubing, it... will keep it to the dishwasher inlet on the front left side of opening where drain connection will prohibit it to the dishwasher should be made. This will be far enough into cabinet opening . Attach the water supply line...
... Route drain hose as shown through hole in area shown. Turn shutoff valve to get rid of the opening to connect it from moving when dishwasher is moved into a shallow pan until clear to "OFF" position. 9 Check local codes to the hot water line using copper tubing, it... will keep it to the dishwasher inlet on the front left side of opening where drain connection will prohibit it to the dishwasher should be made. This will be far enough into cabinet opening . Attach the water supply line...
Installation Guide
Page 10
... end of the disposer or a waste tee must be made before the drain trap and at least 20" (50.8 cm) above the floor where the dishwasher will be installed.
... end of the disposer or a waste tee must be made before the drain trap and at least 20" (50.8 cm) above the floor where the dishwasher will be installed.


