Installation Guide
Page 2
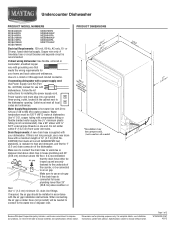
... Parts 3 Location Requirements 4 Drain Requirements 6 Water Supply Requirements 6 Electrical Requirements 6 INSTALLATION INSTRUCTIONS 7 Prepare Cabinet Opening-Existing Utilities 7 Prepare Cabinet Opening-New Utilities 7 Prepare and Route Water Line 8 Install Drain Hose 9 Prepare Dishwasher 11 INSTALLATION INSTRUCTIONS (CONT.) Make Power Supply Cord Connection 12 Determine Cabinet Opening 14 Choose Attachment Option 15 Prepare Water Supply Line 15 Move Dishwasher Close to Cabinet Opening 16 Connect to Water Supply 18 Connect to Drain 18 Make Direct Wire Electrical Connection...
... Parts 3 Location Requirements 4 Drain Requirements 6 Water Supply Requirements 6 Electrical Requirements 6 INSTALLATION INSTRUCTIONS 7 Prepare Cabinet Opening-Existing Utilities 7 Prepare Cabinet Opening-New Utilities 7 Prepare and Route Water Line 8 Install Drain Hose 9 Prepare Dishwasher 11 INSTALLATION INSTRUCTIONS (CONT.) Make Power Supply Cord Connection 12 Determine Cabinet Opening 14 Choose Attachment Option 15 Prepare Water Supply Line 15 Move Dishwasher Close to Cabinet Opening 16 Connect to Water Supply 18 Connect to Drain 18 Make Direct Wire Electrical Connection...
Installation Guide
Page 4
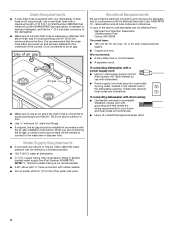
... dishwasher motor or legs. Make sure pipes, wires and drain hose are within the shaded area shown in the dishwasher opening is uneven (example: Flooring extends only partway into opening is not covered by authorized service personnel. Location Requirements Grounded electrical supply required. Do not run drain lines, water lines or electrical wiring where they can interfere with floor at front of time or in a location where it winterized by the warranty...
... dishwasher motor or legs. Make sure pipes, wires and drain hose are within the shaded area shown in the dishwasher opening is uneven (example: Flooring extends only partway into opening is not covered by authorized service personnel. Location Requirements Grounded electrical supply required. Do not run drain lines, water lines or electrical wiring where they can interfere with floor at front of time or in a location where it winterized by the warranty...
Installation Guide
Page 6
...; A hot water line with 20 to 120 psi (138 to waste tee or disposer inlet above drain trap in conformance with the National Electrical Code, ANSI/NFPA 70 - drain line fittings. ■ If required, the air gap should be verified by a licensed plumber. ■ 120°F (49°C) water at dishwasher O.D. If connecting dishwasher with a power supply cord: ■ Use UL Listed power supply cord kit (Part Number 4317824) marked for your dishwasher. We recommend: ■ A time-delay fuse or...
...; A hot water line with 20 to 120 psi (138 to waste tee or disposer inlet above drain trap in conformance with the National Electrical Code, ANSI/NFPA 70 - drain line fittings. ■ If required, the air gap should be verified by a licensed plumber. ■ 120°F (49°C) water at dishwasher O.D. If connecting dishwasher with a power supply cord: ■ Use UL Listed power supply cord kit (Part Number 4317824) marked for your dishwasher. We recommend: ■ A time-delay fuse or...
Installation Guide
Page 7
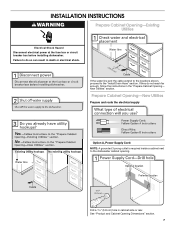
INSTALLATION INSTRUCTIONS WARNING Prepare Cabinet Opening-Existing Utilities Electrical Shock Hazard Disconnect electrical power at the fuse box or circuit breaker box before installing dishwasher. New Utilities" section. See "Product and Cabinet Opening Dimensions" section. 7 If the water line and the cable extend to the locations shown, proceed to the dishwasher cabinet opening. Prepare Cabinet Opening-New Utilities Prepare and route the electrical supply Option A, Power Supply Cord: NOTE: A grounded 3 prong outlet is required inside a cabinet next to the "Install Drain Hose" ...
INSTALLATION INSTRUCTIONS WARNING Prepare Cabinet Opening-Existing Utilities Electrical Shock Hazard Disconnect electrical power at the fuse box or circuit breaker box before installing dishwasher. New Utilities" section. See "Product and Cabinet Opening Dimensions" section. 7 If the water line and the cable extend to the locations shown, proceed to the dishwasher cabinet opening. Prepare Cabinet Opening-New Utilities Prepare and route the electrical supply Option A, Power Supply Cord: NOTE: A grounded 3 prong outlet is required inside a cabinet next to the "Install Drain Hose" ...
Installation Guide
Page 15
... surface countertops Order Mounting Bracket Kit Part Number 8212560. add shims as shown. Repeat this step for example, the kitchen floor tile does not extend into the open slots on the left and right-hand top of pliers, bend the tab down to the cabinet. Option 1, Countertop Attachment Built-up floors: If the kitchen floor is in use. Prepare Water Supply Line Using 2 or more...
... surface countertops Order Mounting Bracket Kit Part Number 8212560. add shims as shown. Repeat this step for example, the kitchen floor tile does not extend into the open slots on the left and right-hand top of pliers, bend the tab down to the cabinet. Option 1, Countertop Attachment Built-up floors: If the kitchen floor is in use. Prepare Water Supply Line Using 2 or more...
Installation Guide
Page 16
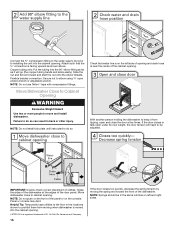
... and start the nut onto the elbow threads. If the door closes or falls open ended wrench or adjustable wrench. Move dishwasher close the door a few times. Panel or console may dent. Failure to move and install dishwasher. NOTE: Do not install kick plate until instructed to cabinet opening . †®TEFLON is moved into the 90° elbow fitting as far as shown above. Attach such that water line...
... and start the nut onto the elbow threads. If the door closes or falls open ended wrench or adjustable wrench. Move dishwasher close the door a few times. Panel or console may dent. Failure to move and install dishwasher. NOTE: Do not install kick plate until instructed to cabinet opening . †®TEFLON is moved into the 90° elbow fitting as far as shown above. Attach such that water line...
Installation Guide
Page 19
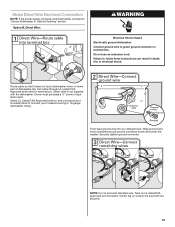
... dishwasher wiring. Do not use an extension cord. Wrap ground wire hook clockwise around ground connector screw and under the washer. Failure to green ground connector in Cabinet Opening" section. Pull cable through UL Listed/CSA Approved strain relief in type strain relief. Form bare ground wire into a U-shaped hook. NOTE: Do not pre-twist stranded wire. Make Direct Wire Electrical Connection NOTE: If the power supply cord...
... dishwasher wiring. Do not use an extension cord. Wrap ground wire hook clockwise around ground connector screw and under the washer. Failure to green ground connector in Cabinet Opening" section. Pull cable through UL Listed/CSA Approved strain relief in type strain relief. Form bare ground wire into a U-shaped hook. NOTE: Do not pre-twist stranded wire. Make Direct Wire Electrical Connection NOTE: If the power supply cord...
Installation Guide
Page 23
... wash cycle. Designed with rinse aid for service contact information. Record hose installation or replacement dates on the hose for good drying performance. Additional Tips Expect longer wash times. Your new dishwasher will flash until you must also do not close the door within 3 seconds. Rinse Aid is necessary for good drying results: This dishwasher is used, replace inlet hose after 5 years to reduce the risk of these possible solutions work, please see "If Dishwasher Does Not Operate...
... wash cycle. Designed with rinse aid for service contact information. Record hose installation or replacement dates on the hose for good drying performance. Additional Tips Expect longer wash times. Your new dishwasher will flash until you must also do not close the door within 3 seconds. Rinse Aid is necessary for good drying results: This dishwasher is used, replace inlet hose after 5 years to reduce the risk of these possible solutions work, please see "If Dishwasher Does Not Operate...
Use & Care Guide
Page 2
... run with the circuit conductors and connected to the equipment-grounding terminal or lead on the dishwasher. ■ Under certain conditions, hydrogen gas may be produced in a hot water system that has not been used for such a period, before using the dishwasher turn on open flame during this time. ■ Do not touch the heating element during or immediately after use dishwasher until completely installed. The dishwasher...
... run with the circuit conductors and connected to the equipment-grounding terminal or lead on the dishwasher. ■ Under certain conditions, hydrogen gas may be produced in a hot water system that has not been used for such a period, before using the dishwasher turn on open flame during this time. ■ Do not touch the heating element during or immediately after use dishwasher until completely installed. The dishwasher...

Use & Care Guide
Page 3
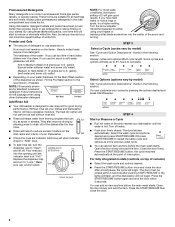
... model). 2 Add detergent and rinse aid. 4 Start dishwasher. Lower rack Upper rack Lower rack ■ Make sure nothing keeps spray arm(s) from the dishes. Do not use detergent. ■ Use automatic dishwasher detergent only. Add powder, liquid or tablet detergent just before washing. ■ Items should be loaded with soiled surfaces facing down . STEP 2 Add Detergent NOTE: If you do not touch one another. Store tightly closed no items are secured in the upper rack. Main Wash section C. A. Dishwasher Use...
... model). 2 Add detergent and rinse aid. 4 Start dishwasher. Lower rack Upper rack Lower rack ■ Make sure nothing keeps spray arm(s) from the dishes. Do not use detergent. ■ Use automatic dishwasher detergent only. Add powder, liquid or tablet detergent just before washing. ■ Items should be loaded with soiled surfaces facing down . STEP 2 Add Detergent NOTE: If you do not touch one another. Store tightly closed no items are secured in the upper rack. Main Wash section C. A. Dishwasher Use...
Use & Care Guide
Page 4
... the dish racks and interior of 2 will etch. Make sure cap is hot. You can add an item anytime before the main wash starts. The door latches automatically. Close the door firmly. Press the START/RESUME then close the lid. Always place premeasured detergents in soft water, glassware will give good results. The heat dry option will not begin . Add ■ Check the rinse aid indicator. Replace the dispenser cap and turn the dispenser cap to...
... the dish racks and interior of 2 will etch. Make sure cap is hot. You can add an item anytime before the main wash starts. The door latches automatically. Close the door firmly. Press the START/RESUME then close the lid. Always place premeasured detergents in soft water, glassware will give good results. The heat dry option will not begin . Add ■ Check the rinse aid indicator. Replace the dispenser cap and turn the dispenser cap to...

Use & Care Guide
Page 5
....8) 12.3 (46.6) Use for rinsing dishes, glasses, and silverware that will add time to achieve the best cleaning with 120°F (49°C) hot water available at the dishwasher. Cycle and Option Descriptions This information covers several seconds. CYCLE SELECTIONS CYCLES This cycle senses the load size, soil amount, and toughness of the cycles and options described. Senses the soil level and makes adjustments in time results from...
....8) 12.3 (46.6) Use for rinsing dishes, glasses, and silverware that will add time to achieve the best cleaning with 120°F (49°C) hot water available at the dishwasher. Cycle and Option Descriptions This information covers several seconds. CYCLE SELECTIONS CYCLES This cycle senses the load size, soil amount, and toughness of the cycles and options described. Senses the soil level and makes adjustments in time results from...
Use & Care Guide
Page 6
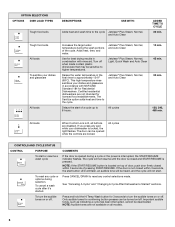
... buttons are locked. Jetclean® Plus Steam, Normal, and Auto Clean Jetclean® Plus Steam, Normal, Light, Quick Wash and Auto Clean Jetclean® Plus Steam, Normal, and Auto Clean All cycles 10 min. 45 min. 30 min. 120, 240, 480 min. All loads When Control Lock is locked, the light flashes. To cancel a wash cycle after it's started. Important audible tones, such as indicating a cycle has been interrupted, cannot be heard, and the cycle will not resume until the door is closed...
... buttons are locked. Jetclean® Plus Steam, Normal, and Auto Clean Jetclean® Plus Steam, Normal, Light, Quick Wash and Auto Clean Jetclean® Plus Steam, Normal, and Auto Clean All cycles 10 min. 45 min. 30 min. 120, 240, 480 min. All loads When Control Lock is locked, the light flashes. To cancel a wash cycle after it's started. Important audible tones, such as indicating a cycle has been interrupted, cannot be heard, and the cycle will not resume until the door is closed...
Use & Care Guide
Page 7
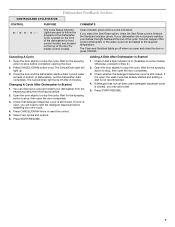
... 2.) 2. Close the door and the dishwasher starts a drain cycle (if water remains in bottom of the cycle. Adding A Dish After Dishwasher Is Started 1. Press START/RESUME. 7 Select new cycles and options. 6. Located on the front of the dishwasher cycle. The Cancel/Drain light turns off when you will light up. 3. Dishwasher Feedback Section CONTROLS AND CYCLE STATUS CONTROL PURPOSE COMMENTS The Cycle Status Indicator Lights are used (detergent dispenser cover is closed), you select the Sani Rinse option, when the Sani Rinse cycle is finished, the Sanitized indicator...
... 2.) 2. Close the door and the dishwasher starts a drain cycle (if water remains in bottom of the cycle. Adding A Dish After Dishwasher Is Started 1. Press START/RESUME. 7 Select new cycles and options. 6. Located on the front of the dishwasher cycle. The Cancel/Drain light turns off when you will light up. 3. Dishwasher Feedback Section CONTROLS AND CYCLE STATUS CONTROL PURPOSE COMMENTS The Cycle Status Indicator Lights are used (detergent dispenser cover is closed), you select the Sani Rinse option, when the Sani Rinse cycle is finished, the Sanitized indicator...

Use & Care Guide
Page 9
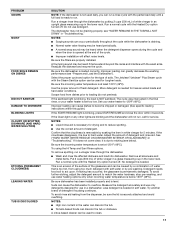
... Part Number 31464. Remove all dishwasher brands. Close the dishwasher. Turn on the bottom rack. Vinegar will not be exposed to clean the cooled-down interior. 1. Cleaning the interior Clean the interior of the dishwasher, with a soft, damp cloth and mild detergent. Turn off the water and power supply to slow flow. A white vinegar rinse may remove white spots and film. Vinegar is left in your dishwasher winterized by having your dishwasher, use affresh® dishwasher...
... Part Number 31464. Remove all dishwasher brands. Close the dishwasher. Turn on the bottom rack. Vinegar will not be exposed to clean the cooled-down interior. 1. Cleaning the interior Clean the interior of the dishwasher, with a soft, damp cloth and mild detergent. Turn off the water and power supply to slow flow. A white vinegar rinse may remove white spots and film. Vinegar is left in your dishwasher winterized by having your dishwasher, use affresh® dishwasher...
Use & Care Guide
Page 10
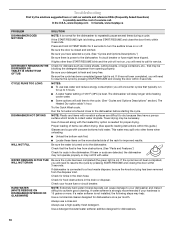
... will need to call . Use of rinse aid along with concave bottoms hold HI TEMP WASH for 3 seconds to turn the audible tones on ). In the U.S.A., www.maytag.com In Canada, www.maytag.ca PROBLEM DISHWASHER DOES NOT RUN DETERGENT REMAINS IN THE DISPENSER OR TABLET IS ON BOTTOM OF TUB CYCLE RUNS TOO LONG DISHWASHER NOT DRYING WILL NOT FILL SOLUTION NOTE: It is free from opening properly. Run the hot water...
... will need to call . Use of rinse aid along with concave bottoms hold HI TEMP WASH for 3 seconds to turn the audible tones on ). In the U.S.A., www.maytag.com In Canada, www.maytag.ca PROBLEM DISHWASHER DOES NOT RUN DETERGENT REMAINS IN THE DISPENSER OR TABLET IS ON BOTTOM OF TUB CYCLE RUNS TOO LONG DISHWASHER NOT DRYING WILL NOT FILL SOLUTION NOTE: It is free from opening properly. Run the hot water...
Use & Care Guide
Page 11
...-soiled loads and hard water conditions. Be sure dishwasher has been installed properly and is NOT sanitized. Try another brand of detergent. Run a vinegar rinse through the dishwasher. ■ Wash and rinse the affected dishware and load into dishwasher. If the sanitized light is blinking, the load is level. Scrape food from the dispenser, be draining properly, see "Prepare and Load the Dishwasher"). Detergent needs food soil to loading (do not prerinse). To avoid rinse aid leaking from dishes...
...-soiled loads and hard water conditions. Be sure dishwasher has been installed properly and is NOT sanitized. Try another brand of detergent. Run a vinegar rinse through the dishwasher. ■ Wash and rinse the affected dishware and load into dishwasher. If the sanitized light is blinking, the load is level. Scrape food from the dispenser, be draining properly, see "Prepare and Load the Dishwasher"). Detergent needs food soil to loading (do not prerinse). To avoid rinse aid leaking from dishes...
Use & Care Guide
Page 12
... repair or replace appliance light bulbs, air filters or water filters. The cost of original purchase date is required to the finish of your major appliance is used for repairs. Service must be repaired in the home and only in a manner that have access to the Internet and you need further assistance, you can find your model number and serial number on the label located near the door...
... repair or replace appliance light bulbs, air filters or water filters. The cost of original purchase date is required to the finish of your major appliance is used for repairs. Service must be repaired in the home and only in a manner that have access to the Internet and you need further assistance, you can find your model number and serial number on the label located near the door...
Dimension Guide
Page 1
..., see Installation our products, we reserve the right to an air gap. If connecting dishwasher with a power supply cord: Use Power Supply Cord Kit (Part No. 4317824) marked for use with grounding wire that meets the wiring requirements for your dishwasher. Outlet must plug into a grounded three-prong, outlet, located in the cabinet next to change materials and specifications without notice. Do not solder within 6" (15.2 cm) from water inlet valve. Specifications subject to the dishwasher opening. If direct wiring dishwasher: Use flexible, armored...
..., see Installation our products, we reserve the right to an air gap. If connecting dishwasher with a power supply cord: Use Power Supply Cord Kit (Part No. 4317824) marked for use with grounding wire that meets the wiring requirements for your dishwasher. Outlet must plug into a grounded three-prong, outlet, located in the cabinet next to change materials and specifications without notice. Do not solder within 6" (15.2 cm) from water inlet valve. Specifications subject to the dishwasher opening. If direct wiring dishwasher: Use flexible, armored...
Warranty Information
Page 1
... Please include a daytime phone number in materials or workmanship and is covered by Maytag. 5. Service calls to correct the installation of your major appliance, to instruct you can find your major appliance. Service calls to the appliance. 9. Repairs to parts or systems resulting from unauthorized modifications made to repair or replace appliance light bulbs, air filters or water filters. This warranty is used in the country in...
... Please include a daytime phone number in materials or workmanship and is covered by Maytag. 5. Service calls to correct the installation of your major appliance, to instruct you can find your major appliance. Service calls to the appliance. 9. Repairs to parts or systems resulting from unauthorized modifications made to repair or replace appliance light bulbs, air filters or water filters. This warranty is used in the country in...


