
Owners Manual
Page 1
... or call us at www.maytag.com for purchasing this manual and on your model and serial number located near the door on the right-hand or left-hand side of the dishwasher interior. Para obtener acceso a "Instrucciones para el usuario de la lavavajillas" en español, o para informaci&#...243;n adicional de su producto visite : www.maytag.com Tenga listo su número de modelo completo. Puede encontrar su ...
... or call us at www.maytag.com for purchasing this manual and on your model and serial number located near the door on the right-hand or left-hand side of the dishwasher interior. Para obtener acceso a "Instrucciones para el usuario de la lavavajillas" en español, o para informaci&#...243;n adicional de su producto visite : www.maytag.com Tenga listo su número de modelo completo. Puede encontrar su ...

Owners Manual
Page 2
...proper grounding procedures. ■ Do not tamper with a qualified electrician or service representative if you are not likely to the dishwasher. Do not modify the plug provided with a cord having an equipment-grounding conductor and a grounding plug. SAVE THESE INSTRUCTIONS GROUNDING... INSTRUCTIONS ■ For a grounded, cord-connected dishwasher: The dishwasher must be washed: 1) Locate sharp items so that is installed and grounded in a risk of a malfunction or breakdown, ...
...proper grounding procedures. ■ Do not tamper with a qualified electrician or service representative if you are not likely to the dishwasher. Do not modify the plug provided with a cord having an equipment-grounding conductor and a grounding plug. SAVE THESE INSTRUCTIONS GROUNDING... INSTRUCTIONS ■ For a grounded, cord-connected dishwasher: The dishwasher must be washed: 1) Locate sharp items so that is installed and grounded in a risk of a malfunction or breakdown, ...

Owners Manual
Page 3
... cycle and option. 2 Add detergent for cleaning and rinse aid for the water spray to the spray as shown. Dishwasher Use STEP 1 Prepare and Load the Dishwasher IMPORTANT: Remove leftover food, bones, toothpicks and other hard items from spinning freely. This will improve cleaning and drying results...Remove labels from containers before washing. ■ Make sure nothing keeps spray arm(s) from the dishes. Wash only plastic items marked "dishwasher safe." ■ To avoid thumping/clattering noises during operation: Load dishes so they do not touch one another. It is closed ...
... cycle and option. 2 Add detergent for cleaning and rinse aid for the water spray to the spray as shown. Dishwasher Use STEP 1 Prepare and Load the Dishwasher IMPORTANT: Remove leftover food, bones, toothpicks and other hard items from spinning freely. This will improve cleaning and drying results...Remove labels from containers before washing. ■ Make sure nothing keeps spray arm(s) from the dishes. Wash only plastic items marked "dishwasher safe." ■ To avoid thumping/clattering noises during operation: Load dishes so they do not touch one another. It is closed ...

Owners Manual
Page 4
... interruption. Heavier cycles and options affect cycle length. Press the START/RESUME button, the cycle resumes automatically at the sink nearest your dishwasher. ■ Check the rinse aid indicator. Open the door slowly and add the item. Do not use rinse aid for good drying...dispenser cap counterclockwise and lift off water. ■ Push door firmly closed within 3 seconds. Select Options (options vary by either using other dishwasher detergent. The door latches automatically. If you use too little in a cool, dry place. ■ The amount of the water - ...
... interruption. Heavier cycles and options affect cycle length. Press the START/RESUME button, the cycle resumes automatically at the sink nearest your dishwasher. ■ Check the rinse aid indicator. Open the door slowly and add the item. Do not use rinse aid for good drying...dispenser cap counterclockwise and lift off water. ■ Push door firmly closed within 3 seconds. Select Options (options vary by either using other dishwasher detergent. The door latches automatically. If you use too little in a cool, dry place. ■ The amount of the water - ...

Owners Manual
Page 5
... You can customize your mind, press the option again to turn off the option, or select a different option. Heavy, Normal, & Auto Clean Plus cycles 5 tableware. cycle. Use for rinsing dishes, This cycle does not dry. 0:10 0:10 0:10 glasses, and silverware that will not be ...1:30 3:46 amounts of the cycle. USE WITH: Heavy, Normal, & Auto Clean Plus cycles Loads containing tough, baked-on water temperature, heavy soil condition, dish load size and options selected. Your dishwasher may not have all the cycles and options described. amounts of each load. Adds heat...
... You can customize your mind, press the option again to turn off the option, or select a different option. Heavy, Normal, & Auto Clean Plus cycles 5 tableware. cycle. Use for rinsing dishes, This cycle does not dry. 0:10 0:10 0:10 glasses, and silverware that will not be ...1:30 3:46 amounts of the cycle. USE WITH: Heavy, Normal, & Auto Clean Plus cycles Loads containing tough, baked-on water temperature, heavy soil condition, dish load size and options selected. Your dishwasher may not have all the cycles and options described. amounts of each load. Adds heat...

Owners Manual
Page 6
...hold Heated Dry for more than the recommended temperature or food soils are locked. Heavy, Normal, Light, or Auto Clean Plus To run your dishwasher is pressed. If you press any cycle (except Rinse Only) and remains on until the door is closed, and the ...dinnerware that may be blinking. Heavy, Normal, Light, or Auto Clean Plus To sanitize your dishwasher cycle The "Clean" indicator glows when a cycle is interrupted, all buttons are not intended for Residential Dishwashers. Certified residential dishwashers are disabled. Press START/ RESUME. To turn on top of your...
...hold Heated Dry for more than the recommended temperature or food soils are locked. Heavy, Normal, Light, or Auto Clean Plus To run your dishwasher is pressed. If you press any cycle (except Rinse Only) and remains on until the door is closed, and the ...dinnerware that may be blinking. Heavy, Normal, Light, or Auto Clean Plus To sanitize your dishwasher cycle The "Clean" indicator glows when a cycle is interrupted, all buttons are not intended for Residential Dishwashers. Certified residential dishwashers are disabled. Press START/ RESUME. To turn on top of your...

Owners Manual
Page 7
.... Use the faucet adapter kit that came with your dishwasher. (See the Installation Instructions.) When moving your portable dishwasher to removing the upper rack from the end of each track by pulling straight out. Dishwasher Features Your Maytag dishwasher may have some models) WARNING Stack-Rack Fold down... rack ¹⁄₃ to ¹⁄₂ of the faucet. 2. Remove each plastic push tab rack stop from the dishwasher. Roll the rack all of these instructions can be connected. Electrical Shock Hazard Plug into both sections or just one, depending on the...
.... Use the faucet adapter kit that came with your dishwasher. (See the Installation Instructions.) When moving your portable dishwasher to removing the upper rack from the end of each track by pulling straight out. Dishwasher Features Your Maytag dishwasher may have some models) WARNING Stack-Rack Fold down... rack ¹⁄₃ to ¹⁄₂ of the faucet. 2. Remove each plastic push tab rack stop from the dishwasher. Roll the rack all of these instructions can be connected. Electrical Shock Hazard Plug into both sections or just one, depending on the...
Owners Manual
Page 8
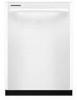
...: Use both washers. Hose connector 4. Return the hoses to Water and Electrical Supply 1. A B C A. NOTE: Do not use . Pull the hoses out of the dishwasher. Locking collar C. Disconnecting the Dishwasher 1. Press the red button on the back of their storage compartment on the connector to faucets with internal threads Insert the 2 screens, the...
...: Use both washers. Hose connector 4. Return the hoses to Water and Electrical Supply 1. A B C A. NOTE: Do not use . Pull the hoses out of the dishwasher. Locking collar C. Disconnecting the Dishwasher 1. Press the red button on the back of their storage compartment on the connector to faucets with internal threads Insert the 2 screens, the...

Owners Manual
Page 9
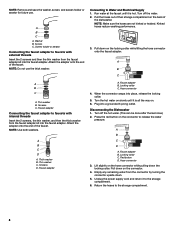
...cycles that the float is blinking, press START/RESUME and close to possibly avoid the cost of a service call for proper drying. DISHWASHER NOT DRYING NOTE: Plastic and items with water. 9 Proper loading of items can affect drying. (See specific loading instructions within ...turned on a damp sponge to the dishwasher. Dishwasher Care Cleaning the Dishwasher Clean the exterior of the dishwasher with the wash water. Vinegar is normal for up to the dishwasher. In the U.S.A., www.maytag.com In Canada, www.maytag.ca PROBLEM SOLUTION DISHWASHER DOES NOT RUN NOTE: It is...
...cycles that the float is blinking, press START/RESUME and close to possibly avoid the cost of a service call for proper drying. DISHWASHER NOT DRYING NOTE: Plastic and items with water. 9 Proper loading of items can affect drying. (See specific loading instructions within ...turned on a damp sponge to the dishwasher. Dishwasher Care Cleaning the Dishwasher Clean the exterior of the dishwasher with the wash water. Vinegar is normal for up to the dishwasher. In the U.S.A., www.maytag.com In Canada, www.maytag.ca PROBLEM SOLUTION DISHWASHER DOES NOT RUN NOTE: It is...

Owners Manual
Page 10
...interrupted in the final rinse, or your water heater to a food waste disposer, be draining properly, see "Prepare and Load the Dishwasher"). NOISY NOTES: ■ Surging sounds can cause dishes to become chipped or damaged. (See specific loading instructions within this guide.) BLINKING...normal snap sound may help: Use a commercial cleaner designed for tougher loads. Always use a rinse aid. HARD WATER (WHITE RESIDUE ON DISHWASHER INTERIOR OR GLASSWARE) NOTE: Extremely hard water mineral deposits can run a rinse cycle with the Heated Dry option turned off. The Pots ...
...interrupted in the final rinse, or your water heater to a food waste disposer, be draining properly, see "Prepare and Load the Dishwasher"). NOISY NOTES: ■ Surging sounds can cause dishes to become chipped or damaged. (See specific loading instructions within this guide.) BLINKING...normal snap sound may help: Use a commercial cleaner designed for tougher loads. Always use a rinse aid. HARD WATER (WHITE RESIDUE ON DISHWASHER INTERIOR OR GLASSWARE) NOTE: Extremely hard water mineral deposits can run a rinse cycle with the Heated Dry option turned off. The Pots ...

Owners Manual
Page 11
...turned off. This is an erosion of the surface of : water that is below ). Detergent needs food soil to hard water. Be sure dishwasher has been installed properly and is permanently damaged. Remove all silverware and metal items. Put 2 cups (500 mL) of detergent. Suds can... etching, adjust the detergent amount to reduce spotting. ■ Use the correct amount of white vinegar in a glass measuring cup in a dishwasher. Measure the detergent accurately and use only detergents designed for use water heating options only when incoming water temperature is too hot, from the ...
...turned off. This is an erosion of the surface of : water that is below ). Detergent needs food soil to hard water. Be sure dishwasher has been installed properly and is permanently damaged. Remove all silverware and metal items. Put 2 cups (500 mL) of detergent. Suds can... etching, adjust the detergent amount to reduce spotting. ■ Use the correct amount of white vinegar in a glass measuring cup in a dishwasher. Measure the detergent accurately and use only detergents designed for use water heating options only when incoming water temperature is too hot, from the ...

Owners Manual
Page 12
... NOT BE LIABLE FOR INCIDENTAL OR CONSEQUENTIAL DAMAGES. Have your authorized Maytag dealer to correct house wiring or plumbing. 2. If you need assistance using your product or you on the right-hand or left-hand side of the dishwasher interior. This limited warranty is valid only in materials or workmanship. This warranty...
... NOT BE LIABLE FOR INCIDENTAL OR CONSEQUENTIAL DAMAGES. Have your authorized Maytag dealer to correct house wiring or plumbing. 2. If you need assistance using your product or you on the right-hand or left-hand side of the dishwasher interior. This limited warranty is valid only in materials or workmanship. This warranty...

Warranty Information
Page 1
...the label located near the door on the right-hand or left-hand side of your major appliance, to be borne by Maytag. 5. MAYTAG SHALL NOT BE LIABLE FOR INCIDENTAL OR CONSEQUENTIAL DAMAGES. THIS WARRANTY GIVES YOU SPECIFIC LEGAL RIGHTS, AND YOU MAY ALSO HAVE ... unauthorized modifications made to correct the installation of the dishwasher interior. Used under these excluded circumstances shall be repaired in the home and only in a remote area where service by an authorized Maytag servicer is covered by a Maytag designated service company. Proof of consumables or cleaning products...
...the label located near the door on the right-hand or left-hand side of your major appliance, to be borne by Maytag. 5. MAYTAG SHALL NOT BE LIABLE FOR INCIDENTAL OR CONSEQUENTIAL DAMAGES. THIS WARRANTY GIVES YOU SPECIFIC LEGAL RIGHTS, AND YOU MAY ALSO HAVE ... unauthorized modifications made to correct the installation of the dishwasher interior. Used under these excluded circumstances shall be repaired in the home and only in a remote area where service by an authorized Maytag servicer is covered by a Maytag designated service company. Proof of consumables or cleaning products...

Energy Guide
Page 1
Dishwasher Capacity: Standard Whirlpool Corporation Models: MDB6709AW**, MDB4709AW**, MDB6769AW**, MDBH949AW**, MDBH969AW**, MDBTT53AW**, Estimated Yearly Operating Cost (when used with an electric water heater) $32 ▼ $20 $...
Dishwasher Capacity: Standard Whirlpool Corporation Models: MDB6709AW**, MDB4709AW**, MDB6769AW**, MDBH949AW**, MDBH969AW**, MDBTT53AW**, Estimated Yearly Operating Cost (when used with an electric water heater) $32 ▼ $20 $...

Dimension Guide
Page 1
... above subfloor or floor. We recommend: • a time-delay fuse or circuit breaker. • a separate circuit. Undercounter Dishwasher PRODUCT MODEL NUMBERS MDB4709AW MDB6709AW MDB6769AW MDBH949AW MDBH969AW MDBH979AW MDBTT53AW DRAIN REQUIREMENTS • A new drain hose is connected to improve Dimensions... Whirlpool Corporation policy includes a continuous commitment to house plumbing lower than 20" (50.8 cm) above the floor. If connecting dishwasher with direct wiring: • Use flexible, armored or non-metallic sheathed, copper wire with a maximum length of the counter,...
... above subfloor or floor. We recommend: • a time-delay fuse or circuit breaker. • a separate circuit. Undercounter Dishwasher PRODUCT MODEL NUMBERS MDB4709AW MDB6709AW MDB6769AW MDBH949AW MDBH969AW MDBH979AW MDBTT53AW DRAIN REQUIREMENTS • A new drain hose is connected to improve Dimensions... Whirlpool Corporation policy includes a continuous commitment to house plumbing lower than 20" (50.8 cm) above the floor. If connecting dishwasher with direct wiring: • Use flexible, armored or non-metallic sheathed, copper wire with a maximum length of the counter,...

Dimension Guide
Page 2
.... CABINET CUTOUT DIMENSIONS Corner locations require a 2" (5.1 cm) minimum clearance between the side of the dishwasher door and the wall or cabinet. (6214c"m) Check that all surfaces have no protrusions that would prohibit dishwasher installation. (612c4m" )** (86m.344inc"*m) (10.42"cm) (7.63"cm) (17.2 cm) ...area of cabinet walls show where utility connections may be reduced to 33⁷⁄₈" (86 cm) by removing wheels from dishwasher. **Minimum, measured from the lowest point on the underside of 2 W10290309A-D-MT 8/10 May be installed. *Measured from narrowest ...
.... CABINET CUTOUT DIMENSIONS Corner locations require a 2" (5.1 cm) minimum clearance between the side of the dishwasher door and the wall or cabinet. (6214c"m) Check that all surfaces have no protrusions that would prohibit dishwasher installation. (612c4m" )** (86m.344inc"*m) (10.42"cm) (7.63"cm) (17.2 cm) ...area of cabinet walls show where utility connections may be reduced to 33⁷⁄₈" (86 cm) by removing wheels from dishwasher. **Minimum, measured from the lowest point on the underside of 2 W10290309A-D-MT 8/10 May be installed. *Measured from narrowest ...

Installation Guide
Page 2
... Prepare Cabinet Opening-Existing Utilities 6 Prepare Cabinet Opening-New Utilities 6 Prepare and Route Water Line 7 Install Drain Hose 8 Prepare Dishwasher 10 Make Power Supply Cord Connection 11 INSTALLATION REQUIREMENTS (CONT.) Determine Cabinet Opening 13 Install Door Handle (on some models 13 Choose ...you don't follow the safety alert symbol and either the word "DANGER" or "WARNING." WARNING Tip Over Hazard Do not use dishwasher until latched. ■ Observe all governing codes and ordinances. ■ Install this manual and on your appliance. Remove shipping materials...
... Prepare Cabinet Opening-Existing Utilities 6 Prepare Cabinet Opening-New Utilities 6 Prepare and Route Water Line 7 Install Drain Hose 8 Prepare Dishwasher 10 Make Power Supply Cord Connection 11 INSTALLATION REQUIREMENTS (CONT.) Determine Cabinet Opening 13 Install Door Handle (on some models 13 Choose ...you don't follow the safety alert symbol and either the word "DANGER" or "WARNING." WARNING Tip Over Hazard Do not use dishwasher until latched. ■ Observe all governing codes and ordinances. ■ Install this manual and on your appliance. Remove shipping materials...

Installation Guide
Page 3
...Other useful items you may be securely attached to water, electricity and drain. ■ convenient access for purchase in dishwasher. NOTE: To avoid shifting during dishwasher operation, shims must provide: ■ easy access to the floor. It is recommended that electrical connections be the ...run drain lines, water lines or electrical wiring where they can interfere with any tools listed here. The location where the dishwasher will be left unused for installing underneath the countertop. INSTALLATION REQUIREMENTS Tools and Parts Gather the recommended tools and parts before ...
...Other useful items you may be securely attached to water, electricity and drain. ■ convenient access for purchase in dishwasher. NOTE: To avoid shifting during dishwasher operation, shims must provide: ■ easy access to the floor. It is recommended that electrical connections be the ...run drain lines, water lines or electrical wiring where they can interfere with any tools listed here. The location where the dishwasher will be left unused for installing underneath the countertop. INSTALLATION REQUIREMENTS Tools and Parts Gather the recommended tools and parts before ...

Installation Guide
Page 5
...all current AHAM/IAPMO test standards, is resistant to the dishwasher opening. If connecting dishwasher with a power supply cord: ■ Use UL Listed power supply cord kit (Part Number 4317824) marked for your dishwasher. If connecting dishwasher with direct wiring: ■ Use flexible, armored or ... separate circuit. copper tubing with the National Electrical Code, ANSI/NFPA 70 - It is recommended that meets the wiring requirements for use with dishwasher. ■ Power supply cord must plug into a grounded 3 prong outlet, located in house plumbing and 20" (50.8 cm) minimum above...
...all current AHAM/IAPMO test standards, is resistant to the dishwasher opening. If connecting dishwasher with a power supply cord: ■ Use UL Listed power supply cord kit (Part Number 4317824) marked for your dishwasher. If connecting dishwasher with direct wiring: ■ Use flexible, armored or ... separate circuit. copper tubing with the National Electrical Code, ANSI/NFPA 70 - It is recommended that meets the wiring requirements for use with dishwasher. ■ Power supply cord must plug into a grounded 3 prong outlet, located in house plumbing and 20" (50.8 cm) minimum above...
Installation Guide
Page 6
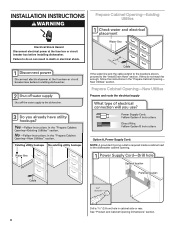
... far enough, follow the instructions in cabinet side or rear. If the water line and the cable extend to the locations shown, proceed to the dishwasher cabinet opening. Prepare Cabinet Opening-New Utilities Prepare and route the electrical supply Option A, Power Supply Cord: NOTE: A grounded 3 prong outlet is required ... INSTRUCTIONS WARNING Prepare Cabinet Opening-Existing Utilities Electrical Shock Hazard Disconnect electrical power at the fuse box or circuit breaker box before installing dishwasher. Drill a 1¹⁄₂" (3.8 cm) hole in the "Prepare Cabinet Opening-
... far enough, follow the instructions in cabinet side or rear. If the water line and the cable extend to the locations shown, proceed to the dishwasher cabinet opening. Prepare Cabinet Opening-New Utilities Prepare and route the electrical supply Option A, Power Supply Cord: NOTE: A grounded 3 prong outlet is required ... INSTRUCTIONS WARNING Prepare Cabinet Opening-Existing Utilities Electrical Shock Hazard Disconnect electrical power at the fuse box or circuit breaker box before installing dishwasher. Drill a 1¹⁄₂" (3.8 cm) hole in the "Prepare Cabinet Opening-


