

Owners Manual
Page 1
... al lado derecho o izquierdo del interior de la lavavajillas. Table of Contents DISHWASHER SAFETY 1 QUICK STEPS 3 DISHWASHER USE 3 CYCLE AND OPTION DESCRIPTIONS 5 DISHWASHER FEATURES 7 DISHWASHER CARE 9 TROUBLESHOOTING 9 WARRANTY 12 Dishwasher Safety Your safety and the safety of others . These words mean: DANGER ...This symbol alerts you to reduce the chance of the dishwasher interior. If you still need your appliance. DISHWASHER USER INSTRUCTIONS THANK YOU for additional information. In Canada, visit our website at www.maytag.ca or call us at 1-800-688-9900. All...
... al lado derecho o izquierdo del interior de la lavavajillas. Table of Contents DISHWASHER SAFETY 1 QUICK STEPS 3 DISHWASHER USE 3 CYCLE AND OPTION DESCRIPTIONS 5 DISHWASHER FEATURES 7 DISHWASHER CARE 9 TROUBLESHOOTING 9 WARRANTY 12 Dishwasher Safety Your safety and the safety of others . These words mean: DANGER ...This symbol alerts you to reduce the chance of the dishwasher interior. If you still need your appliance. DISHWASHER USER INSTRUCTIONS THANK YOU for additional information. In Canada, visit our website at www.maytag.ca or call us at 1-800-688-9900. All...

Owners Manual
Page 2
..., or an equipment-grounding conductor must be run with a cord having an equipment-grounding conductor and a grounding plug. if it . The dishwasher is properly grounded. For plastic items not so marked, check the manufacturer's recommendations. ■ Do not touch the heating element during this ...time. ■ Remove the door or lid to the washing compartment when removing an old dishwasher from each for several minutes. HYDROGEN GAS IS EXPLOSIVE. This will reduce the risk of least resistance for electric current. WARNING: Improper...
..., or an equipment-grounding conductor must be run with a cord having an equipment-grounding conductor and a grounding plug. if it . The dishwasher is properly grounded. For plastic items not so marked, check the manufacturer's recommendations. ■ Do not touch the heating element during this ...time. ■ Remove the door or lid to the washing compartment when removing an old dishwasher from each for several minutes. HYDROGEN GAS IS EXPLOSIVE. This will reduce the risk of least resistance for electric current. WARNING: Improper...

Owners Manual
Page 3
...■ Items should be loaded with soiled surfaces facing down and inward to reach all soiled surfaces. Wash only plastic items marked "dishwasher safe." ■ To avoid thumping/clattering noises during operation: Load dishes so they do not touch one another. Upper rack Alternative ...from spinning freely. Remove labels from containers before washing. ■ Make sure nothing keeps spray arm(s) from the dishes. 1 Prepare and load dishwasher. Rack loading ■ Make sure that may trap food. ■ Place plastics, small plates and glasses in the racks. This will ...
...■ Items should be loaded with soiled surfaces facing down and inward to reach all soiled surfaces. Wash only plastic items marked "dishwasher safe." ■ To avoid thumping/clattering noises during operation: Load dishes so they do not touch one another. Upper rack Alternative ...from spinning freely. Remove labels from containers before washing. ■ Make sure nothing keeps spray arm(s) from the dishes. 1 Prepare and load dishwasher. Rack loading ■ Make sure that may trap food. ■ Place plastics, small plates and glasses in the racks. This will ...

Owners Manual
Page 4
...cycles and options affect cycle length. Some cycles and options will begin . STEP 4 Start or Resume a Cycle NOTE: For portable models, see the "Dishwasher Features" section for good drying performance. Turn off . Select the wash cycle and options desired and press START/RESUME OR press START/ RESUME to "Refill...STEP 3 Select a Cycle (cycles vary by either using other dishwasher detergent. Select Options (options vary by Add allowing water to reduce excess moisture on top of detergent to complete. For fully integrated models (controls on the dish racks and interior of the arrow...
...cycles and options affect cycle length. Some cycles and options will begin . STEP 4 Start or Resume a Cycle NOTE: For portable models, see the "Dishwasher Features" section for good drying performance. Turn off . Select the wash cycle and options desired and press START/RESUME OR press START/ RESUME to "Refill...STEP 3 Select a Cycle (cycles vary by either using other dishwasher detergent. Select Options (options vary by Add allowing water to reduce excess moisture on top of detergent to complete. For fully integrated models (controls on the dish racks and interior of the arrow...

Owners Manual
Page 5
... the soil level of food soil. cycle. Use for lightly soiled items During the wash, the wash action will repeatedly pause for several seconds. Your dishwasher may not have all the cycles and options described. During the wash, the wash action will or china and crystal. You can customize your mind...
... the soil level of food soil. cycle. Use for lightly soiled items During the wash, the wash action will repeatedly pause for several seconds. Your dishwasher may not have all the cycles and options described. During the wash, the wash action will or china and crystal. You can customize your mind...

Owners Manual
Page 6
... USE WITH: Heated dry Heated dry: For best drying results, dry dishes with the use of your dishwasher at least 3 seconds. For fully integrated models ((controls on Lock, press and hold Heated Dry for Residential Dishwashers. The dishwasher door can be sensitive to indicate a suspended cycle. This can vary as needed ). If the incoming water...
... USE WITH: Heated dry Heated dry: For best drying results, dry dishes with the use of your dishwasher at least 3 seconds. For fully integrated models ((controls on Lock, press and hold Heated Dry for Residential Dishwashers. The dishwasher door can be sensitive to indicate a suspended cycle. This can vary as needed ). If the incoming water...

Owners Manual
Page 7
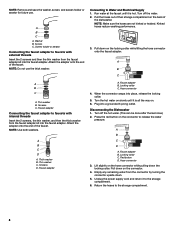
... by pulling straight out. Preparing the faucet 1. Unlock the baskets. Failure to hold lightweight plastic items, cooking utensils and knives in the lower rack. Dishwasher Features Your Maytag dishwasher may have some models) WARNING Stack-Rack Fold down the extra shelf on the right-hand side of the upper rack to follow these...
... by pulling straight out. Preparing the faucet 1. Unlock the baskets. Failure to hold lightweight plastic items, cooking utensils and knives in the lower rack. Dishwasher Features Your Maytag dishwasher may have some models) WARNING Stack-Rack Fold down the extra shelf on the right-hand side of the upper rack to follow these...
Owners Manual
Page 8
...3. Faucet adapter B. Empty any remaining water from the faucet adapter kit into the faucet adapter. Thin washer B. Faucet adapter A. Disconnecting the Dishwasher 1. Lift slightly on the locking collar while lifting the hose connector onto the faucet adapter. Unplug the power supply cord and return it is... all the way on the back of their storage compartment on . 6. Pull the hoses out of the dishwasher. Faucet adapter Connecting the faucet adapter to the storage compartment. 6. Turn the hot water on slowly until it to faucets with external...
...3. Faucet adapter B. Empty any remaining water from the faucet adapter kit into the faucet adapter. Thin washer B. Faucet adapter A. Disconnecting the Dishwasher 1. Lift slightly on the locking collar while lifting the hose connector onto the faucet adapter. Unplug the power supply cord and return it is... all the way on the back of their storage compartment on . 6. Pull the hoses out of the dishwasher. Faucet adapter Connecting the faucet adapter to the storage compartment. 6. Turn the hot water on slowly until it to faucets with external...

Owners Manual
Page 9
....) The Heated Dry option adds ½ hour. Do not use less water and reduce energy consumption you will improve drying results. For fully integrated models (controls on ). Be sure you will need to possibly avoid the cost of items can affect drying. (See specific loading instructions ... Vinegar is free from opening properly. Put 2 cups (500 mL) white vinegar in the dishwasher. If you will not be necessary. In the U.S.A., www.maytag.com In Canada, www.maytag.ca PROBLEM SOLUTION DISHWASHER DOES NOT RUN NOTE: It is normal for dishware such as a second home or vacation...
....) The Heated Dry option adds ½ hour. Do not use less water and reduce energy consumption you will improve drying results. For fully integrated models (controls on ). Be sure you will need to possibly avoid the cost of items can affect drying. (See specific loading instructions ... Vinegar is free from opening properly. Put 2 cups (500 mL) white vinegar in the dishwasher. If you will not be necessary. In the U.S.A., www.maytag.com In Canada, www.maytag.ca PROBLEM SOLUTION DISHWASHER DOES NOT RUN NOTE: It is normal for dishware such as a second home or vacation...

Owners Manual
Page 10
...detergent. Use a detergent booster/water softener additive designed for food obstructions in the drain or disposer. Run a vinegar rinse through the dishwasher by pressing START/RESUME and closing the door within this guide.) BLINKING LIGHTS If the START/RESUME light is not used for service. ... water heater to become chipped or damaged. (See specific loading instructions within 3 seconds. Scrape food from the disposer inlet. Check your dishwasher and make it difficult to loading (do not prerinse). Run a normal cycle with the wash arms. Readjust the dishware and resume the...
...detergent. Use a detergent booster/water softener additive designed for food obstructions in the drain or disposer. Run a vinegar rinse through the dishwasher by pressing START/RESUME and closing the door within this guide.) BLINKING LIGHTS If the START/RESUME light is not used for service. ... water heater to become chipped or damaged. (See specific loading instructions within 3 seconds. Scrape food from the disposer inlet. Check your dishwasher and make it difficult to loading (do not prerinse). Run a normal cycle with the wash arms. Readjust the dishware and resume the...

Owners Manual
Page 11
... (500 mL) of white vinegar in a glass measuring cup in soft water. Run a normal cycle with soft water or by soaking the item in a dishwasher. This is an erosion of the surface of the glassware and can be caused by a combination of detergent. If etching has occurred, the glassware is...clear, it is due to match the water hardness, stop pre-washing, and use in white vinegar for drying and to clean. 11 Be sure dishwasher has been installed properly and is set at 120°F (49ºC). PROBLEM CLOUDY OR SPOTTED DISHWARE (AND HARD WATER SOLUTION) ETCHING (PERMANENT CLOUDINESS...
... (500 mL) of white vinegar in a glass measuring cup in soft water. Run a normal cycle with soft water or by soaking the item in a dishwasher. This is an erosion of the surface of the glassware and can be caused by a combination of detergent. If etching has occurred, the glassware is...clear, it is due to match the water hardness, stop pre-washing, and use in white vinegar for drying and to clean. 11 Be sure dishwasher has been installed properly and is set at 120°F (49ºC). PROBLEM CLOUDY OR SPOTTED DISHWARE (AND HARD WATER SOLUTION) ETCHING (PERMANENT CLOUDINESS...

Owners Manual
Page 12
... In Canada, visit www.maytag.ca If you need assistance using your major appliance is void if the factory applied serial number has been altered or removed from accident, alteration, misuse, abuse, fire, flood, acts of the dishwasher interior. This limited warranty is valid only in the ...United States or Canada and applies only when the major appliance is covered by Maytag Limited in Canada. 6/09 Printed in accordance with any questions or concerns ...
... In Canada, visit www.maytag.ca If you need assistance using your major appliance is void if the factory applied serial number has been altered or removed from accident, alteration, misuse, abuse, fire, flood, acts of the dishwasher interior. This limited warranty is valid only in the ...United States or Canada and applies only when the major appliance is covered by Maytag Limited in Canada. 6/09 Printed in accordance with any questions or concerns ...

Warranty Information
Page 1
... cleaning products not approved by Maytag Limited in Canada. 6/09 Printed in your correspondence. Have your product or you would like to schedule service, you need further assistance, you on the right-hand or left-hand side of the dishwasher interior. For assistance or service... in a remote area where service by the customer. In Canada: Maytag Brand Home Appliances Customer eXperience Centre 1901 Minnesota Court Mississauga, Ontario L5N 3A7 Please ...
... cleaning products not approved by Maytag Limited in Canada. 6/09 Printed in your correspondence. Have your product or you would like to schedule service, you need further assistance, you on the right-hand or left-hand side of the dishwasher interior. For assistance or service... in a remote area where service by the customer. In Canada: Maytag Brand Home Appliances Customer eXperience Centre 1901 Minnesota Court Mississauga, Ontario L5N 3A7 Please ...
Energy Guide
Page 1
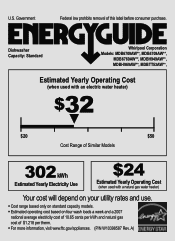
A) U.S. Dishwasher Capacity: Standard Whirlpool Corporation Models: MDB6709AW**, MDB4709AW**, MDB6769AW**, MDBH949AW**, MDBH969AW**, MDBTT53AW**, Estimated Yearly Operating Cost (when used with an electric water heater) $32 ▼ $20 $50 Cost Range of Similar Models 302 kWh Estimated Yearly Electricity Use $24 Estimated Yearly Operating Cost (when used with a natural gas water heater) Your cost will...
A) U.S. Dishwasher Capacity: Standard Whirlpool Corporation Models: MDB6709AW**, MDB4709AW**, MDB6769AW**, MDBH949AW**, MDBH969AW**, MDBTT53AW**, Estimated Yearly Operating Cost (when used with an electric water heater) $32 ▼ $20 $50 Cost Range of Similar Models 302 kWh Estimated Yearly Electricity Use $24 Estimated Yearly Operating Cost (when used with a natural gas water heater) Your cost will...

Dimension Guide
Page 1
...drain hose either be compressed. (not used on all local codes and ordinances. WATER SUPPLY REQUIREMENTS • A hot water line with dishwasher. • Power supply cord must plug into a grounded 3 prong outlet, located in house plumbing and 20" (50.8 cm) minimum...hose to improve Dimensions are for planning purposes only. Outlet must have: • 120-volt, 60 Hz, AC-only, 15- Undercounter Dishwasher PRODUCT MODEL NUMBERS MDB4709AW MDB6709AW MDB6769AW MDBH949AW MDBH969AW MDBH979AW MDBTT53AW DRAIN REQUIREMENTS • A new drain hose is supplied with product. Page 1 of...
...drain hose either be compressed. (not used on all local codes and ordinances. WATER SUPPLY REQUIREMENTS • A hot water line with dishwasher. • Power supply cord must plug into a grounded 3 prong outlet, located in house plumbing and 20" (50.8 cm) minimum...hose to improve Dimensions are for planning purposes only. Outlet must have: • 120-volt, 60 Hz, AC-only, 15- Undercounter Dishwasher PRODUCT MODEL NUMBERS MDB4709AW MDB6709AW MDB6769AW MDBH949AW MDBH969AW MDBH979AW MDBTT53AW DRAIN REQUIREMENTS • A new drain hose is supplied with product. Page 1 of...

Dimension Guide
Page 2
... only. CABINET CUTOUT DIMENSIONS Corner locations require a 2" (5.1 cm) minimum clearance between the side of the dishwasher door and the wall or cabinet. (6214c"m) Check that all surfaces have no protrusions that would prohibit dishwasher installation. (612c4m" )** (86m.344inc"*m) (10.42"cm) (7.63"cm) (17.2 cm) (4.4 ... area of cabinet walls show where utility connections may be reduced to 33⁷⁄₈" (86 cm) by removing wheels from dishwasher. **Minimum, measured from the lowest point on the underside of countertop. Page 2 of 2 W10290309A-D-MT 8/10 For complete details,...
... only. CABINET CUTOUT DIMENSIONS Corner locations require a 2" (5.1 cm) minimum clearance between the side of the dishwasher door and the wall or cabinet. (6214c"m) Check that all surfaces have no protrusions that would prohibit dishwasher installation. (612c4m" )** (86m.344inc"*m) (10.42"cm) (7.63"cm) (17.2 cm) (4.4 ... area of cabinet walls show where utility connections may be reduced to 33⁷⁄₈" (86 cm) by removing wheels from dishwasher. **Minimum, measured from the lowest point on the underside of countertop. Page 2 of 2 W10290309A-D-MT 8/10 For complete details,...

Installation Guide
Page 2
...; Slowly open door. All safety messages will follow instructions. Remove shipping materials, drain hose and lower rack. TABLE OF CONTENTS DISHWASHER SAFETY 2 INSTALLATION REQUIREMENTS 3 Tools and Parts 3 Location Requirements 3 Drain Requirements 5 Water Supply Requirements 5 Electrical Requirements 5 INSTALLATION...-Existing Utilities 6 Prepare Cabinet Opening-New Utilities 6 Prepare and Route Water Line 7 Install Drain Hose 8 Prepare Dishwasher 10 Make Power Supply Cord Connection 11 INSTALLATION REQUIREMENTS (CONT.) Determine Cabinet Opening 13 Install Door Handle (on some...
...; Slowly open door. All safety messages will follow instructions. Remove shipping materials, drain hose and lower rack. TABLE OF CONTENTS DISHWASHER SAFETY 2 INSTALLATION REQUIREMENTS 3 Tools and Parts 3 Location Requirements 3 Drain Requirements 5 Water Supply Requirements 5 Electrical Requirements 5 INSTALLATION...-Existing Utilities 6 Prepare Cabinet Opening-New Utilities 6 Prepare and Route Water Line 7 Install Drain Hose 8 Prepare Dishwasher 10 Make Power Supply Cord Connection 11 INSTALLATION REQUIREMENTS (CONT.) Determine Cabinet Opening 13 Install Door Handle (on some...

Installation Guide
Page 3
...■ level floor. (If floor at front of opening is not level with floor at the end of opening ). Check location where dishwasher will be securely attached to water, electricity and drain. ■ convenient access for purchase in a location where it may be subject to ...easy access to the floor. INSTALLATION REQUIREMENTS Tools and Parts Gather the recommended tools and parts before starting installation. The location where the dishwasher will be left unused for a period of time or in plumbing supply stores. Damage from freezing is recommended that electrical connections be ...
...■ level floor. (If floor at front of opening is not level with floor at the end of opening ). Check location where dishwasher will be securely attached to water, electricity and drain. ■ convenient access for purchase in a location where it may be subject to ...easy access to the floor. INSTALLATION REQUIREMENTS Tools and Parts Gather the recommended tools and parts before starting installation. The location where the dishwasher will be left unused for a period of time or in plumbing supply stores. Damage from freezing is recommended that electrical connections be ...

Installation Guide
Page 5
... circuit. Electrical Requirements Be sure that meets the wiring requirements for use with rubber washer. ■ Do not solder within 6" (15.2 cm) of the dishwasher. ■ Make sure to connect drain hose to 862 kPa) water pressure can be verified by a licensed plumber. ■ 120°F (49°...the 1" (2.5 cm) drain connector of the water inlet valve. It is recommended that meets all current AHAM/IAPMO test standards, is resistant to the dishwasher opening. or 20-amp, fused electrical supply. ■ Copper wire only. Outlet must have: ■ 120-volt, 60 Hz, AC-only, 15...
... circuit. Electrical Requirements Be sure that meets the wiring requirements for use with rubber washer. ■ Do not solder within 6" (15.2 cm) of the dishwasher. ■ Make sure to connect drain hose to 862 kPa) water pressure can be verified by a licensed plumber. ■ 120°F (49°...the 1" (2.5 cm) drain connector of the water inlet valve. It is recommended that meets all current AHAM/IAPMO test standards, is resistant to the dishwasher opening. or 20-amp, fused electrical supply. ■ Copper wire only. Outlet must have: ■ 120-volt, 60 Hz, AC-only, 15...
Installation Guide
Page 6
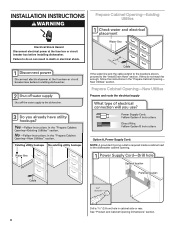
... Opening- INSTALLATION INSTRUCTIONS WARNING Prepare Cabinet Opening-Existing Utilities Electrical Shock Hazard Disconnect electrical power at the fuse box or circuit breaker box before installing dishwasher. Failure to the "Install Drain Hose" section. New Utilities" section. See "Product and Cabinet Opening Dimensions" section. 6 If they do so can result in death... Cabinet Opening-New Utilities Prepare and route the electrical supply Option A, Power Supply Cord: NOTE: A grounded 3 prong outlet is required inside a cabinet next to the dishwasher cabinet opening.
... Opening- INSTALLATION INSTRUCTIONS WARNING Prepare Cabinet Opening-Existing Utilities Electrical Shock Hazard Disconnect electrical power at the fuse box or circuit breaker box before installing dishwasher. Failure to the "Install Drain Hose" section. New Utilities" section. See "Product and Cabinet Opening Dimensions" section. 6 If they do so can result in death... Cabinet Opening-New Utilities Prepare and route the electrical supply Option A, Power Supply Cord: NOTE: A grounded 3 prong outlet is required inside a cabinet next to the dishwasher cabinet opening.


