
User Instructions
Page 1
... derecho o izquierdo del interior de la lavavajillas. Table of Contents DISHWASHER SAFETY 1 QUICK STEPS 3 DISHWASHER USE 3 CYCLE AND OPTION DESCRIPTIONS 5 DISHWASHER FEATURES 7 DISHWASHER CARE 9 TROUBLESHOOTING 9 WARRANTY 12 Your safety and the safety of the dishwasher interior. This is , tell you how to potential hazards that .... All safety messages will follow instructions. In Canada, visit our website at www.maytag.ca or call us at www.maytag.com for purchasing this manual and on your model and serial number located near the door on the right-hand or left-hand side...
... derecho o izquierdo del interior de la lavavajillas. Table of Contents DISHWASHER SAFETY 1 QUICK STEPS 3 DISHWASHER USE 3 CYCLE AND OPTION DESCRIPTIONS 5 DISHWASHER FEATURES 7 DISHWASHER CARE 9 TROUBLESHOOTING 9 WARRANTY 12 Your safety and the safety of the dishwasher interior. This is , tell you how to potential hazards that .... All safety messages will follow instructions. In Canada, visit our website at www.maytag.ca or call us at www.maytag.com for purchasing this manual and on your model and serial number located near the door on the right-hand or left-hand side...
User Instructions
Page 4
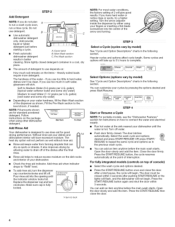
.... Some cycles and options will give good results. Add Rinse Aid J I s°ftwater MainWash Pre-Wash NOTE: For portable models, see the "Dishwasher Features" section for good drying performance. Turn off . The door latches automatically. Close the door firmly. and interior of interruption....water conditions, the factory setting of the dishes after pushing START/RESUME or the lights will flash, and the dishwasher will begin . STEP3 Select a Cycle (cycles vary by model) See "Cycle and Option Descriptions" charts in a cool, dry place. • The amount of detergent to...
.... Some cycles and options will give good results. Add Rinse Aid J I s°ftwater MainWash Pre-Wash NOTE: For portable models, see the "Dishwasher Features" section for good drying performance. Turn off . The door latches automatically. Close the door firmly. and interior of interruption....water conditions, the factory setting of the dishes after pushing START/RESUME or the lights will flash, and the dishwasher will begin . STEP3 Select a Cycle (cycles vary by model) See "Cycle and Option Descriptions" charts in a cool, dry place. • The amount of detergent to...
User Instructions
Page 5
i
i
User Instructions
Page 7
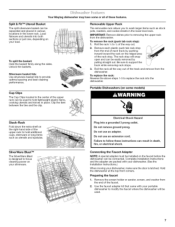
... Shock Hazard Plug into both sections or just one, depending on the ridged area of the rack stop from the dishwasher. Your Maytag dishwasher may have some models) Stack-Rack Fold down the extra shelf on the right-hand side of the upper rack to hold lightweight plastic ... prior to provide optimal spacing and best cleaning performance. The rack stop ): 1. Complete Installation Instructions and the adapter are packed with your dishwasher, make sure the door is designed to follow these features. Connecting the Faucet Adapter NOTE: A special adapter must be installed on your load...
... Shock Hazard Plug into both sections or just one, depending on the ridged area of the rack stop from the dishwasher. Your Maytag dishwasher may have some models) Stack-Rack Fold down the extra shelf on the right-hand side of the upper rack to hold lightweight plastic ... prior to provide optimal spacing and best cleaning performance. The rack stop ): 1. Complete Installation Instructions and the adapter are packed with your dishwasher, make sure the door is designed to follow these features. Connecting the Faucet Adapter NOTE: A special adapter must be installed on your load...
User Instructions
Page 9
... door within 3 seconds. In the U.S.A., www.maytag.com In Canada, www.maytag.ca PROBLEM SOLUTION DISHWASHER DOES NOT RUN DETERGENT REMAINS IN THE DISPENSER OR TABLET IS ON BOTTOM OFTUB CYCLE RUNS TOO LONG DISHWASHER NOT DRYING WILL NOT FILL NOTE: It is ... Wash cycle. NOTE: Plastic and items with concave bottoms hold water. dishwashdeertergeannt dwateor ruseliquiddishwashdeertergent onadampspongteo cleanthecooled-dowinnterior. For fully integrated models (controls on the more slanted side of the High Temp Wash option will need to collect water droplets. Proper loading of...
... door within 3 seconds. In the U.S.A., www.maytag.com In Canada, www.maytag.ca PROBLEM SOLUTION DISHWASHER DOES NOT RUN DETERGENT REMAINS IN THE DISPENSER OR TABLET IS ON BOTTOM OFTUB CYCLE RUNS TOO LONG DISHWASHER NOT DRYING WILL NOT FILL NOTE: It is ... Wash cycle. NOTE: Plastic and items with concave bottoms hold water. dishwashdeertergeannt dwateor ruseliquiddishwashdeertergent onadampspongteo cleanthecooled-dowinnterior. For fully integrated models (controls on the more slanted side of the High Temp Wash option will need to collect water droplets. Proper loading of...
User Instructions
Page 12
... plumbing codes, or use of consumables or cleaning products not approved by an authorized Maytag servicer is not available. 10. If you on the right-hand or left-hand side of the dishwasher interior. W10240116A SP PN W10240117A © 2009. Outside the 50 United States and... Canada, this warranty. 8. Consumable parts are excluded from the date of purchase. 6. Repairs when your complete model number ready. In Canada: Maytag Brand Home Appliances Customer eXperience ...
... plumbing codes, or use of consumables or cleaning products not approved by an authorized Maytag servicer is not available. 10. If you on the right-hand or left-hand side of the dishwasher interior. W10240116A SP PN W10240117A © 2009. Outside the 50 United States and... Canada, this warranty. 8. Consumable parts are excluded from the date of purchase. 6. Repairs when your complete model number ready. In Canada: Maytag Brand Home Appliances Customer eXperience ...
Installation Instructions
Page 4
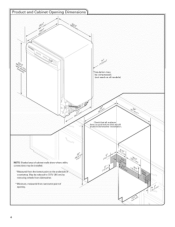
May be compressed. _not used on the underside O| countertop. *Insulation may be installed. *Measured from narrowest point of cabinet walls show where utility connections may be reduced to 33zA '' (86 cm) by removing wheels from dishwasher. **Minimum, measured from the lowest point on all models} Check that all surfaces have no protrusions that w,ould prohibit dishwasher installation. NOTE: Shaded area of opening. 4
May be compressed. _not used on the underside O| countertop. *Insulation may be installed. *Measured from narrowest point of cabinet walls show where utility connections may be reduced to 33zA '' (86 cm) by removing wheels from dishwasher. **Minimum, measured from the lowest point on all models} Check that all surfaces have no protrusions that w,ould prohibit dishwasher installation. NOTE: Shaded area of opening. 4
Installation Instructions
Page 20
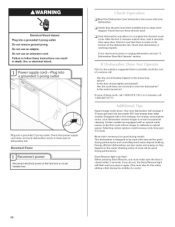
... cleaning. If not, disconnect power or unplug dishwasher and see that power supply cord does not touch dishwasher motor or lower part of a service call 1-8OO-807-6777. Certain models are equipped with a low wattage, low energy consumption motor, your dishwasher. [_1 Check that you have been installed ...Do not remove ground prong• Do not use an adapter• Do not use nearly 40% less energy than older models. Reconnect Power [_1 Read the Dishwasher User Instructions that came with rinse aid for good drying performance. After the first 2 minutes unlatch door, wait 5 seconds, ...
... cleaning. If not, disconnect power or unplug dishwasher and see that power supply cord does not touch dishwasher motor or lower part of a service call 1-8OO-807-6777. Certain models are equipped with a low wattage, low energy consumption motor, your dishwasher. [_1 Check that you have been installed ...Do not remove ground prong• Do not use an adapter• Do not use nearly 40% less energy than older models. Reconnect Power [_1 Read the Dishwasher User Instructions that came with rinse aid for good drying performance. After the first 2 minutes unlatch door, wait 5 seconds, ...

