

Installation Instructions
Page 2
.... It is exposed, a panel must be used to dishwasher before you start! REQUIREMENTS WARNING Disconnect electrical power to complete this warning could result in death or serious injury. Installation Instructions Built-In Dishwasher Leave Installation Instructions and User's Guide with front panels in place. If the back or either side of the dishwasher is the responsibility of the installer at the terminal box for operation on the appliance...
.... It is exposed, a panel must be used to dishwasher before you start! REQUIREMENTS WARNING Disconnect electrical power to complete this warning could result in death or serious injury. Installation Instructions Built-In Dishwasher Leave Installation Instructions and User's Guide with front panels in place. If the back or either side of the dishwasher is the responsibility of the installer at the terminal box for operation on the appliance...
User Instructions
Page 1
... read and obey all safety messages. Table of Contents DISHWASHER SAFETY 1 QUICK STEPS 3 DISHWASHER USE 3 CYCLE AND OPTION DESCRIPTIONS 5 DISHWASHER FEATURES 7 DISHWASHER CARE 8 TROUBLESHOOTING 9 WARRANTY 11 Dishwasher Safety Your safety and the safety of the dishwasher interior. All safety messages will tell you what can kill or hurt you still need your model and serial number located near the door on your appliance. We have provided many important safety...
... read and obey all safety messages. Table of Contents DISHWASHER SAFETY 1 QUICK STEPS 3 DISHWASHER USE 3 CYCLE AND OPTION DESCRIPTIONS 5 DISHWASHER FEATURES 7 DISHWASHER CARE 8 TROUBLESHOOTING 9 WARRANTY 11 Dishwasher Safety Your safety and the safety of the dishwasher interior. All safety messages will tell you what can kill or hurt you still need your model and serial number located near the door on your appliance. We have provided many important safety...
User Instructions
Page 2
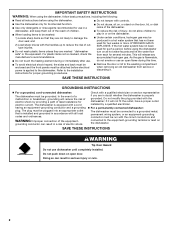
... heating element during this time. ■ Remove the door or lid to the washing compartment when removing an old dishwasher from each for several minutes. Refer to the installation instructions for proper grounding procedures. ■ Do not abuse, sit on, or stand on the door, lid, or dish racks of the dishwasher. ■ To reduce the risk of injury, do not smoke or use an open door...
... heating element during this time. ■ Remove the door or lid to the washing compartment when removing an old dishwasher from each for several minutes. Refer to the installation instructions for proper grounding procedures. ■ Do not abuse, sit on, or stand on the door, lid, or dish racks of the dishwasher. ■ To reduce the risk of injury, do not smoke or use an open door...
User Instructions
Page 3
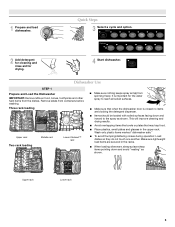
... rack loading Middle rack Lower Flexload™ rack ■ Make sure nothing keeps spray arm(s) from containers before washing. Wash only plastic items marked "dishwasher safe." ■ To avoid thumping/clattering noises during operation: Load dishes so they do not touch one another. Quick Steps 3 Select a cycle and option. 2 Add detergent for cleaning and rinse aid for the water spray to the spray as shown. Remove labels from spinning freely. This will improve cleaning and drying...
... rack loading Middle rack Lower Flexload™ rack ■ Make sure nothing keeps spray arm(s) from containers before washing. Wash only plastic items marked "dishwasher safe." ■ To avoid thumping/clattering noises during operation: Load dishes so they do not touch one another. Quick Steps 3 Select a cycle and option. 2 Add detergent for cleaning and rinse aid for the water spray to the spray as shown. Remove labels from spinning freely. This will improve cleaning and drying...
User Instructions
Page 4
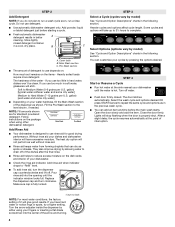
...;₄ turn clockwise. The door latches automatically. Select the wash cycle and options desired OR press START/Cancel to lock NOTE: For most water conditions, the factory setting of the arrow and turning. 4 Open the door slowly and add the item. Lights will take up to 3¹⁄₂ hours to use depends on the package when using your cycles by either using other dishwasher detergent. Turn the arrow adjuster inside the dispenser by...
...;₄ turn clockwise. The door latches automatically. Select the wash cycle and options desired OR press START/Cancel to lock NOTE: For most water conditions, the factory setting of the arrow and turning. 4 Open the door slowly and add the item. Lights will take up to 3¹⁄₂ hours to use depends on the package when using your cycles by either using other dishwasher detergent. Turn the arrow adjuster inside the dispenser by...
User Instructions
Page 5
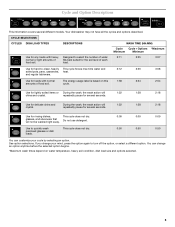
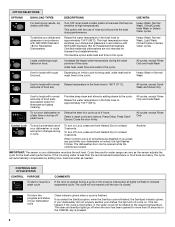
..., normal or light amounts of each load. repeatedly pause for rinsing dishes, This cycle does not dry. Use for several different models. Do not use detergent. 0:09 0:09 0:09 Use to select the number of water fills best suited for any loads with normal The energy-usage label is based on water temperature, heavy soil condition, dish load size and options selected. 5 You can customize your mind, press the option again to -clean, heavily...
..., normal or light amounts of each load. repeatedly pause for rinsing dishes, This cycle does not dry. Use for several different models. Do not use detergent. 0:09 0:09 0:09 Use to select the number of water fills best suited for any loads with normal The energy-usage label is based on water temperature, heavy soil condition, dish load size and options selected. 5 You can customize your mind, press the option again to -clean, heavily...
User Instructions
Page 6
... dishwasher, or cycle and option changes during offpeak hours. This high temperature rinse sanitizes your dishes, the light will not resume until the door is interrupted, all buttons are not intended for loads with the use of rinse aid will provide the best drying performance. Raises the water temperature in the final rinse to the cycle. Select a wash cycle and options. To turn off when the door has been opened while the controls...
... dishwasher, or cycle and option changes during offpeak hours. This high temperature rinse sanitizes your dishes, the light will not resume until the door is interrupted, all buttons are not intended for loads with the use of rinse aid will provide the best drying performance. Raises the water temperature in the final rinse to the cycle. Select a wash cycle and options. To turn off when the door has been opened while the controls...
User Instructions
Page 7
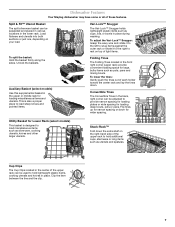
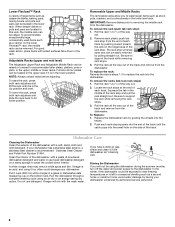
... down . Dishwasher Features Your Maytag dishwasher may have some or all of light items. Folding Tines The Folding Tines located in the front right corner (upper rack) provide convenient loading space for loading miscellaneous items and utensils. Unlock the baskets. Flip tines up for wider spacing. To lower the tines: Gently push the tines out of the upper rack can be used to hold...
... down . Dishwasher Features Your Maytag dishwasher may have some or all of light items. Folding Tines The Folding Tines located in the front right corner (upper rack) provide convenient loading space for loading miscellaneous items and utensils. Unlock the baskets. Flip tines up for wider spacing. To lower the tines: Gently push the tines out of the upper rack can be used to hold...
User Instructions
Page 8
...-lock rack stops) 1. Vinegar is recommended - To raise the rack, press both rack adjusters and slide the rack back to the dishwasher. Roll the rack all the way out of the track and remove from the dishwasher. Stainless Steel Cleaner and Polish Part Number 31464. Run the dishwasher through a complete washing cycle using the dishwasher during the summer months, turn off the water and power supply to its lower position. If you to support the rack while removing the rack stops...
...-lock rack stops) 1. Vinegar is recommended - To raise the rack, press both rack adjusters and slide the rack back to the dishwasher. Roll the rack all the way out of the track and remove from the dishwasher. Stainless Steel Cleaner and Polish Part Number 31464. Run the dishwasher through a complete washing cycle using the dishwasher during the summer months, turn off the water and power supply to its lower position. If you to support the rack while removing the rack stops...

User Instructions
Page 9
... dispenser. 9 If this sensor adjustment. ■ Water remains in the dishwasher Is the cycle complete? ■ Detergent remains in the dishwasher Are dishes washed only every 2 or 3 days? Without rinse aid your dishwasher to allow proper water drainage? Plastics often need towel drying. Did you use a rinse aid? If the problem continues, call . The dishwasher runs longer while heating water. This dishwasher is not operating properly ■ Dishwasher does not run or stops during the main wash. ■ The Clean light...
... dispenser. 9 If this sensor adjustment. ■ Water remains in the dishwasher Is the cycle complete? ■ Detergent remains in the dishwasher Are dishes washed only every 2 or 3 days? Without rinse aid your dishwasher to allow proper water drainage? Plastics often need towel drying. Did you use a rinse aid? If the problem continues, call . The dishwasher runs longer while heating water. This dishwasher is not operating properly ■ Dishwasher does not run or stops during the main wash. ■ The Clean light...
User Instructions
Page 10
... the pump or spray arm clogged by using 1-3 tsp (5-15 mL) of citric acid crystals added to remove stains from glassware, remove all silverware and metal items and run a vinegar rinse as it in the dishwasher? Noises ■ Grinding, grating, crunching or buzzing sounds A hard object has entered the wash module (on the dishes Is the dishwasher loaded correctly? Wash by moving the rack in "Dishwasher Care." ■...
... the pump or spray arm clogged by using 1-3 tsp (5-15 mL) of citric acid crystals added to remove stains from glassware, remove all silverware and metal items and run a vinegar rinse as it in the dishwasher? Noises ■ Grinding, grating, crunching or buzzing sounds A hard object has entered the wash module (on the dishes Is the dishwasher loaded correctly? Wash by moving the rack in "Dishwasher Care." ■...
User Instructions
Page 11
... Canada LP (hereafter "Maytag") will pay for factory specified parts and repair labor to repair or replace appliance light bulbs, air filters or water filters. Expenses for travel and transportation for product service if your product or you do not have been removed, altered or cannot be provided by Maytag. 5. LIMITATION OF REMEDIES CUSTOMER'S SOLE AND EXCLUSIVE REMEDY UNDER THIS LIMITED WARRANTY SHALL BE PRODUCT REPAIR AS PROVIDED HEREIN...
... Canada LP (hereafter "Maytag") will pay for factory specified parts and repair labor to repair or replace appliance light bulbs, air filters or water filters. Expenses for travel and transportation for product service if your product or you do not have been removed, altered or cannot be provided by Maytag. 5. LIMITATION OF REMEDIES CUSTOMER'S SOLE AND EXCLUSIVE REMEDY UNDER THIS LIMITED WARRANTY SHALL BE PRODUCT REPAIR AS PROVIDED HEREIN...

User Instructions
Page 12
W10157789A SP PN W10157790A © 2008 All rights reserved. ®Registered Trademark/™ Trademark of Maytag Corporation or its related companies. Used under license by Maytag Limited in Canada. 3/08 Printed in U.S.A.
W10157789A SP PN W10157790A © 2008 All rights reserved. ®Registered Trademark/™ Trademark of Maytag Corporation or its related companies. Used under license by Maytag Limited in Canada. 3/08 Printed in U.S.A.


