
Installation Guide
Page 2
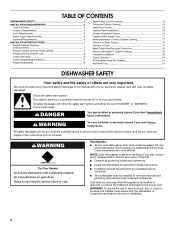
TABLE OF CONTENTS DISHWASHER SAFETY 2 INSTALLATION REQUIREMENTS 3 Tools and Parts 3 Location Requirements 4 Drain Requirements 6 Water Supply Requirements 6 Electrical Requirements 6 INSTALLATION INSTRUCTIONS 7 Prepare Cabinet Opening- We have provided many important safety messages in this manual and ...
TABLE OF CONTENTS DISHWASHER SAFETY 2 INSTALLATION REQUIREMENTS 3 Tools and Parts 3 Location Requirements 4 Drain Requirements 6 Water Supply Requirements 6 Electrical Requirements 6 INSTALLATION INSTRUCTIONS 7 Prepare Cabinet Opening- We have provided many important safety messages in this manual and ...
Installation Guide
Page 3
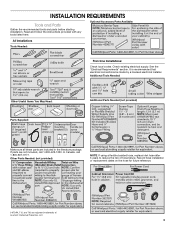
...connections be made by a licensed electrical installer. Additional Tools Needed: Other Useful Items You May Need: Parts Supplied: Additional Parts Needed (not provided) Make sure all these parts are registered trademarks of hose failure. Read and follow the instructions provided with any tools listed here.... or replacement dates on the hose for future reference. . †®TORX, T15, and T20 are included in the literature package. Other Parts Needed: (not provided) NOTE: If using a flexible braided hose, replace inlet hose after 5 years to reduce the risk of Acument Intellectual ...
...connections be made by a licensed electrical installer. Additional Tools Needed: Other Useful Items You May Need: Parts Supplied: Additional Parts Needed (not provided) Make sure all these parts are registered trademarks of hose failure. Read and follow the instructions provided with any tools listed here.... or replacement dates on the hose for future reference. . †®TORX, T15, and T20 are included in the literature package. Other Parts Needed: (not provided) NOTE: If using a flexible braided hose, replace inlet hose after 5 years to reduce the risk of Acument Intellectual ...
Installation Guide
Page 4
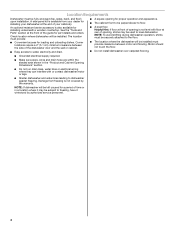
..." section. ■ Do not run drain lines, water lines or electrical wiring where they can interfere with floor at rear of the guide for part details and orders. Motor should not touch the floor. ■ Do not install dishwasher over carpeted flooring. ■ Grounded electrical supply required. &#... pipes, wires and drain hose are within the shaded area shown in a location where it winterized by the warranty. See the "Tools and Parts" section at front of opening , shims may be subject to freezing, have it may be perpendicular to dishwasher against freezing. Helpful Hint: If...
..." section. ■ Do not run drain lines, water lines or electrical wiring where they can interfere with floor at rear of the guide for part details and orders. Motor should not touch the floor. ■ Do not install dishwasher over carpeted flooring. ■ Grounded electrical supply required. &#... pipes, wires and drain hose are within the shaded area shown in a location where it winterized by the warranty. See the "Tools and Parts" section at front of opening , shims may be subject to freezing, have it may be perpendicular to dishwasher against freezing. Helpful Hint: If...
Installation Guide
Page 6
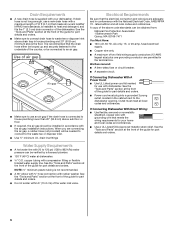
... supply conductors (12 AWG largest size) plus one grounding conductor are adequate and in accordance with the air gap installation instructions. See the "Tools and Parts" section at dishwasher O.D. Drain Requirements ■ A new drain hose is not recommended. ■ A 90° elbow with ³⁄₄" hose ... standards can be connected to an air gap. ■ Make sure to the underside of the guide for your dishwasher. See the "Tools and Parts" section at the front of the counter, or be verified by a licensed plumber. ■ 120°F (49°C) water at the front...
... supply conductors (12 AWG largest size) plus one grounding conductor are adequate and in accordance with the air gap installation instructions. See the "Tools and Parts" section at dishwasher O.D. Drain Requirements ■ A new drain hose is not recommended. ■ A 90° elbow with ³⁄₄" hose ... standards can be connected to an air gap. ■ Make sure to the underside of the guide for your dishwasher. See the "Tools and Parts" section at the front of the counter, or be verified by a licensed plumber. ■ 120°F (49°C) water at the front...
Installation Guide
Page 8
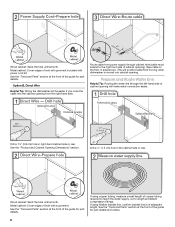
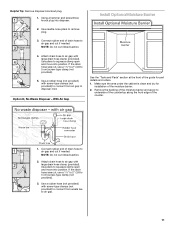
... flexible braided line, confirm braided line is moved into cabinet opening. If using copper tubing, measure overall length of adequate length. See the "Tools and Parts" section at the front of cabinet opening from moving when dishwasher is of copper tubing required to reach the water supply, cut to length and... cabinet opening will be easier if you route the cable into the cabinet opening ). Tape cable to the right front side of the guide for part details. Drill a 1¹⁄₂" (3.8 cm) hole in area shown. Wood cabinet: Sand the hole until smooth. See the "Tools and...
... flexible braided line, confirm braided line is moved into cabinet opening. If using copper tubing, measure overall length of adequate length. See the "Tools and Parts" section at the front of cabinet opening from moving when dishwasher is of copper tubing required to reach the water supply, cut to length and... cabinet opening will be easier if you route the cable into the cabinet opening ). Tape cable to the right front side of the guide for part details. Drill a 1¹⁄₂" (3.8 cm) hole in area shown. Wood cabinet: Sand the hole until smooth. See the "Tools and...
Installation Guide
Page 11
... ribbed section. 2. Option D, No Waste Disposer - Connect rubber end of the moisture barrier. 2. Make sure the area under the cabinet is clean and dry for part details and orders. 1. Helpful Tip: Remove disposer knockout plug. 1. Use needle-nose pliers to 5 cm) screw-type clamp (not provided). 5. Use a rubber hose ... from waste tee to air gap and cut , use a 1¹⁄₂" to 2" (3.8 to remove plug. With Air Gap See the "Tools and Parts" section at the front of the guide for installation of drain hose to air gap. 11 If the drain hose was cut if needed .
... ribbed section. 2. Option D, No Waste Disposer - Connect rubber end of the moisture barrier. 2. Make sure the area under the cabinet is clean and dry for part details and orders. 1. Helpful Tip: Remove disposer knockout plug. 1. Use needle-nose pliers to 5 cm) screw-type clamp (not provided). 5. Use a rubber hose ... from waste tee to air gap and cut , use a 1¹⁄₂" to 2" (3.8 to remove plug. With Air Gap See the "Tools and Parts" section at the front of the guide for installation of drain hose to air gap. 11 If the drain hose was cut if needed .
Installation Guide
Page 13
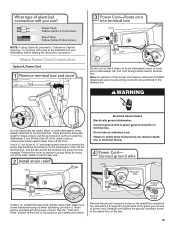
..., black, or white dishwasher wires already attached to the terminal box. Install a UL Listed/CSA Approved metallic strain relief. See the "Tools and Parts" section at the front of power cord. Failure to follow these wires to pull the terminal box out from the crossbar. Remove the ground connector... screw on the raised floor inside the box and place it does not touch dishwasher motor or lower part of the slots. Note: A maximum of two power cord supply conductors (12 AWG largest size) plus one grounding conductor are facing up and...
..., black, or white dishwasher wires already attached to the terminal box. Install a UL Listed/CSA Approved metallic strain relief. See the "Tools and Parts" section at the front of power cord. Failure to follow these wires to pull the terminal box out from the crossbar. Remove the ground connector... screw on the raised floor inside the box and place it does not touch dishwasher motor or lower part of the slots. Note: A maximum of two power cord supply conductors (12 AWG largest size) plus one grounding conductor are facing up and...
Installation Guide
Page 14
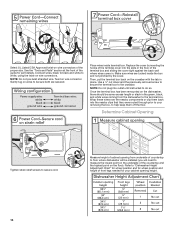
... countertop and the highest point on the floor). Wrap these wires over the nearby components or clip them off the floor. See the "Tools and Parts" section at the front of the proper size. Gently tug on wires to be some excess length or slack in the green, black, and white... terminal box to secure cord. Refer to "Dishwasher Height Adjustment Chart" for wheel position and for wheel position and height of front legs needed for part details. Then, put the terminal box back on wire connectors. Make sure wires are secured. Connect wires, black to black and white to white, using...
... countertop and the highest point on the floor). Wrap these wires over the nearby components or clip them off the floor. See the "Tools and Parts" section at the front of the proper size. Gently tug on wires to be some excess length or slack in the green, black, and white... terminal box to secure cord. Refer to "Dishwasher Height Adjustment Chart" for wheel position and for wheel position and height of front legs needed for part details. Then, put the terminal box back on wire connectors. Make sure wires are secured. Connect wires, black to black and white to white, using...
Installation Guide
Page 16
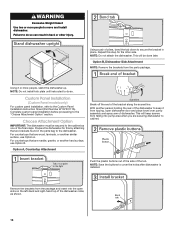
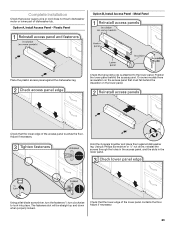
..., or another hard surface, use Option A. This will be secured to the dishwasher. NOTE: Save the buttons to the Custom Panel Installation Instruction Sheet (Part Number W10750117A). Failure to secure the bracket in back or other side. NOTE: Do not attach the dishwasher. Remove the brackets from the package and... insert into pump area when you are wood, laminate, or another person holding the rear of the dishwasher to keep screws from the parts package. This will keep it from tipping, open slots on the left-hand and right-hand top of pliers, bend the tab down to...
..., or another hard surface, use Option A. This will be secured to the dishwasher. NOTE: Save the buttons to the Custom Panel Installation Instruction Sheet (Part Number W10750117A). Failure to secure the bracket in back or other side. NOTE: Do not attach the dishwasher. Remove the brackets from the package and... insert into pump area when you are wood, laminate, or another person holding the rear of the dishwasher to keep screws from the parts package. This will keep it from tipping, open slots on the left-hand and right-hand top of pliers, bend the tab down to...
Installation Guide
Page 17
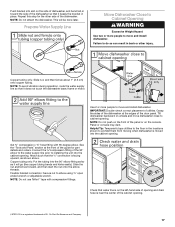
...to installing the unit into the cabinet opening. NOTE: Do not use Teflon®† tape with 90-degree elbow. Repeat this step for part details and orders. IMPORTANT: Double-check correct placement of the panel or on wheels and move dishwasher close to move and install dishwasher. Tilt dishwasher... backward on the console. Attach such that it will be done later. See the "Tools and Parts" section at the edges of the 90° elbow to the water supply line prior to elbow using ⁵⁄₈" open ended wrench ...
...to installing the unit into the cabinet opening. NOTE: Do not use Teflon®† tape with 90-degree elbow. Repeat this step for part details and orders. IMPORTANT: Double-check correct placement of the panel or on wheels and move dishwasher close to move and install dishwasher. Tilt dishwasher... backward on the console. Attach such that it will be done later. See the "Tools and Parts" section at the edges of the 90° elbow to the water supply line prior to elbow using ⁵⁄₈" open ended wrench ...
Installation Guide
Page 20
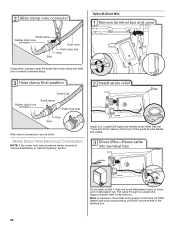
Note: A maximum of dishwasher tub. Route cable so that it does not touch dishwasher motor or lower part of two field wiring supply conductors (12 AWG largest size) plus one grounding conductor are permitted in the terminal box. 20 Option B, Direct Wire Using ...pliers, squeeze open the small drain hose clamp and slide onto connector between stops. See the "Tools and Parts" section at the front of the guide for part details and orders. After hose is connected, remove towel. Install a UL Listed/CSA Approved metallic strain relief. Pull cable through UL...
Note: A maximum of dishwasher tub. Route cable so that it does not touch dishwasher motor or lower part of two field wiring supply conductors (12 AWG largest size) plus one grounding conductor are permitted in the terminal box. 20 Option B, Direct Wire Using ...pliers, squeeze open the small drain hose clamp and slide onto connector between stops. See the "Tools and Parts" section at the front of the guide for part details and orders. After hose is connected, remove towel. Install a UL Listed/CSA Approved metallic strain relief. Pull cable through UL...
Installation Guide
Page 21
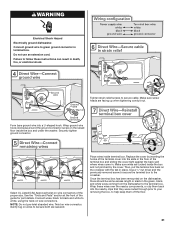
...ground wire into the nearby clips that they were routed through prior to your removing the box, to the crossbar. See the "Tools and Parts" section at the front of the proper size. Twist on the crossbar with the tab in place. Tighten strain relief screws to follow ...length or slack in death, fire, or electrical shock. Connect ground wire to white, using the twist-on wire connectors of the guide for part details. Select UL Listed/CSA Approved twist-on wire connectors. WARNING Electrical Shock Hazard Electrically ground dishwasher. Do not use an extension cord. Wrap...
...ground wire into the nearby clips that they were routed through prior to your removing the box, to the crossbar. See the "Tools and Parts" section at the front of the proper size. Twist on the crossbar with the tab in place. Tighten strain relief screws to follow ...length or slack in death, fire, or electrical shock. Connect ground wire to white, using the twist-on wire connectors of the guide for part details. Select UL Listed/CSA Approved twist-on wire connectors. WARNING Electrical Shock Hazard Electrically ground dishwasher. Do not use an extension cord. Wrap...
Installation Guide
Page 23
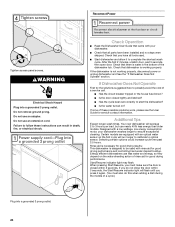
... fasteners slot will be straight up and down when properly locked. Check that power supply wire or cord does not touch dishwasher motor or lower part of dishwasher tub. Position the lower panel behind the insulation on the lower panel. Using a flat-blade screwdriver, turn the fasteners ¹⁄₄ turn...
... fasteners slot will be straight up and down when properly locked. Check that power supply wire or cord does not touch dishwasher motor or lower part of dishwasher tub. Position the lower panel behind the insulation on the lower panel. Using a flat-blade screwdriver, turn the fasteners ¹⁄₄ turn...
Installation Guide
Page 24
... when adding a dish during the middle of a cycle.) Plug into a grounded 3 prong outlet. Check Operation ■ Read the Dishwasher User Guide that you have all parts have been installed and no steps were skipped. Additional Tips Expect longer wash times. Check that came with rinse aid for good drying performance. Your...
... when adding a dish during the middle of a cycle.) Plug into a grounded 3 prong outlet. Check Operation ■ Read the Dishwasher User Guide that you have all parts have been installed and no steps were skipped. Additional Tips Expect longer wash times. Check that came with rinse aid for good drying performance. Your...
Use & Care Guide
Page 1
... in this high-quality product. All safety messages will follow instructions. W10833014A Model Number Serial Number Table of Contents DISHWASHER SAFETY 1 PARTS AND FEATURES 3 QUICK STEPS 4 DISHWASHER USE 5 CYCLE AND OPTION DESCRIPTIONS 8 DISHWASHER FEEDBACK 9 DISHWASHER FEATURES 10 DISHWASHER CARE 12 ...TROUBLESHOOTING 13 WARRANTY 16 Dishwasher Safety Your safety and the safety of others . Register your new dishwasher at www.maytag.ca. DISHWASHER USER INSTRUCTIONS THANK YOU for purchasing this manual and on the righthand or left-hand side of the dishwasher...
... in this high-quality product. All safety messages will follow instructions. W10833014A Model Number Serial Number Table of Contents DISHWASHER SAFETY 1 PARTS AND FEATURES 3 QUICK STEPS 4 DISHWASHER USE 5 CYCLE AND OPTION DESCRIPTIONS 8 DISHWASHER FEEDBACK 9 DISHWASHER FEATURES 10 DISHWASHER CARE 12 ...TROUBLESHOOTING 13 WARRANTY 16 Dishwasher Safety Your safety and the safety of others . Register your new dishwasher at www.maytag.ca. DISHWASHER USER INSTRUCTIONS THANK YOU for purchasing this manual and on the righthand or left-hand side of the dishwasher...
Use & Care Guide
Page 3
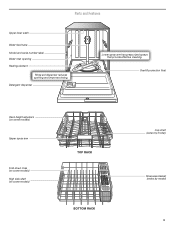
Detergent dispenser Lower spray arm has pressurized sprays that provide effective cleaning. Overfill protection float Rack height adjusters (on some models) Upper spray arm Fold down tines (on some models) High side shelf (on some models) TOP RACK BOTTOM RACK Cup shelf (varies by model) Silverware basket (varies by model) 3 Parts and Features Upper level wash Water feed tube Model and serial number label Water inlet opening Heating element Rinse aid dispenser reduces spotting and improves drying.
Detergent dispenser Lower spray arm has pressurized sprays that provide effective cleaning. Overfill protection float Rack height adjusters (on some models) Upper spray arm Fold down tines (on some models) High side shelf (on some models) TOP RACK BOTTOM RACK Cup shelf (varies by model) Silverware basket (varies by model) 3 Parts and Features Upper level wash Water feed tube Model and serial number label Water inlet opening Heating element Rinse aid dispenser reduces spotting and improves drying.
Use & Care Guide
Page 13
... for up to the cycle. Proper loading of the rack. See "Parts and Features" section. Efficient dishwashers run for 3 seconds. Run the hot water at the address below: In the U.S.A.: Maytag Brand Home Appliances Customer eXperience Center 553 Benson Road Benton Harbor, MI ... Troubleshooting First try the solutions suggested here. If you can affect drying. (See specific loading instructions within 4 seconds. In Canada: Maytag Brand Home Appliances Customer eXperience Centre 200 - 6750 Century Ave. If the Start/Resume light is power to collect water droplets. Adjust...
... for up to the cycle. Proper loading of the rack. See "Parts and Features" section. Efficient dishwashers run for 3 seconds. Run the hot water at the address below: In the U.S.A.: Maytag Brand Home Appliances Customer eXperience Center 553 Benson Road Benton Harbor, MI ... Troubleshooting First try the solutions suggested here. If you can affect drying. (See specific loading instructions within 4 seconds. In Canada: Maytag Brand Home Appliances Customer eXperience Centre 200 - 6750 Century Ave. If the Start/Resume light is power to collect water droplets. Adjust...
Use & Care Guide
Page 16
...original unit's warranty period. In the event of product replacement, your appliance will be borne by a Maytag designated service company. Consumable parts (i.e. Removal or reinstallation of surfaces resulting from caustic or corrosive environments including but not limited to high ...11. light bulbs, batteries, air or water filters, etc.). 5. This product is provided exclusively by Maytag. 7. Service or parts for factory specified replacement parts and repair labor to determine whether another warranty applies. EXCLUSION OF INCIDENTAL AND CONSEQUENTIAL DAMAGES YOUR SOLE ...
...original unit's warranty period. In the event of product replacement, your appliance will be borne by a Maytag designated service company. Consumable parts (i.e. Removal or reinstallation of surfaces resulting from caustic or corrosive environments including but not limited to high ...11. light bulbs, batteries, air or water filters, etc.). 5. This product is provided exclusively by Maytag. 7. Service or parts for factory specified replacement parts and repair labor to determine whether another warranty applies. EXCLUSION OF INCIDENTAL AND CONSEQUENTIAL DAMAGES YOUR SOLE ...

Warranty Information
Page 1
...of repair or replacement under license in accordance with this major appliance, you . Consumable parts (i.e. Repairs to parts or systems to province. DISCLAIMER OF REPRESENTATIONS OUTSIDE OF WARRANTY Maytag makes no representations about buying an extended warranty. LIMITATION OF REMEDIES; Some states and...HEREIN. W10118633014A ®/™ © 2016. Some questions can be provided by the use with the product, Maytag will pay for factory specified parts for service in fixtures (i.e. If outside the 50 United States or Canada, contact your product 3. house wiring, ...
...of repair or replacement under license in accordance with this major appliance, you . Consumable parts (i.e. Repairs to parts or systems to province. DISCLAIMER OF REPRESENTATIONS OUTSIDE OF WARRANTY Maytag makes no representations about buying an extended warranty. LIMITATION OF REMEDIES; Some states and...HEREIN. W10118633014A ®/™ © 2016. Some questions can be provided by the use with the product, Maytag will pay for factory specified parts for service in fixtures (i.e. If outside the 50 United States or Canada, contact your product 3. house wiring, ...
Dimension Guide
Page 1
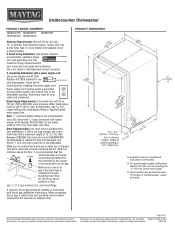
....63 cm" ) C (763.02"cm) (mr8ewi5mn3h,.31oewveceil"mtsdh) " (1.9 cm) A 3 "-4 " (8.8 cm - 10.6 cm) For 4" (10 cm) toekick, height of 12' (3.7 m) (Part Number 3385556) that the air gap drain hose either be looped up and securely fastened to the waste tee or disposer inlet. C. Undercounter Dishwasher PRODUCT... fittings. If required, the air gap should be connected to waste tee or disposer inlet above drain trap in accordance with rubber washer (Part Number W10273460). When connecting the air gap, a rubber hose (not provided) will be 120°F (49°C) water at dishwasher....
....63 cm" ) C (763.02"cm) (mr8ewi5mn3h,.31oewveceil"mtsdh) " (1.9 cm) A 3 "-4 " (8.8 cm - 10.6 cm) For 4" (10 cm) toekick, height of 12' (3.7 m) (Part Number 3385556) that the air gap drain hose either be looped up and securely fastened to the waste tee or disposer inlet. C. Undercounter Dishwasher PRODUCT... fittings. If required, the air gap should be connected to waste tee or disposer inlet above drain trap in accordance with rubber washer (Part Number W10273460). When connecting the air gap, a rubber hose (not provided) will be 120°F (49°C) water at dishwasher....

