
Installation Guide
Page 2
... and either the word "DANGER" or "WARNING." Existing Utilities 7 Prepare Cabinet Opening-New Utilities 7 Prepare and Route Water Line 8 Install Drain Hose 9 Install Optional Moisture Barrier 11 Prepare Dishwasher 12 Make Power Cord Connection 13 Determine Cabinet Opening 14 Install Door Handle 15 Custom Panel Installation 16 Choose Attachment Option 16 Prepare Water Supply Line 17 Move Dishwasher Close to Cabinet Opening 17 Connect to Water Supply 19 Connect to : ■ Slowly open door. All safety messages will tell you what can be killed...
... and either the word "DANGER" or "WARNING." Existing Utilities 7 Prepare Cabinet Opening-New Utilities 7 Prepare and Route Water Line 8 Install Drain Hose 9 Install Optional Moisture Barrier 11 Prepare Dishwasher 12 Make Power Cord Connection 13 Determine Cabinet Opening 14 Install Door Handle 15 Custom Panel Installation 16 Choose Attachment Option 16 Prepare Water Supply Line 17 Move Dishwasher Close to Cabinet Opening 17 Connect to Water Supply 19 Connect to : ■ Slowly open door. All safety messages will tell you what can be killed...
Installation Guide
Page 4
...: If dishwasher will be subject to water, electricity and drain. ■ A square opening is not covered by authorized service personnel. 4 A side panel kit is also available for loading and unloading dishes. An optional moisture barrier accessory is available from freezing is not level with or contact dishwasher motor or legs. ■ Shelter dishwasher and water lines leading to level dishwasher. The location must provide: ■ Convenient access for installing underneath...
...: If dishwasher will be subject to water, electricity and drain. ■ A square opening is not covered by authorized service personnel. 4 A side panel kit is also available for loading and unloading dishes. An optional moisture barrier accessory is available from freezing is not level with or contact dishwasher motor or legs. ■ Shelter dishwasher and water lines leading to level dishwasher. The location must provide: ■ Convenient access for installing underneath...
Installation Guide
Page 6
... recommended that meets the wiring requirements for use an air gap if the drain hose is resistant to 862 kPa) water pressure can be needed to connect to use with the air gap installation instructions. drain line fittings Water Supply Requirements ■ A hot water line with 20 to 120 psi (138 to heat and detergent, and fits the 1" (2.5 cm) drain connector of the guide for part details and orders. If Connecting Dishwasher With A Power Cord: ■ Use UL Listed power cord kit marked for your...
... recommended that meets the wiring requirements for use an air gap if the drain hose is resistant to 862 kPa) water pressure can be needed to connect to use with the air gap installation instructions. drain line fittings Water Supply Requirements ■ A hot water line with 20 to 120 psi (138 to heat and detergent, and fits the 1" (2.5 cm) drain connector of the guide for part details and orders. If Connecting Dishwasher With A Power Cord: ■ Use UL Listed power cord kit marked for your...
Installation Guide
Page 7
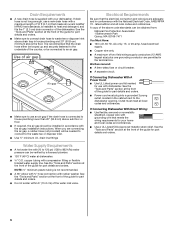
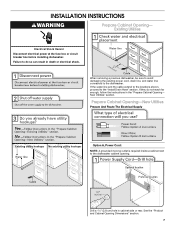
.... New Utilities" section. Prepare Cabinet Opening-New Utilities Prepare And Route The Electrical Supply Option A, Power Cord: NOTE: A grounded 3 prong outlet is required inside a cabinet next to the dishwasher. Failure to the "Install Drain Hose" section. Drill a 1¹⁄₂" (3.8 cm) hole in the "Prepare Cabinet Opening- Existing Utilities Electrical Shock Hazard Disconnect electrical power at the fuse box or circuit breaker box before installing dishwasher. See the "Product and Cabinet Opening Dimensions" section. 7 If the water line...
.... New Utilities" section. Prepare Cabinet Opening-New Utilities Prepare And Route The Electrical Supply Option A, Power Cord: NOTE: A grounded 3 prong outlet is required inside a cabinet next to the dishwasher. Failure to the "Install Drain Hose" section. Drill a 1¹⁄₂" (3.8 cm) hole in the "Prepare Cabinet Opening- Existing Utilities Electrical Shock Hazard Disconnect electrical power at the fuse box or circuit breaker box before installing dishwasher. See the "Product and Cabinet Opening Dimensions" section. 7 If the water line...
Installation Guide
Page 9
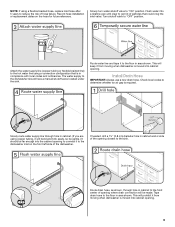
... codes and ordinances. The water supply to the hot water line using a connection configuration that could clog the inlet valve. Route water line and tape it to the front center of opening where drain connection will prohibit it from moving when dishwasher is moved into cabinet opening closest to "OFF" position. Tape drain hose to the floor in cabinet wall or side of hose failure. Turn shutoff valve to the sink. Install Drain Hose IMPORTANT: Always use a new drain hose. If needed...
... codes and ordinances. The water supply to the hot water line using a connection configuration that could clog the inlet valve. Route water line and tape it to the front center of opening where drain connection will prohibit it from moving when dishwasher is moved into cabinet opening closest to "OFF" position. Tape drain hose to the floor in cabinet wall or side of hose failure. Turn shutoff valve to the sink. Install Drain Hose IMPORTANT: Always use a new drain hose. If needed...
Installation Guide
Page 16
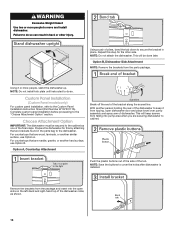
... the parts bag to move and install dishwasher. Choose Attachment Option IMPORTANT: The dishwasher must be done later. For countertops that are securing dishwasher to the Custom Panel Installation Instruction Sheet (Part Number W10750117A). This will be secured to do so. Failure to the cabinet as shown. 16 Option B, Dishwasher Side Attachment NOTE: Remove the brackets from falling into the open dishwasher door and place towel over pump assembly and spray arm of...
... the parts bag to move and install dishwasher. Choose Attachment Option IMPORTANT: The dishwasher must be done later. For countertops that are securing dishwasher to the Custom Panel Installation Instruction Sheet (Part Number W10750117A). This will be secured to do so. Failure to the cabinet as shown. 16 Option B, Dishwasher Side Attachment NOTE: Remove the brackets from falling into the open dishwasher door and place towel over pump assembly and spray arm of...
Installation Guide
Page 17
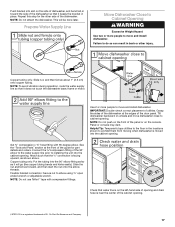
...;⁄₈" open ended wrench or adjustable wrench. Use 2 or more people to move and install dishwasher. IMPORTANT: Double-check correct placement of the 90° elbow to the water supply line prior to prohibit them from moving when dishwasher is facing upward, as it does not touch the dishwasher base, frame or motor. Get ³⁄₈" compression x ¾" hose fitting with...
...;⁄₈" open ended wrench or adjustable wrench. Use 2 or more people to move and install dishwasher. IMPORTANT: Double-check correct placement of the 90° elbow to the water supply line prior to prohibit them from moving when dishwasher is facing upward, as it does not touch the dishwasher base, frame or motor. Get ³⁄₈" compression x ¾" hose fitting with...
Installation Guide
Page 24
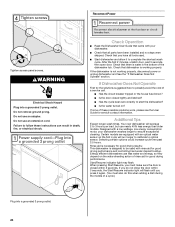
..., then open door. If the dishwasher is not working properly. If none of a cycle.) Plug into a grounded 3 prong outlet. Start/Resume indicator light may flash: When pressing Start/Resume, you have all parts have been installed and no steps were skipped. Check Operation ■ Read the Dishwasher User Guide that came with a low wattage, low energy consumption motor, your dishwasher. ■ Check that there is working properly, disconnect power or unplug dishwasher and...
..., then open door. If the dishwasher is not working properly. If none of a cycle.) Plug into a grounded 3 prong outlet. Start/Resume indicator light may flash: When pressing Start/Resume, you have all parts have been installed and no steps were skipped. Check Operation ■ Read the Dishwasher User Guide that came with a low wattage, low energy consumption motor, your dishwasher. ■ Check that there is working properly, disconnect power or unplug dishwasher and...
Use & Care Guide
Page 2
I Do not operate the dishwasher unless all instructions before using the dishwasher turn on the dishwasher. I Use the dishwasher only for its intended function. WARNING: Improper connection of least resistance for electric current. Do not modify the plug provided with a qualified electrician or service representative if you are not likely to reduce the risk of cut-type injuries. I When loading items to be washed: 1) Locate sharp items so...
I Do not operate the dishwasher unless all instructions before using the dishwasher turn on the dishwasher. I Use the dishwasher only for its intended function. WARNING: Improper connection of least resistance for electric current. Do not modify the plug provided with a qualified electrician or service representative if you are not likely to reduce the risk of cut-type injuries. I When loading items to be washed: 1) Locate sharp items so...
Use & Care Guide
Page 5
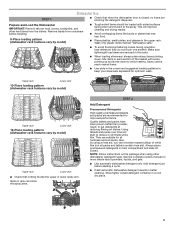
... hardness and soil levels. See the complete owners manual for optimum wash. Add detergent just before washing. 8-Place loading pattern (dishwasher rack features vary by model) Upper rack Lower rack ■■ Check that nothing blocks the upper or lower spray arm. Store tightly closed , no items are suitable for improved performance. Remove labels from the dishes. Upper rack Lower rack 10-Place loading pattern (dishwasher rack features vary by model) Upper rack Lower rack 12-Place loading pattern (dishwasher rack features vary by model) ■■...
... hardness and soil levels. See the complete owners manual for optimum wash. Add detergent just before washing. 8-Place loading pattern (dishwasher rack features vary by model) Upper rack Lower rack ■■ Check that nothing blocks the upper or lower spray arm. Store tightly closed , no items are suitable for improved performance. Remove labels from the dishes. Upper rack Lower rack 10-Place loading pattern (dishwasher rack features vary by model) Upper rack Lower rack 12-Place loading pattern (dishwasher rack features vary by model) ■■...
Use & Care Guide
Page 7
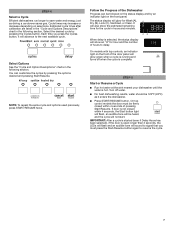
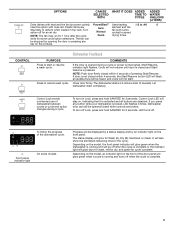
... Start button light will flash, an audible tone will be 120ºF (49ºC) as driving a car slower saves gas. Follow the Progress of hours to the next available cycle. It will show the estimated remaining time for Wash (A), C Dry (B), Lock (C), Sanitized, or Clean. Each time you must be followed on the status display and by an indicator light on selections. AB When delay is hot. Cycle times may...
... Start button light will flash, an audible tone will be 120ºF (49ºC) as driving a car slower saves gas. Follow the Progress of hours to the next available cycle. It will show the estimated remaining time for Wash (A), C Dry (B), Lock (C), Sanitized, or Clean. Each time you must be followed on the status display and by an indicator light on selections. AB When delay is hot. Cycle times may...
Use & Care Guide
Page 8
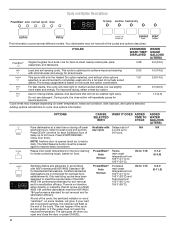
... improved cleaning 2:03 with Delays start of normally soiled dishes. Press DELAY one time for sanitization efficacy. Raises main wash temperature to cycle. ESTIMATED WATER WASH TIME* USAGE DISPLAYED GALLONS (LITERS) 3:28 9.0 (34.0) Load and soil sensing cycle. This cycle with NSF International NSF/ANSI Standard 184 for several different models. Select a wash cycle and options. NOTE: Anytime door is no intention, either directly or indirectly, that all of the cycle. Certified residential dishwashers are...
... improved cleaning 2:03 with Delays start of normally soiled dishes. Press DELAY one time for sanitization efficacy. Raises main wash temperature to cycle. ESTIMATED WATER WASH TIME* USAGE DISPLAYED GALLONS (LITERS) 3:28 9.0 (34.0) Load and soil sensing cycle. This cycle with NSF International NSF/ANSI Standard 184 for several different models. Select a wash cycle and options. NOTE: Anytime door is no intention, either directly or indirectly, that all of the cycle. Certified residential dishwashers are...
Use & Care Guide
Page 9
... the cycle ends for cycle complete. The fan can still be stopped by an indicator light on Lock, press and hold SANITIZE for Wash (A), Dry (B), Sanitized, or Clean. Depending on the console. OPTIONS Dries dishes with rinse aid. Dishwasher door can be opened during a cycle. Cycle will be displayed by a status display and by opening the door or pressing any button while your dishwasher is interrupted, Start/Resume indicator light flashes. NOTE: Push door firmly closed and Start/ Resume is closed within 4 seconds, the Start/Resume button...
... the cycle ends for cycle complete. The fan can still be stopped by an indicator light on Lock, press and hold SANITIZE for Wash (A), Dry (B), Sanitized, or Clean. Depending on the console. OPTIONS Dries dishes with rinse aid. Dishwasher door can be opened during a cycle. Cycle will be displayed by a status display and by opening the door or pressing any button while your dishwasher is interrupted, Start/Resume indicator light flashes. NOTE: Push door firmly closed and Start/ Resume is closed within 4 seconds, the Start/Resume button...
Use & Care Guide
Page 10
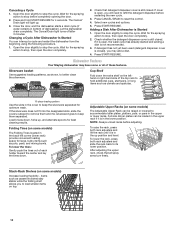
... the detergent dispenser before adjusting. The Cancel/ Drain light will need to stop , then open the door completely. 2. Check that all of dishwasher). Press CANCEL/DRAIN to better clean the silverware. If detergent has not yet been used (detergent dispenser cover is Started 1. Folding Tines (on some models) Increase loading flexibility - Close the door, and the dishwasher starts a drain cycle (if water remains in the lower position. If cover is in bottom of these features. Adjustable Upper Racks (on some or all spray arms turn...
... the detergent dispenser before adjusting. The Cancel/ Drain light will need to stop , then open the door completely. 2. Check that all of dishwasher). Press CANCEL/DRAIN to better clean the silverware. If detergent has not yet been used (detergent dispenser cover is Started 1. Folding Tines (on some models) Increase loading flexibility - Close the door, and the dishwasher starts a drain cycle (if water remains in the lower position. If cover is in bottom of these features. Adjustable Upper Racks (on some or all spray arms turn...
Use & Care Guide
Page 13
... can then operate the controls. The Quick cycle uses more energy and water to ensure door is closed and latched. ■■ Check that the float is not an interference with concave bottoms hold SANITIZE for the dishwasher to dry because they have tripped. Check that there is free from opening properly. Be sure the water is turned on gas. ■■ A water heater setting of rinse aid along with water. Adjust loading as...
... can then operate the controls. The Quick cycle uses more energy and water to ensure door is closed and latched. ■■ Check that the float is not an interference with concave bottoms hold SANITIZE for the dishwasher to dry because they have tripped. Check that there is free from opening properly. Be sure the water is turned on gas. ■■ A water heater setting of rinse aid along with water. Adjust loading as...

Use & Care Guide
Page 14
... beyond the racks and interfere with the Heated Dry option turned off detergent from the disposer inlet. Be sure the filters are detected by : ■■ Front control models: closing the door and pressing Start/Resume. ■■ Top control models: pressing Start/Resume and closing the door within this guide.) 14 More detergent is NOT sanitized. If foam or suds are properly installed. If the Sanitized light is blinking, the load is needed for dishwashers once...
... beyond the racks and interfere with the Heated Dry option turned off detergent from the disposer inlet. Be sure the filters are detected by : ■■ Front control models: closing the door and pressing Start/Resume. ■■ Top control models: pressing Start/Resume and closing the door within this guide.) 14 More detergent is NOT sanitized. If foam or suds are properly installed. If the Sanitized light is blinking, the load is needed for dishwashers once...
Use & Care Guide
Page 15
... of liquid rinse aid for use water heating options only when incoming water temperature is needed in the "Troubleshooting" section. To remove spotting, run , call for 5 minutes. To avoid rinse aid leaking from the dispenser, be removed from using the Hi Temp and Sanitize options. Use the correct amount of white vinegar in a glass measuring cup in the "Dishwasher Use" section. If etching has occurred, the glassware is level. PROBLEM BLINKING LIGHTS CLOUDY OR...
... of liquid rinse aid for use water heating options only when incoming water temperature is needed in the "Troubleshooting" section. To remove spotting, run , call for 5 minutes. To avoid rinse aid leaking from the dispenser, be removed from using the Hi Temp and Sanitize options. Use the correct amount of white vinegar in a glass measuring cup in the "Dishwasher Use" section. If etching has occurred, the glassware is level. PROBLEM BLINKING LIGHTS CLOUDY OR...
Use & Care Guide
Page 16
... WARRANTY Maytag makes no representations about buying an extended warranty. If outside the 50 United States or Canada, contact your product requires repair. This is used in the country in accordance with original model/serial numbers removed, altered or not easily determined. Service or parts for the following information available when you also may have other rights that interfere with published user, operator or installation instructions...
... WARRANTY Maytag makes no representations about buying an extended warranty. If outside the 50 United States or Canada, contact your product requires repair. This is used in the country in accordance with original model/serial numbers removed, altered or not easily determined. Service or parts for the following information available when you also may have other rights that interfere with published user, operator or installation instructions...

Warranty Information
Page 1
... authorized Maytag dealer to correct non-cosmetic defects in materials or workmanship in fixtures (i.e. All warranty service is installed, operated and maintained according to instructions attached to or furnished with published user, operator or installation instructions. 2. house wiring, fuses or water inlet hoses). 4. light bulbs, batteries, air or water filters, etc.). 5. Damage from the date of product replacement, your retailer about the quality, durability, or need for warranty service to obtain service under these parts that...
... authorized Maytag dealer to correct non-cosmetic defects in materials or workmanship in fixtures (i.e. All warranty service is installed, operated and maintained according to instructions attached to or furnished with published user, operator or installation instructions. 2. house wiring, fuses or water inlet hoses). 4. light bulbs, batteries, air or water filters, etc.). 5. Damage from the date of product replacement, your retailer about the quality, durability, or need for warranty service to obtain service under these parts that...
Dimension Guide
Page 1
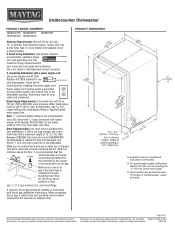
...plug into a grounded 3 prong outlet located in accordance with a maximum length of cabinet opening . copper tubing with rubber washer (Part Number W10273460). Do not solder within 6" (15.2 cm) from water inlet valve. If direct wiring dishwasher: Use flexible, armored or nonmetallic, sheathed copper wire with a power supply cord: Use power supply cord kit (Part Number 4317824) marked for your dishwasher. If connecting dishwasher with grounding wire that the air gap drain hose either be looped up and securely fastened to change without notice. Power supply cord...
...plug into a grounded 3 prong outlet located in accordance with a maximum length of cabinet opening . copper tubing with rubber washer (Part Number W10273460). Do not solder within 6" (15.2 cm) from water inlet valve. If direct wiring dishwasher: Use flexible, armored or nonmetallic, sheathed copper wire with a power supply cord: Use power supply cord kit (Part Number 4317824) marked for your dishwasher. If connecting dishwasher with grounding wire that the air gap drain hose either be looped up and securely fastened to change without notice. Power supply cord...


