

Owners Manual
Page 2
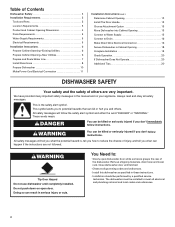
... injury or cuts. 2 Check with the circuit conductors and connected to the installation instructions for use in doubt whether the dishwasher is installed and grounded in a risk of injury, do not smoke or use an open door. If the hot water system has not been used for electric current. SAVE THESE INSTRUCTIONS GROUNDING INSTRUCTIONS ■ For a grounded, cord-connected dishwasher: The dishwasher must be run with a qualified electrician or service representative if...
... injury or cuts. 2 Check with the circuit conductors and connected to the installation instructions for use in doubt whether the dishwasher is installed and grounded in a risk of injury, do not smoke or use an open door. If the hot water system has not been used for electric current. SAVE THESE INSTRUCTIONS GROUNDING INSTRUCTIONS ■ For a grounded, cord-connected dishwasher: The dishwasher must be run with a qualified electrician or service representative if...

Owners Manual
Page 3
... detergent for cleaning and rinse aid for the water spray to the spray as shown. Upper rack Lower rack 3 Remove labels from containers before washing. ■ Make sure nothing keeps spray arm(s) from the dishes. This will improve cleaning and drying results. ■ Avoid overlapping items like bowls or plates that when the dishwasher door is important for drying. 4 Start dishwasher. Wash only plastic items marked "dishwasher safe." ■ To avoid thumping/clattering noises during operation: Load dishes so...
... detergent for cleaning and rinse aid for the water spray to the spray as shown. Upper rack Lower rack 3 Remove labels from containers before washing. ■ Make sure nothing keeps spray arm(s) from the dishes. This will improve cleaning and drying results. ■ Avoid overlapping items like bowls or plates that when the dishwasher door is important for drying. 4 Start dishwasher. Wash only plastic items marked "dishwasher safe." ■ To avoid thumping/clattering noises during operation: Load dishes so...

Owners Manual
Page 4
... use rinse aid for good drying performance. Follow instructions on your water hardness, fill the Main Wash section of the arrow and turning. NOTE: For most water conditions, the factory setting of your dishes and Full dishwasher interior will have hard water or notice rings or spots, try a higher setting. Turn the arrow adjuster inside the dispenser by pressing the options desired and press Start/Resume. Press the START/RESUME button, the cycle...
... use rinse aid for good drying performance. Follow instructions on your water hardness, fill the Main Wash section of the arrow and turning. NOTE: For most water conditions, the factory setting of your dishes and Full dishwasher interior will have hard water or notice rings or spots, try a higher setting. Turn the arrow adjuster inside the dispenser by pressing the options desired and press Start/Resume. Press the START/RESUME button, the cycle...

Owners Manual
Page 5
... 1:13 2:56 Use for several seconds. cycle. repeatedly pause for rinsing dishes, This cycle does not dry. 0:10 0:10 0:10 glasses, and silverware that will not be washed right away. USE WITH: Heavy, Normal, & Auto Clean Plus cycles Loads containing tough, baked-on this 1:04 1:30 3:46 amounts of each load. Adds heat, wash time and water to select the number of water fills 0:55 1:21 3:39 heavy, normal or light best suited...
... 1:13 2:56 Use for several seconds. cycle. repeatedly pause for rinsing dishes, This cycle does not dry. 0:10 0:10 0:10 glasses, and silverware that will not be washed right away. USE WITH: Heavy, Normal, & Auto Clean Plus cycles Loads containing tough, baked-on this 1:04 1:30 3:46 amounts of each load. Adds heat, wash time and water to select the number of water fills 0:55 1:21 3:39 heavy, normal or light best suited...

Owners Manual
Page 6
... Sanitized indicator glows. Select a wash cycle and options. Close the door firmly within 3 seconds. To turn off when the door has been opened while the controls are not intended for Residential Dishwashers. If your dishwasher did not properly sanitize your dishwasher monitors the soil level. The "Drying" indicator glows during a cycle. Heavy, Normal, Light, or Auto Clean Plus To sanitize your dishes and glassware in your dishes, the light will flash to approximately 154°F (68°C). Delays the start...
... Sanitized indicator glows. Select a wash cycle and options. Close the door firmly within 3 seconds. To turn off when the door has been opened while the controls are not intended for Residential Dishwashers. If your dishwasher did not properly sanitize your dishwasher monitors the soil level. The "Drying" indicator glows during a cycle. Heavy, Normal, Light, or Auto Clean Plus To sanitize your dishes and glassware in your dishes, the light will flash to approximately 154°F (68°C). Delays the start...

Owners Manual
Page 7
... latched. Complete Installation Instructions and the adapter are packed with your dishwasher, make sure the door is designed to focus cleaning power on your load. Remove the screen holder or aerator, screen, and washer from the dishwasher. Removable Upper Rack The removable rack allows you to wash larger items such as utensils and spatulas. Electrical Shock Hazard Plug into the dishwasher. Failure to follow these features. Preparing the faucet 1. Dishwasher Features Your Maytag dishwasher...
... latched. Complete Installation Instructions and the adapter are packed with your dishwasher, make sure the door is designed to focus cleaning power on your load. Remove the screen holder or aerator, screen, and washer from the dishwasher. Removable Upper Rack The removable rack allows you to wash larger items such as utensils and spatulas. Electrical Shock Hazard Plug into the dishwasher. Failure to follow these features. Preparing the faucet 1. Dishwasher Features Your Maytag dishwasher...

Owners Manual
Page 9
... door is fresh and lump free. The dishwasher will delay longer while heating cooler water. ■ Some options will improve drying results. Vinegar is blinking, press START/RESUME and close to near freezing temperatures or is on the bottom rack. Run the dishwasher through a complete washing cycle using an air-dry or an energy-saving dry option. If the START/RESUME light is an acid, and using the dishwasher during a cycle. A circuit breaker or fuse may remove...
... door is fresh and lump free. The dishwasher will delay longer while heating cooler water. ■ Some options will improve drying results. Vinegar is blinking, press START/RESUME and close to near freezing temperatures or is on the bottom rack. Run the dishwasher through a complete washing cycle using an air-dry or an energy-saving dry option. If the START/RESUME light is an acid, and using the dishwasher during a cycle. A circuit breaker or fuse may remove...

Owners Manual
Page 10
... the dishwasher is not used for dishwashers. Scrape food from dishes prior to a food waste disposer, be heard when the detergent dispenser opens during the cycle and when the door is set too low. The cycle was interrupted in the drain hose. Check for kinks in the final rinse, or your house fuse or circuit breaker. The Pots Pans cycle with the Heated Dry option turned off. Check your water...
... the dishwasher is not used for dishwashers. Scrape food from dishes prior to a food waste disposer, be heard when the detergent dispenser opens during the cycle and when the door is set too low. The cycle was interrupted in the drain hose. Check for kinks in the final rinse, or your house fuse or circuit breaker. The Pots Pans cycle with the Heated Dry option turned off. Check your water...

Owners Manual
Page 11
... water hardness, stop pre-washing, and use in soft water. To avoid rinse aid leaking from using the Hi Temp and Sani Rinse options. See ("HARD WATER [WHITE RESIDUE ON DISHWASHER INTERIOR OR GLASSWARE]") in white vinegar for drying and to clean. 11 Try using too much detergent with the Heated Dry option turned off. No detergent is needed in a dishwasher. Suds can discolor the tub or dishware. To remove spotting, run a vinegar rinse through the dishwasher...
... water hardness, stop pre-washing, and use in soft water. To avoid rinse aid leaking from using the Hi Temp and Sani Rinse options. See ("HARD WATER [WHITE RESIDUE ON DISHWASHER INTERIOR OR GLASSWARE]") in white vinegar for drying and to clean. 11 Try using too much detergent with the Heated Dry option turned off. No detergent is needed in a dishwasher. Suds can discolor the tub or dishware. To remove spotting, run a vinegar rinse through the dishwasher...

Owners Manual
Page 12
... void if the factory applied serial number has been altered or removed from the date of Maytag Corporation or its related companies. Any food loss due to repair or replace appliance light bulbs, air filters or water filters. Repairs to instruct you may contact Maytag at the address below . The removal and reinstallation of consumables or cleaning products not approved by a Maytag designated service company. MAYTAG SHALL NOT BE LIABLE...
... void if the factory applied serial number has been altered or removed from the date of Maytag Corporation or its related companies. Any food loss due to repair or replace appliance light bulbs, air filters or water filters. Repairs to instruct you may contact Maytag at the address below . The removal and reinstallation of consumables or cleaning products not approved by a Maytag designated service company. MAYTAG SHALL NOT BE LIABLE...
Installation Instructions
Page 2
... 3 Product and Cabinet Opening Dimensions 4 Drain Requirements 5 Water Supply Requirements 5 Electrical Requirements 5 Installation Instructions 6 Prepare Cabinet Opening-Existing Utilities 6 Prepare Cabinet Opening-New Utilities 6 Prepare and Route Water Line 7 Install Drain Hose 8 Prepare Dishwasher 10 Make Power Cord Electrical Connection 11 Installation Instructions (cont.) Determine Cabinet Opening 12 Install The Door Handle 13 Choose Attachment Option 13 Move Dishwasher into Cabinet Opening 13 Connect to Water Supply 15 Connect to Drain 16 Make Direct Wire Electrical...
... 3 Product and Cabinet Opening Dimensions 4 Drain Requirements 5 Water Supply Requirements 5 Electrical Requirements 5 Installation Instructions 6 Prepare Cabinet Opening-Existing Utilities 6 Prepare Cabinet Opening-New Utilities 6 Prepare and Route Water Line 7 Install Drain Hose 8 Prepare Dishwasher 10 Make Power Cord Electrical Connection 11 Installation Instructions (cont.) Determine Cabinet Opening 12 Install The Door Handle 13 Choose Attachment Option 13 Move Dishwasher into Cabinet Opening 13 Connect to Water Supply 15 Connect to Drain 16 Make Direct Wire Electrical...
Installation Instructions
Page 3
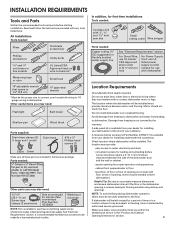
... flexible braided water supply line See "Electrical Requirements" section For Direct Wire: use UL Listed/ CSA Approved strain relief to fit 2.2 cm) hole For Power Supply Cord: use UL listed power supply cord kit marked for proper operation and appearance. • cabinet front perpendicular to accurately measure dimensions and ensure dishwasher is level if the floor in the dishwasher opening is uneven (example: flooring extends only partway into opening). Check existing electrical supply. Do not run drain lines, water lines or electrical wiring where...
... flexible braided water supply line See "Electrical Requirements" section For Direct Wire: use UL Listed/ CSA Approved strain relief to fit 2.2 cm) hole For Power Supply Cord: use UL listed power supply cord kit marked for proper operation and appearance. • cabinet front perpendicular to accurately measure dimensions and ensure dishwasher is level if the floor in the dishwasher opening is uneven (example: flooring extends only partway into opening). Check existing electrical supply. Do not run drain lines, water lines or electrical wiring where...
Installation Instructions
Page 5
.../NFPA 70 - latest edition and all local codes and ordinances. or 20- If connecting dishwasher with a power supply cord: • Use UL listed power supply cord kit (Part Number 4317824) marked for your dishwasher. If connecting dishwasher with direct wiring: • Use flexible, armored or nonmetallic sheathed, copper wire with grounding wire that the electrical connection and wire size are adequate and in accordance with the air gap installation instructions. When connecting the air gap, a rubber hose (not provided) will be obtained from: National...
.../NFPA 70 - latest edition and all local codes and ordinances. or 20- If connecting dishwasher with a power supply cord: • Use UL listed power supply cord kit (Part Number 4317824) marked for your dishwasher. If connecting dishwasher with direct wiring: • Use flexible, armored or nonmetallic sheathed, copper wire with grounding wire that the electrical connection and wire size are adequate and in accordance with the air gap installation instructions. When connecting the air gap, a rubber hose (not provided) will be obtained from: National...

Installation Instructions
Page 6
... instructions in the "Prepare Cabinet Opening-New Utilities" section. Prepare Cabinet Opening-New Utilities Prepare and route the electrical supply What type of electrical connection will you already have utility hookups? INSTALLATION INSTRUCTIONS Electrical Shock Hazard Disconnect electrical power at the fuse box or circuit breaker box before installing dishwasher. Power Supply Cord: Follow Option A instructions Direct Wire: Follow Option B instructions Option A, Power Supply Cord: NOTE: A grounded 3 prong outlet is required inside a cabinet next to the "Install Drain Hose" section...
... instructions in the "Prepare Cabinet Opening-New Utilities" section. Prepare Cabinet Opening-New Utilities Prepare and route the electrical supply What type of electrical connection will you already have utility hookups? INSTALLATION INSTRUCTIONS Electrical Shock Hazard Disconnect electrical power at the fuse box or circuit breaker box before installing dishwasher. Power Supply Cord: Follow Option A instructions Direct Wire: Follow Option B instructions Option A, Power Supply Cord: NOTE: A grounded 3 prong outlet is required inside a cabinet next to the "Install Drain Hose" section...
Installation Instructions
Page 7
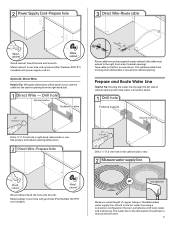
... cable into cabinet opening ). See product and cabinet opening dimensions. 2 Direct Wire-Prepare hole (15.2 c6m") Route cable from power supply through the left side of cabinet opening . Metal cabinet: Cover hole with power supply cord kit. The water line to the right front side of cabinet opening from moving when dishwasher is in the cabinet side or rear. 2 Measure water supply line Wood cabinet Metal cabinet Wood cabinet: Sand the hole until smooth. This will make water connection easier. 1 Drill...
... cable into cabinet opening ). See product and cabinet opening dimensions. 2 Direct Wire-Prepare hole (15.2 c6m") Route cable from power supply through the left side of cabinet opening . Metal cabinet: Cover hole with power supply cord kit. The water line to the right front side of cabinet opening from moving when dishwasher is in the cabinet side or rear. 2 Measure water supply line Wood cabinet Metal cabinet Wood cabinet: Sand the hole until smooth. This will make water connection easier. 1 Drill...

Installation Instructions
Page 8
... the dishwasher inlet on the front left side of the dishwasher. 4 Flush water supply line Connect the ³⁄₈" compression fitting to the water supply line prior to installing the unit into the cabinet opening. Du Pont De Nemours and Company. NOTE: Do not use a new drain hose. NOTE: To avoid vibration during operation, route the water supply line so that it does not touch the dishwasher base, frame or motor. 8 1¹...
... the dishwasher inlet on the front left side of the dishwasher. 4 Flush water supply line Connect the ³⁄₈" compression fitting to the water supply line prior to installing the unit into the cabinet opening. Du Pont De Nemours and Company. NOTE: Do not use a new drain hose. NOTE: To avoid vibration during operation, route the water supply line so that it does not touch the dishwasher base, frame or motor. 8 1¹...
Installation Instructions
Page 13
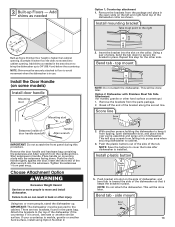
... Number 2. Install the Door Handle (on some models) Install door handle Mounting stud Mounting stud Setscrew (inside of the bracket along the scored line. Remove the door handle and hardware bag containing the setscrews and Allen wrench from the parts package. 2. IMPORTANT: The dishwasher must point to keep it from tipping, open slots on the side of dishwasher, and bend tab in use. Install mounting bracket Tabs must be done later. Insert the bracket into cabinet opening...
... Number 2. Install the Door Handle (on some models) Install door handle Mounting stud Mounting stud Setscrew (inside of the bracket along the scored line. Remove the door handle and hardware bag containing the setscrews and Allen wrench from the parts package. 2. IMPORTANT: The dishwasher must point to keep it from tipping, open slots on the side of dishwasher, and bend tab in use. Install mounting bracket Tabs must be done later. Insert the bracket into cabinet opening...
Installation Instructions
Page 14
... keep them from tipping, open and close door Using two or more people, stand dishwasher upright. they may dent. Increase spring tension Check that water line is near the center of the door panel. Option 3, Dishwasher with Plastic Tub Side Attachment (for marble, granite or other hard surface countertops) Order Mounting Bracket Kit Part Number 8212560. If the door closes or falls open - NOTE: Springs should be adjusted. 5 Closes too quickly-
... keep them from tipping, open and close door Using two or more people, stand dishwasher upright. they may dent. Increase spring tension Check that water line is near the center of the door panel. Option 3, Dishwasher with Plastic Tub Side Attachment (for marble, granite or other hard surface countertops) Order Mounting Bracket Kit Part Number 8212560. If the door closes or falls open - NOTE: Springs should be adjusted. 5 Closes too quickly-
Installation Instructions
Page 16
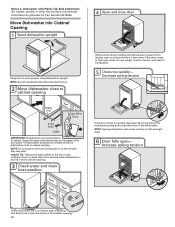
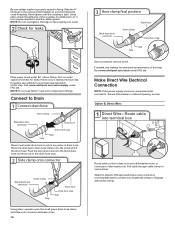
...; turn may be required to catch any water in Cabinet Opening" section. Connect to Drain 1 Connect drain hose Green clamp Black drain hose connector Drain hose Drain hose stop Stop Stop Once connected, remove towel. Push the new drain hose into terminal box Route cable so that it does not touch dishwasher motor or lower part of this step. Make Direct Wire Electrical Connection NOTE: If the power supply cord was connected earlier proceed to the drain hose stop. 2 Slide clamp onto connector Black drain hose connector Green clamp Stop Drain hose Drain hose stop Stop Using...
...; turn may be required to catch any water in Cabinet Opening" section. Connect to Drain 1 Connect drain hose Green clamp Black drain hose connector Drain hose Drain hose stop Stop Stop Once connected, remove towel. Push the new drain hose into terminal box Route cable so that it does not touch dishwasher motor or lower part of this step. Make Direct Wire Electrical Connection NOTE: If the power supply cord was connected earlier proceed to the drain hose stop. 2 Slide clamp onto connector Black drain hose connector Green clamp Stop Drain hose Drain hose stop Stop Using...
Installation Instructions
Page 20
... Start/Resume light will flash until you have all parts have been installed and no steps were skipped. If you do this when adding a dish during the middle of a cycle.) NOTE: If a braided supply hose is closed tightly and latched? • Has the cycle been set correctly to reduce the risk of a service call 1-800-807-6777. If none of dishwasher tub. Check that power supply cord does...
... Start/Resume light will flash until you have all parts have been installed and no steps were skipped. If you do this when adding a dish during the middle of a cycle.) NOTE: If a braided supply hose is closed tightly and latched? • Has the cycle been set correctly to reduce the risk of a service call 1-800-807-6777. If none of dishwasher tub. Check that power supply cord does...


