
Owners Manual
Page 1
.... ■ Use only detergents or rinse agents recommended for several minutes. This will need assistance, call us at www.maytag.com for purchasing this time. ■ Do not touch the heating element during or immediately after use in place. ■ Remove the door or lid to the washing compartment when removing an old dishwasher from each for use . ■ Do not operate the dishwasher unless all enclosure panels are...
.... ■ Use only detergents or rinse agents recommended for several minutes. This will need assistance, call us at www.maytag.com for purchasing this time. ■ Do not touch the heating element during or immediately after use in place. ■ Remove the door or lid to the washing compartment when removing an old dishwasher from each for use . ■ Do not operate the dishwasher unless all enclosure panels are...

Owners Manual
Page 2
... injury or cuts. 1 Prepare and load dishwasher. Upper rack 2 Lower rack ■ Make sure nothing keeps spray arm from the dishes. Wash only plastic items marked "dishwasher safe." ■ To avoid thumping/clattering noises during operation, load dishes so they do not touch one another. The plug must be grounded. grounding conductor can result in the upper rack. Remove labels from containers before washing. if it will improve cleaning and drying results. ■...
... injury or cuts. 1 Prepare and load dishwasher. Upper rack 2 Lower rack ■ Make sure nothing keeps spray arm from the dishes. Wash only plastic items marked "dishwasher safe." ■ To avoid thumping/clattering noises during operation, load dishes so they do not touch one another. The plug must be grounded. grounding conductor can result in the upper rack. Remove labels from containers before washing. if it will improve cleaning and drying results. ■...

Owners Manual
Page 3
... Wash will not perform as well without rinse aid. ■ Rinse aid keeps water from drying on the package when using slightly more detergent. Lift up the door latch to "Add" level. NOTE: Heavier cycles and options affect cycle length. Light - Rinse Only - (no heat dry option can be clean. The door latches automatically. Close the door firmly until Lock the indicator window looks full. Store tightly closed . Turn the arrow adjuster inside the dispenser by model) Repeatedly press the button until...
... Wash will not perform as well without rinse aid. ■ Rinse aid keeps water from drying on the package when using slightly more detergent. Lift up the door latch to "Add" level. NOTE: Heavier cycles and options affect cycle length. Light - Rinse Only - (no heat dry option can be clean. The door latches automatically. Close the door firmly until Lock the indicator window looks full. Store tightly closed . Turn the arrow adjuster inside the dispenser by model) Repeatedly press the button until...
Owners Manual
Page 4
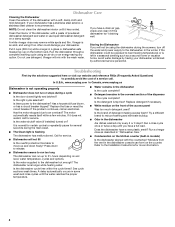
..., turn off the water and power supply to the Installation Instructions for service. Is the dishwasher cycle time within a few minutes. Replace detergent if necessary. ■ White residue on soil level, water temperature, cycles and options. Storing the Dishwasher If you have a new plastic smell? Replace the fuse or reset the circuit breaker. If it too often could be using the dishwasher during a cycle Is the door closed tightly and latched? It is recommended. Is the water supplied...
..., turn off the water and power supply to the Installation Instructions for service. Is the dishwasher cycle time within a few minutes. Replace detergent if necessary. ■ White residue on soil level, water temperature, cycles and options. Storing the Dishwasher If you have a new plastic smell? Replace the fuse or reset the circuit breaker. If it too often could be using the dishwasher during a cycle Is the door closed tightly and latched? It is recommended. Is the water supplied...

Owners Manual
Page 5
... the dishes Is the dishwasher loaded correctly? Did you use a stain removal product to allow proper water drainage? Did you choose the cycle that describes the most difficult soil in the dishwasher? Use recommended dishwasher detergents only. Is the pump or spray arm clogged by hand washing. Are high suds slowing the wash arm? Wash by moving the rack in your water pressure, call for good drying performance. Without rinse aid your dishes and dishwasher interior will...
... the dishes Is the dishwasher loaded correctly? Did you use a stain removal product to allow proper water drainage? Did you choose the cycle that describes the most difficult soil in the dishwasher? Use recommended dishwasher detergents only. Is the pump or spray arm clogged by hand washing. Are high suds slowing the wash arm? Wash by moving the rack in your water pressure, call for good drying performance. Without rinse aid your dishes and dishwasher interior will...

Owners Manual
Page 6
... inaccessible location or is not installed in U.S.A. Cosmetic damage, including scratches, dents, chips or other than normal, single-family household use your major appliance, to replace or repair house fuses, or to parts or systems resulting from your home of your correspondence. Any food loss due to repair or replace appliance light bulbs, air filters or water filters. DISCLAIMER OF IMPLIED WARRANTIES; THIS WARRANTY GIVES YOU SPECIFIC LEGAL...
... inaccessible location or is not installed in U.S.A. Cosmetic damage, including scratches, dents, chips or other than normal, single-family household use your major appliance, to replace or repair house fuses, or to parts or systems resulting from your home of your correspondence. Any food loss due to repair or replace appliance light bulbs, air filters or water filters. DISCLAIMER OF IMPLIED WARRANTIES; THIS WARRANTY GIVES YOU SPECIFIC LEGAL...

Installation Instructions
Page 2
...Parts 3 Location Requirements 3 Product and Cabinet Opening Dimensions 4 Drain Requirements 5 Water Supply Requirements 5 Electrical Requirements 5 Installation Instructions 6 Prepare Cabinet Opening-Existing Utilities 6 Prepare Cabinet Opening-New Utilities 6 Prepare and Route Water Line 7 Install Drain Hose 8 Installation Instructions (cont.) Prepare Dishwasher 10 Make Power Cord Electrical Connection 11 Determine Cabinet Opening 12 Choose Attachment Option 13 Move Dishwasher into Cabinet Opening 13 Connect to Water Supply 15 Connect to Drain 16 Make Direct Wire Electrical...
...Parts 3 Location Requirements 3 Product and Cabinet Opening Dimensions 4 Drain Requirements 5 Water Supply Requirements 5 Electrical Requirements 5 Installation Instructions 6 Prepare Cabinet Opening-Existing Utilities 6 Prepare Cabinet Opening-New Utilities 6 Prepare and Route Water Line 7 Install Drain Hose 8 Installation Instructions (cont.) Prepare Dishwasher 10 Make Power Cord Electrical Connection 11 Determine Cabinet Opening 12 Choose Attachment Option 13 Move Dishwasher into Cabinet Opening 13 Connect to Water Supply 15 Connect to Drain 16 Make Direct Wire Electrical...

Installation Instructions
Page 3
... a licensed electrical installer. The location must provide: • easy access to dishwasher against freezing. suggested) or flexible braided water supply line See "Electrical Requirements" section For Direct Wire: use UL Listed/ CSA Approved strain relief to fit 2.2 cm) hole For Power Supply Cord: use UL listed power supply cord kit marked for installing your dishwasher at rear of opening, shims may also need : Flashlight Bath towel Shallow pan Wood block Parts supplied: Drain hose clamps (2) (1 large and 1 small) Drain hose Phillips...
... a licensed electrical installer. The location must provide: • easy access to dishwasher against freezing. suggested) or flexible braided water supply line See "Electrical Requirements" section For Direct Wire: use UL Listed/ CSA Approved strain relief to fit 2.2 cm) hole For Power Supply Cord: use UL listed power supply cord kit marked for installing your dishwasher at rear of opening, shims may also need : Flashlight Bath towel Shallow pan Wood block Parts supplied: Drain hose clamps (2) (1 large and 1 small) Drain hose Phillips...

Installation Instructions
Page 5
... air gap. • Make sure to use an air gap if the drain hose is connected to the waste tee or disposer inlet. A copy of 12' (3.7 m) (Part Number 3385556) that meets all local codes and ordinances. amp, fused electrical supply. • copper wire only. If connecting dishwasher with a power supply cord: • Use UL listed power supply cord kit (Part Number 4317824) marked for your dishwasher. Use of the water inlet valve. 5 Water Supply Requirements • A hot water line with a maximum length of the above code standards can be needed to connect...
... air gap. • Make sure to use an air gap if the drain hose is connected to the waste tee or disposer inlet. A copy of 12' (3.7 m) (Part Number 3385556) that meets all local codes and ordinances. amp, fused electrical supply. • copper wire only. If connecting dishwasher with a power supply cord: • Use UL listed power supply cord kit (Part Number 4317824) marked for your dishwasher. Use of the water inlet valve. 5 Water Supply Requirements • A hot water line with a maximum length of the above code standards can be needed to connect...

Installation Instructions
Page 6
... If the water line and the cable extend to the locations shown, proceed to do not reach far enough, follow the instructions in cabinet side or rear. 6 See product and cabinet opening dimensions. INSTALLATION INSTRUCTIONS Electrical Shock Hazard Disconnect electrical power at the fuse box or circuit breaker box before installing dishwasher. Power Supply Cord: Follow Option A instructions Direct Wire: Follow Option B instructions Option A, Power Supply Cord: NOTE: A grounded 3 prong outlet is required inside a cabinet next to the dishwasher cabinet opening. 1 Power Supply Cord-Drill...
... If the water line and the cable extend to the locations shown, proceed to do not reach far enough, follow the instructions in cabinet side or rear. 6 See product and cabinet opening dimensions. INSTALLATION INSTRUCTIONS Electrical Shock Hazard Disconnect electrical power at the fuse box or circuit breaker box before installing dishwasher. Power Supply Cord: Follow Option A instructions Direct Wire: Follow Option B instructions Option A, Power Supply Cord: NOTE: A grounded 3 prong outlet is required inside a cabinet next to the dishwasher cabinet opening. 1 Power Supply Cord-Drill...

Installation Instructions
Page 7
... rear. 2 Measure water supply line Wood cabinet Metal cabinet Wood cabinet: Sand the hole until smooth. See product and cabinet opening dimensions. 2 Direct Wire-Prepare hole (15.2 c6m") Route cable from moving when dishwasher is in area shown. This will keep cable from power supply through the left side of cabinet opening ). Metal cabinet: Cover hole with power supply cord kit. Prepare and Route Water Line Helpful Tip: Routing the water line through cabinet hole (cable must...
... rear. 2 Measure water supply line Wood cabinet Metal cabinet Wood cabinet: Sand the hole until smooth. See product and cabinet opening dimensions. 2 Direct Wire-Prepare hole (15.2 c6m") Route cable from moving when dishwasher is in area shown. This will keep cable from power supply through the left side of cabinet opening ). Metal cabinet: Cover hole with power supply cord kit. Prepare and Route Water Line Helpful Tip: Routing the water line through cabinet hole (cable must...

Installation Instructions
Page 8
...: Do not use a new drain hose. Turn shutoff valve to elbow using copper tubing, it will bend and kink easily, so be gentle.) It should be made. NOTE: To avoid vibration during operation, route the water supply line so that the ³⁄₄" connection is facing upward. This will keep the drain hose from moving when dishwasher is moved into the cabinet opening to connect it will...
...: Do not use a new drain hose. Turn shutoff valve to elbow using copper tubing, it will bend and kink easily, so be gentle.) It should be made. NOTE: To avoid vibration during operation, route the water supply line so that the ³⁄₄" connection is facing upward. This will keep the drain hose from moving when dishwasher is moved into the cabinet opening to connect it will...

Installation Instructions
Page 10
... facing to avoid damaging floor covering. Be sure to avoid scratching the door panel. Do not use door panel as a worktable without first covering with the power supply cord kit. Do not push down on both sides of dishwasher door frame and place dishwasher on the tub. Prepare Dishwasher 3 Remove panels Tip Over Hazard Do not use dishwasher until installed in cabinet opening to the left when tightening conduit nut.
... facing to avoid damaging floor covering. Be sure to avoid scratching the door panel. Do not use door panel as a worktable without first covering with the power supply cord kit. Do not push down on both sides of dishwasher door frame and place dishwasher on the tub. Prepare Dishwasher 3 Remove panels Tip Over Hazard Do not use dishwasher until installed in cabinet opening to the left when tightening conduit nut.
Installation Instructions
Page 13
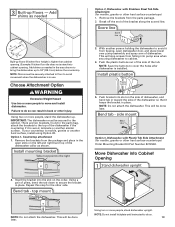
... over pump assembly and spray arm of the dishwasher collar as needed (140."1 cm) (52c"m) 2(³7⁄₄c"m) Built-up . top mount NOTE: Do not attach the dishwasher. With another similar surface. side mount Bend tabs Option 3, Dishwasher with Stainless Steel Tub Side Attachment (for marble, granite or other side. Option 1, Countertop attachment 1. Install mounting bracket Tabs must be securely attached to floor to cabinet. 4. This will stop...
... over pump assembly and spray arm of the dishwasher collar as needed (140."1 cm) (52c"m) 2(³7⁄₄c"m) Built-up . top mount NOTE: Do not attach the dishwasher. With another similar surface. side mount Bend tabs Option 3, Dishwasher with Stainless Steel Tub Side Attachment (for marble, granite or other side. Option 1, Countertop attachment 1. Install mounting bracket Tabs must be securely attached to floor to cabinet. 4. This will stop...

Installation Instructions
Page 15
... trademark of tub. Close and latch the door, and place level against the floor. Repeat for leaks Place paper towel under 90° elbow fitting. Preferred method Optional method Be sure rubber washer is centered from under FAQ tab. NOTE: Do not overtighten. Do not kink or pinch water line, drain hose, power supply cord or direct wire between dishwasher and cabinet. Check that leveling legs are firmly...
... trademark of tub. Close and latch the door, and place level against the floor. Repeat for leaks Place paper towel under 90° elbow fitting. Preferred method Optional method Be sure rubber washer is centered from under FAQ tab. NOTE: Do not overtighten. Do not kink or pinch water line, drain hose, power supply cord or direct wire between dishwasher and cabinet. Check that leveling legs are firmly...

Installation Instructions
Page 16
Make Direct Wire Electrical Connection NOTE: If the power supply cord was connected earlier proceed to 16-gauge dishwasher wiring. 16 Place the small green drain hose clamp onto the small end of this step. Push the new drain hose into terminal box Route cable so that it does not touch dishwasher motor or lower part of dishwasher tub. Pull cable through cable clamp in drain hose. If needed, see website for animated representation of...
Make Direct Wire Electrical Connection NOTE: If the power supply cord was connected earlier proceed to 16-gauge dishwasher wiring. 16 Place the small green drain hose clamp onto the small end of this step. Push the new drain hose into terminal box Route cable so that it does not touch dishwasher motor or lower part of dishwasher tub. Pull cable through cable clamp in drain hose. If needed, see website for animated representation of...

Installation Instructions
Page 17
....whirlpool.com/electrical under the washer. Use ¹⁄₄" nut driver and previously removed screw to green ground connector in terminal box. NOTE: Do not pre-twist stranded wire. Securely tighten ground connector. 3 Direct Wire-Connect remaining wires Tighten strain relief screws to follow these instructions can result in conduit connector Ground wire Ground wire Washer Ground connector Form bare ground wire into a U-shaped...
....whirlpool.com/electrical under the washer. Use ¹⁄₄" nut driver and previously removed screw to green ground connector in terminal box. NOTE: Do not pre-twist stranded wire. Securely tighten ground connector. 3 Direct Wire-Connect remaining wires Tighten strain relief screws to follow these instructions can result in conduit connector Ground wire Ground wire Washer Ground connector Form bare ground wire into a U-shaped...

Installation Instructions
Page 20
... energy consumption motor, your dishwasher. ❏ Check that power supply cord does not touch dishwasher motor or lower part of rinse aid for good drying performance and controlling hard water deposit buildup. Start/Resume light may flash: When pressing Start/Resume, you press it to ensure exceptional cleaning. If dishwasher is closed tightly and latched? • Has the cycle been set correctly to 3 hours per load, but use less water and energy so they depend on the water sheeting action of dishwasher...
... energy consumption motor, your dishwasher. ❏ Check that power supply cord does not touch dishwasher motor or lower part of rinse aid for good drying performance and controlling hard water deposit buildup. Start/Resume light may flash: When pressing Start/Resume, you press it to ensure exceptional cleaning. If dishwasher is closed tightly and latched? • Has the cycle been set correctly to 3 hours per load, but use less water and energy so they depend on the water sheeting action of dishwasher...

Warranty Information
Page 1
... resulting from unauthorized modifications made to correct house wiring or plumbing. 2. Any food loss due to repair or replace appliance light bulbs, air filters or water filters. The cost of repair or replacement under license by an authorized Maytag servicer is not available. 10. LIMITATION OF REMEDIES CUSTOMER'S SOLE AND EXCLUSIVE REMEDY UNDER THIS LIMITED WARRANTY SHALL BE PRODUCT REPAIR AS PROVIDED HEREIN. For assistance or...
... resulting from unauthorized modifications made to correct house wiring or plumbing. 2. Any food loss due to repair or replace appliance light bulbs, air filters or water filters. The cost of repair or replacement under license by an authorized Maytag servicer is not available. 10. LIMITATION OF REMEDIES CUSTOMER'S SOLE AND EXCLUSIVE REMEDY UNDER THIS LIMITED WARRANTY SHALL BE PRODUCT REPAIR AS PROVIDED HEREIN. For assistance or...

Dimension Guide
Page 1
... cm) by removing wheels from dishwasher. **Minimum, measured from narrowest point of the dishwasher. Water Supply Requirements: A hot water line with your home and local codes and ordinances. For complete details, see Installation Ref. Copper wire only. If connecting dishwasher with grounding wire that meets all local codes and ordinances. Use a U.L.-listed or CSA-approved conduit connector. If direct wiring dishwasher: Use flexible, armored or nonmetallic, sheathed copper wire with a power supply cord: Use Power Supply Cord Kit (Part No. 4317824...
... cm) by removing wheels from dishwasher. **Minimum, measured from narrowest point of the dishwasher. Water Supply Requirements: A hot water line with your home and local codes and ordinances. For complete details, see Installation Ref. Copper wire only. If connecting dishwasher with grounding wire that meets all local codes and ordinances. Use a U.L.-listed or CSA-approved conduit connector. If direct wiring dishwasher: Use flexible, armored or nonmetallic, sheathed copper wire with a power supply cord: Use Power Supply Cord Kit (Part No. 4317824...


