
User Instructions
Page 1
... need assistance, call us at 1-800-688-9900. J Your safety and the safety of others . You can kill or hurt you to the washing compartment when removing an old dishwasher from each for several minutes. and 2) Load sharp knives with controls. [] Use the dishwasher only for its intended function. [] Use only detergents or rinse agents recommended for use . [] Do not operate the dishwasher unless all hot water...
... need assistance, call us at 1-800-688-9900. J Your safety and the safety of others . You can kill or hurt you to the washing compartment when removing an old dishwasher from each for several minutes. and 2) Load sharp knives with controls. [] Use the dishwasher only for its intended function. [] Use only detergents or rinse agents recommended for use . [] Do not operate the dishwasher unless all hot water...
User Instructions
Page 2
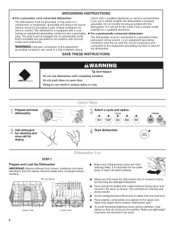
... noises during operation, load dishes so they do not touch one another. GROUNDING iNSTRUCTiONS For a grounded, cord-connected dishwasher: The dishwasher must be run with a qualified electrician or service representative if you are secured in the racks. Make sure lightweight load items are in doubt whether the dishwasher is equipped with the dishwasher; The dishwasher is properly grounded. CYCLES HEAVY WASH NORMAL _ WASH LIGHT INSTA _ R NSE WASH _ _ WASH _ ONLY Start dishwasher. _ OPTIONS LOCK ON Prepare and Load...
... noises during operation, load dishes so they do not touch one another. GROUNDING iNSTRUCTiONS For a grounded, cord-connected dishwasher: The dishwasher must be run with a qualified electrician or service representative if you are secured in the racks. Make sure lightweight load items are in doubt whether the dishwasher is equipped with the dishwasher; The dishwasher is properly grounded. CYCLES HEAVY WASH NORMAL _ WASH LIGHT INSTA _ R NSE WASH _ _ WASH _ ONLY Start dishwasher. _ OPTIONS LOCK ON Prepare and Load...
User Instructions
Page 3
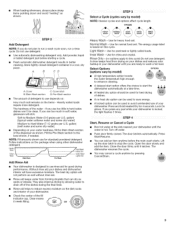
... Cancel/Drain. A B CD A. Cover B. If you are for good drying performance. gallon) [well water and some city water] Medium to Medium Water (0-6 grains per U.S. WASH _ LIGHT _ WASH INSTA WASH RINSE ONLY Heavy Wash - The energy usage label is hot. Insta Wash - Rinse Only- (no heat dry option can be used for prerinsed or lightly soiled loads. LocKoN 24 6 • A no options apply to use detergent. • Use automatic dishwashing detergent only. Push door firmly closed detergent container in better cleaning. Do not use...
... Cancel/Drain. A B CD A. Cover B. If you are for good drying performance. gallon) [well water and some city water] Medium to Medium Water (0-6 grains per U.S. WASH _ LIGHT _ WASH INSTA WASH RINSE ONLY Heavy Wash - The energy usage label is hot. Insta Wash - Rinse Only- (no heat dry option can be used for prerinsed or lightly soiled loads. LocKoN 24 6 • A no options apply to use detergent. • Use automatic dishwashing detergent only. Push door firmly closed detergent container in better cleaning. Do not use...

User Instructions
Page 4
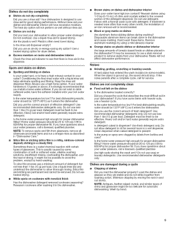
..., turn off the water and power supply to 3V2hours depending on at the end of the dispenser Is the cycle complete? Is there power to the dishwasher hot enough? The motor automatically resets itself within the cycle times? The dishwasher runs longer while heating water. See cycle sections wash times. IMPORTANT: The very first wash cycle after installation in "Dishwasher Care." This cycle must not be using the dishwasher during a cycle Is the door closed tightly and latched? Is the detergent lump-free? Run a vinegar rinse as...
..., turn off the water and power supply to 3V2hours depending on at the end of the dispenser Is the cycle complete? Is there power to the dishwasher hot enough? The motor automatically resets itself within the cycle times? The dishwasher runs longer while heating water. See cycle sections wash times. IMPORTANT: The very first wash cycle after installation in "Dishwasher Care." This cycle must not be using the dishwasher during a cycle Is the door closed tightly and latched? Is the detergent lump-free? Run a vinegar rinse as...
User Instructions
Page 5
... dishwasher. Clean dispenser when caked detergent is recommended. • Black or gray marks on the dishes Is the dishwasher loaded correctly? Minimize chipping by using 1-3 tsp (5-15 mL) of citric acid crystals added to drink softened water, have the softener installed onto your hot water supply. Without rinse aid your dishes and dishwasher interior will not affect dishwasher performance. Use a heated drying option for dryer dishes. • Excess moisture on racks and dishwasher interior Check the rinse aid indicator...
... dishwasher. Clean dispenser when caked detergent is recommended. • Black or gray marks on the dishes Is the dishwasher loaded correctly? Minimize chipping by using 1-3 tsp (5-15 mL) of citric acid crystals added to drink softened water, have the softener installed onto your hot water supply. Without rinse aid your dishes and dishwasher interior will not affect dishwasher performance. Use a heated drying option for dryer dishes. • Excess moisture on racks and dishwasher interior Check the rinse aid indicator...
User Instructions
Page 6
... used for Factory Specified Parts and repair labor to correct defects in materials or workmanship. Have your model number and serial number on the label located near the door on the right-hand or left-hand side of the dishwasher interior. If you can find your complete model number ready. Service must be repaired in the U.S.A., call 1-800-688-2002. Service calls to refrigerator or freezer product...
... used for Factory Specified Parts and repair labor to correct defects in materials or workmanship. Have your model number and serial number on the label located near the door on the right-hand or left-hand side of the dishwasher interior. If you can find your complete model number ready. Service must be repaired in the U.S.A., call 1-800-688-2002. Service calls to refrigerator or freezer product...
Installation Instructions
Page 3
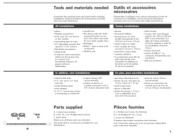
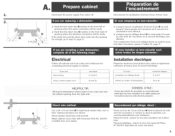
... parts before starting installation. pliers Phillips screwdriver 5/16" and 1/4" nut drivers or hex sockets o measuring tape or ruler 10" adjustable wrench that opens to 1-1/8" (2.9cm) flatobhde screwdriver o utility knife o 2 twistoon wire connectors which are included. See parts list for your household wiring to 16gauge wiring in dishwasher o small level o 90 ° elbow with 3/8" N.RT. Voir la liste des pieces pour les accessoires pour votre lave-vaisselle...
... parts before starting installation. pliers Phillips screwdriver 5/16" and 1/4" nut drivers or hex sockets o measuring tape or ruler 10" adjustable wrench that opens to 1-1/8" (2.9cm) flatobhde screwdriver o utility knife o 2 twistoon wire connectors which are included. See parts list for your household wiring to 16gauge wiring in dishwasher o small level o 90 ° elbow with 3/8" N.RT. Voir la liste des pieces pour les accessoires pour votre lave-vaisselle...
Installation Instructions
Page 7
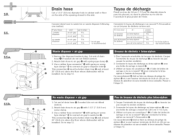
... air gap. 7" use an air gap if the drain hose is 12 feet (3.7 m). 7 have : V' a hot water line with 3/8" N.RT. V" un coude a 90 ° avec filetage externe de 0,95 cm (3/8 po) N.RT. external pipe threads on one end. You must have a high drain loop 20 inches (50.8 cm) minimum above the subfloor or floor. 7" connect drain hose to heat and detergent. Do not solder within 6" (15 cm) from water inlet valve. drain line...
... air gap. 7" use an air gap if the drain hose is 12 feet (3.7 m). 7 have : V' a hot water line with 3/8" N.RT. V" un coude a 90 ° avec filetage externe de 0,95 cm (3/8 po) N.RT. external pipe threads on one end. You must have a high drain loop 20 inches (50.8 cm) minimum above the subfloor or floor. 7" connect drain hose to heat and detergent. Do not solder within 6" (15 cm) from water inlet valve. drain line...
Installation Instructions
Page 8
Failure to do so can result in chart: OPENING FOR: water line drain line direct wire power supply cord DIAMETER: 1/2" (1.3 cm) 1-1/2" (3.8 cm) 3/4" (1.9 cm) 1-1/2" (3.8 cm) 34" (86,4 cm) rain, _ Couper les ouvertures dans la ... cm) 5" (12.7 cm) -- 24" (61 cm) 6"(15.2 cm) 5" (12.7 cm) (5.1 cm) Cut openings in shaded area of opening. ** Minimum, au point le plus @troit de I'ouverture. Electrical Shock Hazard Disconnect electrical power at the fuse box or circuit breaker box before installing dishwasher. Le non-respect de ces instructions ou un choc _lectrique. que pr&cis@...
Failure to do so can result in chart: OPENING FOR: water line drain line direct wire power supply cord DIAMETER: 1/2" (1.3 cm) 1-1/2" (3.8 cm) 3/4" (1.9 cm) 1-1/2" (3.8 cm) 34" (86,4 cm) rain, _ Couper les ouvertures dans la ... cm) 5" (12.7 cm) -- 24" (61 cm) 6"(15.2 cm) 5" (12.7 cm) (5.1 cm) Cut openings in shaded area of opening. ** Minimum, au point le plus @troit de I'ouverture. Electrical Shock Hazard Disconnect electrical power at the fuse box or circuit breaker box before installing dishwasher. Le non-respect de ces instructions ou un choc _lectrique. que pr&cis@...
Installation Instructions
Page 9
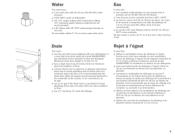
... u / ./ Disconnect the power supply, Turn water off, Deconnecter Hacanalisafion d'arrivee d'eau, Fermer I'eau, 7" check that the water line _ reaches to the front Heft of opening where the water connection vvHI be made, _/check that the direct wire Q reaches to the front right of opening where the ebctrical connection will be made, If the water line and the direct wire reach into the opening \ far enough, go to cabinet. Cut a 3/4" (1.9 cm...
... u / ./ Disconnect the power supply, Turn water off, Deconnecter Hacanalisafion d'arrivee d'eau, Fermer I'eau, 7" check that the water line _ reaches to the front Heft of opening where the water connection vvHI be made, _/check that the direct wire Q reaches to the front right of opening where the ebctrical connection will be made, If the water line and the direct wire reach into the opening \ far enough, go to cabinet. Cut a 3/4" (1.9 cm...
Installation Instructions
Page 12
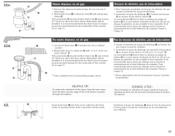
.... _L_s Drain hose Cut a 1-1/2" (3,8 cm) diameter hob in cabinet waii or floor on the side of drain hose _[_ if needed (do not cut ribbed section}. 2. Cut end of the opening ciosest to the sink, Connect drain hose to waste tee or waste disposer following one method, If you have: a waste disposer nO waste disposer and: an air gap go to step: 11a. Go to disposer inlet @. Ce...
.... _L_s Drain hose Cut a 1-1/2" (3,8 cm) diameter hob in cabinet waii or floor on the side of drain hose _[_ if needed (do not cut ribbed section}. 2. Cut end of the opening ciosest to the sink, Connect drain hose to waste tee or waste disposer following one method, If you have: a waste disposer nO waste disposer and: an air gap go to step: 11a. Go to disposer inlet @. Ce...
Installation Instructions
Page 13
...tuyau de decharge. 2. This connection @ must be before drain trap @ and at ieast 20" (50,8 cm) above the floor where dishwasher will be hoped up and ...Cut end of drain hose O if needed (do not cut end of opening where drain connection will be installed. Parts available from local plumbing supply stores. 1, Couper I 'etape 12. Insert drain hose @ into hole cut in cabinet to the front center of drain hose, 2, Attach drain hose...la face inferieure du comptoir. Remove the disposer knockout piug, Do not cut ribbed section), 2. Connecter Hetuyau de decharge @ _ i'entr6e du broyeur...
...tuyau de decharge. 2. This connection @ must be before drain trap @ and at ieast 20" (50,8 cm) above the floor where dishwasher will be hoped up and ...Cut end of drain hose O if needed (do not cut end of opening where drain connection will be installed. Parts available from local plumbing supply stores. 1, Couper I 'etape 12. Insert drain hose @ into hole cut in cabinet to the front center of drain hose, 2, Attach drain hose...la face inferieure du comptoir. Remove the disposer knockout piug, Do not cut ribbed section), 2. Connecter Hetuyau de decharge @ _ i'entr6e du broyeur...
Installation Instructions
Page 24
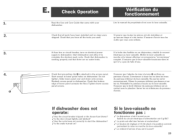
... breaker tripped or the house _/ Is the door closed tightly and latched? _/ Has the cycle been set correctly to start the _/Is the water turned on electrical power supply to the access panel. Reattach access panel to complete the shortest wash cycle. Check that came with your dishwasher, Lire Hemanuei du propdetaire iivr6 avec Heiave-vaisseiie. Start dishwasher and allow it to dishwasher. Ne pas les serrer excessivement. Glisser...
... breaker tripped or the house _/ Is the door closed tightly and latched? _/ Has the cycle been set correctly to start the _/Is the water turned on electrical power supply to the access panel. Reattach access panel to complete the shortest wash cycle. Check that came with your dishwasher, Lire Hemanuei du propdetaire iivr6 avec Heiave-vaisseiie. Start dishwasher and allow it to dishwasher. Ne pas les serrer excessivement. Glisser...
Installation Instructions
Page 26
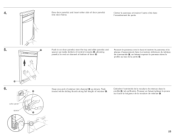
...He panneau et ins6rer H'autre c6te dans H'encadrement de porte, Push in on door panei(s} near the top and siide panei(s) and spacer up inside bottom of controH consoHe (_, aHHowing paneH(s} to rest on channeH at bottom of door _), Pousser He panneau vers He haut et inserer He panneau et Ha piaque... d'espacement dans Ha mouiure inferieure du tabieau de commande (_, en faisant reposer He panneau dans He profile au bas de Ha porte _}, m @ color spacer / Snap one end of retainer into channei@...
...He panneau et ins6rer H'autre c6te dans H'encadrement de porte, Push in on door panei(s} near the top and siide panei(s) and spacer up inside bottom of controH consoHe (_, aHHowing paneH(s} to rest on channeH at bottom of door _), Pousser He panneau vers He haut et inserer He panneau et Ha piaque... d'espacement dans Ha mouiure inferieure du tabieau de commande (_, en faisant reposer He panneau dans He profile au bas de Ha porte _}, m @ color spacer / Snap one end of retainer into channei@...

Installation Instructions
Page 27
...chaque c6te de Ha garniture Q du panneau and set it aside, d'acces pour d6boiter Ha garniture, Refirer Ha garniture et Ha mettre de c6te, m Carefully slide color access panel upwards and remove, Do Faire prudemment glisser le panneau colore d'acces vers le Not remove spacer, haut et Heretirer, Ne pas eniever ... et I'inserer dans I'encadrement du panneau, Faire along bottom of access panel frame, giisser He panneau vers He bas pour qu'ii s'engage dana Ha rainure en bas de i'encadrement du panneau d'acces, m Line up edges of top trim with sides of access panei frame, Aiigner ...
...chaque c6te de Ha garniture Q du panneau and set it aside, d'acces pour d6boiter Ha garniture, Refirer Ha garniture et Ha mettre de c6te, m Carefully slide color access panel upwards and remove, Do Faire prudemment glisser le panneau colore d'acces vers le Not remove spacer, haut et Heretirer, Ne pas eniever ... et I'inserer dans I'encadrement du panneau, Faire along bottom of access panel frame, giisser He panneau vers He bas pour qu'ii s'engage dana Ha rainure en bas de i'encadrement du panneau d'acces, m Line up edges of top trim with sides of access panei frame, Aiigner ...


