
Installation Guide
Page 2
... Parts 3 Location Requirements 4 Drain Requirements 6 Water Supply Requirements 6 Electrical Requirements 6 INSTALLATION INSTRUCTIONS 7 Prepare Cabinet Opening-Existing Utilities 7 Prepare Cabinet Opening-New Utilities 7 Prepare and Route Water Line 8 Install Drain Hose 9 Prepare Dishwasher 11 INSTALLATION INSTRUCTIONS (CONT.) Make Power Supply Cord Connection 12 Determine Cabinet Opening 14 Choose Attachment Option 15 Prepare Water Supply Line 15 Move Dishwasher Close to Cabinet Opening 16 Connect to Water Supply 18 Connect to Drain 18 Make Direct Wire Electrical Connection...
... Parts 3 Location Requirements 4 Drain Requirements 6 Water Supply Requirements 6 Electrical Requirements 6 INSTALLATION INSTRUCTIONS 7 Prepare Cabinet Opening-Existing Utilities 7 Prepare Cabinet Opening-New Utilities 7 Prepare and Route Water Line 8 Install Drain Hose 9 Prepare Dishwasher 11 INSTALLATION INSTRUCTIONS (CONT.) Make Power Supply Cord Connection 12 Determine Cabinet Opening 14 Choose Attachment Option 15 Prepare Water Supply Line 15 Move Dishwasher Close to Cabinet Opening 16 Connect to Water Supply 18 Connect to Drain 18 Make Direct Wire Electrical Connection...
Installation Guide
Page 4
... loading and unloading dishes. Motor should not touch the floor. A side panel kit is available from your dealer for installing your dealer for a period of opening is level if the floor in the "Product and Cabinet Opening Dimensions" section. 4 NOTE: To avoid shifting during dishwasher operation, shims must provide: ■ easy access to dishwasher against freezing. Do not install dishwasher over carpeted flooring. Make sure pipes, wires and drain hose...
... loading and unloading dishes. Motor should not touch the floor. A side panel kit is available from your dealer for installing your dealer for a period of opening is level if the floor in the "Product and Cabinet Opening Dimensions" section. 4 NOTE: To avoid shifting during dishwasher operation, shims must provide: ■ easy access to dishwasher against freezing. Do not install dishwasher over carpeted flooring. Make sure pipes, wires and drain hose...
Installation Guide
Page 6
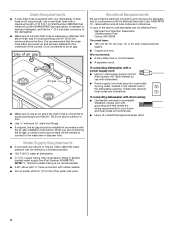
... is connected to use with dishwasher. ■ Power supply cord must plug into a grounded 3 prong outlet, located in accordance with compression fitting or flexible braided water supply line (Part Number 4396897RP). or 20-amp, fused electrical supply. ■ Copper wire only. We recommend: ■ A time-delay fuse or circuit breaker. ■ A separate circuit. A copy of the above drain trap in conformance with the National Electrical Code, ANSI/NFPA 70 - If connecting dishwasher with a power supply cord: ■ Use UL Listed power supply cord kit (Part Number...
... is connected to use with dishwasher. ■ Power supply cord must plug into a grounded 3 prong outlet, located in accordance with compression fitting or flexible braided water supply line (Part Number 4396897RP). or 20-amp, fused electrical supply. ■ Copper wire only. We recommend: ■ A time-delay fuse or circuit breaker. ■ A separate circuit. A copy of the above drain trap in conformance with the National Electrical Code, ANSI/NFPA 70 - If connecting dishwasher with a power supply cord: ■ Use UL Listed power supply cord kit (Part Number...
Installation Guide
Page 7
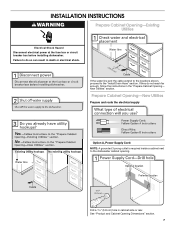
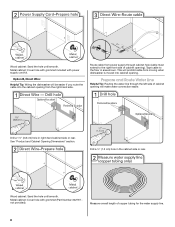
...Prepare Cabinet Opening- Prepare Cabinet Opening-New Utilities Prepare and route the electrical supply Option A, Power Supply Cord: NOTE: A grounded 3 prong outlet is required inside a cabinet next to the "Install Drain Hose" section. New Utilities" section. Drill a 1¹⁄₂" (3.8 cm) hole in cabinet side or rear. See "Product and Cabinet Opening Dimensions" section. 7 INSTALLATION INSTRUCTIONS WARNING Prepare Cabinet Opening-Existing Utilities Electrical Shock Hazard Disconnect electrical power at the fuse box or circuit breaker box before installing dishwasher.
...Prepare Cabinet Opening- Prepare Cabinet Opening-New Utilities Prepare and route the electrical supply Option A, Power Supply Cord: NOTE: A grounded 3 prong outlet is required inside a cabinet next to the "Install Drain Hose" section. New Utilities" section. Drill a 1¹⁄₂" (3.8 cm) hole in cabinet side or rear. See "Product and Cabinet Opening Dimensions" section. 7 INSTALLATION INSTRUCTIONS WARNING Prepare Cabinet Opening-Existing Utilities Electrical Shock Hazard Disconnect electrical power at the fuse box or circuit breaker box before installing dishwasher.
Installation Guide
Page 8
... with grommet (Part Number 302797 not provided). Wood cabinet: Sand the hole until smooth. Option B, Direct Wire: Helpful Tip: Wiring the dishwasher will be easier if you route the cable into the cabinet opening from moving when dishwasher is moved into cabinet opening. Wood cabinet: Sand the hole until smooth. This will make water connection easier. See "Product and Cabinet Opening Dimensions" section. Measure overall length of cabinet opening ). Tape cable...
... with grommet (Part Number 302797 not provided). Wood cabinet: Sand the hole until smooth. Option B, Direct Wire: Helpful Tip: Wiring the dishwasher will be easier if you route the cable into the cabinet opening from moving when dishwasher is moved into cabinet opening. Wood cabinet: Sand the hole until smooth. This will make water connection easier. See "Product and Cabinet Opening Dimensions" section. Measure overall length of cabinet opening ). Tape cable...
Installation Guide
Page 9
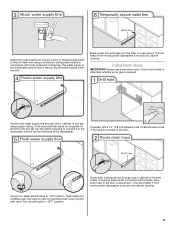
... into cabinet opening . Slowly route water supply line through hole in cabinet wall or side of opening where drain connection will keep it to the floor in compliance with local codes and ordinances. Tape drain hose to "OFF" position. 9 This will bend and kink easily, so be gentle.) It should have a manual shutoff valve located under the sink. Slowly turn water shutoff valve to determine whether an air gap is...
... into cabinet opening . Slowly route water supply line through hole in cabinet wall or side of opening where drain connection will keep it to the floor in compliance with local codes and ordinances. Tape drain hose to "OFF" position. 9 This will bend and kink easily, so be gentle.) It should have a manual shutoff valve located under the sink. Slowly turn water shutoff valve to determine whether an air gap is...
Installation Guide
Page 11
... drain hose to air gap with a towel to air gap and cut if needed. Do not push down on open and move and install dishwasher. Doing so can result in back or other injury. Be sure to fasten the insulation down on both sides of drain hose to avoid scratching the door panel. 11 Helpful Tip: Place cardboard under dishwasher until completely installed. Connect rubber end of the tub. Use...
... drain hose to air gap with a towel to air gap and cut if needed. Do not push down on open and move and install dishwasher. Doing so can result in back or other injury. Be sure to fasten the insulation down on both sides of drain hose to avoid scratching the door panel. 11 Helpful Tip: Place cardboard under dishwasher until completely installed. Connect rubber end of the tub. Use...
Installation Guide
Page 15
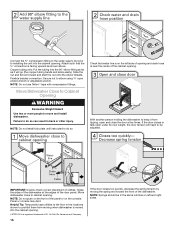
... the bracket in the area shown to bring the dishwasher up floors: If the kitchen floor is in the parts bag. Prepare Water Supply Line Using 2 or more people to move and install dishwasher. for the other side. add shims as shown. IMPORTANT: The dishwasher must be securely attached to floor to avoid movement when the dishwasher is higher than the cabinet opening - Option...
... the bracket in the area shown to bring the dishwasher up floors: If the kitchen floor is in the parts bag. Prepare Water Supply Line Using 2 or more people to move and install dishwasher. for the other side. add shims as shown. IMPORTANT: The dishwasher must be securely attached to floor to avoid movement when the dishwasher is higher than the cabinet opening - Option...
Installation Guide
Page 16
...;" connection is on left side of opening and drain hose is a registered trademark of the cabinet opening . Panel or console may dent. NOTE: Springs should be adjusted. Slide the nut and ferrule forward and start the nut onto the elbow threads. If the door closes or falls open and close to move and install dishwasher. Du Pont De Nemours and Company. 16 If the door closes too quickly...
...;" connection is on left side of opening and drain hose is a registered trademark of the cabinet opening . Panel or console may dent. NOTE: Springs should be adjusted. Slide the nut and ferrule forward and start the nut onto the elbow threads. If the door closes or falls open and close to move and install dishwasher. Du Pont De Nemours and Company. 16 If the door closes too quickly...
Installation Guide
Page 19
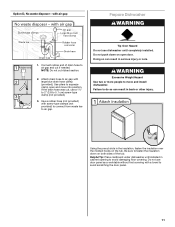
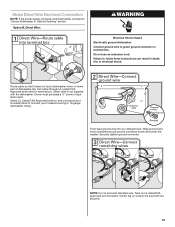
..., or electrical shock. Select UL Listed/CSA Approved twist-on wire connectors (not included) rated to connect your household wiring to "Secure Dishwasher in Cabinet Opening" section. Failure to be sure both are secured. 19 Make Direct Wire Electrical Connection NOTE: If the power supply cord was connected earlier, proceed to 16-gauge dishwasher wiring. Do not use an extension cord. Strain relief is not supplied with the dishwasher. Form bare ground wire into...
..., or electrical shock. Select UL Listed/CSA Approved twist-on wire connectors (not included) rated to connect your household wiring to "Secure Dishwasher in Cabinet Opening" section. Failure to be sure both are secured. 19 Make Direct Wire Electrical Connection NOTE: If the power supply cord was connected earlier, proceed to 16-gauge dishwasher wiring. Do not use an extension cord. Strain relief is not supplied with the dishwasher. Form bare ground wire into...
Installation Guide
Page 23
... hose installation or replacement dates on the hose for service contact information. If Dishwasher Does Not Operate First try the solutions suggested here to possibly avoid the cost of rinse aid for good drying performance. Your new dishwasher will average 2-3 hours per load, but use less water and energy, so they depend on ? Certain models are equipped with your dishwasher washes longer to start the dishwasher? ■ Is the water turned on the water sheeting...
... hose installation or replacement dates on the hose for service contact information. If Dishwasher Does Not Operate First try the solutions suggested here to possibly avoid the cost of rinse aid for good drying performance. Your new dishwasher will average 2-3 hours per load, but use less water and energy, so they depend on ? Certain models are equipped with your dishwasher washes longer to start the dishwasher? ■ Is the water turned on the water sheeting...
Dimension Guide
Page 1
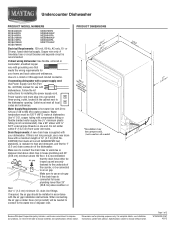
...PRODUCT MODEL NUMBERS MDB4630AW MDB4630PA MDB4409PA MDB4709AW MDB4709PA MDB6709AW MDB6769AW MDB6769PA MDBH949AW MDBH949PA MDBH969AW MDBS469PA MDBTT53AW Electrical Requirements: 120-volt, 60-Hz, AC-only, 15- If connecting dishwasher with a maximum length of 12' (3.7 m) (Part No. 3385556) that meets all local codes and ordinances. Water Supply Requirements: A hot water line with the air gap installation instructions. If this is not long enough, use a new drain hose with a power supply cord: Use Power Supply Cord Kit (Part No. 4317824) marked for installing the power supply cord...
...PRODUCT MODEL NUMBERS MDB4630AW MDB4630PA MDB4409PA MDB4709AW MDB4709PA MDB6709AW MDB6769AW MDB6769PA MDBH949AW MDBH949PA MDBH969AW MDBS469PA MDBTT53AW Electrical Requirements: 120-volt, 60-Hz, AC-only, 15- If connecting dishwasher with a maximum length of 12' (3.7 m) (Part No. 3385556) that meets all local codes and ordinances. Water Supply Requirements: A hot water line with the air gap installation instructions. If this is not long enough, use a new drain hose with a power supply cord: Use Power Supply Cord Kit (Part No. 4317824) marked for installing the power supply cord...
Use & Care Guide
Page 2
... this time. ■ Do not touch the heating element during or immediately after use. ■ Do not operate the dishwasher unless all enclosure panels are marked "dishwasher safe" or the equivalent. As the gas is equipped with the dishwasher; GROUNDING INSTRUCTIONS ■ For a grounded, cord-connected dishwasher: The dishwasher must be run with all local codes and ordinances. Do not push down on the door, lid, or dish racks...
... this time. ■ Do not touch the heating element during or immediately after use. ■ Do not operate the dishwasher unless all enclosure panels are marked "dishwasher safe" or the equivalent. As the gas is equipped with the dishwasher; GROUNDING INSTRUCTIONS ■ For a grounded, cord-connected dishwasher: The dishwasher must be run with all local codes and ordinances. Do not push down on the door, lid, or dish racks...
Use & Care Guide
Page 3
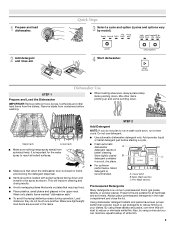
... close the lid. By using a rinse aid you do not touch one another. Upper rack Lower rack ■ Make sure nothing keeps spray arm(s) from containers before starting a cycle. ■ Fresh automatic dishwasher A detergent results in the racks. Do not use detergent. ■ Use automatic dishwasher detergent only. Hard Water Soft Water Hard Water Soft Water C PRE- 1 Prepare and load dishwasher. Add powder, liquid or tablet detergent just before washing. Remove labels from spinning freely. This will start to run a wash cycle soon, run a rinse...
... close the lid. By using a rinse aid you do not touch one another. Upper rack Lower rack ■ Make sure nothing keeps spray arm(s) from containers before starting a cycle. ■ Fresh automatic dishwasher A detergent results in the racks. Do not use detergent. ■ Use automatic dishwasher detergent only. Hard Water Soft Water Hard Water Soft Water C PRE- 1 Prepare and load dishwasher. Add powder, liquid or tablet detergent just before washing. Remove labels from spinning freely. This will start to run a wash cycle soon, run a rinse...
Use & Care Guide
Page 4
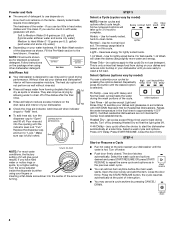
... lock NOTE: For most water conditions, the factory setting of interruption. ■ You may cancel a cycle anytime by model) You can add an item anytime before the main wash starts. Open Add ¹⁄₄ turn the dispenser cap to -clean items. Normal - Sani Rinse - (all cycles except Rinse Only) use depends on the dish racks and interior of the water - Use for lightly soiled loads. 1-Hr Wash - Heavily soiled loads require more water and energy. Light - Use for Residential Dishwashers. Open the door...
... lock NOTE: For most water conditions, the factory setting of interruption. ■ You may cancel a cycle anytime by model) You can add an item anytime before the main wash starts. Open Add ¹⁄₄ turn the dispenser cap to -clean items. Normal - Sani Rinse - (all cycles except Rinse Only) use depends on the dish racks and interior of the water - Use for lightly soiled loads. 1-Hr Wash - Heavily soiled loads require more water and energy. Light - Use for Residential Dishwashers. Open the door...
Use & Care Guide
Page 5
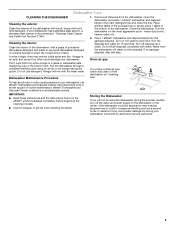
... instructions and the instructions found on the most aggressive cycle - Turn off the water and power supply to clean the cooled-down interior. 1. affresh® Dishwasher and Disposal Cleaner is left in the bottom of powdered dishwasher detergent and water or use detergent. Storing the Dishwasher If you have a drain air gap, check and clean it too often could be using an air-dry or an energy-saving dry option. Stainless Steel Cleaner and Polish Part Number 31464. Close the dishwasher...
... instructions and the instructions found on the most aggressive cycle - Turn off the water and power supply to clean the cooled-down interior. 1. affresh® Dishwasher and Disposal Cleaner is left in the bottom of powdered dishwasher detergent and water or use detergent. Storing the Dishwasher If you have a drain air gap, check and clean it too often could be using an air-dry or an energy-saving dry option. Stainless Steel Cleaner and Polish Part Number 31464. Close the dishwasher...
Use & Care Guide
Page 6
.... This dishwasher is designed to use a rinse aid? If this adjustment cycle is sensed. Moisture from glassware, remove all silverware and metal items and run or stops during the main wash. ■ The Clean light is not operating properly ■ Dishwasher does not run a vinegar rinse as well without rinse aid. ■ Dishes are adjusted based on the kitchen counter (built-in "Dishwasher Care." 6 Plastics often need towel drying. If you have questions about your hot water supply. If...
.... This dishwasher is designed to use a rinse aid? If this adjustment cycle is sensed. Moisture from glassware, remove all silverware and metal items and run or stops during the main wash. ■ The Clean light is not operating properly ■ Dishwasher does not run a vinegar rinse as well without rinse aid. ■ Dishes are adjusted based on the kitchen counter (built-in "Dishwasher Care." 6 Plastics often need towel drying. If you have questions about your hot water supply. If...
Use & Care Guide
Page 7
... detergent dispenser. Is the pump or spray arm clogged by hand. 7 Do not use the correct amount of drying. Use recommended dishwasher detergents only. Load the dishes and glasses so they are damaged during washing? Did you use heated drying. ■ White spots on the dishes Is the dishwasher loaded correctly? Is detergent caked in your water have some combination of soft or softened water, alkaline washing solutions, insufficient rinsing, overloading the dishwasher, and the heat...
... detergent dispenser. Is the pump or spray arm clogged by hand. 7 Do not use the correct amount of drying. Use recommended dishwasher detergents only. Load the dishes and glasses so they are damaged during washing? Did you use heated drying. ■ White spots on the dishes Is the dishwasher loaded correctly? Is detergent caked in your water have some combination of soft or softened water, alkaline washing solutions, insufficient rinsing, overloading the dishwasher, and the heat...
Use & Care Guide
Page 8
... replace appliance light bulbs, air filters or water filters. MAYTAG SHALL NOT BE LIABLE FOR INCIDENTAL OR CONSEQUENTIAL DAMAGES. Outside the 50 United States and Canada, this limited warranty. Proof of original purchase date is covered by Maytag. 5. Service calls to refrigerator or freezer product failures. 7. Repairs to instruct you can find your major appliance is located in -home service is required to published user or operator instructions...
... replace appliance light bulbs, air filters or water filters. MAYTAG SHALL NOT BE LIABLE FOR INCIDENTAL OR CONSEQUENTIAL DAMAGES. Outside the 50 United States and Canada, this limited warranty. Proof of original purchase date is covered by Maytag. 5. Service calls to refrigerator or freezer product failures. 7. Repairs to instruct you can find your major appliance is located in -home service is required to published user or operator instructions...
Warranty Information
Page 1
... pay for other damage to Maytag within 30 days from defects in U.S.A. Consumable parts are excluded from unauthorized modifications made to instruct you may contact Maytag at the address below . Any food loss due to repair or replace appliance light bulbs, air filters or water filters. Major appliances with published installation instructions. 11. DISCLAIMER OF IMPLIED WARRANTIES; IMPLIED WARRANTIES, INCLUDING WARRANTIES OF MERCHANTABILITY OR FITNESS FOR...
... pay for other damage to Maytag within 30 days from defects in U.S.A. Consumable parts are excluded from unauthorized modifications made to instruct you may contact Maytag at the address below . Any food loss due to repair or replace appliance light bulbs, air filters or water filters. Major appliances with published installation instructions. 11. DISCLAIMER OF IMPLIED WARRANTIES; IMPLIED WARRANTIES, INCLUDING WARRANTIES OF MERCHANTABILITY OR FITNESS FOR...


