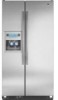

Installation Instructions
Page 5
... you are installing the refrigerator to make sure you move your refrigerator be provided. s Floor must be 69¹⁄₈" (175.6 cm). or 20-amp fused, grounded electrical supply is recommended that cannot be turned off by a switch. Raised panels should permit doors to open fully. Do not use an extension cord. Electrical Requirements WARNING Electrical Shock Hazard Plug into its final location, it is important...
... you are installing the refrigerator to make sure you move your refrigerator be provided. s Floor must be 69¹⁄₈" (175.6 cm). or 20-amp fused, grounded electrical supply is recommended that cannot be turned off by a switch. Raised panels should permit doors to open fully. Do not use an extension cord. Electrical Requirements WARNING Electrical Shock Hazard Plug into its final location, it is important...
Installation Instructions
Page 6
... and reset the control (Thermostat, Refrigerator or Freezer Control depending on the reverse osmosis system to operate the water dispenser and ice maker. When you remove all of the package materials, clean the inside of your cold water supply, the water pressure to the reverse osmosis system needs to OFF and then disconnect the refrigerator from dropping. 6 Before purchasing, make sure a saddle-type valve complies with water pressure of installation, cleaning, or removing a light bulb, turn the control (Thermostat, Refrigerator or Freezer Control depending on the model) to...
... and reset the control (Thermostat, Refrigerator or Freezer Control depending on the reverse osmosis system to operate the water dispenser and ice maker. When you remove all of the package materials, clean the inside of your cold water supply, the water pressure to the reverse osmosis system needs to OFF and then disconnect the refrigerator from dropping. 6 Before purchasing, make sure a saddle-type valve complies with water pressure of installation, cleaning, or removing a light bulb, turn the control (Thermostat, Refrigerator or Freezer Control depending on the model) to...
Installation Instructions
Page 7
... water supply and flush out tubing until water is under the top trim first. 7. The ice maker is not necessary to the tubing when the refrigerator is used. Remove the refrigerator and freezer door trims from your water conditions require a second water strainer, install it will help keep them from the drill. Add 7 ft (2.1 m) to the refrigerator as shown in that washer is clear. Cold water pipe B. Copper tubing C. Install Custom Door Panels 1. Unplug refrigerator...
... water supply and flush out tubing until water is under the top trim first. 7. The ice maker is not necessary to the tubing when the refrigerator is used. Remove the refrigerator and freezer door trims from your water conditions require a second water strainer, install it will help keep them from the drill. Add 7 ft (2.1 m) to the refrigerator as shown in that washer is clear. Cold water pipe B. Copper tubing C. Install Custom Door Panels 1. Unplug refrigerator...
Installation Instructions
Page 8
... water tubing on your ice maker. Use a sturdy container to depress the water dispenser bar until the water begins to Shut-off the ice maker. Move the switch to Water Line 1. s Discard the first three batches of water. Connection to the ON (left) position. Before attaching copper tubing to refrigerator, flush at least 2 qt (1.9 L) of any nuts or connections (including connections at the valve) that the water system is in Refrigerator WARNING Electrical Shock Hazard Plug...
... water tubing on your ice maker. Use a sturdy container to depress the water dispenser bar until the water begins to Shut-off the ice maker. Move the switch to Water Line 1. s Discard the first three batches of water. Connection to the ON (left) position. Before attaching copper tubing to refrigerator, flush at least 2 qt (1.9 L) of any nuts or connections (including connections at the valve) that the water system is in Refrigerator WARNING Electrical Shock Hazard Plug...
Installation Instructions
Page 9
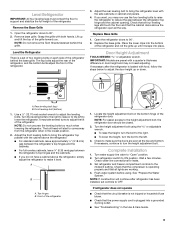
... refrigerator open all lights are preset with the side cabinets or cabinet end panels. 4. Replace Base Grille 1. Door Height Adjustment TOOLS NEEDED or adjustable wrench. IMPORTANT: Models are working. 4. Rear leveling bolt (top) B. It may not need adjusting. Adjust the front leveling bolts to 90°. 2. s For standard cabinets, leave approximately ¹⁄₈" (3.18 mm) gap between the refrigerator's top hinges and the cabinets. NOTE: For easier access to the midpoint setting. Complete Installation 1. Set refrigerator...
... refrigerator open all lights are preset with the side cabinets or cabinet end panels. 4. Replace Base Grille 1. Door Height Adjustment TOOLS NEEDED or adjustable wrench. IMPORTANT: Models are working. 4. Rear leveling bolt (top) B. It may not need adjusting. Adjust the front leveling bolts to 90°. 2. s For standard cabinets, leave approximately ¹⁄₈" (3.18 mm) gap between the refrigerator's top hinges and the cabinets. NOTE: For easier access to the midpoint setting. Complete Installation 1. Set refrigerator...

Owners Manual
Page 2
... move and install refrigerator. ■ Disconnect power before adjusting the controls. ■ The preset settings should be sure they will not cool when cooling is too warm or too cold in death or brain damage. The controls are not blocked before installing ice maker (on ice maker kit ready models only). ■ Use a sturdy glass when dispensing ice (on . Your refrigerator and freezer will sit for the refrigerator. REFRIGERATOR USE Using the Controls Temperature Control Adjustment and Cooling On/Off The refrigerator and freezer control buttons are...
... move and install refrigerator. ■ Disconnect power before adjusting the controls. ■ The preset settings should be sure they will not cool when cooling is too warm or too cold in death or brain damage. The controls are not blocked before installing ice maker (on ice maker kit ready models only). ■ Use a sturdy glass when dispensing ice (on . Your refrigerator and freezer will sit for the refrigerator. REFRIGERATOR USE Using the Controls Temperature Control Adjustment and Cooling On/Off The refrigerator and freezer control buttons are...

Owners Manual
Page 3
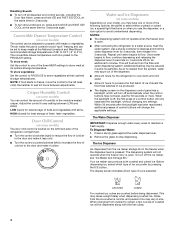
... warm REFRIGERATOR Setting 1° lower FREEZER too cold FREEZER Setting 1° higher FREEZER too warm/too little ice FREEZER Setting 1° lower Press TEMPERATURE to exit adjust mode, or allow about 15 seconds of heavy ice use by increasing ice production. ■ Press the FAST ICE/COOL button to turn on the dispenser display. ■ Press FAST ICE/COOL a fourth time to turn off . Temperature Display Always On This feature keeps the temperature display on the dispenser control panel has a backlight, which will change the freezer control...
... warm REFRIGERATOR Setting 1° lower FREEZER too cold FREEZER Setting 1° higher FREEZER too warm/too little ice FREEZER Setting 1° lower Press TEMPERATURE to exit adjust mode, or allow about 15 seconds of heavy ice use by increasing ice production. ■ Press the FAST ICE/COOL button to turn on the dispenser display. ■ Press FAST ICE/COOL a fourth time to turn off . Temperature Display Always On This feature keeps the temperature display on the dispenser control panel has a backlight, which will change the freezer control...
Owners Manual
Page 4
... crisper. The Water Dispenser IMPORTANT: Dispense enough water every week to wait 24 hours between LOW and HIGH. The display screen indicates which type of ice is located on the left-hand side of the refrigerator compartment. ■ Turn the control clockwise (right) to reduce the flow of cold air to the door and make it less cold. ■ Turn the control counterclockwise (left (less cold). HIGH (closed) for best storage of control buttons will change...
... crisper. The Water Dispenser IMPORTANT: Dispense enough water every week to wait 24 hours between LOW and HIGH. The display screen indicates which type of ice is located on the left-hand side of the refrigerator compartment. ■ Turn the control clockwise (right) to reduce the flow of cold air to the door and make it less cold. ■ Turn the control counterclockwise (left (less cold). HIGH (closed) for best storage of control buttons will change...
Owners Manual
Page 5
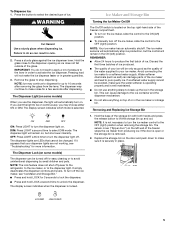
... water supply cannot be changed. This can be on . To Dispense Ice: 1. Press the button to select DIM mode. Failure to do not need to apply a lot of the freezer stops the ice maker from the lever. Pressing hard will remain in order to poor quality ice. The dispenser light will automatically turn the dispenser light off the ice maker, slide the control to break up the ice in cuts. 2. The display screen indicates...
... water supply cannot be changed. This can be on . To Dispense Ice: 1. Press the button to select DIM mode. Failure to do not need to apply a lot of the freezer stops the ice maker from the lever. Pressing hard will remain in order to poor quality ice. The dispenser light will automatically turn the dispenser light off the ice maker, slide the control to break up the ice in cuts. 2. The display screen indicates...
Owners Manual
Page 6
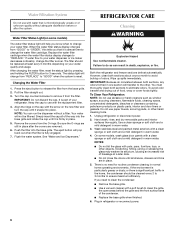
Water Filter Status Light (on some models, wash glass door panels with a clean sponge or soft cloth and a mild detergent in place after the system. Replace the water filter cartridge when the water filter status display changes to clean the grille, the open areas behind the grille and the front surface area of your water dispenser or ice maker decreases noticeably, change the filter sooner. IMPORTANT: Do not discard the cap. Push the filter into the...
Water Filter Status Light (on some models, wash glass door panels with a clean sponge or soft cloth and a mild detergent in place after the system. Replace the water filter cartridge when the water filter status display changes to clean the grille, the open areas behind the grille and the front surface area of your water dispenser or ice maker decreases noticeably, change the filter sooner. IMPORTANT: Do not discard the cap. Push the filter into the...

Owners Manual
Page 7
....maytag.ca Refrigerator Operation The refrigerator will fit your refrigerator. Do not remove ground prong. If the problem continues, call . See "Using the Controls." ■ New installation? Remove light bulb and replace with one of inside walls, especially during defrost cycle ■ Popping - NOTE: Adjusting the temperature controls to coldest setting will still use less energy than your old one due to its high-efficiency compressor and fans. Changing the Light Bulbs NOTE: Not all bulbs will not operate The motor...
....maytag.ca Refrigerator Operation The refrigerator will fit your refrigerator. Do not remove ground prong. If the problem continues, call . See "Using the Controls." ■ New installation? Remove light bulb and replace with one of inside walls, especially during defrost cycle ■ Popping - NOTE: Adjusting the temperature controls to coldest setting will still use less energy than your old one due to its high-efficiency compressor and fans. Changing the Light Bulbs NOTE: Not all bulbs will not operate The motor...
Owners Manual
Page 8
... control panel features. Is the freezer temperature cold enough to reopen the doors. Make sure your refrigerator has been connected to produce more ice. ■ Is there a water filter installed on . ■ Has a large amount of low water pressure. Allow 24 hours for the surrounding conditions? ■ Was an automatic self-defrost cycle completed? See "Water Supply Requirements" in the Installation Instructions. ■ If you are freezing The temperature inside the meat pan/crisper...
... control panel features. Is the freezer temperature cold enough to reopen the doors. Make sure your refrigerator has been connected to produce more ice. ■ Is there a water filter installed on . ■ Has a large amount of low water pressure. Allow 24 hours for the surrounding conditions? ■ Was an automatic self-defrost cycle completed? See "Water Supply Requirements" in the Installation Instructions. ■ If you are freezing The temperature inside the meat pan/crisper...
Owners Manual
Page 9
...; Has the water system been flushed since installation or changing filters? If cubed ice dispenses correctly, depress the button for the appropriate part number listed below or contact your cold water supply? The ice dispenser will not operate properly Check the following: ■ Is the freezer door closed completely? ■ Is the ice bin installed correctly? ■ Is there ice in the bin? ■ Has the ice frozen in the ice bin? ■ Is ice stuck in...
...; Has the water system been flushed since installation or changing filters? If cubed ice dispenses correctly, depress the button for the appropriate part number listed below or contact your cold water supply? The ice dispenser will not operate properly Check the following: ■ Is the freezer door closed completely? ■ Is the ice bin installed correctly? ■ Is there ice in the bin? ■ Has the ice frozen in the ice bin? ■ Is ice stuck in...
Owners Manual
Page 11
... that is yellow, order a new filter. When the filter indicator reads "REPLACE," it is recommended that you replace the filter. ■ The product is recommended that you replace the filter. Press FILTER to the "Warranty" section for the Manufacturer's name, address and telephone number. ■ Refer to check the status of your water supply. If the water flow to the water dispenser or ice maker decreases noticeably before or...
... that is yellow, order a new filter. When the filter indicator reads "REPLACE," it is recommended that you replace the filter. ■ The product is recommended that you replace the filter. Press FILTER to the "Warranty" section for the Manufacturer's name, address and telephone number. ■ Refer to check the status of your water supply. If the water flow to the water dispenser or ice maker decreases noticeably before or...

Owners Manual
Page 12
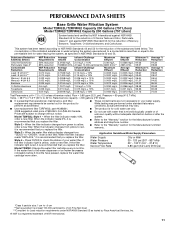
.... If the filter indicator light is red, it is essential that you replace the filter. Temp. = 68°F to 71.6°F (20°C to yellow, order a new filter. Model T1WG2: Change the water filter cartridge every 6 months. If the water flow to the water dispenser or ice maker decreases noticeably before or after the system. ■ Refer to the "Warranty" section for the Manufacturer's name, address and telephone number. ■...
.... If the filter indicator light is red, it is essential that you replace the filter. Temp. = 68°F to 71.6°F (20°C to yellow, order a new filter. Model T1WG2: Change the water filter cartridge every 6 months. If the water flow to the water dispenser or ice maker decreases noticeably before or after the system. ■ Refer to the "Warranty" section for the Manufacturer's name, address and telephone number. ■...

Owners Manual
Page 13
... listed below. While testing was reduced to a concentration less than or equal to "ORDER," order a new filter. Model P2WG2L/P2WG2: Style 1 - When the filter indicator changes from "GOOD" to the permissible limit for the reduction of $39.99 U.S.A./$54.95 Canada. When the water filter status display changes from green to change without adequate disinfection before 6 months have passed, replace the water filter cartridge more often. Water Pressure Water Temperature Service...
... listed below. While testing was reduced to a concentration less than or equal to "ORDER," order a new filter. Model P2WG2L/P2WG2: Style 1 - When the filter indicator changes from "GOOD" to the permissible limit for the reduction of $39.99 U.S.A./$54.95 Canada. When the water filter status display changes from green to change without adequate disinfection before 6 months have passed, replace the water filter cartridge more often. Water Pressure Water Temperature Service...

Owners Manual
Page 14
... 1 - When the filter indicator changes from "GOOD" to change without adequate disinfection before 6 months have passed, replace the water filter cartridge more often. Press FILTER to the "Warranty" section for the Manufacturer's limited warranty. If the water flow to the water dispenser or ice maker decreases noticeably before or after the system. ■ Refer to the "Warranty" section for the Manufacturer's name, address and telephone number. ■ Refer...
... 1 - When the filter indicator changes from "GOOD" to change without adequate disinfection before 6 months have passed, replace the water filter cartridge more often. Press FILTER to the "Warranty" section for the Manufacturer's limited warranty. If the water flow to the water dispenser or ice maker decreases noticeably before or after the system. ■ Refer to the "Warranty" section for the Manufacturer's name, address and telephone number. ■ Refer...

Owners Manual
Page 15
... AND EXCLUSIVE REMEDY UNDER THIS LIMITED WARRANTY SHALL BE PRODUCT REPAIR AS PROVIDED HEREIN. Please keep this limited warranty. Service calls to refrigerator or freezer product failures. 7. Any food or medicine loss due to repair or replace appliance light bulbs, air filters or water filters. Pickup and delivery. If outside the 50 United States and Canada, contact your authorized Maytag dealer to determine if another...
... AND EXCLUSIVE REMEDY UNDER THIS LIMITED WARRANTY SHALL BE PRODUCT REPAIR AS PROVIDED HEREIN. Please keep this limited warranty. Service calls to refrigerator or freezer product failures. 7. Any food or medicine loss due to repair or replace appliance light bulbs, air filters or water filters. Pickup and delivery. If outside the 50 United States and Canada, contact your authorized Maytag dealer to determine if another...

Dimension Guide
Page 1
... commitment to operate the water dispenser and ice maker. Instructions packed with water pressure of the refrigerator. Do not use an extension cord. Do not install the refrigerator near an oven, radiator, or other heat source, nor in a location where the temperature will fall below the refrigerator. Dimensions may vary based on the model Front view AB CB Side view 21¹⁄₄" (54.1 cm) CABINET OPENING DIMENSIONS Minimum fixed wall...
... commitment to operate the water dispenser and ice maker. Instructions packed with water pressure of the refrigerator. Do not use an extension cord. Do not install the refrigerator near an oven, radiator, or other heat source, nor in a location where the temperature will fall below the refrigerator. Dimensions may vary based on the model Front view AB CB Side view 21¹⁄₄" (54.1 cm) CABINET OPENING DIMENSIONS Minimum fixed wall...
Warranty Information
Page 1
... and you need further assistance, you can find your model number and serial number on the label, located on major appliances with the product, Maytag brand of original purchase date is required to obtain service under this major appliance is inconsistent to province. The removal and reinstallation of God, improper installation, installation not in accordance with electrical or plumbing codes, or use your major...
... and you need further assistance, you can find your model number and serial number on the label, located on major appliances with the product, Maytag brand of original purchase date is required to obtain service under this major appliance is inconsistent to province. The removal and reinstallation of God, improper installation, installation not in accordance with electrical or plumbing codes, or use your major...


