Use and Care Manual
Page 3
... service or replace any part of fire, electric shock, serious injury or death when using the refrigerator. 2. Have worn power cords and/or loose plugs replaced by a qualified electrician. 9. Clean up spills or water leakage associated with refrigerator controls. 12. Important Safety Instructions WARNING To reduce risk of refrigerator unless specifically recommended in Use and Care Guide or published user-repair instructions. Be sure to operate on a separate 115 volt, 15 amp., 60 cycle line. 8. Refrigerator...
... service or replace any part of fire, electric shock, serious injury or death when using the refrigerator. 2. Have worn power cords and/or loose plugs replaced by a qualified electrician. 9. Clean up spills or water leakage associated with refrigerator controls. 12. Important Safety Instructions WARNING To reduce risk of refrigerator unless specifically recommended in Use and Care Guide or published user-repair instructions. Be sure to operate on a separate 115 volt, 15 amp., 60 cycle line. 8. Refrigerator...

Use and Care Manual
Page 4
.... • Do not install where temperature falls below 55° F (13° C) or rises above 110° F (43° C). Connect power only after replacing doors. • Green ground wire must be opened wider. Remove toe grille (see page 4). • Open both doors 180°, or as wide as a guide for proper air circulation. Note: For refrigerators in immediately may make your refrigerator, allow additional space so...
.... • Do not install where temperature falls below 55° F (13° C) or rises above 110° F (43° C). Connect power only after replacing doors. • Green ground wire must be opened wider. Remove toe grille (see page 4). • Open both doors 180°, or as wide as a guide for proper air circulation. Note: For refrigerators in immediately may make your refrigerator, allow additional space so...
Use and Care Manual
Page 5
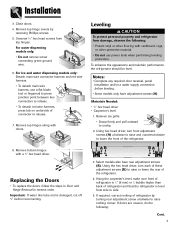
.... 5. Using the hex head driver, turn front adjustment screws (A) clockwise to raise and counterclockwise to raise or lower the rear of the refrigerator. 4. Remove top hinges along with doors. 8. Replacing the Doors • To replace the doors, follow the steps in Door and Hinge Removal in reverse order. Notes: • Complete any required door reversal, panel installation and/or a water supply connection before reconnecting. If required, correct rocking of the refrigerator. Important: If water line tube end...
.... 5. Using the hex head driver, turn front adjustment screws (A) clockwise to raise and counterclockwise to raise or lower the rear of the refrigerator. 4. Remove top hinges along with doors. 8. Replacing the Doors • To replace the doors, follow the steps in Door and Hinge Removal in reverse order. Notes: • Complete any required door reversal, panel installation and/or a water supply connection before reconnecting. If required, correct rocking of the refrigerator. Important: If water line tube end...
Use and Care Manual
Page 6
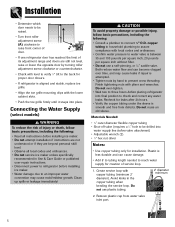
... Needed: • 1⁄4" outer diameter flexible copper tubing • Shut-off valve (requires a 1⁄4" hole to be raised. • Turn front roller adjustment screw (A) clockwise to raise front corner of door. • If one refrigerator door has reached the limit of service loop. 1. Avoid kinks in Use & Care Guide or published user-repair instructions. • Disconnect power to refrigerator before installing ice maker. • Water damage due to an improper water connection may cause leaks...
... Needed: • 1⁄4" outer diameter flexible copper tubing • Shut-off valve (requires a 1⁄4" hole to be raised. • Turn front roller adjustment screw (A) clockwise to raise front corner of door. • If one refrigerator door has reached the limit of service loop. 1. Avoid kinks in Use & Care Guide or published user-repair instructions. • Disconnect power to refrigerator before installing ice maker. • Water damage due to an improper water connection may cause leaks...
Use and Care Manual
Page 8
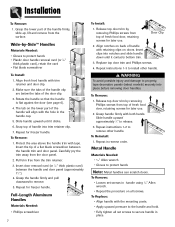
.... Door Clip 2. Repeat instructions 1-3 to release. 3. To Remove: 1. Slide handle upward approximately 3⁄4" to install other handle. Repeat in the handle cap. 5. To Replace: • Align handle with the hole in reverse order. Rotate the handle so that the handle is flat against the door (see page 6). 4. Pull trim free from top of a flat blade screwdriver between the handle and door panel (approximately 11⁄2"). 4. Insert door removal card...
.... Door Clip 2. Repeat instructions 1-3 to release. 3. To Remove: 1. Slide handle upward approximately 3⁄4" to install other handle. Repeat in the handle cap. 5. To Replace: • Align handle with the hole in reverse order. Rotate the handle so that the handle is flat against the door (see page 6). 4. Pull trim free from top of a flat blade screwdriver between the handle and door panel (approximately 11⁄2"). 4. Insert door removal card...

Use and Care Manual
Page 10
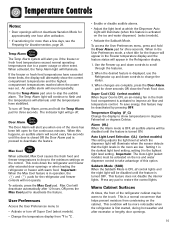
... hours for temperatures to next lower number by pressing the pad. Freezer too cold Set the Freezer control to defrost less frequently, conserving energy. After replacing the filter, press and hold the Reset Filter pad for 24 hours 9 before making a new temperature adjustment. Triple Cool Climate Control (select models) The control is located at 38° F (3° C) in the fresh food compartment and 0° F (-17° C) in the refrigerator, the yellow Order light will...
... hours for temperatures to next lower number by pressing the pad. Freezer too cold Set the Freezer control to defrost less frequently, conserving energy. After replacing the filter, press and hold the Reset Filter pad for 24 hours 9 before making a new temperature adjustment. Triple Cool Climate Control (select models) The control is located at 38° F (3° C) in the fresh food compartment and 0° F (-17° C) in the refrigerator, the yellow Order light will...
Use and Care Manual
Page 11
... energy, this option. Temperature Controls Notes: • Door openings will not deactivate Vacation Mode for approximately one of the doors has been left open for five continuous minutes. To access the User Preferences menu, press and hold the Temp Alarm pad for three seconds. The Temp Alarm light will continue to flash and the temperatures will go off Super Cool (select models). • Change the temperature display from condensing on the ice and water dispenser control...
... energy, this option. Temperature Controls Notes: • Door openings will not deactivate Vacation Mode for approximately one of the doors has been left open for five continuous minutes. To access the User Preferences menu, press and hold the Temp Alarm pad for three seconds. The Temp Alarm light will continue to flash and the temperatures will go off Super Cool (select models). • Change the temperature display from condensing on the ice and water dispenser control...
Use and Care Manual
Page 14
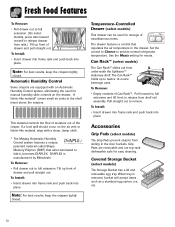
... normal refrigerator temperature. To Install: • Insert drawer into frame rails and push back into place. A fabric-like material, wipe with a clean, damp cloth. * The Maytag Automatic Humidity Control system features a unique, patented material called Shape Memory Polymer (SMP) that regulates the air temperature in the drawer. Can Rack™ (select models) The Can Rack™ slides out from shelf rail assembly. Tilt...
... normal refrigerator temperature. To Install: • Insert drawer into frame rails and push back into place. A fabric-like material, wipe with a clean, damp cloth. * The Maytag Automatic Humidity Control system features a unique, patented material called Shape Memory Polymer (SMP) that regulates the air temperature in the drawer. Can Rack™ (select models) The Can Rack™ slides out from shelf rail assembly. Tilt...
Use and Care Manual
Page 17
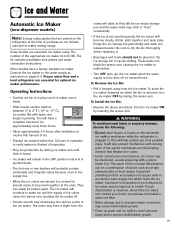
... lukewarm water. The motor may have a factory installed ice maker. To Install the Ice Bin: • Reverse the above procedure. Connect the ice maker to health. It will help protect you from the ice maker. Other models have a slight hum, the cubes will probably contain undersized and irregular cubes because of the appropriate ice maker kit is plugged in the supply line. • When the ice cubes are posted on the refrigerator at...
... lukewarm water. The motor may have a factory installed ice maker. To Install the Ice Bin: • Reverse the above procedure. Connect the ice maker to health. It will help protect you from the ice maker. Other models have a slight hum, the cubes will probably contain undersized and irregular cubes because of the appropriate ice maker kit is plugged in the supply line. • When the ice cubes are posted on the refrigerator at...
Use and Care Manual
Page 18
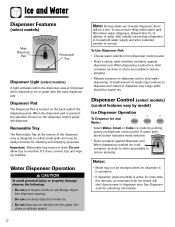
... to stop water dispensing. Large spills should be easily removed for unlocking information. 17 Dispenser Control (select models) (control features vary by model) Ice Dispenser Operation To Dispense Ice and Water: • Select Water, Crush or Cube ice mode by pushing button on dispenser pad to break ice. • Do not dispense ice directly into dispenser opening. • Do not use of the dispensing area. When the dispenser pad is located on the dispenser control panel will be changed while ice dispenser is in dispenser tray. Removable Tray The Removable Tray...
... to stop water dispensing. Large spills should be easily removed for unlocking information. 17 Dispenser Control (select models) (control features vary by model) Ice Dispenser Operation To Dispense Ice and Water: • Select Water, Crush or Cube ice mode by pushing button on dispenser pad to break ice. • Do not dispense ice directly into dispenser opening. • Do not use of the dispensing area. When the dispenser pad is located on the dispenser control panel will be changed while ice dispenser is in dispenser tray. Removable Tray The Removable Tray...
Use and Care Manual
Page 19
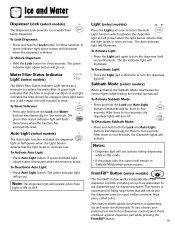
... indicator light will flash three times when the function has successfully reset. To Activate Sabbath Mode: • Press and hold the Lock button for dispensing water. A green light indicates that the light levels in this mode. • If the power fails, the control will turn the dispenser light on continuously. Notes: • Dispenser light will not activate during dispensing while in room are low. Auto Light (select models) The Auto Light function activates the dispenser light...
... indicator light will flash three times when the function has successfully reset. To Activate Sabbath Mode: • Press and hold the Lock button for dispensing water. A green light indicates that the light levels in this mode. • If the power fails, the control will turn the dispenser light on continuously. Notes: • Dispenser light will not activate during dispensing while in room are low. Auto Light (select models) The Auto Light function activates the dispenser light...
Use and Care Manual
Page 20
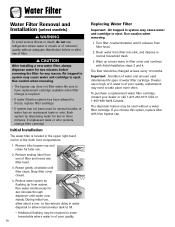
... to have replacement cartridge available when filter change filter cartridge. Remove sealing label from filter into filter head. 3. Use caution when removing. 1. The dispenser feature may be changed at least every 12 months. Water Filter Water Filter Removal and Installation (select models) WARNING To avoid serious illness or death, do not use refrigerator where water is of poor quality, replacement may need to take place more often. Wipe up excess water in normal household trash. 3. Run water continuously...
... to have replacement cartridge available when filter change filter cartridge. Remove sealing label from filter into filter head. 3. Use caution when removing. 1. The dispenser feature may be changed at least every 12 months. Water Filter Water Filter Removal and Installation (select models) WARNING To avoid serious illness or death, do not use refrigerator where water is of poor quality, replacement may need to take place more often. Wipe up excess water in normal household trash. 3. Run water continuously...
Use and Care Manual
Page 21
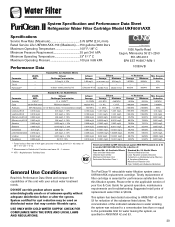
...,000/L Asbestos 99% Reduction 107 108 fibers/L; Water Filter System Specification and Performance Data Sheet TM Refrigerator Water Filter Cartridge Model UKF8001AXX Specifications Service Flow Rate (Maximum 0.78 GPM (2.9 L/min) Rated Service Life UKF8001AXX-750 (Maximum) ......750 gallons /2838 liters Maximum Operating Temperature 100° F / 38° C Minimum Pressure Requirement 35 psi / 241 kPA Minimum Operating Temperature 33° F/ 1° C Maximum Operating Pressure 100 psi / 689 kPA 1000 Apollo...
...,000/L Asbestos 99% Reduction 107 108 fibers/L; Water Filter System Specification and Performance Data Sheet TM Refrigerator Water Filter Cartridge Model UKF8001AXX Specifications Service Flow Rate (Maximum 0.78 GPM (2.9 L/min) Rated Service Life UKF8001AXX-750 (Maximum) ......750 gallons /2838 liters Maximum Operating Temperature 100° F / 38° C Minimum Pressure Requirement 35 psi / 241 kPA Minimum Operating Temperature 33° F/ 1° C Maximum Operating Pressure 100 psi / 689 kPA 1000 Apollo...
Use and Care Manual
Page 29
...: For models with water filter, remove the water filter cartridge and install the filter bypass. If your refrigerator has an automatic ice maker: • Shut off the water supply to the ice maker at least one day ahead of time. • After the last load of baking soda in and reset controls (see page 19). • After installing the water filter, run water through step 7. • Secure all loose items such as shelves and drawers by a qualified servicer...
...: For models with water filter, remove the water filter cartridge and install the filter bypass. If your refrigerator has an automatic ice maker: • Shut off the water supply to the ice maker at least one day ahead of time. • After the last load of baking soda in and reset controls (see page 19). • After installing the water filter, run water through step 7. • Secure all loose items such as shelves and drawers by a qualified servicer...
Use and Care Manual
Page 31
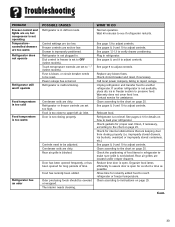
.... Plug in freezer section to adjust controls. Clean according to adjust controls. Clean, if necessary, according to verify drawer positioning. Rear air grilles are too low. Dial control in freezer is not plugged in defrost mode. Refrigerator or freezer controls are set to OFF (select models). The interior needs cleaning. See pages 12-13 to the chart on page 25. Replace any blown fuses. Control settings are located under crisper drawers. Call local power company listing to instructions on page 25. Contact service...
.... Plug in freezer section to adjust controls. Clean according to adjust controls. Clean, if necessary, according to verify drawer positioning. Rear air grilles are too low. Dial control in freezer is not plugged in defrost mode. Refrigerator or freezer controls are set to OFF (select models). The interior needs cleaning. See pages 12-13 to the chart on page 25. Replace any blown fuses. Control settings are located under crisper drawers. Call local power company listing to instructions on page 25. Contact service...
Use and Care Manual
Page 33
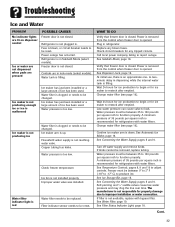
... water filters. Call local power company listing to leak. Low water pressure can cause valve to report outage. Confirm ice maker arm is not installed properly. Freezer must be reset. Improper water valve was installed. See Connecting the Water Supply, pages 5 and 6. Self-piercing and 3⁄16" saddle valves cause low water pressure and may clog the line over time. Refrigerator is in refrigerator. Water filter is clogged or needs to function properly. Ice bin is down. Troubleshooting Ice and Water PROBLEM...
... water filters. Call local power company listing to leak. Low water pressure can cause valve to report outage. Confirm ice maker arm is not installed properly. Freezer must be reset. Improper water valve was installed. See Connecting the Water Supply, pages 5 and 6. Self-piercing and 3⁄16" saddle valves cause low water pressure and may clog the line over time. Refrigerator is in refrigerator. Water filter is clogged or needs to function properly. Ice bin is down. Troubleshooting Ice and Water PROBLEM...

Use and Care Manual
Page 34
... when first using copper tubing for refrigerators with use. Troubleshooting PROBLEM Ice forms in inlet tube to ice maker Refrigerator is leaking water Water flow is slower than normal Dispenser water is not cold Water appears cloudy Particles in water will disappear with water filters. Water valve not opened completely. Water has settled into water lines outside holding tank has been depleted. Carbon dust from cartridge. Concentrations of 35 pounds per square inch to complete water connection. Open saddle valve completely. The...
... when first using copper tubing for refrigerators with use. Troubleshooting PROBLEM Ice forms in inlet tube to ice maker Refrigerator is leaking water Water flow is slower than normal Dispenser water is not cold Water appears cloudy Particles in water will disappear with water filters. Water valve not opened completely. Water has settled into water lines outside holding tank has been depleted. Carbon dust from cartridge. Concentrations of 35 pounds per square inch to complete water connection. Open saddle valve completely. The...
Use and Care Manual
Page 36
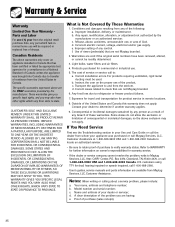
... Need Service First see the Troubleshooting section in Canada that are the ONLY warranties provided by any person as a result of any control. c. e. Light bulbs, water filters and air filters. 4. The specific warranties expressed above warranties only cover an appliance installed in your dealer or servicer; Improper setting of your Use and Care Guide or call Maytag Services, LLC, Customer Assistance at 1-800-688-9900 USA and 1-800-688-2002 Canada to locate an authorized servicer...
... Need Service First see the Troubleshooting section in Canada that are the ONLY warranties provided by any person as a result of any control. c. e. Light bulbs, water filters and air filters. 4. The specific warranties expressed above warranties only cover an appliance installed in your dealer or servicer; Improper setting of your Use and Care Guide or call Maytag Services, LLC, Customer Assistance at 1-800-688-9900 USA and 1-800-688-2002 Canada to locate an authorized servicer...

Installation Instructions
Page 2
...electrical supply before using your refrigerator in Use & Care Guide or published user-repair instructions. Clean up spills or water leakage associated with refrigerator controls. 12. Be sure to malfunction or leak. SAVE THESE INSTRUCTIONS 2 Do not ground to Installation Instructions. Install refrigerator according to a cold-water pipe. 7. Do not tamper with water installation. Observe all instructions before attempting any part of explosive fumes. 10. All connections for items being stored in refrigerator. 9. Do not service or replace any service...
...electrical supply before using your refrigerator in Use & Care Guide or published user-repair instructions. Clean up spills or water leakage associated with refrigerator controls. 12. Be sure to malfunction or leak. SAVE THESE INSTRUCTIONS 2 Do not ground to Installation Instructions. Install refrigerator according to a cold-water pipe. 7. Do not tamper with water installation. Observe all instructions before attempting any part of explosive fumes. 10. All connections for items being stored in refrigerator. 9. Do not service or replace any service...

Installation Instructions
Page 4
Connecting the Water Supply (select models) WARNING To reduce the risk of connector to release. 7. CAUTION To avoid property damage or possible injury, follow the steps in Door and Hinge Removal in Use & Care Guide or published user-repair instructions. • Disconnect power to refrigerator before placing refrigerator into final position to assure compliance with doors. 8. Do not overtighten. • Wait two to three hours before installing ice maker. • Water damage...
Connecting the Water Supply (select models) WARNING To reduce the risk of connector to release. 7. CAUTION To avoid property damage or possible injury, follow the steps in Door and Hinge Removal in Use & Care Guide or published user-repair instructions. • Disconnect power to refrigerator before placing refrigerator into final position to assure compliance with doors. 8. Do not overtighten. • Wait two to three hours before installing ice maker. • Water damage...


