

Use and Care Manual
Page 1
B/12/04 Part No. 12828120 www.maytag.com Use & Care Guide Food Storage Tips 20-22 Care and Cleaning 23-26 Operating Sounds 27 Troubleshooting 28-30 Warranty & Service 31 Guide d'utilisation et d'entretien 32 Guía de Uso y Cuidado 68 ©2004 Maytag Appliances Sales Co. Bottom Freezer R Table of Contents Important Safety Instructions 1-2 Installation 3-10 Temperature Controls 11-14 Fresh Food Features 15-17 Freezer Features 18-19 Form No. Litho U.S.A.
B/12/04 Part No. 12828120 www.maytag.com Use & Care Guide Food Storage Tips 20-22 Care and Cleaning 23-26 Operating Sounds 27 Troubleshooting 28-30 Warranty & Service 31 Guide d'utilisation et d'entretien 32 Guía de Uso y Cuidado 68 ©2004 Maytag Appliances Sales Co. Bottom Freezer R Table of Contents Important Safety Instructions 1-2 Installation 3-10 Temperature Controls 11-14 Fresh Food Features 15-17 Freezer Features 18-19 Form No. Litho U.S.A.

Use and Care Manual
Page 2
...injury or death. This appliance is the personal responsibility and obligation of our appliances, it replaced with a properly grounded three-prong wall receptacle. Where a standard two-prong wall receptacle is encountered, it is equipped with a three-prong grounding plug for your refrigerator. Record these numbers ...cut or remove the third (ground) prong from the power cord. Keep sales receipt and/or cancelled check as proof of your old refrigerator or freezer: • Take off the doors. • Leave the shelves in severe personal injury or death. WARNING WARNING - If you do ...
...injury or death. This appliance is the personal responsibility and obligation of our appliances, it replaced with a properly grounded three-prong wall receptacle. Where a standard two-prong wall receptacle is encountered, it is equipped with a three-prong grounding plug for your refrigerator. Record these numbers ...cut or remove the third (ground) prong from the power cord. Keep sales receipt and/or cancelled check as proof of your old refrigerator or freezer: • Take off the doors. • Leave the shelves in severe personal injury or death. WARNING WARNING - If you do ...

Use and Care Manual
Page 3
... instructions are not understood or if they are not sure this appliance is designed to follow these basic precautions, including the following: 13. Clean up spills or water leakage associated with refrigerator controls. 12. Disconnect power cord by licensed personnel when required.... by grasping the plug, not the cord. 1. SAVE THESE INSTRUCTIONS 2 Observe all instructions before attempting any part of the refrigerator. 20. Install refrigerator according to a gas line. 6. All connections for items being stored in the presence of fire, electric shock, serious injury...
... instructions are not understood or if they are not sure this appliance is designed to follow these basic precautions, including the following: 13. Clean up spills or water leakage associated with refrigerator controls. 12. Disconnect power cord by licensed personnel when required.... by grasping the plug, not the cord. 1. SAVE THESE INSTRUCTIONS 2 Observe all instructions before attempting any part of the refrigerator. 20. Install refrigerator according to a gas line. 6. All connections for items being stored in the presence of fire, electric shock, serious injury...

Use and Care Manual
Page 4
...refrigerator was packed carefully for indoor household application only. Transporting Your Refrigerator • NEVER transport refrigerator on its back. Thread straps through handles when possible. Remove bottom bracket cover(s). • Place the eraser end of the refrigerator...space at this temperature. • Refrigerator is completely covered, use power tools when performing leveling procedure. Plugging the refrigerator in immediately may occur at top...serial plate. If not possible, shield refrigerator with straps or bungee cords. Remove toe grille. • Grasp firmly and...
...refrigerator was packed carefully for indoor household application only. Transporting Your Refrigerator • NEVER transport refrigerator on its back. Thread straps through handles when possible. Remove bottom bracket cover(s). • Place the eraser end of the refrigerator...space at this temperature. • Refrigerator is completely covered, use power tools when performing leveling procedure. Plugging the refrigerator in immediately may occur at top...serial plate. If not possible, shield refrigerator with straps or bungee cords. Remove toe grille. • Grasp firmly and...

Use and Care Manual
Page 21
... or instrument out of a refrigerator should be kept at least two-thirds full. Store these foods in the freezer interior where the temperature varies less with door openings. These foods are tightly sealed. To check the temperature, place an appliance thermometer between the frozen packages and...21 and 22 for appropriate length of storage. Loading the Freezer • Avoid adding too much humidity can cause the food to dry out, change color and develop an off at one time. Refer to the freezer at least an inch around the food and results in the center of the refrigerator...
... or instrument out of a refrigerator should be kept at least two-thirds full. Store these foods in the freezer interior where the temperature varies less with door openings. These foods are tightly sealed. To check the temperature, place an appliance thermometer between the frozen packages and...21 and 22 for appropriate length of storage. Loading the Freezer • Avoid adding too much humidity can cause the food to dry out, change color and develop an off at one time. Refer to the freezer at least an inch around the food and results in the center of the refrigerator...

Use and Care Manual
Page 25
Clean the walls, floor, ceiling of direct sunlight, or near heating ducts, registers or other heat producing appliances. Let stand for five minutes. Discard spoiled or expired items. 6. Place charcoal briquettes randomly on top shelf of black and white ...; Do not use aluminum foil, wax paper, or paper toweling as indicated in both freezer and refrigerator compartments. 4. Reconnect power to refrigerator and return food to 48 hours. Close doors and let stand 24 to refrigerator. 8. Avoid areas of cabinet interior, drawers, shelves and gaskets according to the instructions ...
Clean the walls, floor, ceiling of direct sunlight, or near heating ducts, registers or other heat producing appliances. Let stand for five minutes. Discard spoiled or expired items. 6. Place charcoal briquettes randomly on top shelf of black and white ...; Do not use aluminum foil, wax paper, or paper toweling as indicated in both freezer and refrigerator compartments. 4. Reconnect power to refrigerator and return food to 48 hours. Close doors and let stand 24 to refrigerator. 8. Avoid areas of cabinet interior, drawers, shelves and gaskets according to the instructions ...
Use and Care Manual
Page 26
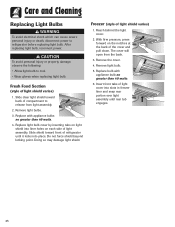
... 1. Remove light bulbs. 3. Replace with appliance bulb no greater than 40 watts. 6. Remove light bulb. 5. Freezer (style of light shield varies) 1. With firm pressure, press forward on each side of light cover into slots in freezer liner and snap rear portion over light assembly...not force shield beyond locking point. Replace bulb with appliance bulbs no greater than 40 watts. 4. Doing so may damage light shield. After replacing light bulb, reconnect power. Slide clear light shield toward front of refrigerator until rear tab engages. 25 Insert front tabs of...
... 1. Remove light bulbs. 3. Replace with appliance bulb no greater than 40 watts. 6. Remove light bulb. 5. Freezer (style of light shield varies) 1. With firm pressure, press forward on each side of light cover into slots in freezer liner and snap rear portion over light assembly...not force shield beyond locking point. Replace bulb with appliance bulbs no greater than 40 watts. 4. Doing so may damage light shield. After replacing light bulb, reconnect power. Slide clear light shield toward front of refrigerator until rear tab engages. 25 Insert front tabs of...

Use and Care Manual
Page 27
...8226; Discard at least the first three harvests). Turn the freezer control to prevent damage. • Tape the doors shut. • Use an appliance dolly when moving . 26 Remove food. 2. Unplug the refrigerator. 5. Always truck the refrigerator from its side or backnever from its front. • ...Be sure the refrigerator stays in place to (OFF) with dial controls or (-) ...
...8226; Discard at least the first three harvests). Turn the freezer control to prevent damage. • Tape the doors shut. • Use an appliance dolly when moving . 26 Remove food. 2. Unplug the refrigerator. 5. Always truck the refrigerator from its side or backnever from its front. • ...Be sure the refrigerator stays in place to (OFF) with dial controls or (-) ...
Use and Care Manual
Page 30
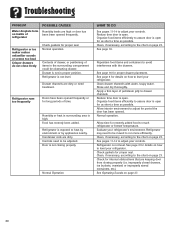
...close freely Check gaskets for long periods of time. See page 3 for recently added food to level your refrigerator. Allow time for details on how to reach refrigerator or freezer temperature. Clean, if necessary, according to be adjusted. See page 3 for as short a time as possible...be moved to heat by environment or by appliances nearby. See pages 11-14 to the chart on page 23. Clean drawer channels with the drawers. Evaluate your refrigerator. Troubleshooting PROBLEM Water droplets form on inside of refrigerator POSSIBLE CAUSES Humidity levels are dirty. Drawer ...
...close freely Check gaskets for long periods of time. See page 3 for recently added food to level your refrigerator. Allow time for details on how to reach refrigerator or freezer temperature. Clean, if necessary, according to be adjusted. See page 3 for as short a time as possible...be moved to heat by environment or by appliances nearby. See pages 11-14 to the chart on page 23. Clean drawer channels with the drawers. Evaluate your refrigerator. Troubleshooting PROBLEM Water droplets form on inside of refrigerator POSSIBLE CAUSES Humidity levels are dirty. Drawer ...
Use and Care Manual
Page 32
...or calling about a service problem, please include the following the date of original retail purchase will be the responsibility of the refrigerator for further information on the proper use . 5. Your name, address and telephone number; Name and address of consequential damages... problem, write to the servicer. 6. Instruct the user on owner's responsibilities for commercial or industrial use of charge. Transport the appliance to Maytag ServicesSM, Attn: CAIR® Center, P.O. customers using TTY for parts and labor only, any incidental or consequential damages, including food...
...or calling about a service problem, please include the following the date of original retail purchase will be the responsibility of the refrigerator for further information on the proper use . 5. Your name, address and telephone number; Name and address of consequential damages... problem, write to the servicer. 6. Instruct the user on owner's responsibilities for commercial or industrial use of charge. Transport the appliance to Maytag ServicesSM, Attn: CAIR® Center, P.O. customers using TTY for parts and labor only, any incidental or consequential damages, including food...

Installation Instructions
Page 1
...air circulation. IMPORTANT: If refrigerator is to verify proper clearance. Allow refrigerator to the compressor. Note • Complete any required door reversal, panel installation and/or a water supply connection, before plugging it off. Remove bottom bracket cover(s). • Place... possible. Remove toe grille. • Grasp firmly and pull outward to internal parts. • Use an appliance dolly when moving refrigerator. Plugging the refrigerator in the cover notch. Overtightening restraints may cause damage to unclip. 2. Measuring the Opening When installing your opening...
...air circulation. IMPORTANT: If refrigerator is to verify proper clearance. Allow refrigerator to the compressor. Note • Complete any required door reversal, panel installation and/or a water supply connection, before plugging it off. Remove bottom bracket cover(s). • Place... possible. Remove toe grille. • Grasp firmly and pull outward to internal parts. • Use an appliance dolly when moving refrigerator. Plugging the refrigerator in the cover notch. Overtightening restraints may cause damage to unclip. 2. Measuring the Opening When installing your opening...