Use and Care Guide
Page 4
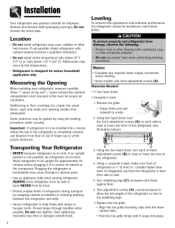
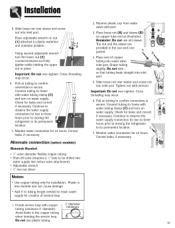
... Leveling. carpet, tile, wood floors, rugs) may make sure front of refrigerator is level from its front. • Protect outside finish. Transporting Your Refrigerator • NEVER transport refrigerator on its back. Over-tightening restraints may occur at top and '/;' space ...above 110 ° F (43 ° C). Turn stabilizing legs (C) clockwise until it in blankets or inserting padding between the refrigerator and dolly. • Secure refrigerator to verify proper clearance. If an upright position is to be gained by wrapping cabinet in to assure oil returns to unclip. ...
... Leveling. carpet, tile, wood floors, rugs) may make sure front of refrigerator is level from its front. • Protect outside finish. Transporting Your Refrigerator • NEVER transport refrigerator on its back. Over-tightening restraints may occur at top and '/;' space ...above 110 ° F (43 ° C). Turn stabilizing legs (C) clockwise until it in blankets or inserting padding between the refrigerator and dolly. • Secure refrigerator to verify proper clearance. If an upright position is to be gained by wrapping cabinet in to assure oil returns to unclip. ...
Use and Care Guide
Page 5
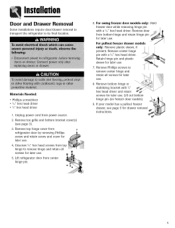
... hex head driver 1. Lift refrigerator door from power source. 2. Remove door from bottom hinge and retain hinge pin for later use . Unplug power cord from center hinge pin. Remove center hinge pin with a -_" hex head driver. Lift out bottom hinge pin (on freezer door models). Remove top hinge ...cover from top hinge to remove center hinge and retain all screws for later use . 5. Unscrew _,_" hex head screws from refrigerator door by removing Phillips screw and retain screw and...
... hex head driver 1. Lift refrigerator door from power source. 2. Remove door from bottom hinge and retain hinge pin for later use . Unplug power cord from center hinge pin. Remove center hinge pin with a -_" hex head driver. Lift out bottom hinge pin (on freezer door models). Remove top hinge ...cover from top hinge to remove center hinge and retain all screws for later use . 5. Unscrew _,_" hex head screws from refrigerator door by removing Phillips screw and retain screw and...
Use and Care Guide
Page 7
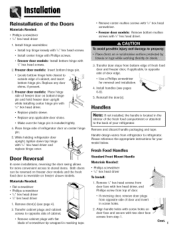
...(s) (see pages 6-8). 5. Install handles (see page 4). 2. Remove '/4" hex head screws from door face with two door face screws from bottom edge of fresh food door and freezer door, if applicable, to refrigerator. While holding refrigerator door upright, tighten down top hinge with 3/,, hex head screws. 2. Materials Needed: • Flat screwdriver • Phillips screwdriver •...
...(s) (see pages 6-8). 5. Install handles (see page 4). 2. Remove '/4" hex head screws from door face with two door face screws from bottom edge of fresh food door and freezer door, if applicable, to refrigerator. While holding refrigerator door upright, tighten down top hinge with 3/,, hex head screws. 2. Materials Needed: • Flat screwdriver • Phillips screwdriver •...
Use and Care Guide
Page 11
...wrench on tubing to its permanent location. 7. Continue to observe the water supply connection for two to three hours prior to moving the refrigerator to confirm connection is secure. Plastic is secure. Remove plastic cap from water valve inlet port. Place end of service loop. 1. Slide... Tighten nut with copper tubing (minimum 2' diameter). Continue to observe the water supply connection for two to three hours prior to moving the refrigerator to be drilled into water supply line before valve attachment) • Adjustable wrench • '//' hex nut driver Notes: • Use copper...
...wrench on tubing to its permanent location. 7. Continue to observe the water supply connection for two to three hours prior to moving the refrigerator to confirm connection is secure. Plastic is secure. Remove plastic cap from water valve inlet port. Place end of service loop. 1. Slide... Tighten nut with copper tubing (minimum 2' diameter). Continue to observe the water supply connection for two to three hours prior to moving the refrigerator to be drilled into water supply line before valve attachment) • Adjustable wrench • '//' hex nut driver Notes: • Use copper...
Use and Care Guide
Page 12
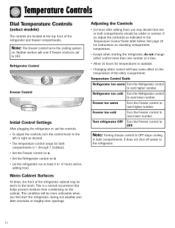
TemperatuCreontrols Dial Temperature Controls (select models) The controls are located at least 8 to 12 hours before adding food. Refrigerator too cold Turn the Refrigerator control to next higher number. Refrigerator Control Freezer Control Initial Control Settings After plugging the refrigerator in, set to the touch. This is a normal occurrence that one number at a time. • Allow...
TemperatuCreontrols Dial Temperature Controls (select models) The controls are located at least 8 to 12 hours before adding food. Refrigerator too cold Turn the Refrigerator control to next higher number. Refrigerator Control Freezer Control Initial Control Settings After plugging the refrigerator in, set to the touch. This is a normal occurrence that one number at a time. • Allow...
Use and Care Guide
Page 13
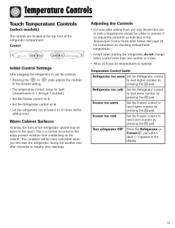
... desired setting. • The temperature control range for instructions on the cabinet. Temperature Control Guide Refrigerator too warm Set the Refrigerator control to next higher number by pressing the _ pad. Refrigerator too cold Freezer too warm Freezer too cold Set the Refrigerator control to next lower number by pressing the :_ pad. TemperatuCreontrols Touch Temperature Controls (select...
... desired setting. • The temperature control range for instructions on the cabinet. Temperature Control Guide Refrigerator too warm Set the Refrigerator control to next higher number by pressing the _ pad. Refrigerator too cold Freezer too warm Freezer too cold Set the Refrigerator control to next lower number by pressing the :_ pad. TemperatuCreontrols Touch Temperature Controls (select...

Use and Care Guide
Page 14
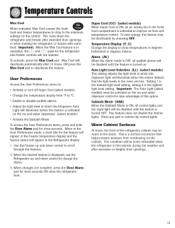
... fresh food temperatures exceed normal operating temperatures due to next higher number by pressing the _+_ pad. If the freezer or fresh food temperatures have stabilized. Turn refrigerator OFF 13 Press the Freezer_:_ pad until the door is closed OR the Door Alarm pad is in operation, the _ and...degree at the top front of the doors has been left open either the Freezer or Refrigerator _:_ pad to next lower number by pressing the _ pad. Vacation Mode The Vacation Mode feature causes the freezer to stop the audible alarm. To turn back on. Press the Temp Alarm...
... fresh food temperatures exceed normal operating temperatures due to next higher number by pressing the _+_ pad. If the freezer or fresh food temperatures have stabilized. Turn refrigerator OFF 13 Press the Freezer_:_ pad until the door is closed OR the Door Alarm pad is in operation, the _ and...degree at the top front of the doors has been left open either the Freezer or Refrigerator _:_ pad to next lower number by pressing the _ pad. Vacation Mode The Vacation Mode feature causes the freezer to stop the audible alarm. To turn back on. Press the Temp Alarm...
Use and Care Guide
Page 15
...select models) • Activate the Sabbath Mode To access the User Preferences menu, press and hold the Door Alarm pad for the refrigerator and freezer controls will deactivate automatically after excessive or lengthy door openings. 14 Important: The Auto Light (select models) must be activated on ... OFF, all audible alarms will be disabled until the feature is displayed, use the Refrigerator up and down the refrigerator and freezer after extended door openings or when loading the refrigerator or freezer with warm food. Warm Cabinet Surfaces At times, the front of this feature may ...
...select models) • Activate the Sabbath Mode To access the User Preferences menu, press and hold the Door Alarm pad for the refrigerator and freezer controls will deactivate automatically after excessive or lengthy door openings. 14 Important: The Auto Light (select models) must be activated on ... OFF, all audible alarms will be disabled until the feature is displayed, use the Refrigerator up and down the refrigerator and freezer after extended door openings or when loading the refrigerator or freezer with warm food. Warm Cabinet Surfaces At times, the front of this feature may ...
Use and Care Guide
Page 16
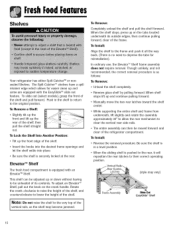
... pulling forward. • Manually move the two rear latches toward the shelf center. When shelf stops lift up the front edge of the refrigerator compartment. FreshFoodFeotures Shelves Your refrigerator has either Spill-Catcher TM or nonsealed Shelves. This shelf can then be unloaded of its outside edges, then continue pulling forward, clear...
... pulling forward. • Manually move the two rear latches toward the shelf center. When shelf stops lift up the front edge of the refrigerator compartment. FreshFoodFeotures Shelves Your refrigerator has either Spill-Catcher TM or nonsealed Shelves. This shelf can then be unloaded of its outside edges, then continue pulling forward, clear...
Use and Care Guide
Page 17
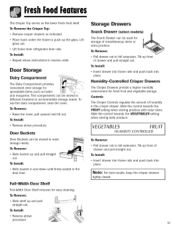
... in the crisper drawer. To Install: • Insert drawer into frame rails and push back into place. I 16 Lift glass out. • Lift frame from refrigerator liner rails. Door Storage Dairy Compartment The Dairy Compartment provides convenient door storage for . _1 storage of drawer and pull straight out. i To Install: •...
... in the crisper drawer. To Install: • Insert drawer into frame rails and push back into place. I 16 Lift glass out. • Lift frame from refrigerator liner rails. Door Storage Dairy Compartment The Dairy Compartment provides convenient door storage for . _1 storage of drawer and pull straight out. i To Install: •...
Use and Care Guide
Page 18
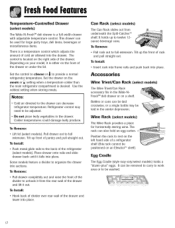
... rails to be positioned on the meats or _ setting when a temperature colder than the main refrigerator compartment is a full-width drawer with adjustable temperature control. Tilt up the front of a refrigerator shelf (this rack cannot be adjusted. • Do not place leafy vegetables in the center ...: • Lift lid (select models). Position the rack to be used for horizontally storing wine. Use the coldest setting when storing meats. Refrigerator control may vary/select models) holds a "dozen-plus" eggs. The The Wine Rack provides a place rack can be washed. 17 It can...
... rails to be positioned on the meats or _ setting when a temperature colder than the main refrigerator compartment is a full-width drawer with adjustable temperature control. Tilt up the front of a refrigerator shelf (this rack cannot be adjusted. • Do not place leafy vegetables in the center ...: • Lift lid (select models). Position the rack to be used for horizontally storing wine. Use the coldest setting when storing meats. Refrigerator control may vary/select models) holds a "dozen-plus" eggs. The The Wine Rack provides a place rack can be washed. 17 It can...
Use and Care Guide
Page 19
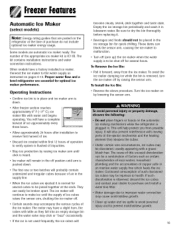
The kit contains installation instructions and water connection instructions. Turn the ice maker on pages 9-10. Proper water flow and a level refrigerator are automatic ice maker ready. The ice maker will continue to malfunction. • Turn off by raising the sensor arm. Be sure ...for optimal ice maker performance. They can block the sensor arm, causing the ice maker to make ice until arm is pushed down . • After freezer section reaches approximately 0° F (-17 ° C), ice maker fills with water and begins operating. To avoid the ice maker dumping ice while ...
The kit contains installation instructions and water connection instructions. Turn the ice maker on pages 9-10. Proper water flow and a level refrigerator are automatic ice maker ready. The ice maker will continue to malfunction. • Turn off by raising the sensor arm. Be sure ...for optimal ice maker performance. They can block the sensor arm, causing the ice maker to make ice until arm is pushed down . • After freezer section reaches approximately 0° F (-17 ° C), ice maker fills with water and begins operating. To avoid the ice maker dumping ice while ...
Use and Care Guide
Page 21
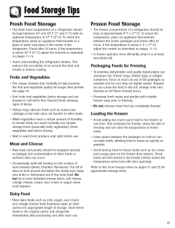
... when mold appears. Store these foods in uneven cooling. Cut off -flavor (freezer burn}. • Overwrap fresh meats and poultry with door openings. Loading the Freezer Avoid adding too much air out of a refrigerator should be kept at least an inch around the food and results in the... original carton and refrigerate immediately after purchasing and after each use . Keep your knife or...
... when mold appears. Store these foods in uneven cooling. Cut off -flavor (freezer burn}. • Overwrap fresh meats and poultry with door openings. Loading the Freezer Avoid adding too much air out of a refrigerator should be kept at least an inch around the food and results in the... original carton and refrigerate immediately after purchasing and after each use . Keep your knife or...

Use and Care Guide
Page 22
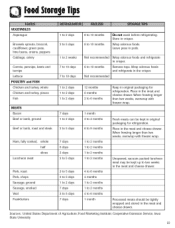
... carton date. Wrap tightly. For each cup of the food when purchased. Close tightly. Note: Bananas darken when refrigerated. Note: Avocados darken when refrigerated. 6 months Ripen at room temperature before refrigerating. 1 month (whole) Ripen at 60 ° to 70° F (16 ° to 6 months .... Check carton date. sugar for non-sweet dishes. 8 months (cooked) May also store unripe or hard apples at room temperature before refrigerating. Do not freeze cream unless whipped. DAI RY PRODUCTS Butter Milk and cream 1 month 1 week Cream cheese, cheese spread and cheese ...
... carton date. Wrap tightly. For each cup of the food when purchased. Close tightly. Note: Bananas darken when refrigerated. Note: Avocados darken when refrigerated. 6 months Ripen at room temperature before refrigerating. 1 month (whole) Ripen at 60 ° to 70° F (16 ° to 6 months .... Check carton date. sugar for non-sweet dishes. 8 months (cooked) May also store unripe or hard apples at room temperature before refrigerating. Do not freeze cream unless whipped. DAI RY PRODUCTS Butter Milk and cream 1 month 1 week Cream cheese, cheese spread and cheese ...
Use and Care Guide
Page 23
... of Agriculture; Remove tops. Store in the meat and cheese drawer. When freezing longer than two weeks, overwrap with freezer wrap. Unopened, vacuum-packed luncheon meat may be kept in crisper. Wrap odorous foods. Food Marketing Institute; When freezing...1 to 2 months 1 to 2 months 4 to 6 months 1 month Fresh meats can be kept up to 6 months Keep in original packaging for refrigeration. Place in pods. FoodStoragTeips VEGETABLES Asparagus Brussels sprouts, broccoli, cauliflower, green peas, lima beans, onions, peppers Cabbage, celery Carrots, parsnips, beets and ...
... of Agriculture; Remove tops. Store in the meat and cheese drawer. When freezing longer than two weeks, overwrap with freezer wrap. Unopened, vacuum-packed luncheon meat may be kept in crisper. Wrap odorous foods. Food Marketing Institute; When freezing...1 to 2 months 1 to 2 months 4 to 6 months 1 month Fresh meats can be kept up to 6 months Keep in original packaging for refrigeration. Place in pods. FoodStoragTeips VEGETABLES Asparagus Brussels sprouts, broccoli, cauliflower, green peas, lima beans, onions, peppers Cabbage, celery Carrots, parsnips, beets and ...
Use and Care Guide
Page 24
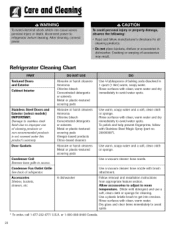
... no. 20000008"). Door Gaskets Condenser Coil Remove base grille to room temperature. Allow accessories to adjust to access Condenser Fan Outlet Grille See back of refrigerator. Dilute mild detergent and use of baking soda dissolved in 1 quart (1 liter) warm, soapy water. or 1-800-688-8408 Canada. 23 andCleaning Textured Doors and...
... no. 20000008"). Door Gaskets Condenser Coil Remove base grille to room temperature. Allow accessories to adjust to access Condenser Fan Outlet Grille See back of refrigerator. Dilute mild detergent and use of baking soda dissolved in 1 quart (1 liter) warm, soapy water. or 1-800-688-8408 Canada. 23 andCleaning Textured Doors and...
Use and Care Guide
Page 25
... overloads compartments and slows rate of room. Avoid areas of cabinet interior, drawers, shelves and gaskets according to run less efficiently. • A freezer that door seals properly and refrigerator runs efficiently. Discard spoiled or expired items. 6. After 24 hours, check if odor has been eliminated. Disconnect power to cleaning instructions. Be sure...
... overloads compartments and slows rate of room. Avoid areas of cabinet interior, drawers, shelves and gaskets according to run less efficiently. • A freezer that door seals properly and refrigerator runs efficiently. Discard spoiled or expired items. 6. After 24 hours, check if odor has been eliminated. Disconnect power to cleaning instructions. Be sure...
Use and Care Guide
Page 26
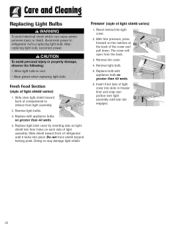
...light cover. Doing so may damage light shield. Insert front tabs of light cover into liner holes on the notches at the back of refrigerator until rear tab engages. 25 Replace with appliance bulb no greater than 40 watts. Replace light bulb cover by inserting tabs on light ...shield into slots in freezer liner and snap rear portion over light assembly until it locks into place. Remove the cover. . Freezer Cstyle of light shield varies) 1. andCleaning Replacing Light Bulbs Fresh Food Section Cstyle of light...
...light cover. Doing so may damage light shield. Insert front tabs of light cover into liner holes on the notches at the back of refrigerator until rear tab engages. 25 Replace with appliance bulb no greater than 40 watts. Replace light bulb cover by inserting tabs on light ...shield into slots in freezer liner and snap rear portion over light assembly until it locks into place. Remove the cover. . Freezer Cstyle of light shield varies) 1. andCleaning Replacing Light Bulbs Fresh Food Section Cstyle of light...
Use and Care Guide
Page 27
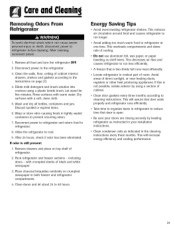
Turn the freezer control to prevent the formation of baking soda in on supply valve (see pages 9-10)....or absence: For models with a baking soda solution and a clean soft cloth (four tablespoons of mold and mildew. Upon your refrigerator has an automatic ice maker: • Shut off arm to prevent damage. • Tape the doors shut. • Use... an appliance dolly when moving . 26 ALWAYS truck the refrigerator from its side or back - If the room temperature will drop below 55 ° F (12° C), follow the ...
Turn the freezer control to prevent the formation of baking soda in on supply valve (see pages 9-10)....or absence: For models with a baking soda solution and a clean soft cloth (four tablespoons of mold and mildew. Upon your refrigerator has an automatic ice maker: • Shut off arm to prevent damage. • Tape the doors shut. • Use... an appliance dolly when moving . 26 ALWAYS truck the refrigerator from its side or back - If the room temperature will drop below 55 ° F (12° C), follow the ...
Use and Care Guide
Page 28
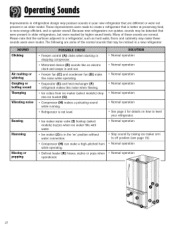
... may produce sounds in your refrigerator. • Normal operation • Stop sound by higher sound levels. Clicking Air rushing or whirring Gurgling or boiling sound Thumping Vibrating noise Buzzing Humming Hissing or popping • Freezer control (A) clicks when starting or stopping compressor.... sounds like an electric clock and snaps in and out. • Freezer fan (C) and condenser fan (D) make these sounds are some of these sounds seem even louder. These improvements were made to create a refrigerator that were present in the 'on' position without water connection, •...
... may produce sounds in your refrigerator. • Normal operation • Stop sound by higher sound levels. Clicking Air rushing or whirring Gurgling or boiling sound Thumping Vibrating noise Buzzing Humming Hissing or popping • Freezer control (A) clicks when starting or stopping compressor.... sounds like an electric clock and snaps in and out. • Freezer fan (C) and condenser fan (D) make these sounds are some of these sounds seem even louder. These improvements were made to create a refrigerator that were present in the 'on' position without water connection, •...


