Use and Care Guide
Page 2
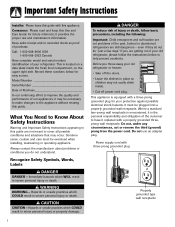
.... It must be plugged into a properly grounded wall receptacle. Power supply cord with a three-prong grounded plug for your old refrigerator or freezer: • Take off the doors. • Leave the shelves in this Use and Care Guide for future reference; it may not easily... cut or remove the third (ground) prong from the power cord. Call: 1-800-688-9900 USA 1-800-688-2002 Canada Have complete model and serial number identification of purchase. Common sense, caution and care must be exercised when installing, maintaining or operating appliance. CAUTION CAUTION - Record...
.... It must be plugged into a properly grounded wall receptacle. Power supply cord with a three-prong grounded plug for your old refrigerator or freezer: • Take off the doors. • Leave the shelves in this Use and Care Guide for future reference; it may not easily... cut or remove the third (ground) prong from the power cord. Call: 1-800-688-9900 USA 1-800-688-2002 Canada Have complete model and serial number identification of purchase. Common sense, caution and care must be exercised when installing, maintaining or operating appliance. CAUTION CAUTION - Record...
Use and Care Guide
Page 4
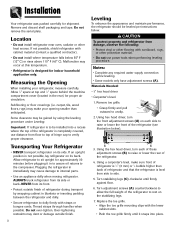
...) may be gained by wrapping cabinet in the rear) for shipment. If an upright position is designed for approximately 30 minutes before leveling. • Some models only have adjustment screws (A). Plugging the refrigerator in to assure oil returns to the compressor. Over-tightening restraints may cause damage to unclip. 2. Replace the...
...) may be gained by wrapping cabinet in the rear) for shipment. If an upright position is designed for approximately 30 minutes before leveling. • Some models only have adjustment screws (A). Plugging the refrigerator in to assure oil returns to the compressor. Over-tightening restraints may cause damage to unclip. 2. Replace the...
Use and Care Guide
Page 5
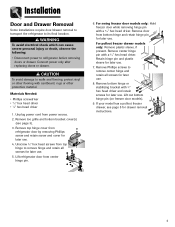
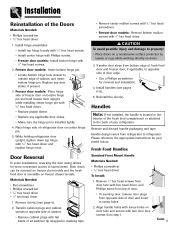
...: Remove plastic sleeve, if present. Remove center hinge pin with a 5⁄16" hex head driver. Lift out bottom hinge pin (on freezer door models). 9. Remove toe grille and bottom bracket cover(s) (see page 5 for drawer removal instructions. 4 Lift refrigerator door from power source. 2. Installation Door and Drawer Removal Some installations require door/drawer removal...
...: Remove plastic sleeve, if present. Remove center hinge pin with a 5⁄16" hex head driver. Lift out bottom hinge pin (on freezer door models). 9. Remove toe grille and bottom bracket cover(s) (see page 5 for drawer removal instructions. 4 Lift refrigerator door from power source. 2. Installation Door and Drawer Removal Some installations require door/drawer removal...

Use and Care Guide
Page 6
.... 2. Remove Phillips screw from each cradle, unlatch the snaps by pushing them inward, away from the drawer slides (select models). 5. Lift door front out to function properly. 3. To Install: 1. Basket cradle snap attachments 6. Align basket cradle snaps with two... snap attachments. Installation Pullout Freezer Drawer (select models) DANGER To prevent accidental child entrapment or suffocation risk, do not remove the divider in the proper slots for the drawer...
.... 2. Remove Phillips screw from each cradle, unlatch the snaps by pushing them inward, away from the drawer slides (select models). 5. Lift door front out to function properly. 3. To Install: 1. Basket cradle snap attachments 6. Align basket cradle snaps with two... snap attachments. Installation Pullout Freezer Drawer (select models) DANGER To prevent accidental child entrapment or suffocation risk, do not remove the divider in the proper slots for the drawer...
Use and Care Guide
Page 7
...and insert in masking tape. • Remove center mullion screws with 5⁄16" hex head screwdriver. • Freezer door models: Remove bottom mullion screws with hex head driver, and Phillips screw from top of door. • If reversing door, remove door...pages 6-8). 5. Cont. 6 Replace any applicable door shims. • Make sure the hinge pin is reversible on doors. 3. Freezer door models: Insert bottom hinge pin. • Locate bottom hinge hole closest to refrigerator. Materials Needed: • Flat screwdriver • Phillips screwdriver • 5⁄16" hex head ...
...and insert in masking tape. • Remove center mullion screws with 5⁄16" hex head screwdriver. • Freezer door models: Remove bottom mullion screws with hex head driver, and Phillips screw from top of door. • If reversing door, remove door...pages 6-8). 5. Cont. 6 Replace any applicable door shims. • Make sure the hinge pin is reversible on doors. 3. Freezer door models: Insert bottom hinge pin. • Locate bottom hinge hole closest to refrigerator. Materials Needed: • Flat screwdriver • Phillips screwdriver • 5⁄16" hex head ...
Use and Care Guide
Page 10
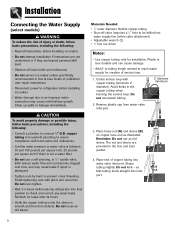
..." saddle valve. Do not reuse an old sleeve. Do not use an old sleeve. Remove plastic cap from defects. Installation Connecting the Water Supply (select models) WARNING To reduce the risk of injury or death, follow basic precautions, including the following : • Read all local codes and ordinances. • Do not...
..." saddle valve. Do not reuse an old sleeve. Do not use an old sleeve. Remove plastic cap from defects. Installation Connecting the Water Supply (select models) WARNING To reduce the risk of injury or death, follow basic precautions, including the following : • Read all local codes and ordinances. • Do not...
Use and Care Guide
Page 11
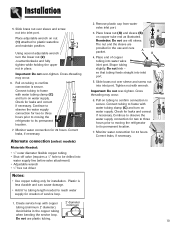
... Avoid kinks in place. Check for leaks and correct if necessary. Pull on water supply. Check for leaks and correct if necessary. Alternate connection (select models) Materials Needed: • 1⁄4" outer diameter flexible copper tubing • Shut-off valve (requires a 1⁄4" hole to its permanent location. 7. Plastic is less durable and...
... Avoid kinks in place. Check for leaks and correct if necessary. Pull on water supply. Check for leaks and correct if necessary. Alternate connection (select models) Materials Needed: • 1⁄4" outer diameter flexible copper tubing • Shut-off valve (requires a 1⁄4" hole to its permanent location. 7. Plastic is less durable and...
Use and Care Guide
Page 12
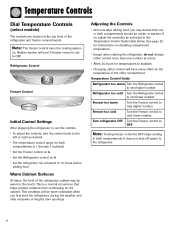
... first start the refrigerator, during hot weather and after excessive or lengthy door openings. Freezer too cold Turn the Freezer control to OFF. Temperature Controls Dial Temperature Controls (select models) The controls are located at a time. • Allow 24 hours for temperatures ...to next higher number. This condition will cool if freezer control is 1 through 7 (coldest). • Set the Freezer control on 4. • Set the...
... first start the refrigerator, during hot weather and after excessive or lengthy door openings. Freezer too cold Turn the Freezer control to OFF. Temperature Controls Dial Temperature Controls (select models) The controls are located at a time. • Allow 24 hours for temperatures ...to next higher number. This condition will cool if freezer control is 1 through 7 (coldest). • Set the Freezer control on 4. • Set the...
Use and Care Guide
Page 13
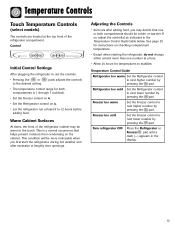
... Refrigerator too cold Set the Refrigerator control to next lower number by pressing the pad. Temperature Controls Touch Temperature Controls (select models) The controls are located at least 8 to 12 hours before adding food. Temperature Control Guide Refrigerator too warm Set the ...pad. Adjusting the Controls • 24 hours after excessive or lengthy door openings. This is 1 through 7 (coldest). • Set the Freezer control on 4. • Set the Refrigerator control on checking compartment temperature. • Except when starting the refrigerator, do not change either ...
... Refrigerator too cold Set the Refrigerator control to next lower number by pressing the pad. Temperature Controls Touch Temperature Controls (select models) The controls are located at least 8 to 12 hours before adding food. Temperature Control Guide Refrigerator too warm Set the ...pad. Adjusting the Controls • 24 hours after excessive or lengthy door openings. This is 1 through 7 (coldest). • Set the Freezer control on 4. • Set the Refrigerator control on checking compartment temperature. • Except when starting the refrigerator, do not change either ...

Use and Care Guide
Page 14
...due to stop the audible alarm. When this happens, an audible alarm will go off. Temperature Controls Triple Cool Climate Control (select models) The control is located at the top front of the or current temperature setting. Temperature Control Guide Refrigerator too cold Set the ... to stabilize for approximately three seconds, and then return to next higher number by pressing the pad. Turn refrigerator OFF Press the Freezer pad until the temperatures have exceeded these limits, the display will continue to produce more than one or both compartments should be colder...
...due to stop the audible alarm. When this happens, an audible alarm will go off. Temperature Controls Triple Cool Climate Control (select models) The control is located at the top front of the or current temperature setting. Temperature Control Guide Refrigerator too cold Set the ... to stabilize for approximately three seconds, and then return to next higher number by pressing the pad. Turn refrigerator OFF Press the Freezer pad until the temperatures have exceeded these limits, the display will continue to produce more than one or both compartments should be colder...

Use and Care Guide
Page 15
...temperature display from condensing on the ice and water dispenser) (select models) • Activate the Sabbath Mode To access the User Preferences menu, press and hold the Door Alarm pad for the refrigerator and freezer controls will illuminate (when this option. When in the User Preferences...Max Cool will appear in the Refrigerator display. 1. Temperature Controls Max Cool When activated, Max Cool causes the fresh food and freezer temperatures to drop to show temperatures in degrees Fahrenheit or degrees Celsius. This cools down control to restore the control lights. ...
...temperature display from condensing on the ice and water dispenser) (select models) • Activate the Sabbath Mode To access the User Preferences menu, press and hold the Door Alarm pad for the refrigerator and freezer controls will illuminate (when this option. When in the User Preferences...Max Cool will appear in the Refrigerator display. 1. Temperature Controls Max Cool When activated, Max Cool causes the fresh food and freezer temperatures to drop to show temperatures in degrees Fahrenheit or degrees Celsius. This cools down control to restore the control lights. ...
Use and Care Guide
Page 16
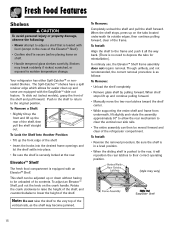
... is equipped with the EasyGlideTM slide out feature. The Spill-Catcher™ shelves have a spill retainer edge which allows for reinstallation). To slide out (select models), grasp the front of the shelf. • Insert the hooks into the desired frame openings and let the shelf settle into place. • Be sure...
... is equipped with the EasyGlideTM slide out feature. The Spill-Catcher™ shelves have a spill retainer edge which allows for reinstallation). To slide out (select models), grasp the front of the shelf. • Insert the hooks into the desired frame openings and let the shelf settle into place. • Be sure...
Use and Care Guide
Page 17
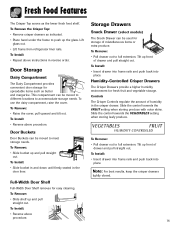
... Food Features The Crisper Top serves as butter and margarine. To Remove: • Slide bucket up and pull straight out. Storage Drawers Snack Drawer (select models) The Snack Drawer can be moved to accommodate storage needs. To Install: • Reverse above procedure. To Install: • Reverse above procedure. To Remove: •...
... Food Features The Crisper Top serves as butter and margarine. To Remove: • Slide bucket up and pull straight out. Storage Drawers Snack Drawer (select models) The Snack Drawer can be moved to accommodate storage needs. To Install: • Reverse above procedure. To Install: • Reverse above procedure. To Remove: •...
Use and Care Guide
Page 18
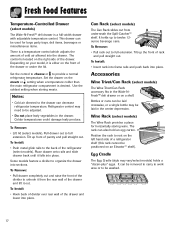
... the back of a refrigerator shelf (this rack cannot be adjusted. • Do not place leafy vegetables in the drawer. Depending on your model, it is either on the meats or setting when a temperature colder than the main refrigerator compartment is a temperature control which adjusts the amount... it from underneath the Spill-Catcher™ shelf. Set the drawer on the front of the drawer. Accessories Wine Trivet/Can Rack (select models) The Wine Trivet/Can Rack accessory fits in the center depression. Notes: • Cold air directed to twelve 12ounce beverage cans. To Install...
... the back of a refrigerator shelf (this rack cannot be adjusted. • Do not place leafy vegetables in the drawer. Depending on your model, it is either on the meats or setting when a temperature colder than the main refrigerator compartment is a temperature control which adjusts the amount... it from underneath the Spill-Catcher™ shelf. Set the drawer on the front of the drawer. Accessories Wine Trivet/Can Rack (select models) The Wine Trivet/Can Rack accessory fits in the center depression. Notes: • Cold air directed to twelve 12ounce beverage cans. To Install...

Use and Care Guide
Page 19
...be shut off (arm up water and ice spills to avoid personal injury and to make ice until arm is pushed down . • After freezer section reaches approximately 0° F (-17° C), ice maker fills with a greenbluish hue. The ice maker will continue to prevent mold/mildew... To avoid personal injury or property damage, observe the following: • Do not place fingers or hands on pages 9-10. Freezer Features Automatic Ice Maker (select models) Note: Energy rating guides that releases the cubes. • Under certain rare circumstances, ice cubes may be discolored, usually appearing...
...be shut off (arm up water and ice spills to avoid personal injury and to make ice until arm is pushed down . • After freezer section reaches approximately 0° F (-17° C), ice maker fills with a greenbluish hue. The ice maker will continue to prevent mold/mildew... To avoid personal injury or property damage, observe the following: • Do not place fingers or hands on pages 9-10. Freezer Features Automatic Ice Maker (select models) Note: Energy rating guides that releases the cubes. • Under certain rare circumstances, ice cubes may be discolored, usually appearing...
Use and Care Guide
Page 20
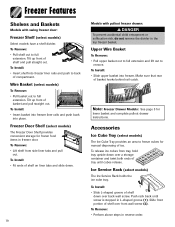
.... Upper Wire Basket To Remove: • Pull upper basket out to full extension and lift out to back of compartment. Note: Freezer Drawer Models: See page 5 for manual dispensing of basket hooks behind rail catch. Tilt up front of shelf and pull straight out. Tilt up... out. To Remove: • Lift shelf from tray, hold tray upside down . 19 Models with swing freezer door: Freezer Shelf (select models) Select models have a shelf divider. To Install: • Slide upper basket into freezer. Slide front portion of shelf down over a storage container and twist both ends of shelf ...
.... Upper Wire Basket To Remove: • Pull upper basket out to full extension and lift out to back of compartment. Note: Freezer Drawer Models: See page 5 for manual dispensing of basket hooks behind rail catch. Tilt up front of shelf and pull straight out. Tilt up... out. To Remove: • Lift shelf from tray, hold tray upside down . 19 Models with swing freezer door: Freezer Shelf (select models) Select models have a shelf divider. To Install: • Slide upper basket into freezer. Slide front portion of shelf down over a storage container and twist both ends of shelf ...
Use and Care Guide
Page 24
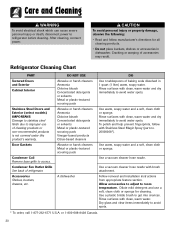
... warm, soapy water and a soft, clean cloth or sponge. Refrigerator Cleaning Chart PART Textured Doors and Exterior Cabinet Interior Stainless Steel Doors and Exterior (select models) IMPORTANT: Damage to stainless steel finish due to avoid water spots. Rinse surfaces with clean, warm water and dry immediately to improper use a soft, clean...
... warm, soapy water and a soft, clean cloth or sponge. Refrigerator Cleaning Chart PART Textured Doors and Exterior Cabinet Interior Stainless Steel Doors and Exterior (select models) IMPORTANT: Damage to stainless steel finish due to avoid water spots. Rinse surfaces with clean, warm water and dry immediately to improper use a soft, clean...
Use and Care Guide
Page 27
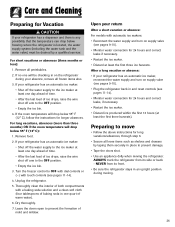
... as shelves and drawers by a qualified servicer. Care and Cleaning Preparing for Vacation CAUTION If your return After a short vacation or absence: For models with automatic ice makers: • Reconnect the water supply and turn on supply valve (see pages 9-10). • Plug the refrigerator back .... • Restart the ice maker. • Discard ice produced within the first 12 hours (at least the first three ice harvests. Turn the freezer control to OFF with dial controls or (-) with a baking soda solution and a clean soft cloth (four tablespoons of warm water). 6. Thoroughly clean the...
... as shelves and drawers by a qualified servicer. Care and Cleaning Preparing for Vacation CAUTION If your return After a short vacation or absence: For models with automatic ice makers: • Reconnect the water supply and turn on supply valve (see pages 9-10). • Plug the refrigerator back .... • Restart the ice maker. • Discard ice produced within the first 12 hours (at least the first three ice harvests. Turn the freezer control to OFF with dial controls or (-) with a baking soda solution and a clean soft cloth (four tablespoons of warm water). 6. Thoroughly clean the...
Use and Care Guide
Page 28
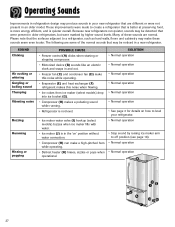
... 18). • Normal operation • Normal operation B GJ A F CE I ) hookup (select models) buzzes when ice maker fills with water. • Ice maker (J) is in and out. • Freezer fan (C) and condenser fan (D) make this noise while operating. • Evaporator (E) and heat exchanger ...(F) refrigerant makes this noise when flowing. • Ice cubes from ice maker (select models) drop into ice bucket (G). • Compressor (H) makes...
... 18). • Normal operation • Normal operation B GJ A F CE I ) hookup (select models) buzzes when ice maker fills with water. • Ice maker (J) is in and out. • Freezer fan (C) and condenser fan (D) make this noise while operating. • Evaporator (E) and heat exchanger ...(F) refrigerant makes this noise when flowing. • Ice cubes from ice maker (select models) drop into ice bucket (G). • Compressor (H) makes...
Use and Care Guide
Page 34
...supply. A clear description of any breach of residence from the United States to and from Maytag Services, LLC, Customer Assistance. c. customers using TTY for deaf, hearing impaired or speech impaired, call to refrigerator or freezer product failures. 7. Canadian Residents The above are having; Improper setting of the problem you may.... Consequential or incidental damages sustained by the manufacturer. The specific warranties expressed above warranties only cover an appliance installed in remote locations. 8. Model number and serial number; d. d.
...supply. A clear description of any breach of residence from the United States to and from Maytag Services, LLC, Customer Assistance. c. customers using TTY for deaf, hearing impaired or speech impaired, call to refrigerator or freezer product failures. 7. Canadian Residents The above are having; Improper setting of the problem you may.... Consequential or incidental damages sustained by the manufacturer. The specific warranties expressed above warranties only cover an appliance installed in remote locations. 8. Model number and serial number; d. d.

