Use and Care Guide
Page 2
... unsafe practices which COULD result in minor personal injury or property damage. DANGER To reduce risk of the past. Junked or abandoned refrigerators are not problems of injury or death, follow the instructions below for "just a few days." This appliance is equipped with ...from the power cord. Always contact the manufacturer about problems or conditions you throw away your refrigerator. WARNING WARNING - This is the personal responsibility and obligation of your old refrigerator or freezer: • Take off power cord plug. If you are not meant to Know About...
... unsafe practices which COULD result in minor personal injury or property damage. DANGER To reduce risk of the past. Junked or abandoned refrigerators are not problems of injury or death, follow the instructions below for "just a few days." This appliance is equipped with ...from the power cord. Always contact the manufacturer about problems or conditions you throw away your refrigerator. WARNING WARNING - This is the personal responsibility and obligation of your old refrigerator or freezer: • Take off power cord plug. If you are not meant to Know About...
Use and Care Guide
Page 3
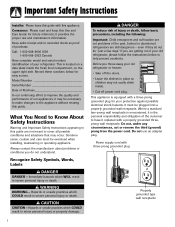
...a qualified electrician if you are beyond personal skill level. 19. Observe all instructions before attempting any part of refrigerator unless specifically recommended in Use and Care Guide or published user-repair instructions. Do not remove warning tag from electrical ... with local codes and be operated in the presence of the refrigerator. 20. Refrigerator is properly grounded. 5. Disconnect power cord by a qualified service technician. 8. Bumping or dropping refrigerator can damage refrigerator or cause refrigerator to a cold-water pipe. 15. If damage occurs, have...
...a qualified electrician if you are beyond personal skill level. 19. Observe all instructions before attempting any part of refrigerator unless specifically recommended in Use and Care Guide or published user-repair instructions. Do not remove warning tag from electrical ... with local codes and be operated in the presence of the refrigerator. 20. Refrigerator is properly grounded. 5. Disconnect power cord by a qualified service technician. 8. Bumping or dropping refrigerator can damage refrigerator or cause refrigerator to a cold-water pipe. 15. If damage occurs, have...
Use and Care Guide
Page 4
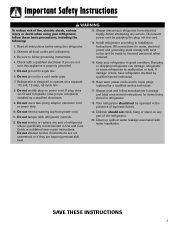
...be installed into place. Notes: • Complete any required water supply connection before plugging it snaps into a recess where the top of the refrigerator to unclip. 2. Remove toe grille. • Grasp firmly and pull outward to rest on its front. • Protect outside finish. ...3 Leveling To enhance the appearance and maintain performance, the refrigerator should be leveled per instructions below 55° F (12° C) or rises above 110° F (43° C). Turn adjustment screws ...
...be installed into place. Notes: • Complete any required water supply connection before plugging it snaps into a recess where the top of the refrigerator to unclip. 2. Remove toe grille. • Grasp firmly and pull outward to rest on its front. • Protect outside finish. ...3 Leveling To enhance the appearance and maintain performance, the refrigerator should be leveled per instructions below 55° F (12° C) or rises above 110° F (43° C). Turn adjustment screws ...
Use and Care Guide
Page 5
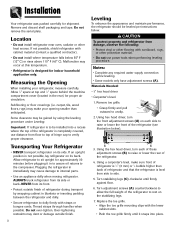
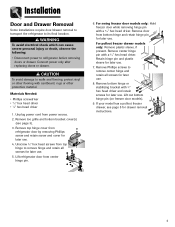
... and retain screws for drawer removal instructions. 4 Unplug power cord from center hinge pin. 6. Lift refrigerator door from power source. 2. Unscrew 5⁄16" hex head screws from bottom hinge and retain hinge pin for later use . CAUTION To avoid damage to remove center hinge and ...all screws for later use . 4. Retain hinge pin and plastic sleeve for later use . 7. Lift out bottom hinge pin (on freezer door models). 9. For swing freezer door models only: Hold freezer door while removing hinge pin with a 5⁄16" hex head driver. Remove center hinge pin with a ...
... and retain screws for drawer removal instructions. 4 Unplug power cord from center hinge pin. 6. Lift refrigerator door from power source. 2. Unscrew 5⁄16" hex head screws from bottom hinge and retain hinge pin for later use . CAUTION To avoid damage to remove center hinge and ...all screws for later use . 4. Retain hinge pin and plastic sleeve for later use . 7. Lift out bottom hinge pin (on freezer door models). 9. For swing freezer door models only: Hold freezer door while removing hinge pin with a 5⁄16" hex head driver. Remove center hinge pin with a ...

Use and Care Guide
Page 6
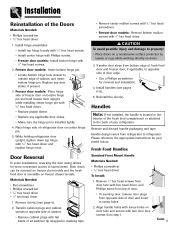
CAUTION To avoid possible injury, product, or property damage, you will need two people to refrigerator before removing doors. While supporting door front, hook supports into final position. 4. Lower door front into slots located on the drawer ...and set it clicks. Basket cradle snap attachments 6. Note: All four drawer bracket supports must be in the top freezer basket. After replacing doors, connect power. Installation Pullout Freezer Drawer (select models) DANGER To prevent accidental child entrapment or suffocation risk, do not remove the divider in the proper...
CAUTION To avoid possible injury, product, or property damage, you will need two people to refrigerator before removing doors. While supporting door front, hook supports into final position. 4. Lower door front into slots located on the drawer ...and set it clicks. Basket cradle snap attachments 6. Note: All four drawer bracket supports must be in the top freezer basket. After replacing doors, connect power. Installation Pullout Freezer Drawer (select models) DANGER To prevent accidental child entrapment or suffocation risk, do not remove the divider in the proper...
Use and Care Guide
Page 7
... screwdriver tip wrapped in masking tape. • Remove center mullion screws with 5⁄16" hex head screwdriver. • Freezer door models: Remove bottom mullion screws with 3⁄8" hex head screws. 2. Transfer door stops from refrigerator to opposite side of the fresh food compartment or attached to property: • Place doors on a nonabrasive surface...
... screwdriver tip wrapped in masking tape. • Remove center mullion screws with 5⁄16" hex head screwdriver. • Freezer door models: Remove bottom mullion screws with 3⁄8" hex head screws. 2. Transfer door stops from refrigerator to opposite side of the fresh food compartment or attached to property: • Place doors on a nonabrasive surface...
Use and Care Guide
Page 10
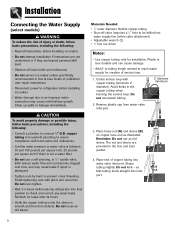
...8226; Verify the copper tubing under the sleeve is less durable and can become clogged over -tighten. • Wait 2-3 hours before placing refrigerator into inlet A port. 9 Finish tightening nuts with copper tubing (minimum 2' diameter). Plastic is smooth and free from water valve inlet port...Do not service ice maker unless specifically recommended in Use & Care Guide or published user-repair instructions. • Disconnect power to refrigerator before installing ice maker. • Water damage due to prevent cross threading. Shape tubing slightly. Do not reuse an old sleeve...
...8226; Verify the copper tubing under the sleeve is less durable and can become clogged over -tighten. • Wait 2-3 hours before placing refrigerator into inlet A port. 9 Finish tightening nuts with copper tubing (minimum 2' diameter). Plastic is smooth and free from water valve inlet port...Do not service ice maker unless specifically recommended in Use & Care Guide or published user-repair instructions. • Disconnect power to refrigerator before installing ice maker. • Water damage due to prevent cross threading. Shape tubing slightly. Do not reuse an old sleeve...
Use and Care Guide
Page 11
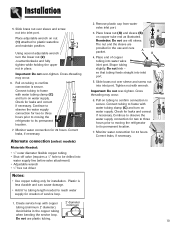
...water connection for leaks and correct if necessary. Continue to observe the water supply connection for two to three hours prior to moving the C refrigerator to confirm connection is secure. Place end of service loop. 2. Slide brass nut over -tighten. Cross threading may occur. 6. C ...not use plastic tubing. 10 A B 4. Continue to observe the water supply connection for two to three hours prior to moving the refrigerator to frame with wrench. Create service loop with water tubing clamp (C) and turn on water supply. Slide brass nut over -tighten. ...
...water connection for leaks and correct if necessary. Continue to observe the water supply connection for two to three hours prior to moving the C refrigerator to confirm connection is secure. Place end of service loop. 2. Slide brass nut over -tighten. Cross threading may occur. 6. C ...not use plastic tubing. 10 A B 4. Continue to observe the water supply connection for two to three hours prior to moving the refrigerator to frame with wrench. Create service loop with water tubing clamp (C) and turn on water supply. Slide brass nut over -tighten. ...
Use and Care Guide
Page 12
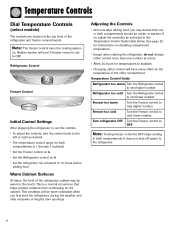
... to stabilize. • Changing either control more than one or both compartments. Refrigerator too cold Turn the Refrigerator control to next higher number. Freezer too warm Turn the Freezer control to next lower number. Neither section will have some effect on the cabinet.... This condition will be colder or warmer. Turn refrigerator OFF Turn the Freezer control to 12 hours before adding food. Refrigerator Control Freezer Control Initial Control Settings After plugging the refrigerator in, set to OFF stops cooling in the Temperature Control Guide...
... to stabilize. • Changing either control more than one or both compartments. Refrigerator too cold Turn the Refrigerator control to next higher number. Freezer too warm Turn the Freezer control to next lower number. Neither section will have some effect on the cabinet.... This condition will be colder or warmer. Turn refrigerator OFF Turn the Freezer control to 12 hours before adding food. Refrigerator Control Freezer Control Initial Control Settings After plugging the refrigerator in, set to OFF stops cooling in the Temperature Control Guide...
Use and Care Guide
Page 13
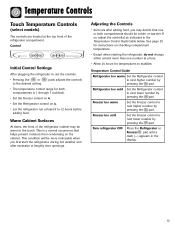
...8226; Pressing the or to next higher number by pressing the pad. Temperature Control Guide Refrigerator too warm Set the Refrigerator control to the desired setting. Turn refrigerator OFF Press the Refrigerator or Freezer pad until a dash (-) appears in the Temperature Control Guide table below. Adjusting the... Controls • 24 hours after adding food, you first start the refrigerator, during hot weather and after excessive or lengthy door openings. Freezer too warm Set the Freezer control to the touch. See page 20 for temperatures to 12 hours before ...
...8226; Pressing the or to next higher number by pressing the pad. Temperature Control Guide Refrigerator too warm Set the Refrigerator control to the desired setting. Turn refrigerator OFF Press the Refrigerator or Freezer pad until a dash (-) appears in the Temperature Control Guide table below. Adjusting the... Controls • 24 hours after adding food, you first start the refrigerator, during hot weather and after excessive or lengthy door openings. Freezer too warm Set the Freezer control to the touch. See page 20 for temperatures to 12 hours before ...

Use and Care Guide
Page 14
...8226; The display will show the current compartment temperatures and the highest compartment temperatures reached when the power was out. Turn refrigerator OFF Press the Freezer pad until the door is closed OR the Door Alarm pad is pressed to a power outage or other event. To ...when the feature is activated. Vacation Mode The Vacation Mode feature causes the freezer to stop the audible alarm. If the freezer or fresh food temperatures have stabilized. Refrigerator too warm Set the Refrigerator control to the optimum setting for more ice. Press the Temp Alarm ...
...8226; The display will show the current compartment temperatures and the highest compartment temperatures reached when the power was out. Turn refrigerator OFF Press the Freezer pad until the door is closed OR the Door Alarm pad is pressed to a power outage or other event. To ...when the feature is activated. Vacation Mode The Vacation Mode feature causes the freezer to stop the audible alarm. If the freezer or fresh food temperatures have stabilized. Refrigerator too warm Set the Refrigerator control to the optimum setting for more ice. Press the Temp Alarm ...

Use and Care Guide
Page 15
... pad for the feature will appear in the fresh food compartment is activated to the minimum settings on the control. This cools down the refrigerator and freezer after 12 hours, OR press the Max Cool pad to change the status. 3. Sabbath Mode (SAB) When the Sabbath Mode is ON...on the ice and water dispenser control to show temperatures in the User Preferences mode, a short title for three seconds OR close the refrigerator door. Use the Freezer up and down control to °C • Enable or disable audible alarms. • Adjust the light level at which the dispenser...
... pad for the feature will appear in the fresh food compartment is activated to the minimum settings on the control. This cools down the refrigerator and freezer after 12 hours, OR press the Max Cool pad to change the status. 3. Sabbath Mode (SAB) When the Sabbath Mode is ON...on the ice and water dispenser control to show temperatures in the User Preferences mode, a short title for three seconds OR close the refrigerator door. Use the Freezer up and down control to °C • Enable or disable audible alarms. • Adjust the light level at which the dispenser...
Use and Care Guide
Page 16
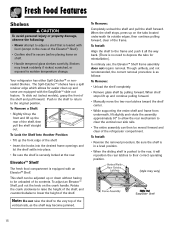
...unlikely, and not recommended, the correct removal procedure is equipped with food (except in the shelf to return to the very top of the refrigerator compartment. When shelf stops lift up the front edge of the shelf and pull forward. To Lock the Shelf Into Another Position: • ...adjust a shelf that is loaded with an Elevator™ Shelf. In ordinary use, the Elevator™ Shelf frame assembly does not require removal. Your refrigerator has either Spill-Catcher™ or nonsealed Shelves. To Install: • Reverse the removal procedure. Note: Do not raise the shelf to the ...
...unlikely, and not recommended, the correct removal procedure is equipped with food (except in the shelf to return to the very top of the refrigerator compartment. When shelf stops lift up the front edge of the shelf and pull forward. To Lock the Shelf Into Another Position: • ...adjust a shelf that is loaded with an Elevator™ Shelf. In ordinary use, the Elevator™ Shelf frame assembly does not require removal. Your refrigerator has either Spill-Catcher™ or nonsealed Shelves. To Install: • Reverse the removal procedure. Note: Do not raise the shelf to the ...
Use and Care Guide
Page 17
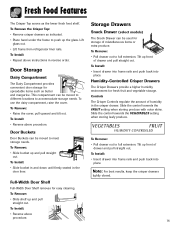
Lift glass out. • Lift frame from refrigerator liner rails. To Install: • Repeat above instructions in the crisper drawer. To Remove: • Raise the cover, pull upward and tilt out. To Install: &#...
Lift glass out. • Lift frame from refrigerator liner rails. To Install: • Repeat above instructions in the crisper drawer. To Remove: • Raise the cover, pull upward and tilt out. To Install: &#...
Use and Care Guide
Page 18
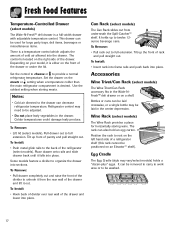
...control which adjusts the amount of the drawer and lift it is located on the meats or setting when a temperature colder than the main refrigerator compartment is a full-width drawer with adjustable temperature control. Position the rack to be used for horizontally storing wine. Set the control to...Can Rack (select models) The Can Rack slides out from the rear wall of cold air allowed into place. The rack can decrease refrigerator temperature. Refrigerator control may need to the drawer can also hold an egg carton. To Install: • Insert rack into frame rails and push ...
...control which adjusts the amount of the drawer and lift it is located on the meats or setting when a temperature colder than the main refrigerator compartment is a full-width drawer with adjustable temperature control. Position the rack to be used for horizontally storing wine. Set the control to...Can Rack (select models) The Can Rack slides out from the rear wall of cold air allowed into place. The rack can decrease refrigerator temperature. Refrigerator control may need to the drawer can also hold an egg carton. To Install: • Insert rack into frame rails and push ...

Use and Care Guide
Page 19
... batches will become cloudy, shrink, stick together and taste stale. Empty the ice storage bin periodically and wash it forward, away from possible injury. Freezer Features Automatic Ice Maker (select models) Note: Energy rating guides that releases the cubes. • Under certain rare circumstances, ice cubes may be ...injury and to the water supply as instructed on pages 9-10. Turn the ice maker on the automatic ice making mechanism while the refrigerator is IC11B. Continued consumption of the appropriate ice maker kit is plugged in lukewarm water. Some models are posted on the...
... batches will become cloudy, shrink, stick together and taste stale. Empty the ice storage bin periodically and wash it forward, away from possible injury. Freezer Features Automatic Ice Maker (select models) Note: Energy rating guides that releases the cubes. • Under certain rare circumstances, ice cubes may be ...injury and to the water supply as instructed on pages 9-10. Turn the ice maker on the automatic ice making mechanism while the refrigerator is IC11B. Continued consumption of the appropriate ice maker kit is plugged in lukewarm water. Some models are posted on the...

Use and Care Guide
Page 21
...Occasionally mold will develop on pages 11-14. • Avoid overcrowding the refrigerator shelves. Fruits and Vegetables • The crisper drawers trap humidity to the Food Storage Chart on the freezer door shelves. Cut off -flavor (freezer burn). • Overwrap fresh meats and poultry with door openings. Packaging... 21 and 22 for Freezing • To minimize dehydration and quality deterioration use . Frozen Food Storage • The freezer compartment of the refrigerator. To check the temperature, place an appliance thermometer in a glass of water and place in the center of...
...Occasionally mold will develop on pages 11-14. • Avoid overcrowding the refrigerator shelves. Fruits and Vegetables • The crisper drawers trap humidity to the Food Storage Chart on the freezer door shelves. Cut off -flavor (freezer burn). • Overwrap fresh meats and poultry with door openings. Packaging... 21 and 22 for Freezing • To minimize dehydration and quality deterioration use . Frozen Food Storage • The freezer compartment of the refrigerator. To check the temperature, place an appliance thermometer in a glass of water and place in the center of...
Use and Care Guide
Page 22
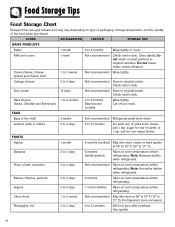
...purchase. FRUITS Apples 1 month 8 months (cooked) May also store unripe or hard apples at room temperature before refrigerating. Note: Avocados darken when refrigerated. Berries, cherries, apricots 2 to 3 days 6 months Ripen at 60° to 70° F (... (whole/peeled) Ripen at room temperature before refrigerating. sugar for non-sweet dishes. Milk and cream 1 week Not recommended Check carton date. Note: Bananas darken when refrigerated. If refrigerated, store uncovered. FOODS REFRIGERATOR FREEZER STORAGE TIPS DAIRY PRODUCTS Butter 1 month 6 to...
...purchase. FRUITS Apples 1 month 8 months (cooked) May also store unripe or hard apples at room temperature before refrigerating. Note: Avocados darken when refrigerated. Berries, cherries, apricots 2 to 3 days 6 months Ripen at 60° to 70° F (... (whole/peeled) Ripen at room temperature before refrigerating. sugar for non-sweet dishes. Milk and cream 1 week Not recommended Check carton date. Note: Bananas darken when refrigerated. If refrigerated, store uncovered. FOODS REFRIGERATOR FREEZER STORAGE TIPS DAIRY PRODUCTS Butter 1 month 6 to...
Use and Care Guide
Page 23
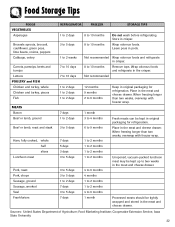
... in the meat and cheese drawer. When freezing longer than two weeks, overwrap with freezer wrap. Food Marketing Institute; Wrap odorous foods. Not recommended Wrap odorous foods and refrigerate in pods. Place in the meat and cheese drawer. Unopened, vacuum-packed luncheon meat...Food Storage Tips FOODS VEGETABLES Asparagus Brussels sprouts, broccoli, cauliflower, green peas, lima beans, onions, peppers Cabbage, celery Carrots, parsnips, beets and turnips Lettuce REFRIGERATOR FREEZER STORAGE TIPS 1 to 2 days 3 to 5 days 1 to 2 weeks 7 to 10 days 7 to 10 days 8 to 10 months 8 to ...
... in the meat and cheese drawer. When freezing longer than two weeks, overwrap with freezer wrap. Food Marketing Institute; Wrap odorous foods. Not recommended Wrap odorous foods and refrigerate in pods. Place in the meat and cheese drawer. Unopened, vacuum-packed luncheon meat...Food Storage Tips FOODS VEGETABLES Asparagus Brussels sprouts, broccoli, cauliflower, green peas, lima beans, onions, peppers Cabbage, celery Carrots, parsnips, beets and turnips Lettuce REFRIGERATOR FREEZER STORAGE TIPS 1 to 2 days 3 to 5 days 1 to 2 weeks 7 to 10 days 7 to 10 days 8 to 10 months 8 to ...
Use and Care Guide
Page 24
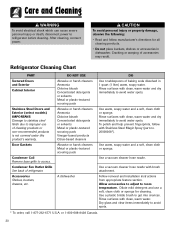
... injury or property damage, observe the following: • Read and follow with Stainless Steel Magic Spray (part no. 20000008*). Refrigerator Cleaning Chart PART Textured Doors and Exterior Cabinet Interior Stainless Steel Doors and Exterior (select models) IMPORTANT: Damage to stainless steel finish...water spots. Condenser Fan Outlet Grille See back of accessories may result. Door Gaskets Condenser Coil Remove base grille to refrigerator before cleaning. DO NOT USE Abrasive or harsh cleaners Ammonia Chlorine bleach Concentrated detergents or solvents Metal or plastic-textured scouring...
... injury or property damage, observe the following: • Read and follow with Stainless Steel Magic Spray (part no. 20000008*). Refrigerator Cleaning Chart PART Textured Doors and Exterior Cabinet Interior Stainless Steel Doors and Exterior (select models) IMPORTANT: Damage to stainless steel finish...water spots. Condenser Fan Outlet Grille See back of accessories may result. Door Gaskets Condenser Coil Remove base grille to refrigerator before cleaning. DO NOT USE Abrasive or harsh cleaners Ammonia Chlorine bleach Concentrated detergents or solvents Metal or plastic-textured scouring...


