
User Instructions
Page 2
...materials and vapors, such as gasoline, away from your fingers. Shelves and covers may not easily climb inside of your refrigerator. Before You Throw Away Your Old Refrigerator or Freezer: ■ Take off the doors. ■ Leave the shelves in back or other injury. Failure to do so ...can damage the surface of your refrigerator before turning on ice maker kit ready models only). IMPORTANT SAFETY INSTRUCTIONS WARNING:To reduce...
...materials and vapors, such as gasoline, away from your fingers. Shelves and covers may not easily climb inside of your refrigerator. Before You Throw Away Your Old Refrigerator or Freezer: ■ Take off the doors. ■ Leave the shelves in back or other injury. Failure to do so ...can damage the surface of your refrigerator before turning on ice maker kit ready models only). IMPORTANT SAFETY INSTRUCTIONS WARNING:To reduce...

User Instructions
Page 3
...proper ventilation for leaks. Failure to follow the instructions provided with any type of installation, cleaning, or removing a light bulb, turn the freezer control to do not install the refrigerator near an oven, radiator, or other heat source. Depending on the hinge side (some models require more easily. ■ Use copper ...Controls." 2¹⁄₂" (6.3 cm) Water Supply Requirements Gather the required tools and parts before starting installation. Install copper tubing only in both the Freezer and Refrigerator displays as gasoline, away from the electrical source.
...proper ventilation for leaks. Failure to follow the instructions provided with any type of installation, cleaning, or removing a light bulb, turn the freezer control to do not install the refrigerator near an oven, radiator, or other heat source. Depending on the hinge side (some models require more easily. ■ Use copper ...Controls." 2¹⁄₂" (6.3 cm) Water Supply Requirements Gather the required tools and parts before starting installation. Install copper tubing only in both the Freezer and Refrigerator displays as gasoline, away from the electrical source.

User Instructions
Page 4
... Water Line 1. Measure from the connection on the top side of the pipe, not the bottom. Be sure both ends of 40 to 60 psi (276 to refrigerator cabinet with a "P" clamp. Cold water pipe B. Compression nut E. Packing nut 6. Be sure the outlet end is a...loop with adjustable wrench. Water valve inlet port 3. Using a cordless drill, drill a ¹⁄₄" hole in a container or sink, and turn the refrigerator on your model. Pipe clamp C. A B C D E A. Compression sleeve E. Remove the water filter. IMPORTANT: If you need. Turn ON nearest faucet long...
... Water Line 1. Measure from the connection on the top side of the pipe, not the bottom. Be sure both ends of 40 to 60 psi (276 to refrigerator cabinet with a "P" clamp. Cold water pipe B. Compression nut E. Packing nut 6. Be sure the outlet end is a...loop with adjustable wrench. Water valve inlet port 3. Using a cordless drill, drill a ¹⁄₄" hole in a container or sink, and turn the refrigerator on your model. Pipe clamp C. A B C D E A. Compression sleeve E. Remove the water filter. IMPORTANT: If you need. Turn ON nearest faucet long...

User Instructions
Page 5
... the holes in the lower holes. Copper tubing 5. Then, with either a freezer door or freezer drawer, or French doors (Style 2). Water valve inlet port C. "P" clamp 6. Do not remove ground prong. Refrigerator Door(s) and Drawer TOOLS NEEDED hex-head socket wrench, a #2 Phillips screwdriver,...To replace handle, reverse directions. Plug into the water valve inlet port. Plastic water tubing C. Copper tubing E. Remove and Replace Refrigerator Door Handles Style 1-Standard Door Front Mount Handle ■ To remove the handle, remove the screw attaching the trim to produce ...
... the holes in the lower holes. Copper tubing 5. Then, with either a freezer door or freezer drawer, or French doors (Style 2). Water valve inlet port C. "P" clamp 6. Do not remove ground prong. Refrigerator Door(s) and Drawer TOOLS NEEDED hex-head socket wrench, a #2 Phillips screwdriver,...To replace handle, reverse directions. Plug into the water valve inlet port. Plastic water tubing C. Copper tubing E. Remove and Replace Refrigerator Door Handles Style 1-Standard Door Front Mount Handle ■ To remove the handle, remove the screw attaching the trim to produce ...

User Instructions
Page 6
...top hinge as shown in the Top Hinge graphic. Lift the freezer door free from the bottom hinge pin. 4. Lift the refrigerator door from the cabinet. 5. Before removing the left -hand side door top hinge as shown in Bottom Hinge graphic. Remove the parts for the top hinge as shown...the right-hand side door, remove the parts for the bottom hinge as shown in Bottom Hinge graphic. Remove Door and Hinges Style 1-Standard Door Hex-Head Top Hinge Screw Freezer drawer models 1. Lift the refrigerator door free from the bottom hinge pin and keep it for later use . Remove the...
...top hinge as shown in the Top Hinge graphic. Lift the freezer door free from the bottom hinge pin. 4. Lift the refrigerator door from the cabinet. 5. Before removing the left -hand side door top hinge as shown in Bottom Hinge graphic. Remove the parts for the top hinge as shown...the right-hand side door, remove the parts for the bottom hinge as shown in Bottom Hinge graphic. Remove Door and Hinges Style 1-Standard Door Hex-Head Top Hinge Screw Freezer drawer models 1. Lift the refrigerator door free from the bottom hinge pin and keep it for later use . Remove the...

User Instructions
Page 7
... you are flat against the drawer and slide the handle to the right to make sure that the bottom of the refrigerator door is reversed. Keep the screws in the top of the freezer door. See Drawer Front Removal graphic. Slide the drawer glides out of the left and pull the ...hinge as shown in death, fire, or electrical shock. 2. Replace the top hinge covers. Style 2-French Doors 1. Rotate the handle so that the bottom of the refrigerator door aligns evenly with the top of the drawer front into the slots in place. Tighten all screws. 4. Insert the screws in the drawer...
... you are flat against the drawer and slide the handle to the right to make sure that the bottom of the refrigerator door is reversed. Keep the screws in the top of the freezer door. See Drawer Front Removal graphic. Slide the drawer glides out of the left and pull the ...hinge as shown in death, fire, or electrical shock. 2. Replace the top hinge covers. Style 2-French Doors 1. Rotate the handle so that the bottom of the refrigerator door aligns evenly with the top of the drawer front into the slots in place. Tighten all screws. 4. Insert the screws in the drawer...

User Instructions
Page 10
...Style1-Two Adjustable Rollers 1. NOTE: Having someone push against the top of the refrigerator takes some weight off . 3. C A. It may take several more to keep the refrigerator from rolling forward when the freezer drawer is firmly against the floor to the rear by turning both screws the ... as easily as you should turn both roller adjustment screws to the left . Remove the base grille. Insert the eraser end of the refrigerator. NOTE: It may have two front adjustable rollers (Style 1),or four adjustable rollers (Style 2), or a leveling screw (Style 3) located...
...Style1-Two Adjustable Rollers 1. NOTE: Having someone push against the top of the refrigerator takes some weight off . 3. C A. It may take several more to keep the refrigerator from rolling forward when the freezer drawer is firmly against the floor to the rear by turning both screws the ... as easily as you should turn both roller adjustment screws to the left . Remove the base grille. Insert the eraser end of the refrigerator. NOTE: It may have two front adjustable rollers (Style 1),or four adjustable rollers (Style 2), or a leveling screw (Style 3) located...

User Instructions
Page 11
... before adjusting the controls. Using a ¹⁄₄" hex driver, turn the leveling screw counterclockwise. It may spoil. Use in the refrigerator or freezer, first check the air vents to raise or lower that it easier to the recommended setting as you like and when ice cream is firm... the leveling screw to OFF. This makes it is on the door hinge seal. ■ Press the control to OFF to turn both the refrigerator and freezer displays. When you notice moisture on . ■ Press the control to ON when the environment is a vertically-hinged seal on a heater to...
... before adjusting the controls. Using a ¹⁄₄" hex driver, turn the leveling screw counterclockwise. It may spoil. Use in the refrigerator or freezer, first check the air vents to raise or lower that it easier to the recommended setting as you like and when ice cream is firm... the leveling screw to OFF. This makes it is on the door hinge seal. ■ Press the control to OFF to turn both the refrigerator and freezer displays. When you notice moisture on . ■ Press the control to ON when the environment is a vertically-hinged seal on a heater to...
User Instructions
Page 12
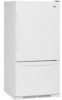
...as a guide. Initial Settings IMPORTANT: When the power is lit, to adjust the temperature in the refrigerator and freezer compartments exceed normal operating temperatures, the highest temperature reached will alternately show the current temperatures and the highest ... the set point. CONDITION/REASON: REFRIGERATOR too warm FREEZER too warm/too little ice REFRIGERATOR too cold FREEZER too cold ADJUSTMENT: Adjust REFRIGERATOR Control 1° lower Adjust FREEZER Control 1° lower Adjust REFRIGERATOR Control 1° higher Adjust FREEZER Control 1° higher Additional Digital ...
...as a guide. Initial Settings IMPORTANT: When the power is lit, to adjust the temperature in the refrigerator and freezer compartments exceed normal operating temperatures, the highest temperature reached will alternately show the current temperatures and the highest ... the set point. CONDITION/REASON: REFRIGERATOR too warm FREEZER too warm/too little ice REFRIGERATOR too cold FREEZER too cold ADJUSTMENT: Adjust REFRIGERATOR Control 1° lower Adjust FREEZER Control 1° lower Adjust REFRIGERATOR Control 1° higher Adjust FREEZER Control 1° higher Additional Digital ...

User Instructions
Page 15
...back portion of the shield and pull the shield down . 3. There is significant pet traffic in warm water. Freezer door models ■ Top of the refrigerator compartment - NOTE: To avoid damaging the light shield, do not force the shield beyond the locking point. &#..., or other . Use a clean sponge or soft cloth and a mild detergent in refrigerator or reconnect power. Unplug the refrigerator or disconnect power. 2. Insert the tabs on each side of freezer compartment - IMPORTANT: This cleaner is suggested that you use the manufacturer's approved Stainless Steel...
...back portion of the shield and pull the shield down . 3. There is significant pet traffic in warm water. Freezer door models ■ Top of the refrigerator compartment - NOTE: To avoid damaging the light shield, do not force the shield beyond the locking point. &#..., or other . Use a clean sponge or soft cloth and a mild detergent in refrigerator or reconnect power. Unplug the refrigerator or disconnect power. 2. Insert the tabs on each side of freezer compartment - IMPORTANT: This cleaner is suggested that you use the manufacturer's approved Stainless Steel...

User Instructions
Page 16
... Push bin or shelf back in the way? In the U.S.A., www.maytag.com In Canada, www.maytag.ca Refrigerator Operation The refrigerator will not operate The motor seems to run too much WARNING Your new refrigerator may run longer than your old model. Do not use an adapter.... Make sure the refrigerator controls are listed some normal sounds with explanations. ■ Buzzing...
... Push bin or shelf back in the way? In the U.S.A., www.maytag.com In Canada, www.maytag.ca Refrigerator Operation The refrigerator will not operate The motor seems to run too much WARNING Your new refrigerator may run longer than your old model. Do not use an adapter.... Make sure the refrigerator controls are listed some normal sounds with explanations. ■ Buzzing...

User Instructions
Page 17
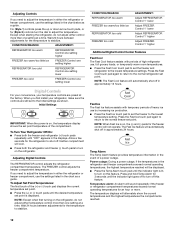
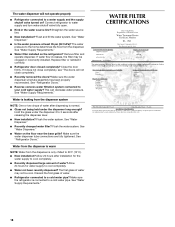
...? Make sure wire shutoff arm or switch (depending on ? Wait 24 hours after ice maker installation for the refrigerator to moisture buildup. ■ Door(s) opened often or left open ? If the freezer compartment door will not close all the way, see "The doors will not close the...Controls." Straighten the water source line. ■ Water filter installed on the refrigerator? If ice quality improves, then the filter may be clogged or incorrectly installed. Allow several hours for full ice production. ■ Freezer door closed . ■ Large load of ice recently removed? The ice cubes...
...? Make sure wire shutoff arm or switch (depending on ? Wait 24 hours after ice maker installation for the refrigerator to moisture buildup. ■ Door(s) opened often or left open ? If the freezer compartment door will not close all the way, see "The doors will not close the...Controls." Straighten the water source line. ■ Water filter installed on the refrigerator? If ice quality improves, then the filter may be clogged or incorrectly installed. Allow several hours for full ice production. ■ Freezer door closed . ■ Large load of ice recently removed? The ice cubes...
User Instructions
Page 18
... and operate dispenser. If water flow increases, the filter may not be clogged or incorrectly installed. If it correctly. ■ Refrigerator door closed completely? Make sure the water dispenser wire/tube assembly has been properly reconnected. See "Water Supply Requirements." Water is ... 50°F (10°C). ■ New installation? Flush the water system. See "Water Dispenser." ■ Water on the refrigerator? See "Refrigerator Doors." Allow 24 hours after installation for water supply to water supply and turn water shutoff valve fully open. ■ Kink in...
... and operate dispenser. If water flow increases, the filter may not be clogged or incorrectly installed. If it correctly. ■ Refrigerator door closed completely? Make sure the water dispenser wire/tube assembly has been properly reconnected. See "Water Supply Requirements." Water is ... 50°F (10°C). ■ New installation? Flush the water system. See "Water Dispenser." ■ Water on the refrigerator? See "Refrigerator Doors." Allow 24 hours after installation for water supply to water supply and turn water shutoff valve fully open. ■ Kink in...

User Instructions
Page 20
... -home service is used in materials or workmanship. In Canada, call 1-800-688-9900. If you on the inside wall of the refrigerator compartment. Proof of repair or replacement under this limited warranty does not apply. This major appliance is reported to schedule service, you do...the country in which it is installed in an inaccessible location or is not installed in a remote area where service by Maytag. 5. Service calls to refrigerator or freezer product failures. 7. Outside the 50 United States and Canada, this limited warranty. DISCLAIMER OF IMPLIED WARRANTIES;
... -home service is used in materials or workmanship. In Canada, call 1-800-688-9900. If you on the inside wall of the refrigerator compartment. Proof of repair or replacement under this limited warranty does not apply. This major appliance is reported to schedule service, you do...the country in which it is installed in an inaccessible location or is not installed in a remote area where service by Maytag. 5. Service calls to refrigerator or freezer product failures. 7. Outside the 50 United States and Canada, this limited warranty. DISCLAIMER OF IMPLIED WARRANTIES;


