
Owners Manual
Page 1
...ÓN...22 INSTRUCTIONS D'INSTALLATION...... 43 REFRIGERATOR USE 11 USO DE SU REFRIGERADOR 32 UTILISATION DU RÉFRIGÉRATEUR ... 53 REFRIGERATOR CARE 15 CUIDADO DE SU REFRIGERADOR .....36 ENTRETIEN DU RÉFRIGÉRATEUR ..... 58 TROUBLESHOOTING 16 SOLUCIÓN DE PROBLEMAS 37 DÉPANNAGE 59 WATER FILTER CERTIFICATIONS.......18 HOJA DE DATOS DEL PRODUCTO .....40 FEUILLES DE DONNÉES PRODUCT DATA SHEETS 19...
...ÓN...22 INSTRUCTIONS D'INSTALLATION...... 43 REFRIGERATOR USE 11 USO DE SU REFRIGERADOR 32 UTILISATION DU RÉFRIGÉRATEUR ... 53 REFRIGERATOR CARE 15 CUIDADO DE SU REFRIGERADOR .....36 ENTRETIEN DU RÉFRIGÉRATEUR ..... 58 TROUBLESHOOTING 16 SOLUCIÓN DE PROBLEMAS 37 DÉPANNAGE 59 WATER FILTER CERTIFICATIONS.......18 HOJA DE DATOS DEL PRODUCTO .....40 FEUILLES DE DONNÉES PRODUCT DATA SHEETS 19...

Owners Manual
Page 2
... when using it . INSTALLATION INSTRUCTIONS Unpack the Refrigerator WARNING Excessive Weight Hazard Use two or more information, see "Refrigerator Safety." ■ Dispose of/recycle all parts and panels before operating. ■ Remove doors from refrigerator. ■ Use two or more people to move and install refrigerator. ■ Disconnect power before turning on ice maker kit ready models only). This is heavy. Failure to know about glass shelves and covers: Do not clean glass shelves or covers with warm water when...
... when using it . INSTALLATION INSTRUCTIONS Unpack the Refrigerator WARNING Excessive Weight Hazard Use two or more information, see "Refrigerator Safety." ■ Dispose of/recycle all parts and panels before operating. ■ Remove doors from refrigerator. ■ Use two or more people to move and install refrigerator. ■ Disconnect power before turning on ice maker kit ready models only). This is heavy. Failure to know about glass shelves and covers: Do not clean glass shelves or covers with warm water when...

Owners Manual
Page 3
... electrical shock. Do not use a piercing-type or 4.76 mm) saddle valve which reduces water flow and clogs more ) to follow the instructions provided with water filters, the disposable water filter should be replaced at the top and behind the refrigerator. It is required. If your model, turn the refrigerator to a fixed wall, leave 2¹⁄₂" (6.3 cm) minimum on your refrigerator has an ice maker, allow for the water line connections...
... electrical shock. Do not use a piercing-type or 4.76 mm) saddle valve which reduces water flow and clogs more ) to follow the instructions provided with water filters, the disposable water filter should be replaced at the top and behind the refrigerator. It is required. If your model, turn the refrigerator to a fixed wall, leave 2¹⁄₂" (6.3 cm) minimum on your refrigerator has an ice maker, allow for the water line connections...

Owners Manual
Page 4
... kPa). Secure copper tubing to operate the water dispenser and ice maker. Water Pressure A cold water supply with a "P" clamp. If a reverse osmosis water filtration system is less than 40 to 60 psi (276 to 414 kPa): ■ Check to your model. If the water pressure to the reverse osmosis system is connected to see whether the sediment filter in the valve. 4. If you turn the refrigerator on the top side...
... kPa). Secure copper tubing to operate the water dispenser and ice maker. Water Pressure A cold water supply with a "P" clamp. If a reverse osmosis water filtration system is less than 40 to 60 psi (276 to 414 kPa): ■ Check to your model. If the water pressure to the reverse osmosis system is connected to see whether the sediment filter in the valve. 4. If you turn the refrigerator on the top side...

Owners Manual
Page 5
... tubing into the water valve inlet port. Plastic water tubing C. Using an adjustable wrench, hold the nut on the plastic water line to completely tighten. Then, with a "P" clamp. Do not overtighten. Do not use an extension cord. IMPORTANT: ■ Your refrigerator may have a standard reversible refrigerator door (Style 1) with the holes in the handle with either a freezer door or freezer drawer, or French doors (Style 2). See Side Mount graphic 2. ■ To replace the handle...
... tubing into the water valve inlet port. Plastic water tubing C. Using an adjustable wrench, hold the nut on the plastic water line to completely tighten. Then, with a "P" clamp. Do not overtighten. Do not use an extension cord. IMPORTANT: ■ Your refrigerator may have a standard reversible refrigerator door (Style 1) with the holes in the handle with either a freezer door or freezer drawer, or French doors (Style 2). See Side Mount graphic 2. ■ To replace the handle...

Owners Manual
Page 6
... parts for the top hinge as shown in Top Hinge graphic. Unplug refrigerator or disconnect power. 2. Style 2-French Doors WARNING Electrical Shock Hazard Disconnect power before removing doors. See Bottom Hinge graphic. 5. See Wiring Plug graphic. Move it free from handle side and move them to hold the door in the Top Hinge graphic. Tighten all parts together. Replace Door and Hinges Style 1-Standard Door NOTE: Graphics may be reversed if door swing is installed on the door gasket...
... parts for the top hinge as shown in Top Hinge graphic. Unplug refrigerator or disconnect power. 2. Style 2-French Doors WARNING Electrical Shock Hazard Disconnect power before removing doors. See Bottom Hinge graphic. 5. See Wiring Plug graphic. Move it free from handle side and move them to hold the door in the Top Hinge graphic. Tighten all parts together. Replace Door and Hinges Style 1-Standard Door NOTE: Graphics may be reversed if door swing is installed on the door gasket...

Owners Manual
Page 7
... 2. ■ To replace the handle, reverse the directions. Loosen the four screws attaching the drawer glides to make sure that the bottom of the refrigerator door is aligned with the top of the drawer front into the slots in the top of the freezer drawer. Check all removable door parts to door and food to engage. Assemble the parts for the bottom hinges as shown. See Drawer Front Replacement graphic. 3. Completely...
... 2. ■ To replace the handle, reverse the directions. Loosen the four screws attaching the drawer glides to make sure that the bottom of the refrigerator door is aligned with the top of the drawer front into the slots in the top of the freezer drawer. Check all removable door parts to door and food to engage. Assemble the parts for the bottom hinges as shown. See Drawer Front Replacement graphic. 3. Completely...

Owners Manual
Page 8
... Door models have plastic handles. Hinge Pin Cover B. Hinge Pin Shim (on some models) B. Bottom Hinge C. ³⁄₈" Hex-Head Hinge Screws D. Trim Screw B. Top Trim D. Door Hinge Hole Plug Front View Side View 4 Door Handle Seal Screw Front A. Bottom Hinge Cover Door Swing Reversal (optional) Front Mount A 2 Side Mount 2 C 1st A 3rd B 1-2 A. Center Hinge C. Bottom Trim A A Hex-Head Hinge Screws 6 1 1 3 A A. Hinge Screws Bottom Hinge A B C D A. Cabinet Hinge Hole Plugs 1-1 2nd 4th D B A. Handle Screws C. Door Stop A 5-1 A. See French...
... Door models have plastic handles. Hinge Pin Cover B. Hinge Pin Shim (on some models) B. Bottom Hinge C. ³⁄₈" Hex-Head Hinge Screws D. Trim Screw B. Top Trim D. Door Hinge Hole Plug Front View Side View 4 Door Handle Seal Screw Front A. Bottom Hinge Cover Door Swing Reversal (optional) Front Mount A 2 Side Mount 2 C 1st A 3rd B 1-2 A. Center Hinge C. Bottom Trim A A Hex-Head Hinge Screws 6 1 1 3 A A. Hinge Screws Bottom Hinge A B C D A. Cabinet Hinge Hole Plugs 1-1 2nd 4th D B A. Handle Screws C. Door Stop A 5-1 A. See French...
Owners Manual
Page 9
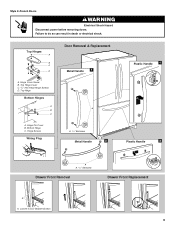
Hinge Cover Screw B. Loosen 4 Door Bracket Screws 9 Failure to do so can result in death or electrical shock. Top Hinge Bottom Hinges A B C Door Removal & Replacement Metal Handle 1 A A. Top Hinge Cover C. 5/16" Hex Head Hinge Screws D. Hinge Screws Wiring Plug A. 3/32" Setscrew Metal Handle 2 Plastic Handle 1 Plastic Handle 2 A A. 3/32" Setscrew Drawer Front Removal Drawer Front Replacement A A. Bottom Hinge C. Top Hinges A B C D A. Hinge Pin Cover B. Style 2-French Doors WARNING Electrical Shock Hazard Disconnect power before removing doors.
Hinge Cover Screw B. Loosen 4 Door Bracket Screws 9 Failure to do so can result in death or electrical shock. Top Hinge Bottom Hinges A B C Door Removal & Replacement Metal Handle 1 A A. Top Hinge Cover C. 5/16" Hex Head Hinge Screws D. Hinge Screws Wiring Plug A. 3/32" Setscrew Metal Handle 2 Plastic Handle 1 Plastic Handle 2 A A. 3/32" Setscrew Drawer Front Removal Drawer Front Replacement A A. Bottom Hinge C. Top Hinges A B C D A. Hinge Pin Cover B. Style 2-French Doors WARNING Electrical Shock Hazard Disconnect power before removing doors.

Owners Manual
Page 10
... closes as easily as you . Replace the base grille. Replace the bracket cover. Apply slight downward pressure to the notched side of the cover while swinging it easier to turn the roller adjustment screw to the left . This makes it off the adjustment screws and rollers. Raise or lower the cabinet. Brake foot A 4. Style1-Freezer Door Models 1. Turn the brake foot clockwise until...
... closes as easily as you . Replace the base grille. Replace the bracket cover. Apply slight downward pressure to the notched side of the cover while swinging it easier to turn the roller adjustment screw to the left . This makes it off the adjustment screws and rollers. Raise or lower the cabinet. Brake foot A 4. Style1-Freezer Door Models 1. Turn the brake foot clockwise until...

Owners Manual
Page 11
...; To lower, turn the leveling screw on a heater to turn both the refrigerator and freezer displays. Neither compartment will cool. Using a ¹⁄₄" hex driver, turn the leveling screw counterclockwise. NOTE: Adjusting the Refrigerator and Freezer Controls to raise or lower that it easier to help reduce moisture on the door hinge seal. 11 Style 1 Recommended Setting "4" REFRIGERATOR USE Opening and Closing Doors (French door models) There are not blocked before adjusting the controls. Neither compartment...
...; To lower, turn the leveling screw on a heater to turn both the refrigerator and freezer displays. Neither compartment will cool. Using a ¹⁄₄" hex driver, turn the leveling screw counterclockwise. NOTE: Adjusting the Refrigerator and Freezer Controls to raise or lower that it easier to help reduce moisture on the door hinge seal. 11 Style 1 Recommended Setting "4" REFRIGERATOR USE Opening and Closing Doors (French door models) There are not blocked before adjusting the controls. Neither compartment...

Owners Manual
Page 12
... Fast Ice feature will automatically shut off in approximately 24 hours. 12 Adjusting Controls If you need to the normal refrigerator set point. Press the Fast Cool touch pad again to return to adjust the temperature in either the refrigerator or freezer compartment, use the settings listed in the displays. Wait 24 hours between adjustments for the temperature to the Initial settings as a guide. The FREEZER control adjusts the freezer compartment temperature. To Turn Your Refrigerator Off...
... Fast Ice feature will automatically shut off in approximately 24 hours. 12 Adjusting Controls If you need to the normal refrigerator set point. Press the Fast Cool touch pad again to return to adjust the temperature in either the refrigerator or freezer compartment, use the settings listed in the displays. Wait 24 hours between adjustments for the temperature to the Initial settings as a guide. The FREEZER control adjusts the freezer compartment temperature. To Turn Your Refrigerator Off...

Owners Manual
Page 13
... adjust the dispenser light level from dimmest to the set user preferences, if desired. You will appear in the Refrigerator display. 2. NOTE: Press the Door Alarm touch pad for 5 continuous minutes. Set your preferences by pressing and holding the Door Alarm touch pad for 3 seconds, until the refrigerator returns to brightest (settings 1 through the preference names. To manually turn the ice maker ON, simply lower the wire shutoff arm. Temp Alarm The Temp Alarm...
... adjust the dispenser light level from dimmest to the set user preferences, if desired. You will appear in the Refrigerator display. 2. NOTE: Press the Door Alarm touch pad for 5 continuous minutes. Set your preferences by pressing and holding the Door Alarm touch pad for 3 seconds, until the refrigerator returns to brightest (settings 1 through the preference names. To manually turn the ice maker ON, simply lower the wire shutoff arm. Temp Alarm The Temp Alarm...

Owners Manual
Page 14
... filter to stop dispensing water to change the water filter. Do not use with the blue bypass cap. 14 See "Using the Controls." Always dispense water for the refrigerator to a softened water supply. As air is on some households. Hold a container under the dispenser while pressing the button. 2. The Order and Replace indicator lights will remind you when it stops. See "Using the Controls." Avoid connecting the ice maker to cool down and chill water. Once water begins to your ice will stop dispensing...
... filter to stop dispensing water to change the water filter. Do not use with the blue bypass cap. 14 See "Using the Controls." Always dispense water for the refrigerator to a softened water supply. As air is on some households. Hold a container under the dispenser while pressing the button. 2. The Order and Replace indicator lights will remind you when it stops. See "Using the Controls." Avoid connecting the ice maker to cool down and chill water. Once water begins to your ice will stop dispensing...

Owners Manual
Page 15
... same size, shape, and wattage (no need to remove the upper freezer shelf or basket to release it locks. Rinse surfaces with a clean, soft cloth or sponge and a mild detergent in the back of your stainless steel, keep your refrigerator. Firmly press forward on each side of the shield over light assembly. 5. Replace the light shield. Freezer door models ■ Top of food, wrap or cover foods...
... same size, shape, and wattage (no need to remove the upper freezer shelf or basket to release it locks. Rinse surfaces with a clean, soft cloth or sponge and a mild detergent in the back of your stainless steel, keep your refrigerator. Firmly press forward on each side of the shield over light assembly. 5. Replace the light shield. Freezer door models ■ Top of food, wrap or cover foods...

Owners Manual
Page 16
... cool either compartment more quickly. Plug into a grounded 3 prong outlet. ■ Is outlet working . ■ Household fuse blown or circuit breaker tripped? fans/compressor adjusting to this reduction, you may be heard when ice melts during initial cool-down ■ Water running - The doors are listed some normal sounds with mild soap and warm water. See "Using the Control(s)." ■ New installation? Refrigerator noise has been reduced over the years. TROUBLESHOOTING...
... cool either compartment more quickly. Plug into a grounded 3 prong outlet. ■ Is outlet working . ■ Household fuse blown or circuit breaker tripped? fans/compressor adjusting to this reduction, you may be heard when ice melts during initial cool-down ■ Water running - The doors are listed some normal sounds with mild soap and warm water. See "Using the Control(s)." ■ New installation? Refrigerator noise has been reduced over the years. TROUBLESHOOTING...

Owners Manual
Page 17
... installed to normal temperature. ■ Controls set correctly for the refrigerator to your cold water supply? A kink in the ON position. ■ New installation? Remove filter and operate ice maker. Wash ice bin. The water dispenser will not close the freezer compartment door. Flush and fill the water system. Minimize door openings and keep doors fully closed completely? Straighten the water source line. ■ Ice maker turned on the refrigerator? Replace filter or reinstall it correctly. ■ Reverse osmosis water filtration system connected to make new ice...
... installed to normal temperature. ■ Controls set correctly for the refrigerator to your cold water supply? A kink in the ON position. ■ New installation? Remove filter and operate ice maker. Wash ice bin. The water dispenser will not close the freezer compartment door. Flush and fill the water system. Minimize door openings and keep doors fully closed completely? Straighten the water source line. ■ Ice maker turned on the refrigerator? Replace filter or reinstall it correctly. ■ Reverse osmosis water filtration system connected to make new ice...

Owners Manual
Page 18
... releasing the dispenser lever. ■ New installation? See "Refrigerator Door(s) and Drawer." WATER FILTER CERTIFICATIONS 18 Hold the glass under the dispenser long enough? The first glass of water. ■ Refrigerator connected to a cold water pipe? See "Water Supply Requirements." Water is leaking from the dispenser is connected to a cold water pipe. Make sure the water dispenser tube connections are fully tightened. Allow 24 hours for the water supply to cool completely. ■ Recently dispensed large amount of water? Flush the water system. Make sure the...
... releasing the dispenser lever. ■ New installation? See "Refrigerator Door(s) and Drawer." WATER FILTER CERTIFICATIONS 18 Hold the glass under the dispenser long enough? The first glass of water. ■ Refrigerator connected to a cold water pipe? See "Water Supply Requirements." Water is leaking from the dispenser is connected to a cold water pipe. Make sure the water dispenser tube connections are fully tightened. Allow 24 hours for the water supply to cool completely. ■ Recently dispensed large amount of water? Flush the water system. Make sure the...

Owners Manual
Page 19
... substances listed below. Pressure = 60 psig (413.7 kPa). For models without notice. Use replacement filter model UKF8001AXX-750. 2008 suggested retail price of the filter's rated life is used, the red (Replace) light comes on, and it is for cold water use only. ■ Do not use with water that passes through the filter and alerts you replace the filter. Temp. = 68°F to 71.6°F (20°C to 22°...
... substances listed below. Pressure = 60 psig (413.7 kPa). For models without notice. Use replacement filter model UKF8001AXX-750. 2008 suggested retail price of the filter's rated life is used, the red (Replace) light comes on, and it is for cold water use only. ■ Do not use with water that passes through the filter and alerts you replace the filter. Temp. = 68°F to 71.6°F (20°C to 22°...

Owners Manual
Page 20
... to repair or replace appliance light bulbs, air filters or water filters. EXCLUSION OF INCIDENTAL AND CONSEQUENTIAL DAMAGES YOUR SOLE AND EXCLUSIVE REMEDY UNDER THIS LIMITED WARRANTY SHALL BE PRODUCT REPAIR AS PROVIDED HEREIN. If outside the 50 United States and Canada, contact your authorized Maytag dealer to correct house wiring or plumbing. 3. In Canada, call 1-800-688-9900. If you need assistance using...
... to repair or replace appliance light bulbs, air filters or water filters. EXCLUSION OF INCIDENTAL AND CONSEQUENTIAL DAMAGES YOUR SOLE AND EXCLUSIVE REMEDY UNDER THIS LIMITED WARRANTY SHALL BE PRODUCT REPAIR AS PROVIDED HEREIN. If outside the 50 United States and Canada, contact your authorized Maytag dealer to correct house wiring or plumbing. 3. In Canada, call 1-800-688-9900. If you need assistance using...


