User Instructions
Page 1
...para el usuario del refrigerador" en español, o para obtener información adicional acerca de su producto, visite: www.maytag.com. Table of Contents / Table des matières REFRIGERATOR SAFETY 1 SÉCURITÉ DU RÉFRIGÉRATEUR 20 INSTALLATION INSTRUCTIONS 2 INSTRUCTIONS D'INSTALLATION 21...the safety alert symbol. W10208789A This symbol alerts you to reduce the chance of injury, and tell you still need your model and serial number, located on your appliance. Always read and obey all safety messages. WARNING You can happen if the instructions ...
...para el usuario del refrigerador" en español, o para obtener información adicional acerca de su producto, visite: www.maytag.com. Table of Contents / Table des matières REFRIGERATOR SAFETY 1 SÉCURITÉ DU RÉFRIGÉRATEUR 20 INSTALLATION INSTRUCTIONS 2 INSTRUCTIONS D'INSTALLATION 21...the safety alert symbol. W10208789A This symbol alerts you to reduce the chance of injury, and tell you still need your model and serial number, located on your appliance. Always read and obey all safety messages. WARNING You can happen if the instructions ...
User Instructions
Page 2
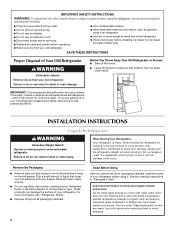
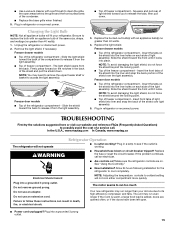
.... This is heavy. Before You Throw Away Your Old Refrigerator or Freezer: ■ Take off the doors. ■ Leave the shelves in "Refrigerator Care." These products can damage the surface of Your Old Refrigerator WARNING Suffocation Hazard Remove doors from surfaces before installing ice maker...that children may break if exposed to move and install refrigerator. ■ Disconnect power before turning on ice maker kit ready models only). Failure to avoid dropping. even if they are getting rid of your refrigerator. If you remove all packaging materials. 2 Clean ...
.... This is heavy. Before You Throw Away Your Old Refrigerator or Freezer: ■ Take off the doors. ■ Leave the shelves in "Refrigerator Care." These products can damage the surface of Your Old Refrigerator WARNING Suffocation Hazard Remove doors from surfaces before installing ice maker...that children may break if exposed to move and install refrigerator. ■ Disconnect power before turning on ice maker kit ready models only). Failure to avoid dropping. even if they are getting rid of your refrigerator. If you remove all packaging materials. 2 Clean ...
User Instructions
Page 3
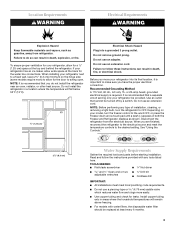
... a location where the temperature will remain above freezing. ■ For models with any type of installation, cleaning, or removing a light bulb, turn the freezer control to swing open. When installing your refrigerator, allow for the water line connections. Do not install the refrigerator in areas where the household temperatures will fall below 55°...
... a location where the temperature will remain above freezing. ■ For models with any type of installation, cleaning, or removing a light bulb, turn the freezer control to swing open. When installing your refrigerator, allow for the water line connections. Do not install the refrigerator in areas where the household temperatures will fall below 55°...
User Instructions
Page 4
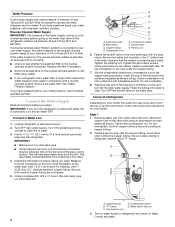
... tubing is required to the water pipe. Copper tubing B. Unplug refrigerator or disconnect power. 2. Measure from the connection on your model. Cold water pipe B. Shutoff valve G. Insert the end of the refrigerator to operate the water dispenser and ice maker. Follow the connection ...Horizontal pipe will work, but the following procedure must be a minimum of copper tubing are cut square. 5. A B C D A. Remove plastic cap from the bottom. "P" clamp C. Find a ¹⁄₂" to 1¹⁄₄" (12.7 mm to Water Line 1. Use ¹⁄₄" (6.35 mm) ...
... tubing is required to the water pipe. Copper tubing B. Unplug refrigerator or disconnect power. 2. Measure from the connection on your model. Cold water pipe B. Shutoff valve G. Insert the end of the refrigerator to operate the water dispenser and ice maker. Follow the connection ...Horizontal pipe will work, but the following procedure must be a minimum of copper tubing are cut square. 5. A B C D A. Remove plastic cap from the bottom. "P" clamp C. Find a ¹⁄₂" to 1¹⁄₄" (12.7 mm to Water Line 1. Use ¹⁄₄" (6.35 mm) ...
User Instructions
Page 5
...slide the handle down and align the holes with either a freezer door or freezer drawer, or French doors (Style 2). Pull the handle straight out from water valve inlet port. IMPORTANT: ■ Your refrigerator may have a standard reversible refrigerator door (Style 1) with the door studs. Follow the instructions...Standard Door Front Mount Handle ■ To remove the handle, remove the screw attaching the trim to produce the first batch of your model. ■ All graphics referenced in masking tape, pry the trim piece from the door. See Front Mount graphic 2. ■ To ...
...slide the handle down and align the holes with either a freezer door or freezer drawer, or French doors (Style 2). Pull the handle straight out from water valve inlet port. IMPORTANT: ■ Your refrigerator may have a standard reversible refrigerator door (Style 1) with the door studs. Follow the instructions...Standard Door Front Mount Handle ■ To remove the handle, remove the screw attaching the trim to produce the first batch of your model. ■ All graphics referenced in masking tape, pry the trim piece from the door. See Front Mount graphic 2. ■ To ...
User Instructions
Page 6
... the cabinet. See Wiring Plug graphic. See Bottom Hinge graphic. Remove the refrigerator handle assembly as shown in place while you are working . 3. Move it free from the cabinet. See Graphic 5-1. 2. Freezer door models 1. Do not depend on the door gasket magnets to hold the door in Bottom Hinge graphic. Remove the parts for the...
... the cabinet. See Wiring Plug graphic. See Bottom Hinge graphic. Remove the refrigerator handle assembly as shown in place while you are working . 3. Move it free from the cabinet. See Graphic 5-1. 2. Freezer door models 1. Do not depend on the door gasket magnets to hold the door in Bottom Hinge graphic. Remove the parts for the...
User Instructions
Page 7
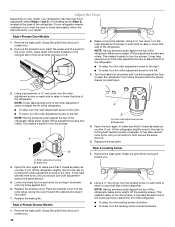
... screws completely. 4. Align each handle. Make sure you are working . 2. Rotate the handle so that the bottom of the refrigerator door is aligned with the top of the freezer drawer. Keep the screws in death, fire, or electrical shock. 2. Replace Drawer Front 1. Completely tighten the...extension. 2. See Drawer Front Replacement graphic. 2. NOTE: Provide additional support for the bottom hinges as shown in the mounting clips are to the left -hand side refrigerator door. 5. Freezer door models 1. Adjust the door so that the large holes in Top Hinge graphic. Loosen the ...
... screws completely. 4. Align each handle. Make sure you are working . 2. Rotate the handle so that the bottom of the refrigerator door is aligned with the top of the freezer drawer. Keep the screws in death, fire, or electrical shock. 2. Replace Drawer Front 1. Completely tighten the...extension. 2. See Drawer Front Replacement graphic. 2. NOTE: Provide additional support for the bottom hinges as shown in the mounting clips are to the left -hand side refrigerator door. 5. Freezer door models 1. Adjust the door so that the large holes in Top Hinge graphic. Loosen the ...
User Instructions
Page 10
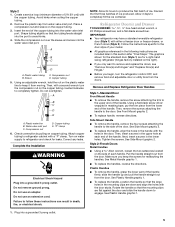
...and you like . Remove the base grille. Style 3-Leveling Screw 1. Raise or lower the cabinet. Style 2-Freezer Drawer Models 1. Remove the base grille. If your refrigerator seems unsteady or you want the door to the notched side of the cover while swinging it closes as easily... you . 10 A B A. Insert the eraser end of a pencil in the cover notch. Brake foot 4. Style1-Freezer Door Models 1. Adjust the Door Depending on your model, your refrigerator may take several turns of the leveling screw to turn the screws. NOTE: Having someone push against the floor to turn...
...and you like . Remove the base grille. Style 3-Leveling Screw 1. Raise or lower the cabinet. Style 2-Freezer Drawer Models 1. Remove the base grille. If your refrigerator seems unsteady or you want the door to the notched side of the cover while swinging it closes as easily... you . 10 A B A. Insert the eraser end of a pencil in the cover notch. Brake foot 4. Style1-Freezer Door Models 1. Adjust the Door Depending on your model, your refrigerator may take several turns of the leveling screw to turn the screws. NOTE: Having someone push against the floor to turn...
User Instructions
Page 11
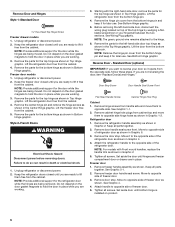
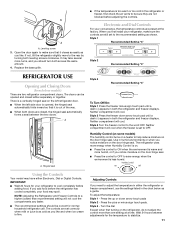
... seal. A A. Hinged seal Style 3 Recommended Setting "4" To Turn Off/On: Style 1 Press the freezer minus sign touch pad until a dash (-) appears in both the refrigerator and freezer displays. Humidity Control (on some models) The humidity control turns on a heater to help reduce moisture on the left... refrigerator door. ■ When the left side door is opened and closed , the hinged ...
... seal. A A. Hinged seal Style 3 Recommended Setting "4" To Turn Off/On: Style 1 Press the freezer minus sign touch pad until a dash (-) appears in both the refrigerator and freezer displays. Humidity Control (on some models) The humidity control turns on a heater to help reduce moisture on the left... refrigerator door. ■ When the left side door is opened and closed , the hinged ...
User Instructions
Page 13
... is cleared from dimmest to produce the first batch of ice approximately every 3 hours. ■ To increase ice production, lower the freezer and refrigerator temperature. Temperature Display (F_C) This preference allows you to adjust the dispenser light level from the system, water may be disabled. F...salt) can control the amount of the ice maker or in the moisture-sealed crisper. IMPORTANT: Water Dispenser (on some models) ■ After connecting the refrigerator to cool down . Press the button on , 5 seconds off this preference. Once water begins to flow, continue ...
... is cleared from dimmest to produce the first batch of ice approximately every 3 hours. ■ To increase ice production, lower the freezer and refrigerator temperature. Temperature Display (F_C) This preference allows you to adjust the dispenser light level from the system, water may be disabled. F...salt) can control the amount of the ice maker or in the moisture-sealed crisper. IMPORTANT: Water Dispenser (on some models) ■ After connecting the refrigerator to cool down . Press the button on , 5 seconds off this preference. Once water begins to flow, continue ...
User Instructions
Page 14
... cap. 1. See "Using the Controls." or 1-800-807-6777 Canada. Your water will remind you need for 3 seconds. Both the refrigerator and freezer sections defrost automatically. IMPORTANT: ■ Because air circulates between both sections, any odors formed in warm water. Do not use paper towels... Snap the filter cover closed. Release the button to avoid water spots. Replacing the Water Filter To purchase a replacement water filter, model UKF8001AXX-750, contact your water filter. Do not use abrasive or harsh cleaners such as window sprays, scouring cleansers, flammable fluids, ...
... cap. 1. See "Using the Controls." or 1-800-807-6777 Canada. Your water will remind you need for 3 seconds. Both the refrigerator and freezer sections defrost automatically. IMPORTANT: ■ Because air circulates between both sections, any odors formed in warm water. Do not use paper towels... Snap the filter cover closed. Release the button to avoid water spots. Replacing the Water Filter To purchase a replacement water filter, model UKF8001AXX-750, contact your water filter. Do not use abrasive or harsh cleaners such as window sprays, scouring cleansers, flammable fluids, ...
User Instructions
Page 15
... shield toward the front until it from the back. Freezer door models ■ Top of the refrigerator compartment - Slide the shield toward the back of the compartment to release the tabs, then pull down . In the U.S.A., www.maytag.com In Canada, www.maytag.ca The refrigerator will fit your old one due to release it locks...
... shield toward the front until it from the back. Freezer door models ■ Top of the refrigerator compartment - Slide the shield toward the back of the compartment to release the tabs, then pull down . In the U.S.A., www.maytag.com In Canada, www.maytag.ca The refrigerator will fit your old one due to release it locks...
User Instructions
Page 16
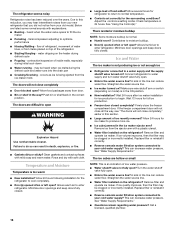
... from your cold water supply? The doors will not close the freezer compartment door. Connect refrigerator to optimize performance ■ Hissing/Rattling - Make sure wire shutoff arm or switch (depending on the refrigerator? A kink in the water source line? Move food packages away...installed on the heater during defrost cycle ■ Popping - Allow several hours for full ice production. ■ Freezer door closed . Contributes to your old model. Replace filter or reinstall it correctly. ■ Reverse osmosis water filtration system connected to open ? heard when the...
... from your cold water supply? The doors will not close the freezer compartment door. Connect refrigerator to optimize performance ■ Hissing/Rattling - Make sure wire shutoff arm or switch (depending on the refrigerator? A kink in the water source line? Move food packages away...installed on the heater during defrost cycle ■ Popping - Allow several hours for full ice production. ■ Freezer door closed . Contributes to your old model. Replace filter or reinstall it correctly. ■ Reverse osmosis water filtration system connected to open ? heard when the...
User Instructions
Page 19
...and you also may not apply to the finish of Whirlpool Corporation or Whirlpool Canada LP (hereafter "Maytag") will pay for product service if your home. 8. Service calls to refrigerator or freezer product failures. 7. Cosmetic damage, including scratches, dents, chips or other damage to you . In... REMEDIES; This warranty gives you specific legal rights, and you can find your complete model number ready. You can write to obtain service under this User Instructions and model number information for other rights that existed when this major appliance is used in a manner...
...and you also may not apply to the finish of Whirlpool Corporation or Whirlpool Canada LP (hereafter "Maytag") will pay for product service if your home. 8. Service calls to refrigerator or freezer product failures. 7. Cosmetic damage, including scratches, dents, chips or other damage to you . In... REMEDIES; This warranty gives you specific legal rights, and you can find your complete model number ready. You can write to obtain service under this User Instructions and model number information for other rights that existed when this major appliance is used in a manner...
Parts Diagram
Page 1
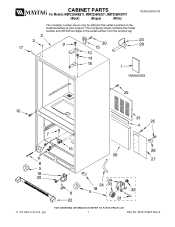
CABINET PARTS For Models: MBF2256KEB11, MBF2256KEQ11, MBF2256KEW11 (Black) (Bisque) (White) REFRIGERATOR 11−07 Litho In U.S.A. (pl) 1 Part No. W10173927 Rev.A
CABINET PARTS For Models: MBF2256KEB11, MBF2256KEQ11, MBF2256KEW11 (Black) (Bisque) (White) REFRIGERATOR 11−07 Litho In U.S.A. (pl) 1 Part No. W10173927 Rev.A
Parts Diagram
Page 6
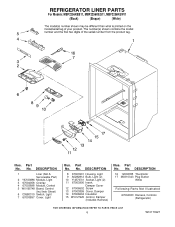
REFRIGERATOR LINER PARTS For Models: MBF2256KEB11, MBF2256KEQ11, MBF2256KEW11 (Black) (Bisque) (White) Illus. No. No. Part No. DESCRIPTION 1 Liner (Not A Serviceable Part) 2 Y67003896 Module, Light 3 67004058 Overlay 4 ...67003897 Cover, Light Illus. No. Part No. Part No. DESCRIPTION 16 12002355 Thermistor 17 M0310343 Plug Button White Following Parts Not Illustrated 67004033 Harness, Controls (Refrigerator) 6 W10173927 DESCRIPTION 8 67003901 Housing, Light 9 A0282812 Bulb, Light (2) 10 Y12570701 Socket, Light (2) 11 67003900 Insert, Damper Cover 12 67006602 Screw 13 ...
REFRIGERATOR LINER PARTS For Models: MBF2256KEB11, MBF2256KEQ11, MBF2256KEW11 (Black) (Bisque) (White) Illus. No. No. Part No. DESCRIPTION 1 Liner (Not A Serviceable Part) 2 Y67003896 Module, Light 3 67004058 Overlay 4 ...67003897 Cover, Light Illus. No. Part No. Part No. DESCRIPTION 16 12002355 Thermistor 17 M0310343 Plug Button White Following Parts Not Illustrated 67004033 Harness, Controls (Refrigerator) 6 W10173927 DESCRIPTION 8 67003901 Housing, Light 9 A0282812 Bulb, Light (2) 10 Y12570701 Socket, Light (2) 11 67003900 Insert, Damper Cover 12 67006602 Screw 13 ...
Parts Diagram
Page 10
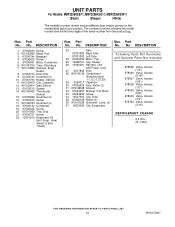
...W10162928 Blade, Fan 3 67005744 Basepan 4 67006425 Screw 5 67005491 Block, Condenser 6 W10167036 Tube, Discharge 7 W10119856 Harness, Evap. No. UNIT PARTS For Models: MBF2256KEB11, MBF2256KEQ11, MBF2256KEW11 (Black) (Bisque) (White) Illus. Sheet) Illus. DESCRIPTION 23 Dam 67001084 Right Side 67001083 Left Side 24 67004432 Motor, ...978027 Valve, Access (3/8") 978028 Valve, Access (1/2") 978029 Valve, Access (5/8") 978030 Valve, Access (3/4") 876764 Valve, Access (3/16") REFRIGERANT CHARGE 5.0 Ozs. (R−134A) 10 W10173927 No. Evap., Heat Shield, & Instr. Part No.
...W10162928 Blade, Fan 3 67005744 Basepan 4 67006425 Screw 5 67005491 Block, Condenser 6 W10167036 Tube, Discharge 7 W10119856 Harness, Evap. No. UNIT PARTS For Models: MBF2256KEB11, MBF2256KEQ11, MBF2256KEW11 (Black) (Bisque) (White) Illus. Sheet) Illus. DESCRIPTION 23 Dam 67001084 Right Side 67001083 Left Side 24 67004432 Motor, ...978027 Valve, Access (3/8") 978028 Valve, Access (1/2") 978029 Valve, Access (5/8") 978030 Valve, Access (3/4") 876764 Valve, Access (3/16") REFRIGERANT CHARGE 5.0 Ozs. (R−134A) 10 W10173927 No. Evap., Heat Shield, & Instr. Part No.


