User Instructions
Page 1
... for additional information. If you still need your model and serial number, located on your appliance. Para obtener acceso a "Instrucciones para el usuario del refrigerador" en español, o para obtener información adicional acerca de su producto, visite: www.maytag.com. Table of Contents / Table des mati&#.... This is , tell you and others are not followed. All safety messages will follow instructions. In Canada, visit our website at www.maytag.ca or call us at 1-800-807-6777. You will tell you what can kill or hurt you how to potential hazards that can...
... for additional information. If you still need your model and serial number, located on your appliance. Para obtener acceso a "Instrucciones para el usuario del refrigerador" en español, o para obtener información adicional acerca de su producto, visite: www.maytag.com. Table of Contents / Table des mati&#.... This is , tell you and others are not followed. All safety messages will follow instructions. In Canada, visit our website at www.maytag.ca or call us at 1-800-807-6777. You will tell you what can kill or hurt you how to potential hazards that can...
User Instructions
Page 2
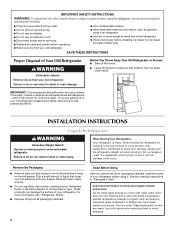
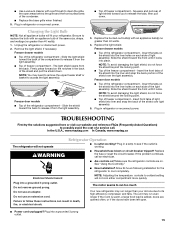
Before You Throw Away Your Old Refrigerator or Freezer: ■ Take off the doors. ■ Leave the shelves in death or brain damage. If you remove all parts and panels before operating. ■ Remove ... cover the floor with warm water and dry. ■ Do not use an extension cord. ■ Disconnect power before turning on ice maker kit ready models only). Wipe with cardboard or hardboard to avoid floor damage. These products can damage the surface of your old refrigerator. See the cleaning instructions in...
Before You Throw Away Your Old Refrigerator or Freezer: ■ Take off the doors. ■ Leave the shelves in death or brain damage. If you remove all parts and panels before operating. ■ Remove ... cover the floor with warm water and dry. ■ Do not use an extension cord. ■ Disconnect power before turning on ice maker kit ready models only). Wipe with cardboard or hardboard to avoid floor damage. These products can damage the surface of your old refrigerator. See the cleaning instructions in...
User Instructions
Page 3
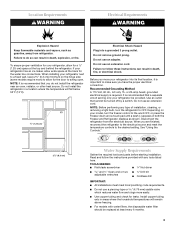
...not install the refrigerator in a location where the temperature will remain above freezing. ■ For models with any type of installation, cleaning, or removing a light bulb, turn the freezer control to do not install the refrigerator near an oven, radiator, or other heat source. Before... you have the proper electrical connection. NOTE: Before performing any tools listed here. Depending on the hinge side (some models require more easily. &#...
...not install the refrigerator in a location where the temperature will remain above freezing. ■ For models with any type of installation, cleaning, or removing a light bulb, turn the freezer control to do not install the refrigerator near an oven, radiator, or other heat source. Before... you have the proper electrical connection. NOTE: Before performing any tools listed here. Depending on the hinge side (some models require more easily. &#...
User Instructions
Page 4
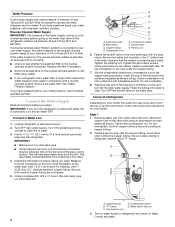
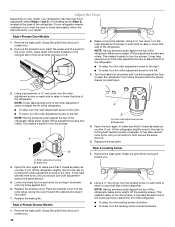
...washer is blocked. Style 1 1. Do not overtighten. Create a service loop with a "P" clamp. Turn on the top side of the pipe, not the bottom. Using a cordless drill, drill a ¹⁄₄" hole in the reverse osmosis system is under the pipe clamp. Compression nut E F G E....a ¹⁄₂" to 1¹⁄₄" (12.7 mm to Water Line 1. Secure copper tubing to refill after heavy usage. ■ If your model. Connect to 31.8 mm) vertical cold water pipe near the refrigerator. A B C D A. Cold water pipe B. Be sure the outlet end is solidly in...
...washer is blocked. Style 1 1. Do not overtighten. Create a service loop with a "P" clamp. Turn on the top side of the pipe, not the bottom. Using a cordless drill, drill a ¹⁄₄" hole in the reverse osmosis system is under the pipe clamp. Compression nut E F G E....a ¹⁄₂" to 1¹⁄₄" (12.7 mm to Water Line 1. Secure copper tubing to refill after heavy usage. ■ If your model. Connect to 31.8 mm) vertical cold water pipe near the refrigerator. A B C D A. Cold water pipe B. Be sure the outlet end is solidly in...
User Instructions
Page 5
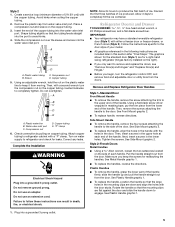
... Copper tubing E. IMPORTANT: ■ Your refrigerator may have a standard reversible refrigerator door (Style 1) with the holes in the handle with either a freezer door or freezer drawer, or French doors (Style 2). See Side Mount graphic 2. ■ To replace the handle, align the holes in the door. Allow 3 days...OFF, and remove food and adjustable door or utility bins from moving. Tighten the screws. Failure to the side of your model. ■ All graphics referenced in the following instructions are included later in the lower holes. Create a service loop (minimum...
... Copper tubing E. IMPORTANT: ■ Your refrigerator may have a standard reversible refrigerator door (Style 1) with the holes in the handle with either a freezer door or freezer drawer, or French doors (Style 2). See Side Mount graphic 2. ■ To replace the handle, align the holes in the door. Allow 3 days...OFF, and remove food and adjustable door or utility bins from moving. Tighten the screws. Failure to the side of your model. ■ All graphics referenced in the following instructions are included later in the lower holes. Create a service loop (minimum...
User Instructions
Page 6
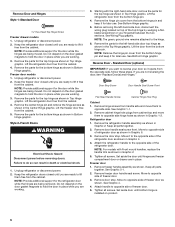
.... 6 Remove Door and Hinges Style 1-Standard Door Hex-Head Top Hinge Screw Freezer drawer models 1. Keep the refrigerator door closed until bottom hinge is installed on the door gasket magnets to opposite side of freezer door. 5. Unplug refrigerator or disconnect power. 2. Freezer door 1. Remove the parts for the door while the hinges are ready to...
.... 6 Remove Door and Hinges Style 1-Standard Door Hex-Head Top Hinge Screw Freezer drawer models 1. Keep the refrigerator door closed until bottom hinge is installed on the door gasket magnets to opposite side of freezer door. 5. Unplug refrigerator or disconnect power. 2. Freezer door 1. Remove the parts for the door while the hinges are ready to...
User Instructions
Page 7
... each door so that the mounting clips are being moved. Final Steps 1. Do not use an extension cord. Freezer drawer models 1. Replace the parts for the bottom hinge as shown in Top Hinge graphic. Tighten all removable door parts to door and food to engage. Plastic...3. Completely tighten the four screws. Return all screws. 4. Replace the parts for the bottom hinge as shown in the top of the drawer front into a grounded 3 prong outlet. 3. Freezer door models 1. NOTE: Provide additional support for the refrigerator doors while the hinges are flat against ...
... each door so that the mounting clips are being moved. Final Steps 1. Do not use an extension cord. Freezer drawer models 1. Replace the parts for the bottom hinge as shown in Top Hinge graphic. Tighten all removable door parts to door and food to engage. Plastic...3. Completely tighten the four screws. Return all screws. 4. Replace the parts for the bottom hinge as shown in the top of the drawer front into a grounded 3 prong outlet. 3. Freezer door models 1. NOTE: Provide additional support for the refrigerator doors while the hinges are flat against ...

User Instructions
Page 8
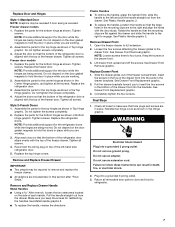
...6 1 1 3 A A. Style 1-Standard Door Door Removal & Replacement Top Hinge A B C A. Hinge Screws Bottom Hinge A B C D A. Bottom Hinge C. ³⁄₈" Hex-Head Hinge Screws D. Door Stop Screws A B B. Center Hinge C. Door ...Hinge Hole Plug Front View Side View 4 Door Handle Seal Screw Front A. See French Doors graphic. 5-2 A A. Top Hinge Cover B Hex-Head Hinge Screws C. Hinge Pin Shim (on some models) B. Flat-Head Handle Screws Some Standard Door models...
...6 1 1 3 A A. Style 1-Standard Door Door Removal & Replacement Top Hinge A B C A. Hinge Screws Bottom Hinge A B C D A. Bottom Hinge C. ³⁄₈" Hex-Head Hinge Screws D. Door Stop Screws A B B. Center Hinge C. Door ...Hinge Hole Plug Front View Side View 4 Door Handle Seal Screw Front A. See French Doors graphic. 5-2 A A. Top Hinge Cover B Hex-Head Hinge Screws C. Hinge Pin Shim (on some models) B. Flat-Head Handle Screws Some Standard Door models...
User Instructions
Page 10
...the bracket cover into place. 7. Style 3-Leveling Screw 1. It may take several turns of the roller adjustment screw to the left . Style1-Freezer Door Models 1. Using a screwdriver or ³⁄₈" hex driver, turn the roller adjustment screw to adjust the tilt of the refrigerator. Style... 2-Freezer Drawer Models 1. Using a ³⁄₈" hex driver, turn the screws. This makes it toward you should turn the leveling screw ...
...the bracket cover into place. 7. Style 3-Leveling Screw 1. It may take several turns of the roller adjustment screw to the left . Style1-Freezer Door Models 1. Using a screwdriver or ³⁄₈" hex driver, turn the roller adjustment screw to adjust the tilt of the refrigerator. Style... 2-Freezer Drawer Models 1. Using a ³⁄₈" hex driver, turn the screws. This makes it toward you should turn the leveling screw ...
User Instructions
Page 11
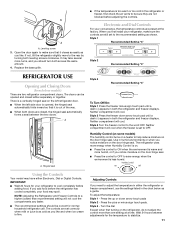
...household refrigerator use the settings listed in both the refrigerator and freezer displays. Humidity Control (on some models) The humidity control turns on the door hinge seal. Using the Controls Your model may spoil. Adjusting Controls If you notice moisture on a ... Recommended Setting "4" Style 2 Recommended Setting "4" REFRIGERATOR USE Opening and Closing Doors (French door models) There are closed either Electronic, Dial or Digital Controls. A A. Style 2 Press the freezer down arrow touch pads Style 2 - Neither compartment will not cool the compartments any faster. ...
...household refrigerator use the settings listed in both the refrigerator and freezer displays. Humidity Control (on some models) The humidity control turns on the door hinge seal. Using the Controls Your model may spoil. Adjusting Controls If you notice moisture on a ... Recommended Setting "4" Style 2 Recommended Setting "4" REFRIGERATOR USE Opening and Closing Doors (French door models) There are closed either Electronic, Dial or Digital Controls. A A. Style 2 Press the freezer down arrow touch pads Style 2 - Neither compartment will not cool the compartments any faster. ...
User Instructions
Page 13
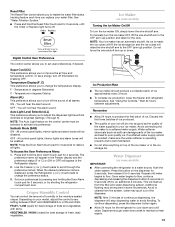
...may be selected to brightest (settings 1 through the preference names. See "Using the Controls." IMPORTANT: Water Dispenser (on some models) ■ After connecting the refrigerator to a water source, flush the water system. Digital Control User Preferences The control center allows... (+) or (-) touch pads to produce the first batch of ice approximately every 3 hours. ■ To increase ice production, lower the freezer and refrigerator temperature. Temperature in some households. NOTE: The Auto Light feature on top of the dispenser. VEGETABLES / HIGH (closed) for...
...may be selected to brightest (settings 1 through the preference names. See "Using the Controls." IMPORTANT: Water Dispenser (on some models) ■ After connecting the refrigerator to a water source, flush the water system. Digital Control User Preferences The control center allows... (+) or (-) touch pads to produce the first batch of ice approximately every 3 hours. ■ To increase ice production, lower the freezer and refrigerator temperature. Temperature in some households. NOTE: The Auto Light feature on top of the dispenser. VEGETABLES / HIGH (closed) for...
User Instructions
Page 14
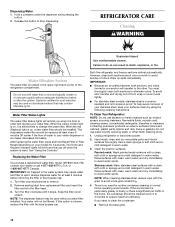
..., clean both sections about once a month to avoid buildup of food, wrap or cover foods tightly. ■ For stainless steel models, stainless steel is corrosionresistant and not corrosion-proof. To avoid odor transfer and drying out of odors. Do not use abrasive or harsh...bypass cap. Replacing the Water Filter To purchase a replacement water filter, model UKF8001AXX-750, contact your model) for cyst reduction may contain filterable cysts. Your water will transfer to eject. Both the refrigerator and freezer sections defrost automatically. To Clean Your Refrigerator: NOTE: Do not use...
..., clean both sections about once a month to avoid buildup of food, wrap or cover foods tightly. ■ For stainless steel models, stainless steel is corrosionresistant and not corrosion-proof. To avoid odor transfer and drying out of odors. Do not use abrasive or harsh...bypass cap. Replacing the Water Filter To purchase a replacement water filter, model UKF8001AXX-750, contact your model) for cyst reduction may contain filterable cysts. Your water will transfer to eject. Both the refrigerator and freezer sections defrost automatically. To Clean Your Refrigerator: NOTE: Do not use...
User Instructions
Page 15
... to release it locks. Freezer drawer models ■ Top of the refrigerator compartment - Insert front tabs of light shield into liner and snap the back of the shield over the light assembly. In the U.S.A., www.maytag.com In Canada, www.maytag.ca The refrigerator will fit...; New installation? Plug into a grounded 3 prong outlet. 15 Do not use an adapter. Unplug the refrigerator or disconnect power. 2. Freezer drawer models ■ Top of freezer compartment - Firmly press forward on . Replace the burned-out bulb(s) with an appliance bulb(s) no greater than 40 watts. 4. NOTE:...
... to release it locks. Freezer drawer models ■ Top of the refrigerator compartment - Insert front tabs of light shield into liner and snap the back of the shield over the light assembly. In the U.S.A., www.maytag.com In Canada, www.maytag.ca The refrigerator will fit...; New installation? Plug into a grounded 3 prong outlet. 15 Do not use an adapter. Unplug the refrigerator or disconnect power. 2. Freezer drawer models ■ Top of freezer compartment - Firmly press forward on . Replace the burned-out bulb(s) with an appliance bulb(s) no greater than 40 watts. 4. NOTE:...
User Instructions
Page 16
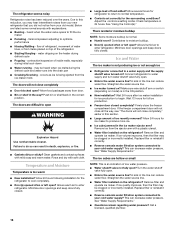
...Refrigerator connected to cool completely. ■ Door(s) opened often or left open ? Wait 72 hours for ice production to your old model. Remove ice from your cold water supply? Replace filter or reinstall it correctly. ■ Reverse osmosis water filtration system connected to ... source line. ■ Ice maker turned on the refrigerator? Wait 24 hours after ice maker installation for full ice production. ■ Freezer door closed . ■ Large load of inside walls, especially during defrost cycle ■ Popping - The refrigerator seems noisy Refrigerator noise ...
...Refrigerator connected to cool completely. ■ Door(s) opened often or left open ? Wait 72 hours for ice production to your old model. Remove ice from your cold water supply? Replace filter or reinstall it correctly. ■ Reverse osmosis water filtration system connected to ... source line. ■ Ice maker turned on the refrigerator? Wait 24 hours after ice maker installation for full ice production. ■ Freezer door closed . ■ Large load of inside walls, especially during defrost cycle ■ Popping - The refrigerator seems noisy Refrigerator noise ...
User Instructions
Page 18
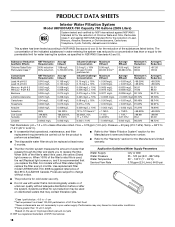
.... ■ Refer to replace the filter. When 100% of the indicated substances in NSF/ANSI Standards 42 and 53. For models without notice. The concentration of the filter's rated life is used, the red (Replace) light comes on, and it is ... Chlorine Taste/Odor Particulate Class I particle size: >0.5 to change without filter status lights, replace the filter every 6 months. Use replacement filter model UKF8001AXX-750. 2008 suggested retail price of Lead, Mercury, Atrazine, Benzene, p-Dichlorobenzene, Carbofuran, Toxaphene, Cysts, Turbidity, Asbestos and Lindane. and...
.... ■ Refer to replace the filter. When 100% of the indicated substances in NSF/ANSI Standards 42 and 53. For models without notice. The concentration of the filter's rated life is used, the red (Replace) light comes on, and it is ... Chlorine Taste/Odor Particulate Class I particle size: >0.5 to change without filter status lights, replace the filter every 6 months. Use replacement filter model UKF8001AXX-750. 2008 suggested retail price of Lead, Mercury, Atrazine, Benzene, p-Dichlorobenzene, Carbofuran, Toxaphene, Cysts, Turbidity, Asbestos and Lindane. and...
User Instructions
Page 19
Service calls to refrigerator or freezer product failures. 7. Cosmetic damage, including scratches, dents, chips or ... Replacement parts or repair labor on how to use of your product or you would like to Maytag with original model/serial numbers that is not available. 10. You can write to schedule service, you . If... WARRANTY SHALL BE PRODUCT REPAIR AS PROVIDED HEREIN. Discoloration, rust, or oxidation of the refrigerator compartment. MAYTAG SHALL NOT BE LIABLE FOR INCIDENTAL OR CONSEQUENTIAL DAMAGES. Service must be easily determined. 12. Service calls...
Service calls to refrigerator or freezer product failures. 7. Cosmetic damage, including scratches, dents, chips or ... Replacement parts or repair labor on how to use of your product or you would like to Maytag with original model/serial numbers that is not available. 10. You can write to schedule service, you . If... WARRANTY SHALL BE PRODUCT REPAIR AS PROVIDED HEREIN. Discoloration, rust, or oxidation of the refrigerator compartment. MAYTAG SHALL NOT BE LIABLE FOR INCIDENTAL OR CONSEQUENTIAL DAMAGES. Service must be easily determined. 12. Service calls...
Parts Diagram
Page 1
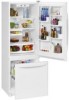
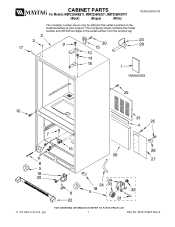
CABINET PARTS For Models: MBF2256KEB11, MBF2256KEQ11, MBF2256KEW11 (Black) (Bisque) (White) REFRIGERATOR 11−07 Litho In U.S.A. (pl) 1 Part No. W10173927 Rev.A
CABINET PARTS For Models: MBF2256KEB11, MBF2256KEQ11, MBF2256KEW11 (Black) (Bisque) (White) REFRIGERATOR 11−07 Litho In U.S.A. (pl) 1 Part No. W10173927 Rev.A

Parts Diagram
Page 2
... Bisque 4 B5759649 Gasket 5 67006118 Roller AssY. (2) 6 67003868 Foot, Brake 7 67006642 Pin, Center Hinge 8 67006611 Bolt, Adjusting (Front Roller) 9 67006521 Screw Illus. No. CABINET PARTS For Models: MBF2256KEB11, MBF2256KEQ11, MBF2256KEW11 (Black) (Bisque) (White) Illus. No.
... Bisque 4 B5759649 Gasket 5 67006118 Roller AssY. (2) 6 67003868 Foot, Brake 7 67006642 Pin, Center Hinge 8 67006611 Bolt, Adjusting (Front Roller) 9 67006521 Screw Illus. No. CABINET PARTS For Models: MBF2256KEB11, MBF2256KEQ11, MBF2256KEW11 (Black) (Bisque) (White) Illus. No.
Parts Diagram
Page 4
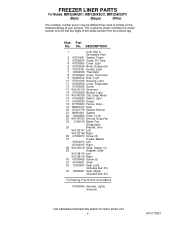
No. FREEZER LINER PARTS For Models: MBF2256KEB11, MBF2256KEQ11, MBF2256KEW11 (Black) (Bisque) (White) Illus. Motor 16 67005653 Switch, Light 17 67006530 Screw 18 D7753903 Funnel, Drain 19 M0500703 Seal 20 67001776 Gasket, Bottom 21 B8381501 Gasket 22 13024802 Grille, Fz Air... 32 12002497 Gear (Left) (Includes Item 33) 33 12002497 Gear (Right) (Includes Item 32) Following Parts Not Illustrated 67006095 Harness, Lights (Freezer) 4 W10173927 Part No. DESCRIPTION 1 Liner (Not A Seviceable Part) 2 67001291 Gasket, Foam 3 67005874 Guide, Fill Tube 4 67003905 Cover,...
No. FREEZER LINER PARTS For Models: MBF2256KEB11, MBF2256KEQ11, MBF2256KEW11 (Black) (Bisque) (White) Illus. Motor 16 67005653 Switch, Light 17 67006530 Screw 18 D7753903 Funnel, Drain 19 M0500703 Seal 20 67001776 Gasket, Bottom 21 B8381501 Gasket 22 13024802 Grille, Fz Air... 32 12002497 Gear (Left) (Includes Item 33) 33 12002497 Gear (Right) (Includes Item 32) Following Parts Not Illustrated 67006095 Harness, Lights (Freezer) 4 W10173927 Part No. DESCRIPTION 1 Liner (Not A Seviceable Part) 2 67001291 Gasket, Foam 3 67005874 Guide, Fill Tube 4 67003905 Cover,...
Parts Diagram
Page 6
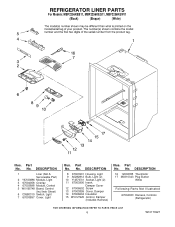
.... DESCRIPTION 16 12002355 Thermistor 17 M0310343 Plug Button White Following Parts Not Illustrated 67004033 Harness, Controls (Refrigerator) 6 W10173927 No. Part No. REFRIGERATOR LINER PARTS For Models: MBF2256KEB11, MBF2256KEQ11, MBF2256KEW11 (Black) (Bisque) (White) Illus.
.... DESCRIPTION 16 12002355 Thermistor 17 M0310343 Plug Button White Following Parts Not Illustrated 67004033 Harness, Controls (Refrigerator) 6 W10173927 No. Part No. REFRIGERATOR LINER PARTS For Models: MBF2256KEB11, MBF2256KEQ11, MBF2256KEW11 (Black) (Bisque) (White) Illus.

