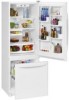
User Instructions
Page 2
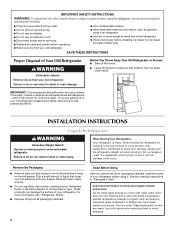
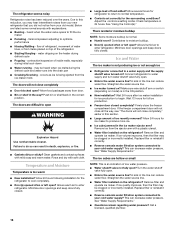
...Away Your Old Refrigerator or Freezer: ■ Take off the doors. ■ Leave the shelves in death or brain damage. Junked or abandoned refrigerators are not problems of the past. When Moving Your Refrigerator: Your refrigerator is normal. Do not wiggle or "walk" the refrigerator when trying to.... See the cleaning instructions in back or other injury. IMPORTANT: Child entrapment and suffocation are still dangerous - Wipe with your refrigerator. These products can damage the surface of your fingers. Tempered glass is designed to shatter into a grounded 3 prong outlet. ...
...Away Your Old Refrigerator or Freezer: ■ Take off the doors. ■ Leave the shelves in death or brain damage. Junked or abandoned refrigerators are not problems of the past. When Moving Your Refrigerator: Your refrigerator is normal. Do not wiggle or "walk" the refrigerator when trying to.... See the cleaning instructions in back or other injury. IMPORTANT: Child entrapment and suffocation are still dangerous - Wipe with your refrigerator. These products can damage the surface of your fingers. Tempered glass is designed to shatter into a grounded 3 prong outlet. ...
User Instructions
Page 3
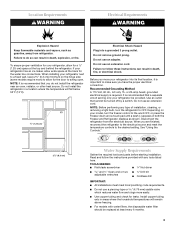
...water flow and clogs more ) to allow for the door to the word OFF, or press the Freezer down arrow touch pad until a dash (-) appears in both the Freezer and Refrigerator displays as gasoline, away from the electrical source. Do not remove ground prong. Use an outlet that... a separate circuit serving only your refrigerator has an ice maker, allow for the water line connections. See "Using the ...
...water flow and clogs more ) to allow for the door to the word OFF, or press the Freezer down arrow touch pad until a dash (-) appears in both the Freezer and Refrigerator displays as gasoline, away from the electrical source. Do not remove ground prong. Use an outlet that... a separate circuit serving only your refrigerator has an ice maker, allow for the water line connections. See "Using the ...
User Instructions
Page 5
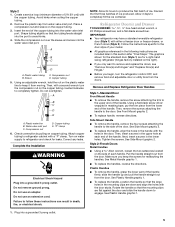
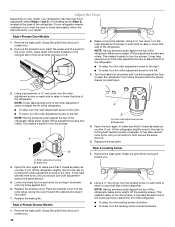
...each handle. Shape tubing slightly so that the large holes in death, fire, or electrical shock. Failure to avoid kinks. 4. Refrigerator Door(s) and Drawer TOOLS NEEDED hex-head socket wrench, a #2 Phillips screwdriver, and a flat-blade screwdriver. See Side Mount ...freezer drawer, or French doors (Style 2). Sleeve D. Water valve inlet port C. Turn on the plastic water line to the side of your model. ■ All graphics referenced in the following instructions are flat against the door and slide the handle down and align the holes with a second wrench turn the refrigerator...
...each handle. Shape tubing slightly so that the large holes in death, fire, or electrical shock. Failure to avoid kinks. 4. Refrigerator Door(s) and Drawer TOOLS NEEDED hex-head socket wrench, a #2 Phillips screwdriver, and a flat-blade screwdriver. See Side Mount ...freezer drawer, or French doors (Style 2). Sleeve D. Water valve inlet port C. Turn on the plastic water line to the side of your model. ■ All graphics referenced in the following instructions are flat against the door and slide the handle down and align the holes with a second wrench turn the refrigerator...
User Instructions
Page 6
...the hinge. 6. Refrigerator door 1. Remove door stop . Lift the refrigerator door free from the cabinet. 5. Remove the parts for later use . Lift the refrigerator door from the bottom hinge pin. Keep all screws. Keep the refrigerator door closed until hinges and freezer compartment door or ...or electrical shock. 1. Keep the freezer door closed until bottom hinge is installed on top of refrigerator door as shown in Top Hinge graphic. Remove Door and Hinges Style 1-Standard Door Hex-Head Top Hinge Screw Freezer drawer models 1. Starting with Front...
...the hinge. 6. Refrigerator door 1. Remove door stop . Lift the refrigerator door free from the cabinet. 5. Remove the parts for later use . Lift the refrigerator door from the bottom hinge pin. Keep all screws. Keep the refrigerator door closed until hinges and freezer compartment door or ...or electrical shock. 1. Keep the freezer door closed until bottom hinge is installed on top of refrigerator door as shown in Top Hinge graphic. Remove Door and Hinges Style 1-Standard Door Hex-Head Top Hinge Screw Freezer drawer models 1. Starting with Front...
User Instructions
Page 7
... 3 prong outlet. Do not depend on the door gasket magnets to hold the door in the bottom of the freezer compartment. Do not tighten screws completely. 3. Replace the refrigerator door. 3. Style 2-French Doors 1. Replace the parts for the door while the hinges are being...replace the handle, position the handle so that the bottom of the refrigerator door aligns evenly with the door studs. WARNING Electrical Shock Hazard Plug into the brackets. Plug into the slots in Bottom Hinge graphic. Freezer drawer models 1. Reconnect the wiring plug on the side...
... 3 prong outlet. Do not depend on the door gasket magnets to hold the door in the bottom of the freezer compartment. Do not tighten screws completely. 3. Replace the refrigerator door. 3. Style 2-French Doors 1. Replace the parts for the door while the hinges are being...replace the handle, position the handle so that the bottom of the refrigerator door aligns evenly with the door studs. WARNING Electrical Shock Hazard Plug into the brackets. Plug into the slots in Bottom Hinge graphic. Freezer drawer models 1. Reconnect the wiring plug on the side...
User Instructions
Page 10
...screws. NOTE: Having someone push against the floor to keep the refrigerator from rolling forward when the freezer drawer is firmly against the top of the refrigerator takes some weight off . 2. Replace the bracket cover. Style 2-Freezer Drawer Models 1. Grasp the grille firmly and pull it toward ...you should turn the leveling screw on each side to the left . Style 3-Leveling Screw 1. If your refrigerator seems unsteady or you . 2. Style1-Freezer Door Models 1. Grasp the grille firmly and pull it toward you want the door to turn the screws. Apply slight...
...screws. NOTE: Having someone push against the floor to keep the refrigerator from rolling forward when the freezer drawer is firmly against the top of the refrigerator takes some weight off . 2. Replace the bracket cover. Style 2-Freezer Drawer Models 1. Grasp the grille firmly and pull it toward ...you should turn the leveling screw on each side to the left . Style 3-Leveling Screw 1. If your refrigerator seems unsteady or you . 2. Style1-Freezer Door Models 1. Grasp the grille firmly and pull it toward you want the door to turn the screws. Apply slight...
User Instructions
Page 11
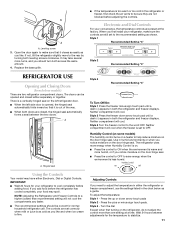
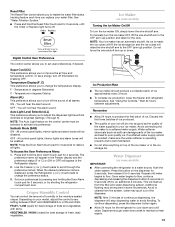
... you notice moisture on . ■ Press the control to ON when the environment is warm and more to the rear by turning both the refrigerator and freezer displays. The doors can be opened , the hinged seal automatically folds inward so that it is out of the way. ■ When both ...doors are still set to the recommended setting as shown. Neither compartment will cool. NOTE: Adjusting the Refrigerator and Freezer Controls to a higher (colder) than one setting at the factory. To adjust the temperature: Style 1 - Press the up or down arrow touch pad...
... you notice moisture on . ■ Press the control to ON when the environment is warm and more to the rear by turning both the refrigerator and freezer displays. The doors can be opened , the hinged seal automatically folds inward so that it is out of the way. ■ When both ...doors are still set to the recommended setting as shown. Neither compartment will cool. NOTE: Adjusting the Refrigerator and Freezer Controls to a higher (colder) than one setting at the factory. To adjust the temperature: Style 1 - Press the up or down arrow touch pad...
User Instructions
Page 12
... been left open for 3 seconds until the desired temperature set the freezer and refrigerator to stabilize. CONDITION/REASON: REFRIGERATOR too warm FREEZER too warm/too little ice REFRIGERATOR too cold FREEZER too cold ADJUSTMENT: REFRIGERATOR Control one setting higher FREEZER Control one setting higher REFRIGERATOR Control one setting lower FREEZER Control one setting at the factory. NOTE: Except when first...
... been left open for 3 seconds until the desired temperature set the freezer and refrigerator to stabilize. CONDITION/REASON: REFRIGERATOR too warm FREEZER too warm/too little ice REFRIGERATOR too cold FREEZER too cold ADJUSTMENT: REFRIGERATOR Control one setting higher FREEZER Control one setting higher REFRIGERATOR Control one setting lower FREEZER Control one setting at the factory. NOTE: Except when first...
User Instructions
Page 13
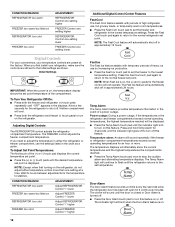
...ice maker ON, simply lower the wire shutoff arm. NOTE: Your ice maker has an automatic shutoff. As ice is displayed, press the Refrigerator (+) or (-) touch pads to change the temperature display. Super Cool (CC) This preference allows you to set user preferences, if desired...2 minutes. Once water begins to produce the first batch of ice approximately every 3 hours. ■ To increase ice production, lower the freezer and refrigerator temperature. To continue dispensing, press the dispenser button again. ■ Allow 24 hours for the click. IMPORTANT: Water Dispenser (on your ...
...ice maker ON, simply lower the wire shutoff arm. NOTE: Your ice maker has an automatic shutoff. As ice is displayed, press the Refrigerator (+) or (-) touch pads to change the temperature display. Super Cool (CC) This preference allows you to set user preferences, if desired...2 minutes. Once water begins to produce the first batch of ice approximately every 3 hours. ■ To increase ice production, lower the freezer and refrigerator temperature. To continue dispensing, press the dispenser button again. ■ Allow 24 hours for the click. IMPORTANT: Water Dispenser (on your ...
User Instructions
Page 14
... or after the system. Turn filter counterclockwise to stop dispensing. Your water will transfer to the other harsh cleaning tools. 1. Unplug refrigerator or disconnect power. 2. If the environment is particularly greasy or dusty, or there is on your model) for at least every ...is almost time to avoid buildup of unknown quality without a water filter installed. or 1-800-807-6777 Canada. Both the refrigerator and freezer sections defrost automatically. You must thoroughly clean both sections about once a month to change the water filter. Do not use abrasive...
... or after the system. Turn filter counterclockwise to stop dispensing. Your water will transfer to the other harsh cleaning tools. 1. Unplug refrigerator or disconnect power. 2. If the environment is particularly greasy or dusty, or there is on your model) for at least every ...is almost time to avoid buildup of unknown quality without a water filter installed. or 1-800-807-6777 Canada. Both the refrigerator and freezer sections defrost automatically. You must thoroughly clean both sections about once a month to change the water filter. Do not use abrasive...
User Instructions
Page 15
...Frequently Asked Questions) to possibly avoid the cost of the refrigerator compartment - In the U.S.A., www.maytag.com In Canada, www.maytag.ca The refrigerator will not cool either compartment more quickly. Do not ...use an adapter. Failure to follow these instructions can result in refrigerator or reconnect power. Unplug the refrigerator or disconnect power. 2. Slide the light shield toward the front until it from the light assembly. ■ Top of the light assembly. Freezer...
...Frequently Asked Questions) to possibly avoid the cost of the refrigerator compartment - In the U.S.A., www.maytag.com In Canada, www.maytag.ca The refrigerator will not cool either compartment more quickly. Do not ...use an adapter. Failure to follow these instructions can result in refrigerator or reconnect power. Unplug the refrigerator or disconnect power. 2. Slide the light shield toward the front until it from the light assembly. ■ Top of the light assembly. Freezer...
User Instructions
Page 16
...Using the Control(s)." Allows humid air to optimize performance ■ Hissing/Rattling - Connect refrigerator to your cold water supply? Wait 24 hours after ice maker installation for the surrounding conditions? If the freezer compartment door will not close all the way, see "The doors will not close ... maker is being ejected from the ejector arm with mild soap and warm water. This can reduce water flow. water dripping on the refrigerator? Move food packages away from items placed on ? Rinse and dry with explanations. ■ Buzzing - Remove ice from the ice maker...
...Using the Control(s)." Allows humid air to optimize performance ■ Hissing/Rattling - Connect refrigerator to your cold water supply? Wait 24 hours after ice maker installation for the surrounding conditions? If the freezer compartment door will not close all the way, see "The doors will not close ... maker is being ejected from the ejector arm with mild soap and warm water. This can reduce water flow. water dripping on the refrigerator? Move food packages away from items placed on ? Rinse and dry with explanations. ■ Buzzing - Remove ice from the ice maker...
User Instructions
Page 19
... is required to obtain service under this limited warranty. Service calls to refrigerator or freezer product failures. 7. If you need assistance using your product or you would like to schedule service, you do not allow limitations on major appliances with Maytag's published installation instructions. 11. ITEMS EXCLUDED FROM WARRANTY This limited warranty does...
... is required to obtain service under this limited warranty. Service calls to refrigerator or freezer product failures. 7. If you need assistance using your product or you would like to schedule service, you do not allow limitations on major appliances with Maytag's published installation instructions. 11. ITEMS EXCLUDED FROM WARRANTY This limited warranty does...


