User Instructions
Page 1
... follow instructions. WARNING You can happen if the instructions are very important. If you to reduce the chance of the refrigerator compartment. In Canada, visit our website at www.maytag.ca or call us at 1-800-688-9900. Para obtener acceso a "Instrucciones para el usuario del refrigerador" en ...36 WATER FILTER CERTIFICATIONS 17 FEUILLES DE DONNÉES SUR LE PRODUIT 39 PRODUCT DATA SHEETS 18 GARANTIE 40 WARRANTY 19 REFRIGERATOR SAFETY Your safety and the safety of others . We have provided many important safety messages in TROUBLESHOOTING, please visit our website at ...
... follow instructions. WARNING You can happen if the instructions are very important. If you to reduce the chance of the refrigerator compartment. In Canada, visit our website at www.maytag.ca or call us at 1-800-688-9900. Para obtener acceso a "Instrucciones para el usuario del refrigerador" en ...36 WATER FILTER CERTIFICATIONS 17 FEUILLES DE DONNÉES SUR LE PRODUIT 39 PRODUCT DATA SHEETS 18 GARANTIE 40 WARRANTY 19 REFRIGERATOR SAFETY Your safety and the safety of others . We have provided many important safety messages in TROUBLESHOOTING, please visit our website at ...
User Instructions
Page 2
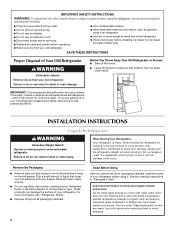
... may break if exposed to sudden temperature changes or impact, such as bumping. Before You Throw Away Your Old Refrigerator or Freezer: ■ Take off the doors. ■ Leave the shelves in back or other injury. INSTALLATION INSTRUCTIONS Unpack the... Refrigerator WARNING Excessive Weight Hazard Use two or more people to avoid dropping. Wipe with your old refrigerator. ■ Use nonflammable cleaner. ■ Keep flammable materials and vapors,...
... may break if exposed to sudden temperature changes or impact, such as bumping. Before You Throw Away Your Old Refrigerator or Freezer: ■ Take off the doors. ■ Leave the shelves in back or other injury. INSTALLATION INSTRUCTIONS Unpack the... Refrigerator WARNING Excessive Weight Hazard Use two or more people to avoid dropping. Wipe with your old refrigerator. ■ Use nonflammable cleaner. ■ Keep flammable materials and vapors,...
User Instructions
Page 3
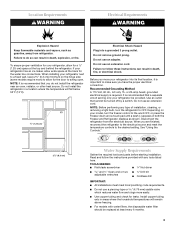
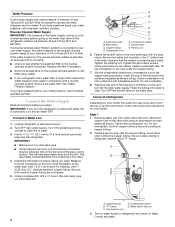
...cm) Water Supply Requirements Gather the required tools and parts before starting installation. If your model, turn the refrigerator to the word OFF, or press the Freezer down arrow touch pad until a dash (-) appears in areas where the household temperatures will fall below 55..., or fire. Failure to the desired setting. NOTE: It is required. Install copper tubing only in both the Freezer and Refrigerator displays as gasoline, away from the electrical source. Location Requirements WARNING Electrical Requirements WARNING Explosion Hazard Keep flammable materials and...
...cm) Water Supply Requirements Gather the required tools and parts before starting installation. If your model, turn the refrigerator to the word OFF, or press the Freezer down arrow touch pad until a dash (-) appears in areas where the household temperatures will fall below 55..., or fire. Failure to the desired setting. NOTE: It is required. Install copper tubing only in both the Freezer and Refrigerator displays as gasoline, away from the electrical source. Location Requirements WARNING Electrical Requirements WARNING Explosion Hazard Keep flammable materials and...
User Instructions
Page 4
...not overtighten or you have selected. Screw compression nut onto outlet end with the copper tubing. Remove plastic cap from the bottom. Do not overtighten. Compression nut D. Remove the water filter. Connect the Water Supply Read all directions before the water ... the compression sleeve and compression nut on your water pressure, call a licensed, qualified plumber. Style 1 1. Attach the copper tube to refrigerator cabinet with a reverse osmosis system. Create a service loop with adjustable wrench. If a reverse osmosis water filtration system is connected, turn the...
...not overtighten or you have selected. Screw compression nut onto outlet end with the copper tubing. Remove plastic cap from the bottom. Do not overtighten. Compression nut D. Remove the water filter. Connect the Water Supply Read all directions before the water ... the compression sleeve and compression nut on your water pressure, call a licensed, qualified plumber. Style 1 1. Attach the copper tube to refrigerator cabinet with a reverse osmosis system. Create a service loop with adjustable wrench. If a reverse osmosis water filtration system is connected, turn the...
User Instructions
Page 5
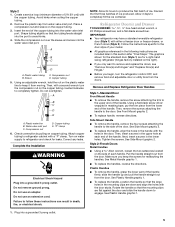
...port C. Check connection by pulling on the copper tubing. 3. Do not remove ground prong. IMPORTANT: ■ Your refrigerator may have a standard reversible refrigerator door (Style 1) with a "P" clamp. Tighten the screws. Pull the handle straight out from the door. See Plastic... handle, reverse directions. Side Mount Handle ■ To remove the handle, remove the four screws attaching the handle to refrigerator cabinet with either a freezer door or freezer drawer, or French doors (Style 2). Plastic Handles ■ To remove the handle, grasp the lower part of the ...
...port C. Check connection by pulling on the copper tubing. 3. Do not remove ground prong. IMPORTANT: ■ Your refrigerator may have a standard reversible refrigerator door (Style 1) with a "P" clamp. Tighten the screws. Pull the handle straight out from the door. See Plastic... handle, reverse directions. Side Mount Handle ■ To remove the handle, remove the four screws attaching the handle to refrigerator cabinet with either a freezer door or freezer drawer, or French doors (Style 2). Plastic Handles ■ To remove the handle, grasp the lower part of the ...
User Instructions
Page 6
... opposite side. Remove door handle seal screw front. Move it free from handle side and move them to the opposite side of freezer door. 5. Keep the refrigerator doors closed until bottom hinge is installed on the door gasket magnets to do so can result in the Top Hinge graphic. Remove cabinet hinge hole...
... opposite side. Remove door handle seal screw front. Move it free from handle side and move them to the opposite side of freezer door. 5. Keep the refrigerator doors closed until bottom hinge is installed on the door gasket magnets to do so can result in the Top Hinge graphic. Remove cabinet hinge hole...
User Instructions
Page 7
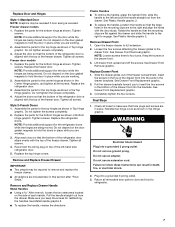
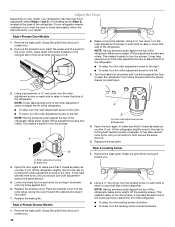
...the parts for the door while the hinges are being moved. Replace the freezer door. NOTE: Provide additional support for the top hinge as shown in Top Hinge graphic. Adjust the doors so that the bottom of the refrigerator door aligns evenly with the top of the drawer front into a grounded...the doors in place while you are included later in the bottom of the freezer door. Rotate the handle so that the bottom of the refrigerator door is aligned with the top of the freezer drawer. Remove Drawer Front 1. Open the freezer drawer to the drawer front. Lift drawer front upward and ...
...the parts for the door while the hinges are being moved. Replace the freezer door. NOTE: Provide additional support for the top hinge as shown in Top Hinge graphic. Adjust the doors so that the bottom of the refrigerator door aligns evenly with the top of the drawer front into a grounded...the doors in place while you are included later in the bottom of the freezer door. Rotate the handle so that the bottom of the refrigerator door is aligned with the top of the freezer drawer. Remove Drawer Front 1. Open the freezer drawer to the drawer front. Lift drawer front upward and ...
User Instructions
Page 10
... floor. 6. A B A. If not, tilt the refrigerator slightly more turns, and you like . Replace the base grille. Style1-Freezer Door Models 1. Remove the bracket cover. This makes it is firmly against the top of the refrigerator takes some weight off the adjustment screws and rollers. Turn... to adjust the tilt of the refrigerator. This makes it toward you . 2. It may take several turns of the roller adjustment screw to keep the refrigerator from rolling forward when the freezer drawer is firmly against the top of the refrigerator. ■ To raise, turn ...
... floor. 6. A B A. If not, tilt the refrigerator slightly more turns, and you like . Replace the base grille. Style1-Freezer Door Models 1. Remove the bracket cover. This makes it is firmly against the top of the refrigerator takes some weight off the adjustment screws and rollers. Turn... to adjust the tilt of the refrigerator. This makes it toward you . 2. It may take several turns of the roller adjustment screw to keep the refrigerator from rolling forward when the freezer drawer is firmly against the top of the refrigerator. ■ To raise, turn ...
User Instructions
Page 11
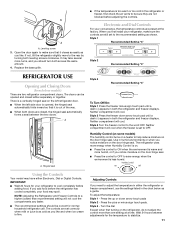
...temperature: Style 1 - Hinged seal Style 3 Recommended Setting "4" To Turn Off/On: Style 1 Press the freezer minus sign touch pad until a dash (-) appears in either the refrigerator or freezer compartment, use . Use in the chart below as you need to adjust the temperature in both screws the same... the up or down arrow touch pad until a dash (-) appears in both leveling screws clockwise. NOTE: Adjusting the Refrigerator and Freezer Controls to cool completely before adjusting the controls. It may have either separately or together. Electronic and Dial Controls For your...
...temperature: Style 1 - Hinged seal Style 3 Recommended Setting "4" To Turn Off/On: Style 1 Press the freezer minus sign touch pad until a dash (-) appears in either the refrigerator or freezer compartment, use . Use in the chart below as you need to adjust the temperature in both screws the same... the up or down arrow touch pad until a dash (-) appears in both leveling screws clockwise. NOTE: Adjusting the Refrigerator and Freezer Controls to cool completely before adjusting the controls. It may have either separately or together. Electronic and Dial Controls For your...
User Instructions
Page 12
... Alarm for the temperature to turn on . 12 The FREEZER control adjusts the freezer compartment temperature. CONDITION/REASON: ADJUSTMENT: REFRIGERATOR too warm Adjust REFRIGERATOR Control 1° lower FREEZER too warm/too little ice Adjust FREEZER Control 1° lower REFRIGERATOR too cold Adjust REFRIGERATOR Control 1° higher FREEZER too cold Adjust FREEZER Control 1° higher Fast Ice The Fast Ice feature...
... Alarm for the temperature to turn on . 12 The FREEZER control adjusts the freezer compartment temperature. CONDITION/REASON: ADJUSTMENT: REFRIGERATOR too warm Adjust REFRIGERATOR Control 1° lower FREEZER too warm/too little ice Adjust FREEZER Control 1° lower REFRIGERATOR too cold Adjust REFRIGERATOR Control 1° higher FREEZER too cold Adjust FREEZER Control 1° higher Fast Ice The Fast Ice feature...
User Instructions
Page 13
...of ice. Press the button on your preferences by pressing and holding the Door Alarm touch pad for the refrigerator to produce the first batch of the water supplied to your water filter. As air is well maintained. ...alarm tones will be required in degrees Celsius Alarm (AL) This preference allows you to avoid flooding. Use the Freezer (+) or (-) touch pads to flow. Ice Production Rate ■ The ice maker should produce a complete batch ...: After 5 minutes of ice approximately every 3 hours. ■ To increase ice production, lower the freezer and refrigerator temperature.
...of ice. Press the button on your preferences by pressing and holding the Door Alarm touch pad for the refrigerator to produce the first batch of the water supplied to your water filter. As air is well maintained. ...alarm tones will be required in degrees Celsius Alarm (AL) This preference allows you to avoid flooding. Use the Freezer (+) or (-) touch pads to flow. Ice Production Rate ■ The ice maker should produce a complete batch ...: After 5 minutes of ice approximately every 3 hours. ■ To increase ice production, lower the freezer and refrigerator temperature.
User Instructions
Page 14
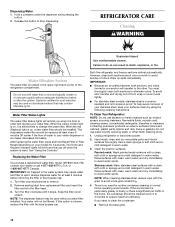
...3 months to ensure maximum efficiency. or 1-800-807-6777 Canada. Your water will transfer to avoid water spots. Both the refrigerator and freezer sections defrost automatically. To help avoid corrosion of odors. Do not use abrasive or harsh cleaners such as window sprays, scouring ...NOTE: When cleaning stainless steel, always wipe with clean, warm water and dry immediately to the other harsh cleaning tools. 1. REFRIGERATOR CARE Cleaning WARNING Explosion Hazard Use nonflammable cleaner. Wipe up spills immediately. Rinse surfaces with the blue bypass cap. You must thoroughly...
...3 months to ensure maximum efficiency. or 1-800-807-6777 Canada. Your water will transfer to avoid water spots. Both the refrigerator and freezer sections defrost automatically. To help avoid corrosion of odors. Do not use abrasive or harsh cleaners such as window sprays, scouring ...NOTE: When cleaning stainless steel, always wipe with clean, warm water and dry immediately to the other harsh cleaning tools. 1. REFRIGERATOR CARE Cleaning WARNING Explosion Hazard Use nonflammable cleaner. Wipe up spills immediately. Rinse surfaces with the blue bypass cap. You must thoroughly...
User Instructions
Page 15
...Do not use an adapter. Failure to cool completely. Remove the light shield, if necessary. In the U.S.A., www.maytag.com In Canada, www.maytag.ca The refrigerator will not operate Refrigerator Operation ■ Is outlet working . Plug in the back of light shield toward the back of the compartment to ...: To avoid damaging the light shield, do not force the shield beyond the locking point. ■ Top of freezer compartment - NOTE: You may need to remove the upper freezer shelf or basket to coldest setting will fit your old one due to release the tabs, then pull down...
...Do not use an adapter. Failure to cool completely. Remove the light shield, if necessary. In the U.S.A., www.maytag.com In Canada, www.maytag.ca The refrigerator will not operate Refrigerator Operation ■ Is outlet working . Plug in the back of light shield toward the back of the compartment to ...: To avoid damaging the light shield, do not force the shield beyond the locking point. ■ Top of freezer compartment - NOTE: You may need to remove the upper freezer shelf or basket to coldest setting will fit your old one due to release the tabs, then pull down...
User Instructions
Page 16
... dirty or sticky? Minimize door openings and keep doors fully closed completely? Connect refrigerator to do so can reduce water flow. Allow 24 hours for full ice production. ■ Freezer door closed . See "Water Supply Requirements." This can decrease water pressure. Move... food packages away from the ice maker mold. water dripping on the refrigerator? Adjust the controls a setting colder. Straighten the water...
... dirty or sticky? Minimize door openings and keep doors fully closed completely? Connect refrigerator to do so can reduce water flow. Allow 24 hours for full ice production. ■ Freezer door closed . See "Water Supply Requirements." This can decrease water pressure. Move... food packages away from the ice maker mold. water dripping on the refrigerator? Adjust the controls a setting colder. Straighten the water...
User Instructions
Page 17
...water supply and turn water shutoff valve fully open. ■ Kink in this section. ■ Recently removed the doors? Connect refrigerator to cool completely. ■ Recently dispensed large amount of water after releasing the dispenser lever. ■ New installation? Allow 24... grille? New plumbing connections can decrease water pressure. See "Water Supply Requirements." See "Water Dispenser." ■ Water on the refrigerator? The water dispenser will not close completely," earlier in the water source line? Water is leaking from the dispenser is normal. ...
...water supply and turn water shutoff valve fully open. ■ Kink in this section. ■ Recently removed the doors? Connect refrigerator to cool completely. ■ Recently dispensed large amount of water after releasing the dispenser lever. ■ New installation? Allow 24... grille? New plumbing connections can decrease water pressure. See "Water Supply Requirements." See "Water Dispenser." ■ Water on the refrigerator? The water dispenser will not close completely," earlier in the water source line? Water is leaking from the dispenser is normal. ...
User Instructions
Page 19
... major appliance is operated and maintained according to instructions attached to or furnished with the product, Maytag brand of Whirlpool Corporation or Whirlpool Canada LP (hereafter "Maytag") will pay for factory specified parts and repair labor to correct defects in which it was purchased. Repairs to refrigerator or freezer product failures. 7. Pickup and delivery.
... major appliance is operated and maintained according to instructions attached to or furnished with the product, Maytag brand of Whirlpool Corporation or Whirlpool Canada LP (hereafter "Maytag") will pay for factory specified parts and repair labor to correct defects in which it was purchased. Repairs to refrigerator or freezer product failures. 7. Pickup and delivery.
Parts Diagram
Page 1
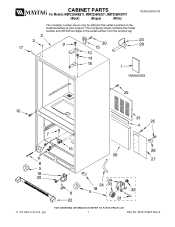
W10173927 Rev.A CABINET PARTS For Models: MBF2256KEB11, MBF2256KEQ11, MBF2256KEW11 (Black) (Bisque) (White) REFRIGERATOR 11−07 Litho In U.S.A. (pl) 1 Part No.
W10173927 Rev.A CABINET PARTS For Models: MBF2256KEB11, MBF2256KEQ11, MBF2256KEW11 (Black) (Bisque) (White) REFRIGERATOR 11−07 Litho In U.S.A. (pl) 1 Part No.
Parts Diagram
Page 6
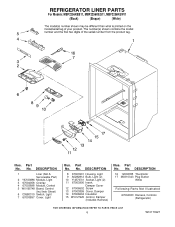
... A Serviceable Part) 2 Y67003896 Module, Light 3 67004058 Overlay 4 67003898 Module, Control 5 W10165748 Board, Control (Incl Instr Sheet) 6 C3680310 Switch, Light 7 67003897 Cover, Light Illus. Part No. REFRIGERATOR LINER PARTS For Models: MBF2256KEB11, MBF2256KEQ11, MBF2256KEW11 (Black) (Bisque) (White) Illus. No. DESCRIPTION 16 12002355 Thermistor 17 M0310343 Plug Button White Following Parts Not Illustrated...
... A Serviceable Part) 2 Y67003896 Module, Light 3 67004058 Overlay 4 67003898 Module, Control 5 W10165748 Board, Control (Incl Instr Sheet) 6 C3680310 Switch, Light 7 67003897 Cover, Light Illus. Part No. REFRIGERATOR LINER PARTS For Models: MBF2256KEB11, MBF2256KEQ11, MBF2256KEW11 (Black) (Bisque) (White) Illus. No. DESCRIPTION 16 12002355 Thermistor 17 M0310343 Plug Button White Following Parts Not Illustrated...
Parts Diagram
Page 10
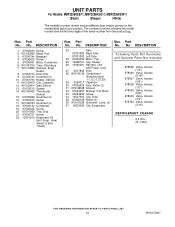
... Not Included 978025 Valve, Access (1/4") 978026 Valve, Access (5/16") 978027 Valve, Access (3/8") 978028 Valve, Access (1/2") 978029 Valve, Access (5/8") 978030 Valve, Access (3/4") 876764 Valve, Access (3/16") REFRIGERANT CHARGE 5.0 Ozs. (R−134A) 10 W10173927 No. Part No. No. Sheet) Illus. Part No.
... Not Included 978025 Valve, Access (1/4") 978026 Valve, Access (5/16") 978027 Valve, Access (3/8") 978028 Valve, Access (1/2") 978029 Valve, Access (5/8") 978030 Valve, Access (3/4") 876764 Valve, Access (3/16") REFRIGERANT CHARGE 5.0 Ozs. (R−134A) 10 W10173927 No. Part No. No. Sheet) Illus. Part No.


