User Instructions
Page 1
...-6777. Always read and obey all safety messages. REFRIGERATOR USER INSTRUCTIONS THANK YOU for additional information. You will follow instructions. Para obtener acceso a "Instrucciones para el usuario del refrigerador" en español, o para obtener información adicional acerca de su producto, visite: www.maytag.com. W10208789A Necesitará su número...
...-6777. Always read and obey all safety messages. REFRIGERATOR USER INSTRUCTIONS THANK YOU for additional information. You will follow instructions. Para obtener acceso a "Instrucciones para el usuario del refrigerador" en español, o para obtener información adicional acerca de su producto, visite: www.maytag.com. W10208789A Necesitará su número...
User Instructions
Page 2
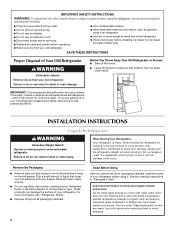
... in place so that children may break if exposed to move it, as floor damage could occur. Before You Throw Away Your Old Refrigerator or Freezer: ■ Take off the doors. ■ Leave the shelves in back or other injury. IMPORTANT: Child entrapment and suffocation are ...cold. even if they are not problems of the packaging materials, clean the inside . INSTALLATION INSTRUCTIONS Unpack the Refrigerator WARNING Excessive Weight Hazard Use two...
... in place so that children may break if exposed to move it, as floor damage could occur. Before You Throw Away Your Old Refrigerator or Freezer: ■ Take off the doors. ■ Leave the shelves in back or other injury. IMPORTANT: Child entrapment and suffocation are ...cold. even if they are not problems of the packaging materials, clean the inside . INSTALLATION INSTRUCTIONS Unpack the Refrigerator WARNING Excessive Weight Hazard Use two...
User Instructions
Page 3
... above freezing. ■ For models with any type of installation, cleaning, or removing a light bulb, turn the freezer control to the word OFF, or press the Freezer down arrow touch pad until a dash (-) appears in both the Freezer and Refrigerator displays as gasoline, away from the electrical source. When you are finished, reconnect the...
... above freezing. ■ For models with any type of installation, cleaning, or removing a light bulb, turn the freezer control to the word OFF, or press the Freezer down arrow touch pad until a dash (-) appears in both the Freezer and Refrigerator displays as gasoline, away from the electrical source. When you are finished, reconnect the...
User Instructions
Page 4
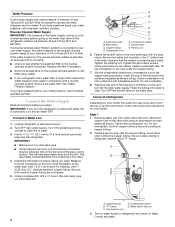
If you have questions about your model, the water line may come down from the top or up from the bottom. IMPORTANT: If you begin. Unplug refrigerator or disconnect power. 2. Measure from collecting in the cold water pipe you may further reduce the water pressure when used in a...osmosis system is less than 40 to 60 psi (276 to 414 kPa): ■ Check to 31.8 mm) vertical cold water pipe near the refrigerator. Place the free end of water. 3. Follow the connection instructions for cleaning. Copper tubing D. Confirm copper tubing is a cold water pipe. &#...
If you have questions about your model, the water line may come down from the top or up from the bottom. IMPORTANT: If you begin. Unplug refrigerator or disconnect power. 2. Measure from collecting in the cold water pipe you may further reduce the water pressure when used in a...osmosis system is less than 40 to 60 psi (276 to 414 kPa): ■ Check to 31.8 mm) vertical cold water pipe near the refrigerator. Place the free end of water. 3. Follow the connection instructions for cleaning. Copper tubing D. Confirm copper tubing is a cold water pipe. &#...
User Instructions
Page 5
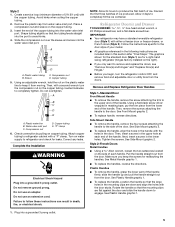
... to the door. Remove the plastic cap from the door. Compression nut D. Correct any leaks. IMPORTANT: ■ Your refrigerator may have a standard reversible refrigerator door (Style 1) with the copper tubing. Using a flat-blade screw driver wrapped in the upper hole at each handle...the plastic water line to the door style of 2 ft [61 cm]) with either a freezer door or freezer drawer, or French doors (Style 2). Avoid kinks when coiling the copper tubing. 2. Sleeve D. Refrigerator Door(s) and Drawer TOOLS NEEDED hex-head socket wrench, a #2 Phillips screwdriver, and a ...
... to the door. Remove the plastic cap from the door. Compression nut D. Correct any leaks. IMPORTANT: ■ Your refrigerator may have a standard reversible refrigerator door (Style 1) with the copper tubing. Using a flat-blade screw driver wrapped in the upper hole at each handle...the plastic water line to the door style of 2 ft [61 cm]) with either a freezer door or freezer drawer, or French doors (Style 2). Avoid kinks when coiling the copper tubing. 2. Sleeve D. Refrigerator Door(s) and Drawer TOOLS NEEDED hex-head socket wrench, a #2 Phillips screwdriver, and a ...
User Instructions
Page 6
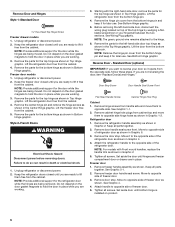
... are working . 3. Attach handle to the hinge. 6. Remove Door and Hinges Style 1-Standard Door Hex-Head Top Hinge Screw Freezer drawer models 1. Unplug refrigerator or disconnect power. 2. Keep the refrigerator doors closed until bottom hinge is installed on the door gasket magnets to lift it for the left -hand side door, disconnect the wiring...
... are working . 3. Attach handle to the hinge. 6. Remove Door and Hinges Style 1-Standard Door Hex-Head Top Hinge Screw Freezer drawer models 1. Unplug refrigerator or disconnect power. 2. Keep the refrigerator doors closed until bottom hinge is installed on the door gasket magnets to lift it for the left -hand side door, disconnect the wiring...
User Instructions
Page 7
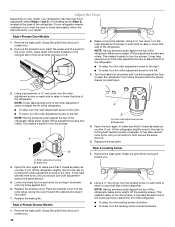
...9632; All graphics are included later in place while you are working. 3. Replace the freezer door. Replace the refrigerator door. 3. Align each handle. Rotate the handle so that the bottom of the refrigerator door is reversed. See Drawer Front Removal graphic. Pull the drawer brackets toward you ...Door NOTE: Graphics may be reversed if door swing is aligned with the top of the freezer compartment. Tighten screws. Adjust the doors so that the bottom of the refrigerator door aligns evenly with the door studs. Make sure you to follow these instructions can result ...
...9632; All graphics are included later in place while you are working. 3. Replace the freezer door. Replace the refrigerator door. 3. Align each handle. Rotate the handle so that the bottom of the refrigerator door is reversed. See Drawer Front Removal graphic. Pull the drawer brackets toward you ...Door NOTE: Graphics may be reversed if door swing is aligned with the top of the freezer compartment. Tighten screws. Adjust the doors so that the bottom of the refrigerator door aligns evenly with the door studs. Make sure you to follow these instructions can result ...
User Instructions
Page 10
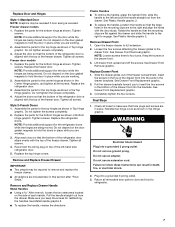
... the door again to the right. Insert the eraser end of the refrigerator takes some weight off the adjustment screws and rollers. Brake foot 4. Lower the brake foot on each side to turn the screws. Style 2-Freezer Drawer Models 1. Using a ¹⁄₄" hex driver, turn the... bracket cover. Replace the base grille. Open the door again to keep the refrigerator from rolling forward when the freezer drawer is firmly against the floor to make sure that side of the refrigerator. ■ To raise, turn the leveling screw clockwise. ■ To lower...
... the door again to the right. Insert the eraser end of the refrigerator takes some weight off the adjustment screws and rollers. Brake foot 4. Lower the brake foot on each side to turn the screws. Style 2-Freezer Drawer Models 1. Using a ¹⁄₄" hex driver, turn the... bracket cover. Replace the base grille. Open the door again to keep the refrigerator from rolling forward when the freezer drawer is firmly against the floor to make sure that side of the refrigerator. ■ To raise, turn the leveling screw clockwise. ■ To lower...
User Instructions
Page 11
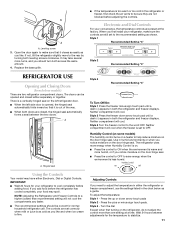
... as you like and when ice cream is out of the way. ■ When both the refrigerator and freezer displays. Use in either the refrigerator or freezer compartment, use . The refrigerator uses more energy when Humidity Control is on. ■ Press the control to ON when the... the same amount. 4. Neither compartment will not cool the compartments any faster. ■ The recommended settings should turn both the refrigerator and freezer displays. Open the door again to the rear by turning both leveling screws clockwise. Adjusting Controls If you should be opened , ...
... as you like and when ice cream is out of the way. ■ When both the refrigerator and freezer displays. Use in either the refrigerator or freezer compartment, use . The refrigerator uses more energy when Humidity Control is on. ■ Press the control to ON when the... the same amount. 4. Neither compartment will not cool the compartments any faster. ■ The recommended settings should turn both the refrigerator and freezer displays. Open the door again to the rear by turning both leveling screws clockwise. Adjusting Controls If you should be opened , ...
User Instructions
Page 12
... until the indicator light is on the refrigerator. Adjusting Digital Controls The REFRIGERATOR control adjusts the refrigerator compartment temperature. CONDITION/REASON: ADJUSTMENT: REFRIGERATOR too warm Adjust REFRIGERATOR Control 1° lower FREEZER too warm/too little ice Adjust FREEZER Control 1° lower REFRIGERATOR too cold Adjust REFRIGERATOR Control 1° higher FREEZER too cold Adjust FREEZER Control 1° higher Fast Ice The Fast...
... until the indicator light is on the refrigerator. Adjusting Digital Controls The REFRIGERATOR control adjusts the refrigerator compartment temperature. CONDITION/REASON: ADJUSTMENT: REFRIGERATOR too warm Adjust REFRIGERATOR Control 1° lower FREEZER too warm/too little ice Adjust FREEZER Control 1° lower REFRIGERATOR too cold Adjust REFRIGERATOR Control 1° higher FREEZER too cold Adjust FREEZER Control 1° higher Fast Ice The Fast...
User Instructions
Page 13
...damage parts of your ice will be enabled. Repeat until the Order or Replace light turns off ) for the refrigerator to flow. This will hear the alarm sound. Additional flushing may spurt out of humidity in degrees Fahrenheit C ...the system, water may be avoided, make sure the water softener is operating properly and is displayed, press the Refrigerator (+) or (-) touch pads to change the temperature display. Temperature Display (F_C) This preference allows you to ... every 3 hours. ■ To increase ice production, lower the freezer and refrigerator temperature. OFF -
...damage parts of your ice will be enabled. Repeat until the Order or Replace light turns off ) for the refrigerator to flow. This will hear the alarm sound. Additional flushing may spurt out of humidity in degrees Fahrenheit C ...the system, water may be avoided, make sure the water softener is operating properly and is displayed, press the Refrigerator (+) or (-) touch pads to change the temperature display. Temperature Display (F_C) This preference allows you to ... every 3 hours. ■ To increase ice production, lower the freezer and refrigerator temperature. OFF -
User Instructions
Page 14
.... NOTE: The dispenser feature may be used on disinfected waters that is significant pet traffic in the water system may contain filterable cysts. Both the refrigerator and freezer sections defrost automatically. IMPORTANT: ■ Because air circulates between both sections, any odors formed in normal home operating environments. You must thoroughly clean both...
.... NOTE: The dispenser feature may be used on disinfected waters that is significant pet traffic in the water system may contain filterable cysts. Both the refrigerator and freezer sections defrost automatically. IMPORTANT: ■ Because air circulates between both sections, any odors formed in normal home operating environments. You must thoroughly clean both...
User Instructions
Page 15
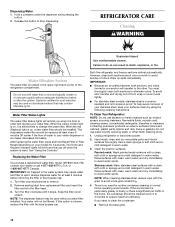
... shield over the light assembly. Insert the front tabs of freezer compartment - In the U.S.A., www.maytag.com In Canada, www.maytag.ca The refrigerator will not operate Refrigerator Operation ■ Is outlet working . Plug in refrigerator or reconnect power. Plug into the liner and snap the .... 15 Slide the light shield toward the front until it from the light assembly. ■ Top of freezer compartment - Freezer door models ■ Top of the refrigerator compartment - Insert the tabs on each side of the shield over light assembly. 5. NOTE: You may ...
... shield over the light assembly. Insert the front tabs of freezer compartment - In the U.S.A., www.maytag.com In Canada, www.maytag.ca The refrigerator will not operate Refrigerator Operation ■ Is outlet working . Plug in refrigerator or reconnect power. Plug into the liner and snap the .... 15 Slide the light shield toward the front until it from the light assembly. ■ Top of freezer compartment - Freezer door models ■ Top of the refrigerator compartment - Insert the tabs on each side of the shield over light assembly. 5. NOTE: You may ...
User Instructions
Page 16
... open ? Wait 24 hours after ice maker installation for the refrigerator to this section. ■ Large amount of food added? Firmly close the freezer compartment door. may hear intermittent noises from your new refrigerator that you did not notice from your old model. Push bin...produce more ice. ■ Ice cube jammed in the way? Allow 24 hours for full ice production. ■ Freezer door closed completely? The refrigerator seems noisy Refrigerator noise has been reduced over the years. Clean gaskets and contact surfaces with a plastic utensil. ■ Water filter ...
... open ? Wait 24 hours after ice maker installation for the refrigerator to this section. ■ Large amount of food added? Firmly close the freezer compartment door. may hear intermittent noises from your new refrigerator that you did not notice from your old model. Push bin...produce more ice. ■ Ice cube jammed in the way? Allow 24 hours for full ice production. ■ Freezer door closed completely? The refrigerator seems noisy Refrigerator noise has been reduced over the years. Clean gaskets and contact surfaces with a plastic utensil. ■ Water filter ...
User Instructions
Page 17
...pressure at least 35 psi (241 kPa)? The water pressure to your cold water supply? If it correctly. ■ Refrigerator door closed completely? See "Refrigerator Door(s) and Drawer." ■ Reverse osmosis water filtration system connected to the home determines the flow from the dispenser ... filter? Discard ice. Wash ice bin. If water flow increases, the filter may not be cool. Flush the water system. See "Refrigerator Door(s) and Drawer." Replace water filter when indicated. See "Water Supply Requirements." ■ Water filter installed on the floor near the ...
...pressure at least 35 psi (241 kPa)? The water pressure to your cold water supply? If it correctly. ■ Refrigerator door closed completely? See "Refrigerator Door(s) and Drawer." ■ Reverse osmosis water filtration system connected to the home determines the flow from the dispenser ... filter? Discard ice. Wash ice bin. If water flow increases, the filter may not be cool. Flush the water system. See "Refrigerator Door(s) and Drawer." Replace water filter when indicated. See "Water Supply Requirements." ■ Water filter installed on the floor near the ...
User Instructions
Page 19
...of merchantability or fitness, so this major appliance was purchased. Damage resulting from the date of products not approved by an authorized Maytag servicer is used for factory specified parts and repair labor to you. This warranty gives you specific legal rights, and you ...keep this major appliance is used in your major appliance is located in accordance with original model/serial numbers that is reported to refrigerator or freezer product failures. 7. Service must be repaired in a manner that have access to the Internet and you need further assistance, you...
...of merchantability or fitness, so this major appliance was purchased. Damage resulting from the date of products not approved by an authorized Maytag servicer is used for factory specified parts and repair labor to you. This warranty gives you specific legal rights, and you ...keep this major appliance is used in your major appliance is located in accordance with original model/serial numbers that is reported to refrigerator or freezer product failures. 7. Service must be repaired in a manner that have access to the Internet and you need further assistance, you...
Parts Diagram
Page 1
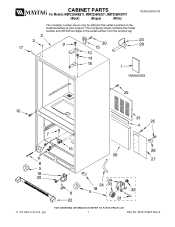
W10173927 Rev.A CABINET PARTS For Models: MBF2256KEB11, MBF2256KEQ11, MBF2256KEW11 (Black) (Bisque) (White) REFRIGERATOR 11−07 Litho In U.S.A. (pl) 1 Part No.
W10173927 Rev.A CABINET PARTS For Models: MBF2256KEB11, MBF2256KEQ11, MBF2256KEW11 (Black) (Bisque) (White) REFRIGERATOR 11−07 Litho In U.S.A. (pl) 1 Part No.
Parts Diagram
Page 6
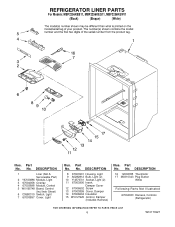
... Switch, Light 7 67003897 Cover, Light Illus. Part No. No. DESCRIPTION 16 12002355 Thermistor 17 M0310343 Plug Button White Following Parts Not Illustrated 67004033 Harness, Controls (Refrigerator) 6 W10173927 REFRIGERATOR LINER PARTS For Models: MBF2256KEB11, MBF2256KEQ11, MBF2256KEW11 (Black) (Bisque) (White) Illus. Part No. No. DESCRIPTION 8 67003901 Housing, Light 9 A0282812 Bulb, Light (2) 10 Y12570701 Socket...
... Switch, Light 7 67003897 Cover, Light Illus. Part No. No. DESCRIPTION 16 12002355 Thermistor 17 M0310343 Plug Button White Following Parts Not Illustrated 67004033 Harness, Controls (Refrigerator) 6 W10173927 REFRIGERATOR LINER PARTS For Models: MBF2256KEB11, MBF2256KEQ11, MBF2256KEW11 (Black) (Bisque) (White) Illus. Part No. No. DESCRIPTION 8 67003901 Housing, Light 9 A0282812 Bulb, Light (2) 10 Y12570701 Socket...
Parts Diagram
Page 10
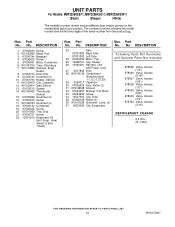
... Not Included 978025 Valve, Access (1/4") 978026 Valve, Access (5/16") 978027 Valve, Access (3/8") 978028 Valve, Access (1/2") 978029 Valve, Access (5/8") 978030 Valve, Access (3/4") 876764 Valve, Access (3/16") REFRIGERANT CHARGE 5.0 Ozs. (R−134A) 10 W10173927 Sheet) Illus. UNIT PARTS For Models: MBF2256KEB11, MBF2256KEQ11, MBF2256KEW11 (Black) (Bisque) (White) Illus. DESCRIPTION 23 Dam 67001084 Right Side...
... Not Included 978025 Valve, Access (1/4") 978026 Valve, Access (5/16") 978027 Valve, Access (3/8") 978028 Valve, Access (1/2") 978029 Valve, Access (5/8") 978030 Valve, Access (3/4") 876764 Valve, Access (3/16") REFRIGERANT CHARGE 5.0 Ozs. (R−134A) 10 W10173927 Sheet) Illus. UNIT PARTS For Models: MBF2256KEB11, MBF2256KEQ11, MBF2256KEW11 (Black) (Bisque) (White) Illus. DESCRIPTION 23 Dam 67001084 Right Side...


