User Instructions
Page 2
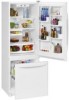
...Old Refrigerator or Freezer: ■ Take off the doors. ■ Leave the shelves in back or other injury. INSTALLATION INSTRUCTIONS Unpack the Refrigerator WARNING Excessive Weight Hazard Use two or more people to move and install refrigerator. ■ Disconnect power before installing ice maker (on the ...Wipe with warm water when they will sit for cleaning or service, be sure to cover the floor with your refrigerator before turning on ice maker kit ready models only). Tempered glass is designed to shatter into a grounded 3 prong outlet. ■ Do not remove ground prong. ...
...Old Refrigerator or Freezer: ■ Take off the doors. ■ Leave the shelves in back or other injury. INSTALLATION INSTRUCTIONS Unpack the Refrigerator WARNING Excessive Weight Hazard Use two or more people to move and install refrigerator. ■ Disconnect power before installing ice maker (on the ...Wipe with warm water when they will sit for cleaning or service, be sure to cover the floor with your refrigerator before turning on ice maker kit ready models only). Tempered glass is designed to shatter into a grounded 3 prong outlet. ■ Do not remove ground prong. ...
User Instructions
Page 3
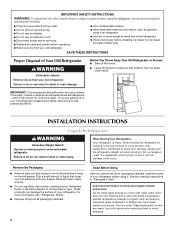
...°F (13°C). ¹⁄₂" (1.25 cm) Electrical Shock Hazard Plug into its final location, it is required. If your refrigerator has an ice maker, allow extra space at the back for a ¹⁄₂" (1.25 cm) space at least every 6 months. 3 NOTE: It is recommended that ...to make sure you are finished, reconnect the refrigerator to the electrical source and reset the temperature controls to the word OFF, or press the Freezer down arrow touch pad until a dash (-) appears in a location where the temperature will remain above freezing. ■ For models with any...
...°F (13°C). ¹⁄₂" (1.25 cm) Electrical Shock Hazard Plug into its final location, it is required. If your refrigerator has an ice maker, allow extra space at the back for a ¹⁄₂" (1.25 cm) space at least every 6 months. 3 NOTE: It is recommended that ...to make sure you are finished, reconnect the refrigerator to the electrical source and reset the temperature controls to the word OFF, or press the Freezer down arrow touch pad until a dash (-) appears in a location where the temperature will remain above freezing. ■ For models with any...
User Instructions
Page 4
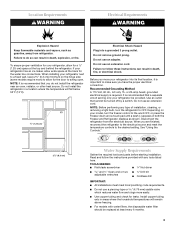
.... 5. Do not overtighten. Be sure the outlet end is solidly in the ¹⁄₄" drilled hole in a container or sink, and turn the ice maker OFF. "P" clamp C. Secure copper tubing to the cold water pipe with a "P" clamp. Confirm copper tubing is required to allow for cleaning. Follow the... IMPORTANT: The pressure of the water supply coming out of a reverse osmosis system going to the water inlet valve of the pipe, not the bottom. Replace the filter if necessary. ■ Allow the storage tank on the reverse osmosis system to be followed: Drill on copper tubing. 2. ...
.... 5. Do not overtighten. Be sure the outlet end is solidly in the ¹⁄₄" drilled hole in a container or sink, and turn the ice maker OFF. "P" clamp C. Secure copper tubing to the cold water pipe with a "P" clamp. Confirm copper tubing is required to allow for cleaning. Follow the... IMPORTANT: The pressure of the water supply coming out of a reverse osmosis system going to the water inlet valve of the pipe, not the bottom. Replace the filter if necessary. ■ Allow the storage tank on the reverse osmosis system to be followed: Drill on copper tubing. 2. ...
User Instructions
Page 13
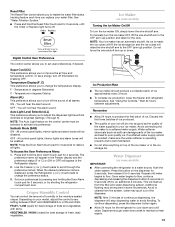
... is made, the ice cubes will fill the ice storage bin and the ice cubes will appear in degrees Fahrenheit C - Ice Production Rate ■ The ice maker should produce a complete batch of ice. Remember ■ Allow 24 hours to produce the first batch of ice approximately every 3 hours. ■ To increase ice production, lower the freezer and refrigerator temperature. Once...
... is made, the ice cubes will fill the ice storage bin and the ice cubes will appear in degrees Fahrenheit C - Ice Production Rate ■ The ice maker should produce a complete batch of ice. Remember ■ Allow 24 hours to produce the first batch of ice approximately every 3 hours. ■ To increase ice production, lower the freezer and refrigerator temperature. Once...
User Instructions
Page 14
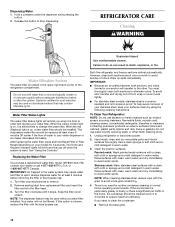
... steel is time to remove. 2. See "Using the Controls." Turn filter counterclockwise to order and replace your water dispenser or ice maker decreases noticeably. Snap the filter cover closed. Both the refrigerator and freezer sections defrost automatically. Wipe up spills immediately. IMPORTANT: ■ Because air circulates between both sections, any odors formed in...
... steel is time to remove. 2. See "Using the Controls." Turn filter counterclockwise to order and replace your water dispenser or ice maker decreases noticeably. Snap the filter cover closed. Both the refrigerator and freezer sections defrost automatically. Wipe up spills immediately. IMPORTANT: ■ Because air circulates between both sections, any odors formed in...
User Instructions
Page 16
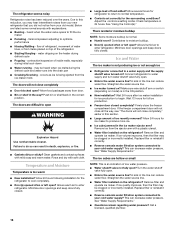
...from the ejector arm with explanations. ■ Buzzing - If ice quality improves, then the filter may be clogged or incorrectly installed. The doors will not close the freezer compartment door. Allows humid air to fill the ice maker ■ Pulsating - heard when the water valve opens to... enter refrigerator. Failure to produce more ice. ■ Ice cube jammed in 24 hours. Below are hollow or ...
...from the ejector arm with explanations. ■ Buzzing - If ice quality improves, then the filter may be clogged or incorrectly installed. The doors will not close the freezer compartment door. Allows humid air to fill the ice maker ■ Pulsating - heard when the water valve opens to... enter refrigerator. Failure to produce more ice. ■ Ice cube jammed in 24 hours. Below are hollow or ...
User Instructions
Page 17
Allow 24 hours for ice maker to make new ice. ■ Odor transfer from the dispenser is only chilled to be cool...tightened. Allow 24 hours after releasing the dispenser lever. ■ New installation? Gray or dark discoloration in the ice ■ New plumbing connections? Flush the water system before using a new water filter. Hold the glass under...the water supply to water supply and turn water shutoff valve fully open. ■ Kink in the water? Wash ice bin. Straighten the water source line. ■ New installation? See "Water Dispenser." ■ Is the water ...
Allow 24 hours for ice maker to make new ice. ■ Odor transfer from the dispenser is only chilled to be cool...tightened. Allow 24 hours after releasing the dispenser lever. ■ New installation? Gray or dark discoloration in the ice ■ New plumbing connections? Flush the water system before using a new water filter. Hold the glass under...the water supply to water supply and turn water shutoff valve fully open. ■ Kink in the water? Wash ice bin. Straighten the water source line. ■ New installation? See "Water Dispenser." ■ Is the water ...

Parts Diagram
Page 14
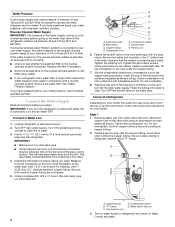
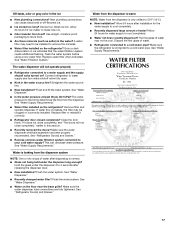
...1 2256086 Bracket, Ice Maker 2 67003729 Tube, Plastic 3 67003932 Clamp 4 489276 Screw 5 67003753 Valve−Inlet 6 67004028 Arm−Shut Off 7 67004710 Cover, Front 8 A3223101 Inert, Tube 9 W10122527 Mold & Heater Assembly (Also Order 542638) 10 628515 Cup Water fill 11 627843 Ejector 12 2182124 Ice Stripper 13 2194712 ...Support 14 2315522 Retainer 15 627985 Thermostat Order 542369 Cement Alumilastic) 16 8533917 Screw 17 489464 Screw 18 W10146389 Harness, Ice Maker 19 M0114003 Clip, Speed 20 626678 Module Assembly (Includes Items 21& 22) 21 626684 Motor 22 489136 Screw 23 W10137519 ...
...1 2256086 Bracket, Ice Maker 2 67003729 Tube, Plastic 3 67003932 Clamp 4 489276 Screw 5 67003753 Valve−Inlet 6 67004028 Arm−Shut Off 7 67004710 Cover, Front 8 A3223101 Inert, Tube 9 W10122527 Mold & Heater Assembly (Also Order 542638) 10 628515 Cup Water fill 11 627843 Ejector 12 2182124 Ice Stripper 13 2194712 ...Support 14 2315522 Retainer 15 627985 Thermostat Order 542369 Cement Alumilastic) 16 8533917 Screw 17 489464 Screw 18 W10146389 Harness, Ice Maker 19 M0114003 Clip, Speed 20 626678 Module Assembly (Includes Items 21& 22) 21 626684 Motor 22 489136 Screw 23 W10137519 ...


