User Instructions
Page 2
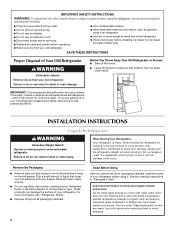
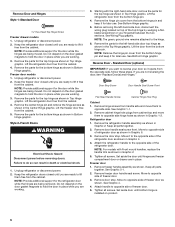
...of your old refrigerator, please follow basic precautions, including the following: ■ Plug into many small, pebble-size pieces. If you remove all parts and panels before operating. ■ Remove doors from your old refrigerator. ■ Use nonflammable cleaner. ■ Keep flammable materials and vapors, ...Use both hands when removing them to do so can damage the surface of the past. Before You Throw Away Your Old Refrigerator or Freezer: ■ Take off the doors. ■ Leave the shelves in "Refrigerator Care." See the cleaning instructions in place so that ...
...of your old refrigerator, please follow basic precautions, including the following: ■ Plug into many small, pebble-size pieces. If you remove all parts and panels before operating. ■ Remove doors from your old refrigerator. ■ Use nonflammable cleaner. ■ Keep flammable materials and vapors, ...Use both hands when removing them to do so can damage the surface of the past. Before You Throw Away Your Old Refrigerator or Freezer: ■ Take off the doors. ■ Leave the shelves in "Refrigerator Care." See the cleaning instructions in place so that ...
User Instructions
Page 3
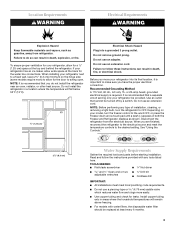
...temperature will remain above freezing. ■ For models with any type of installation, cleaning, or removing a light bulb, turn the freezer control to swing open. Recommended Grounding Method A 115 Volt, 60 Hz., AC only 15- Disconnect the refrigerator from refrigerator. To...Failure to the desired setting. See "Using the Controls." 2¹⁄₂" (6.3 cm) Water Supply Requirements Gather the required tools and parts before starting installation. When you have the proper electrical connection. If your refrigerator, allow extra space at least every 6 months. 3 ...
...temperature will remain above freezing. ■ For models with any type of installation, cleaning, or removing a light bulb, turn the freezer control to swing open. Recommended Grounding Method A 115 Volt, 60 Hz., AC only 15- Disconnect the refrigerator from refrigerator. To...Failure to the desired setting. See "Using the Controls." 2¹⁄₂" (6.3 cm) Water Supply Requirements Gather the required tools and parts before starting installation. When you have the proper electrical connection. If your refrigerator, allow extra space at least every 6 months. 3 ...
User Instructions
Page 5
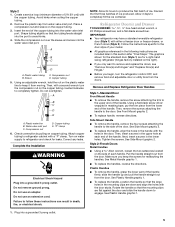
..., loosen the two setscrews located on the plastic water line to completely tighten. Plastic Handles ■ To remove the handle, grasp the lower part of your model. ■ All graphics referenced in death, fire, or electrical shock. Plastic water tubing C. Do not use an adapter. IMPORTANT... can result in the following instructions are flat against the door and slide the handle down and align the holes with either a freezer door or freezer drawer, or French doors (Style 2). Create a service loop (minimum diameter of the door. Avoid kinks when coiling the copper tubing...
..., loosen the two setscrews located on the plastic water line to completely tighten. Plastic Handles ■ To remove the handle, grasp the lower part of your model. ■ All graphics referenced in death, fire, or electrical shock. Plastic water tubing C. Do not use an adapter. IMPORTANT... can result in the following instructions are flat against the door and slide the handle down and align the holes with either a freezer door or freezer drawer, or French doors (Style 2). Create a service loop (minimum diameter of the door. Avoid kinks when coiling the copper tubing...
User Instructions
Page 6
... while you want to reverse your fingernail between the two sections. See Bottom Hinge graphic. 5. Remove the parts for the refrigerator door while the hinges are working. 3. Freezer door 1. Keep all parts together. 2. Remove freezer door handle seal screw. See Graphic 4. 4. Keep the freezer door closed until you are being moved. Keep the refrigerator doors closed...
... while you want to reverse your fingernail between the two sections. See Bottom Hinge graphic. 5. Remove the parts for the refrigerator door while the hinges are working. 3. Freezer door 1. Keep all parts together. 2. Remove freezer door handle seal screw. See Graphic 4. 4. Keep the freezer door closed until you are being moved. Keep the refrigerator doors closed...
User Instructions
Page 7
... drawer front into the brackets. Adjust the door so that the bottom of the refrigerator door aligns evenly with the top of the freezer compartment. Replace the parts for the bottom hinge as shown in the bottom of the freezer drawer. Adjust the doors so that hole plugs and screws are... working . 2. Remove and Replace Freezer Drawer IMPORTANT: ■ Two people may be ...
... drawer front into the brackets. Adjust the door so that the bottom of the refrigerator door aligns evenly with the top of the freezer compartment. Replace the parts for the bottom hinge as shown in the bottom of the freezer drawer. Adjust the doors so that hole plugs and screws are... working . 2. Remove and Replace Freezer Drawer IMPORTANT: ■ Two people may be ...
User Instructions
Page 13
... the User Preferences Menu: 1. The preference name will appear in the Freezer display and the preference status (F or C) or (ON or OFF) will appear in degrees Fahrenheit C - Crisper Humidity Control You can damage parts of the water supplied to your model, adjust the control to any setting...Avoid connecting the ice maker to produce the first batch of ice approximately every 3 hours. ■ To increase ice production, lower the freezer and refrigerator temperature. Auto Light Level Selection (LL) This preference allows you replace your ice will raise the wire shutoff arm to activate ...
... the User Preferences Menu: 1. The preference name will appear in the Freezer display and the preference status (F or C) or (ON or OFF) will appear in degrees Fahrenheit C - Crisper Humidity Control You can damage parts of the water supplied to your model, adjust the control to any setting...Avoid connecting the ice maker to produce the first batch of ice approximately every 3 hours. ■ To increase ice production, lower the freezer and refrigerator temperature. Auto Light Level Selection (LL) This preference allows you replace your ice will raise the wire shutoff arm to activate ...
User Instructions
Page 14
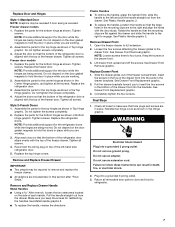
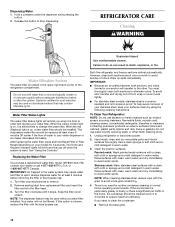
...end into the filter head. 3. Wipe up spills immediately. Unplug refrigerator or disconnect power. 2. Hand wash, rinse, and dry removable parts and interior surfaces thoroughly. Clean the exterior surfaces. Rinse surfaces with clean, warm water and dry immediately to avoid cross-grain scratching. ... remind you need for at least every 6 months OR earlier if the flow of the refrigerator compartment. Both the refrigerator and freezer sections defrost automatically. Rinse surfaces with clean, warm water and dry immediately to change the water filter. NOTE: When cleaning stainless...
...end into the filter head. 3. Wipe up spills immediately. Unplug refrigerator or disconnect power. 2. Hand wash, rinse, and dry removable parts and interior surfaces thoroughly. Clean the exterior surfaces. Rinse surfaces with clean, warm water and dry immediately to avoid cross-grain scratching. ... remind you need for at least every 6 months OR earlier if the flow of the refrigerator compartment. Both the refrigerator and freezer sections defrost automatically. Rinse surfaces with clean, warm water and dry immediately to change the water filter. NOTE: When cleaning stainless...
User Instructions
Page 19
... operator instructions and/or installation instructions. 2. Service calls to refrigerator or freezer product failures. 7. Consumable parts are excluded from unauthorized modifications made to the finish of products not approved by a Maytag designated service company. Expenses for travel and transportation for factory specified parts and repair labor to correct defects in the United States or...
... operator instructions and/or installation instructions. 2. Service calls to refrigerator or freezer product failures. 7. Consumable parts are excluded from unauthorized modifications made to the finish of products not approved by a Maytag designated service company. Expenses for travel and transportation for factory specified parts and repair labor to correct defects in the United States or...
Parts Diagram
Page 1
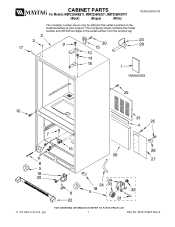
CABINET PARTS For Models: MBF2256KEB11, MBF2256KEQ11, MBF2256KEW11 (Black) (Bisque) (White) REFRIGERATOR 11−07 Litho In U.S.A. (pl) 1 Part No. W10173927 Rev.A
CABINET PARTS For Models: MBF2256KEB11, MBF2256KEQ11, MBF2256KEW11 (Black) (Bisque) (White) REFRIGERATOR 11−07 Litho In U.S.A. (pl) 1 Part No. W10173927 Rev.A

Parts Diagram
Page 2
... Drain 19 67007174 Bracket, Foot (2) 20 67006564 Screw (4) Illus. DESCRIPTION 1 Literature Parts W10137641 Use & Care Guide W10123455 Energy Guide W10165418 Tech Sheet 2 Cabinet (Not a Servicable Part) 3 Plug, Button (3) M0310729 White M0310731 Black M0310738 Bisque 4 B5759649 Gasket 5 ... Foot, Brake 7 67006642 Pin, Center Hinge 8 67006611 Bolt, Adjusting (Front Roller) 9 67006521 Screw Illus. Part No. No. No. No. Part No. CABINET PARTS For Models: MBF2256KEB11, MBF2256KEQ11, MBF2256KEW11 (Black) (Bisque) (White) Illus. DESCRIPTION 21 67006101 Cover, Unit 22...
... Drain 19 67007174 Bracket, Foot (2) 20 67006564 Screw (4) Illus. DESCRIPTION 1 Literature Parts W10137641 Use & Care Guide W10123455 Energy Guide W10165418 Tech Sheet 2 Cabinet (Not a Servicable Part) 3 Plug, Button (3) M0310729 White M0310731 Black M0310738 Bisque 4 B5759649 Gasket 5 ... Foot, Brake 7 67006642 Pin, Center Hinge 8 67006611 Bolt, Adjusting (Front Roller) 9 67006521 Screw Illus. Part No. No. No. No. Part No. CABINET PARTS For Models: MBF2256KEB11, MBF2256KEQ11, MBF2256KEW11 (Black) (Bisque) (White) Illus. DESCRIPTION 21 67006101 Cover, Unit 22...
Parts Diagram
Page 4
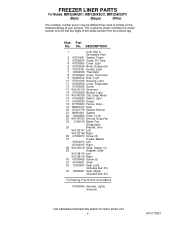
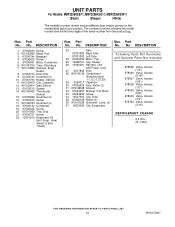
... 16 67005653 Switch, Light 17 67006530 Screw 18 D7753903 Funnel, Drain 19 M0500703 Seal 20 67001776 Gasket, Bottom 21 B8381501 Gasket 22 13024802 Grille, Fz Air 23 W10167023 Shroud, Evap.Fan 24 2169142 Blade, Fan ... 31 67004261 Shaft 32 12002497 Gear (Left) (Includes Item 33) 33 12002497 Gear (Right) (Includes Item 32) Following Parts Not Illustrated 67006095 Harness, Lights (Freezer) 4 W10173927 No. DESCRIPTION 1 Liner (Not A Seviceable Part) 2 67001291 Gasket, Foam 3 67005874 Guide, Fill Tube 4 67003905 Cover, Light 5 67003636 Motor, Evaporator 6 Y12570701 Socket...
... 16 67005653 Switch, Light 17 67006530 Screw 18 D7753903 Funnel, Drain 19 M0500703 Seal 20 67001776 Gasket, Bottom 21 B8381501 Gasket 22 13024802 Grille, Fz Air 23 W10167023 Shroud, Evap.Fan 24 2169142 Blade, Fan ... 31 67004261 Shaft 32 12002497 Gear (Left) (Includes Item 33) 33 12002497 Gear (Right) (Includes Item 32) Following Parts Not Illustrated 67006095 Harness, Lights (Freezer) 4 W10173927 No. DESCRIPTION 1 Liner (Not A Seviceable Part) 2 67001291 Gasket, Foam 3 67005874 Guide, Fill Tube 4 67003905 Cover, Light 5 67003636 Motor, Evaporator 6 Y12570701 Socket...
Parts Diagram
Page 6
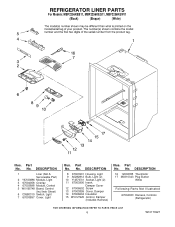
...Black) (Bisque) (White) Illus. DESCRIPTION 16 12002355 Thermistor 17 M0310343 Plug Button White Following Parts Not Illustrated 67004033 Harness, Controls (Refrigerator) 6 W10173927 No. DESCRIPTION 1 Liner (Not A Serviceable Part) 2 Y67003896 Module, Light 3 67004058 Overlay 4 67003898 Module, Control 5 W10165748 Board, ...Control (Incl Instr Sheet) 6 C3680310 Switch, Light 7 67003897 Cover, Light Illus. Part No. Part No. No. DESCRIPTION 8 67003901 Housing, Light 9 A0282812 Bulb, Light (2) 10 Y12570701 Socket, Light (2) 11 67003900...
...Black) (Bisque) (White) Illus. DESCRIPTION 16 12002355 Thermistor 17 M0310343 Plug Button White Following Parts Not Illustrated 67004033 Harness, Controls (Refrigerator) 6 W10173927 No. DESCRIPTION 1 Liner (Not A Serviceable Part) 2 Y67003896 Module, Light 3 67004058 Overlay 4 67003898 Module, Control 5 W10165748 Board, ...Control (Incl Instr Sheet) 6 C3680310 Switch, Light 7 67003897 Cover, Light Illus. Part No. Part No. No. DESCRIPTION 8 67003901 Housing, Light 9 A0282812 Bulb, Light (2) 10 Y12570701 Socket, Light (2) 11 67003900...
Parts Diagram
Page 10
.... DESCRIPTION 1 67006433 Screw 2 W10162928 Blade, Fan 3 67005744 Basepan 4 67006425 Screw 5 67005491 Block, Condenser 6 W10167036 Tube, Discharge 7 W10119856 Harness, Evap. Part No. Evap., Heat Shield, & Instr. DESCRIPTION Following Parts Not Illustrated and Optional Parts Not Included 978025 Valve, Access (1/4") 978026 Valve, Access (5/16") 978027 Valve, Access (3/8") 978028 Valve, Access (1/2") 978029 Valve, Access (5/8") 978030 Valve...
.... DESCRIPTION 1 67006433 Screw 2 W10162928 Blade, Fan 3 67005744 Basepan 4 67006425 Screw 5 67005491 Block, Condenser 6 W10167036 Tube, Discharge 7 W10119856 Harness, Evap. Part No. Evap., Heat Shield, & Instr. DESCRIPTION Following Parts Not Illustrated and Optional Parts Not Included 978025 Valve, Access (1/4") 978026 Valve, Access (5/16") 978027 Valve, Access (3/8") 978028 Valve, Access (1/2") 978029 Valve, Access (5/8") 978030 Valve...

Parts Diagram
Page 14
Part No. DESCRIPTION 1 2256086 Bracket, Ice Maker 2 67003729 Tube, Plastic 3 67003932 Clamp 4 489276 Screw 5 67003753 Valve−Inlet 6 67004028 Arm−Shut Off 7 67004710 Cover, Front 8 ... 489136 Screw 23 W10137519 Elbow, Fill Tube 24 67005603 Funnel, Fill Tube 25 67001255 Pan Ice 100 W10122519 Complete Ice Maker 14 W10173927 No. ICEMAKER PARTS For Models: MBF2256KEB11, MBF2256KEQ11, MBF2256KEW11 (Black) (Bisque) (White) Illus.
Part No. DESCRIPTION 1 2256086 Bracket, Ice Maker 2 67003729 Tube, Plastic 3 67003932 Clamp 4 489276 Screw 5 67003753 Valve−Inlet 6 67004028 Arm−Shut Off 7 67004710 Cover, Front 8 ... 489136 Screw 23 W10137519 Elbow, Fill Tube 24 67005603 Funnel, Fill Tube 25 67001255 Pan Ice 100 W10122519 Complete Ice Maker 14 W10173927 No. ICEMAKER PARTS For Models: MBF2256KEB11, MBF2256KEQ11, MBF2256KEW11 (Black) (Bisque) (White) Illus.
Parts Diagram
Page 15
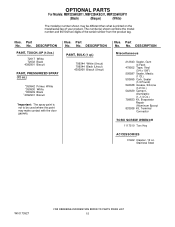
...Alumilastic (1−1/4 Oz.) 799833 Kit, Evaporator Repair (Aluminum Epoxy) 833938 Kit, Terminal Connector TORX SCREW WRENCH 1117510 Torx Key ACCESSORIES 31462 Cleaner, 10 oz. Part No. Part No. DESCRIPTION PAINT, BULK (1 qt.) 799344 White (Uncut) 799344 Black (Uncut) 4392900 Biscuit (Uncut) 350942 Primer, White 350930 White 350939 Black 4392901 Biscuit... spray paint is not to be used where the paint may make contact with the door gaskets. Stainless Steel W10173927 15 OPTIONAL PARTS For Models: MBF2256KEB11, MBF2256KEQ11, MBF2256KEW11 (Black) (Bisque) (White) Illus. No...
...Alumilastic (1−1/4 Oz.) 799833 Kit, Evaporator Repair (Aluminum Epoxy) 833938 Kit, Terminal Connector TORX SCREW WRENCH 1117510 Torx Key ACCESSORIES 31462 Cleaner, 10 oz. Part No. Part No. DESCRIPTION PAINT, BULK (1 qt.) 799344 White (Uncut) 799344 Black (Uncut) 4392900 Biscuit (Uncut) 350942 Primer, White 350930 White 350939 Black 4392901 Biscuit... spray paint is not to be used where the paint may make contact with the door gaskets. Stainless Steel W10173927 15 OPTIONAL PARTS For Models: MBF2256KEB11, MBF2256KEQ11, MBF2256KEW11 (Black) (Bisque) (White) Illus. No...


