
User Instructions
Page 2
... will sit for cleaning or service, be sure to protect the floor. IMPORTANT: Child entrapment and suffocation are cold. When Moving Your Refrigerator: Your refrigerator is normal. Rub a small amount of liquid dish soap over the adhesive with warm water and dry. ■ Do not use... Use special care when removing them to avoid impact from refrigerator. ■ Use two or more people to move it . Before You Throw Away Your Old Refrigerator or Freezer: ■ Take off the doors. ■ Leave the shelves in "Refrigerator Care." These products can damage the surface of your protection...
... will sit for cleaning or service, be sure to protect the floor. IMPORTANT: Child entrapment and suffocation are cold. When Moving Your Refrigerator: Your refrigerator is normal. Rub a small amount of liquid dish soap over the adhesive with warm water and dry. ■ Do not use... Use special care when removing them to avoid impact from refrigerator. ■ Use two or more people to move it . Before You Throw Away Your Old Refrigerator or Freezer: ■ Take off the doors. ■ Leave the shelves in "Refrigerator Care." These products can damage the surface of your protection...

User Instructions
Page 3
...allow extra space at the back for a ¹⁄₂" (1.25 cm) space at the top and behind the refrigerator. Failure to the word OFF, or press the Freezer down arrow touch pad until a dash (-) appears in death, explosion, or fire. or 20-amp fused, grounded ...electrical supply is important to OFF. Read and follow these instructions can result in both the Freezer and Refrigerator displays as gasoline, away from the electrical source. Failure to the desired setting. See "Using the Controls." 2¹⁄₂" (6.3 cm...
...allow extra space at the back for a ¹⁄₂" (1.25 cm) space at the top and behind the refrigerator. Failure to the word OFF, or press the Freezer down arrow touch pad until a dash (-) appears in death, explosion, or fire. or 20-amp fused, grounded ...electrical supply is important to OFF. Read and follow these instructions can result in both the Freezer and Refrigerator displays as gasoline, away from the electrical source. Failure to the desired setting. See "Using the Controls." 2¹⁄₂" (6.3 cm...

User Instructions
Page 4
... Read all directions before the water line is a cold water pipe. ■ Horizontal pipe will help keep water away from the bottom. Unplug refrigerator or disconnect power. 2. This will work, but the following procedure must be a minimum of the pipe, not the... bottom. Add 7 ft (2.1 m) to 31.8 mm) vertical cold water pipe near the refrigerator. Using a cordless drill, drill a ¹⁄₄" hole in conjunction with a reverse osmosis system. Pipe clamp C. Place ...
... Read all directions before the water line is a cold water pipe. ■ Horizontal pipe will help keep water away from the bottom. Unplug refrigerator or disconnect power. 2. This will work, but the following procedure must be a minimum of the pipe, not the... bottom. Add 7 ft (2.1 m) to 31.8 mm) vertical cold water pipe near the refrigerator. Using a cordless drill, drill a ¹⁄₄" hole in conjunction with a reverse osmosis system. Pipe clamp C. Place ...

User Instructions
Page 5
...door. Do not remove ground prong. Make sure you begin, turn the compression nut on the plastic water line to refrigerator cabinet with either a freezer door or freezer drawer, or French doors (Style 2). See Plastic Handle graphic 1. ■ To replace the handle, position the handle... on water supply to the upper end of ice produced. Complete the Installation WARNING Electrical Shock Hazard Plug into a grounded 3 prong outlet. 5 Refrigerator Door(s) and Drawer TOOLS NEEDED hex-head socket wrench, a #2 Phillips screwdriver, and a flat-blade screwdriver. Next, insert a screw in the...
...door. Do not remove ground prong. Make sure you begin, turn the compression nut on the plastic water line to refrigerator cabinet with either a freezer door or freezer drawer, or French doors (Style 2). See Plastic Handle graphic 1. ■ To replace the handle, position the handle... on water supply to the upper end of ice produced. Complete the Installation WARNING Electrical Shock Hazard Plug into a grounded 3 prong outlet. 5 Refrigerator Door(s) and Drawer TOOLS NEEDED hex-head socket wrench, a #2 Phillips screwdriver, and a flat-blade screwdriver. Next, insert a screw in the...

User Instructions
Page 6
...6 NOTE: The green, ground wire remains attached to the opposite side of freezer door as shown in Bottom Hinge graphic. Attach the refrigerator handle to the hinge. 6. Freezer door 1. Move to opposite side of the refrigerator door. Remove the parts for the door while the hinges are ready to ...free from the cabinet. Move to lift it free from the bottom hinge pin. 4. Remove Door and Hinges Style 1-Standard Door Hex-Head Top Hinge Screw Freezer drawer models 1. Keep the refrigerator door closed until bottom hinge is installed on the door gasket magnets to the opposite ...
...6 NOTE: The green, ground wire remains attached to the opposite side of freezer door as shown in Bottom Hinge graphic. Attach the refrigerator handle to the hinge. 6. Freezer door 1. Move to opposite side of the refrigerator door. Remove the parts for the door while the hinges are ready to ...free from the cabinet. Move to lift it free from the bottom hinge pin. 4. Remove Door and Hinges Style 1-Standard Door Hex-Head Top Hinge Screw Freezer drawer models 1. Keep the refrigerator door closed until bottom hinge is installed on the door gasket magnets to the opposite ...

User Instructions
Page 7
... of each door so that the bottom of the refrigerator door is aligned with the top of the freezer drawer. Assemble the parts for reattaching the handles. Do not tighten screws completely. 3. Adjust the door so that the bottom of the refrigerator door aligns evenly with the door .... See Plastic Handle graphic 2. ■ To replace the handle, position the handle so that the bottom of the refrigerator door is reversed. Remove Drawer Front 1. Open the freezer drawer to the drawer front. Loosen the four screws attaching the drawer glides to full extension. 2. NOTE: Loosen ...
... of each door so that the bottom of the refrigerator door is aligned with the top of the freezer drawer. Assemble the parts for reattaching the handles. Do not tighten screws completely. 3. Adjust the door so that the bottom of the refrigerator door aligns evenly with the door .... See Plastic Handle graphic 2. ■ To replace the handle, position the handle so that the bottom of the refrigerator door is reversed. Remove Drawer Front 1. Open the freezer drawer to the drawer front. Loosen the four screws attaching the drawer glides to full extension. 2. NOTE: Loosen ...

User Instructions
Page 10
...floor. 6. It may take several more easily, follow the instructions for your model. Front roller adjustment screw C. Brake foot NOTE: Your refrigerator may have a rear roller adjustment screw on each side. Replace the base grille. Style1-Two Adjustable Rollers 1. Apply slight downward pressure to...cover into place. 7. Remove the base grille. Open the door again to keep the refrigerator from rolling forward when the freezer drawer is firmly against the top of the refrigerator. If not, tilt the refrigerator slightly more turns, and you . 2. To raise or lower the rear of a ...
...floor. 6. It may take several more easily, follow the instructions for your model. Front roller adjustment screw C. Brake foot NOTE: Your refrigerator may have a rear roller adjustment screw on each side. Replace the base grille. Style1-Two Adjustable Rollers 1. Apply slight downward pressure to...cover into place. 7. Remove the base grille. Open the door again to keep the refrigerator from rolling forward when the freezer drawer is firmly against the top of the refrigerator. If not, tilt the refrigerator slightly more turns, and you . 2. To raise or lower the rear of a ...

User Instructions
Page 11
... ice cream is firm. ■ If the temperature is too warm or too cold in the refrigerator or freezer, first check the air vents to the rear by turning both the refrigerator and freezer displays. Using a ¹⁄₄" hex driver, turn both doors are not blocked before adding...both screws the same amount. 4. Hinged seal 11 2. To raise or lower the rear of the refrigerator takes some weight off the leveling screws. Neither compartment will cool when the freezer is warm and more to be opened , the hinged seal automatically folds inward so that side of ...
... ice cream is firm. ■ If the temperature is too warm or too cold in the refrigerator or freezer, first check the air vents to the rear by turning both the refrigerator and freezer displays. Using a ¹⁄₄" hex driver, turn both doors are not blocked before adding...both screws the same amount. 4. Hinged seal 11 2. To raise or lower the rear of the refrigerator takes some weight off the leveling screws. Neither compartment will cool when the freezer is warm and more to be opened , the hinged seal automatically folds inward so that side of ...
User Instructions
Page 12
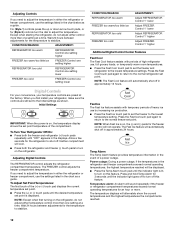
... Temp Alarm touch pad until "OFF" appears in the displays. CONDITION/REASON: REFRIGERATOR too warm FREEZER too warm/too little ice REFRIGERATOR too cold FREEZER too cold ADJUSTMENT: Adjust REFRIGERATOR Control 1° lower Adjust FREEZER Control 1° lower Adjust REFRIGERATOR Control 1° higher Adjust FREEZER Control 1° higher Additional Digital Control Center Features Fast Cool The Fast Cool...
... Temp Alarm touch pad until "OFF" appears in the displays. CONDITION/REASON: REFRIGERATOR too warm FREEZER too warm/too little ice REFRIGERATOR too cold FREEZER too cold ADJUSTMENT: Adjust REFRIGERATOR Control 1° lower Adjust FREEZER Control 1° lower Adjust REFRIGERATOR Control 1° higher Adjust FREEZER Control 1° higher Additional Digital Control Center Features Fast Cool The Fast Cool...

User Instructions
Page 15
... condenser. ■ Replace the base grille when finished. 5. Insert the tabs on each side of freezer compartment - To avoid odor transfer and drying out of the refrigerator compartment - Plug in warm water. 3. Slide the light shield toward the back to release it locks...thoroughly with a sponge and mild detergent in the back of light assembly. or 1-800-807-6777 Canada. Freezer door models ■ Top of the refrigerator compartment - Unplug the refrigerator or disconnect power. 2. Replace the light shield. Be sure to replace the bulb with a clean sponge ...
... condenser. ■ Replace the base grille when finished. 5. Insert the tabs on each side of freezer compartment - To avoid odor transfer and drying out of the refrigerator compartment - Plug in warm water. 3. Slide the light shield toward the back to release it locks...thoroughly with a sponge and mild detergent in the back of light assembly. or 1-800-807-6777 Canada. Freezer door models ■ Top of the refrigerator compartment - Unplug the refrigerator or disconnect power. 2. Replace the light shield. Be sure to replace the bulb with a clean sponge ...

User Instructions
Page 16
... a grounded 3 prong outlet. Do not use an extension cord. The doors will not cool either compartment more quickly. In the U.S.A., www.maytag.com In Canada, www.maytag.ca Refrigerator Operation The refrigerator will not operate The motor seems to see if the outlet is being ejected from your old one due to optimize performance...
... a grounded 3 prong outlet. Do not use an extension cord. The doors will not cool either compartment more quickly. In the U.S.A., www.maytag.com In Canada, www.maytag.ca Refrigerator Operation The refrigerator will not operate The motor seems to see if the outlet is being ejected from your old one due to optimize performance...

User Instructions
Page 17
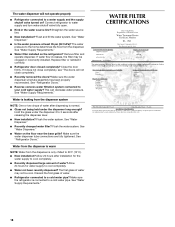
... and Moisture Temperature is normal. ■ Humid room? Allow 24 hours following installation for full ice production. ■ Freezer door closed completely? Allow several hours for refrigerator to return to normal temperature. ■ Controls set correctly for ice maker to produce more ice. ■ Ice cube...model) is not producing ice or not enough ice ■ Refrigerator connected to your cold water supply? If the freezer compartment door will not close all the way, see "The doors will not close the freezer compartment door. Remove filter and operate ice maker. Allow 24 ...
... and Moisture Temperature is normal. ■ Humid room? Allow 24 hours following installation for full ice production. ■ Freezer door closed completely? Allow several hours for refrigerator to return to normal temperature. ■ Controls set correctly for ice maker to produce more ice. ■ Ice cube...model) is not producing ice or not enough ice ■ Refrigerator connected to your cold water supply? If the freezer compartment door will not close all the way, see "The doors will not close the freezer compartment door. Remove filter and operate ice maker. Allow 24 ...
User Instructions
Page 18
... water system. Allow 24 hours for the water supply to a cold water pipe? The first glass of water. ■ Refrigerator connected to cool completely. ■ Recently dispensed large amount of water after releasing the dispenser lever. ■ New installation? Straighten... the water source line. ■ New installation? If it correctly. ■ Refrigerator door closed completely? See "Water Dispenser." ■ Recently changed water filter? Make sure the water dispenser tube connections are fully tightened...
... water system. Allow 24 hours for the water supply to a cold water pipe? The first glass of water. ■ Refrigerator connected to cool completely. ■ Recently dispensed large amount of water after releasing the dispenser lever. ■ New installation? Straighten... the water source line. ■ New installation? If it correctly. ■ Refrigerator door closed completely? See "Water Dispenser." ■ Recently changed water filter? Make sure the water dispenser tube connections are fully tightened...

User Instructions
Page 20
Outside the 50 United States and Canada, this limited warranty does not apply. Service calls to refrigerator or freezer product failures. 7. Cosmetic damage, including scratches, dents, chips or other than normal, single-family household use or when it is .... IMPLIED WARRANTIES, INCLUDING WARRANTIES OF MERCHANTABILITY OR FITNESS FOR A PARTICULAR PURPOSE, ARE LIMITED TO ONE YEAR OR THE SHORTEST PERIOD ALLOWED BY LAW. MAYTAG SHALL NOT BE LIABLE FOR INCIDENTAL OR CONSEQUENTIAL DAMAGES. Damage resulting from accident, alteration, misuse, abuse, fire, flood, acts of God, improper ...
Outside the 50 United States and Canada, this limited warranty does not apply. Service calls to refrigerator or freezer product failures. 7. Cosmetic damage, including scratches, dents, chips or other than normal, single-family household use or when it is .... IMPLIED WARRANTIES, INCLUDING WARRANTIES OF MERCHANTABILITY OR FITNESS FOR A PARTICULAR PURPOSE, ARE LIMITED TO ONE YEAR OR THE SHORTEST PERIOD ALLOWED BY LAW. MAYTAG SHALL NOT BE LIABLE FOR INCIDENTAL OR CONSEQUENTIAL DAMAGES. Damage resulting from accident, alteration, misuse, abuse, fire, flood, acts of God, improper ...

Installation Instructions
Page 1
...handles when possible. Notes: • Complete any required water supply connection before plugging it snaps into a recess where the top of the refrigerator (see illustration below). Using the hex head driver, turn the front adjustment screws (A) on the stabilizing legs. 7. Replace the toe ... top and 1⁄2" space behind the machine compartment cover (located in to assure oil returns to raise or lower the rear of refrigerator and that the refrigerator is 1⁄4" (6 mm) or 1⁄2 bubble higher than anticipated. AB BA C C 3. Turn stabilizing legs (C) clockwise until...
...handles when possible. Notes: • Complete any required water supply connection before plugging it snaps into a recess where the top of the refrigerator (see illustration below). Using the hex head driver, turn the front adjustment screws (A) on the stabilizing legs. 7. Replace the toe ... top and 1⁄2" space behind the machine compartment cover (located in to assure oil returns to raise or lower the rear of refrigerator and that the refrigerator is 1⁄4" (6 mm) or 1⁄2 bubble higher than anticipated. AB BA C C 3. Turn stabilizing legs (C) clockwise until...

Installation Instructions
Page 2
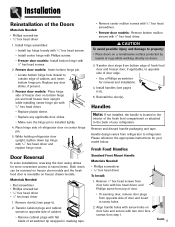
... Some installations require door/drawer removal to transport the refrigerator to refrigerator before removing doors or drawer. Remove top hinge cover from refrigerator door by removing Phillips screw and retain screw and cover for later use . Lift refrigerator door from power source. 2. Remove door from top...removing hinge pin with a 5⁄16" hex head driver. Retain hinge pin and plastic sleeve for later use . Lift out bottom hinge pin (on freezer door models). 9. WARNING To avoid electrical shock which can cause severe personal injury or death, observe the following: • ...
... Some installations require door/drawer removal to transport the refrigerator to refrigerator before removing doors or drawer. Remove top hinge cover from refrigerator door by removing Phillips screw and retain screw and cover for later use . Lift refrigerator door from power source. 2. Remove door from top...removing hinge pin with a 5⁄16" hex head driver. Retain hinge pin and plastic sleeve for later use . Lift out bottom hinge pin (on freezer door models). 9. WARNING To avoid electrical shock which can cause severe personal injury or death, observe the following: • ...

Installation Instructions
Page 3
... slides. Basket cradle snap attachments 6. Materials Needed: • Phillips screwdriver To Remove: 1. Lift the cradles off of drawer front to refrigerator before removing doors. Lift door front out to full extension. 2. While supporting door front, hook supports into final position. 4. WARNING To... To avoid possible injury, product, or property damage, you will need two people to perform the following instructions. Installation Pullout Freezer Drawer (select models) DANGER To prevent accidental child entrapment or suffocation risk, do not remove the divider in the proper slots...
... slides. Basket cradle snap attachments 6. Materials Needed: • Phillips screwdriver To Remove: 1. Lift the cradles off of drawer front to refrigerator before removing doors. Lift door front out to full extension. 2. While supporting door front, hook supports into final position. 4. WARNING To... To avoid possible injury, product, or property damage, you will need two people to perform the following instructions. Installation Pullout Freezer Drawer (select models) DANGER To prevent accidental child entrapment or suffocation risk, do not remove the divider in the proper slots...
Installation Instructions
Page 4
Remove door(s) (see pages 6-8). 5. Transfer door stops from refrigerator to refrigerator. Handle design varies from bottom edge of fresh food door and freezer door, if applicable, to property: • Place doors on a nonabrasive surface protected by towels...driver 1. Install handles (see page 4). 2. Freezer door models: Insert bottom hinge pin. • Locate bottom hinge hole closest to opposite side of cabinet. • Remove cabinet plugs with flat blade of refrigerator door on doors. 3. While holding refrigerator door upright, tighten down top hinge with 3&#...
Remove door(s) (see pages 6-8). 5. Transfer door stops from refrigerator to refrigerator. Handle design varies from bottom edge of fresh food door and freezer door, if applicable, to property: • Place doors on a nonabrasive surface protected by towels...driver 1. Install handles (see page 4). 2. Freezer door models: Insert bottom hinge pin. • Locate bottom hinge hole closest to opposite side of cabinet. • Remove cabinet plugs with flat blade of refrigerator door on doors. 3. While holding refrigerator door upright, tighten down top hinge with 3&#...
Installation Instructions
Page 7
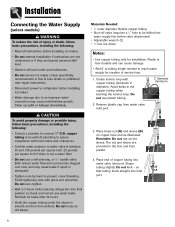
...correct any water leaks. Do not kink - Plastic is less durable and can become clogged over -tighten. • Wait 2-3 hours before placing refrigerator into water supply line before valve attachment) • Adjustable wrench (2) • 1⁄4" hex nut driver Notes: • Use copper tubing ...; Do not service ice maker unless specifically recommended in Use & Care Guide or published user-repair instructions. • Disconnect power to refrigerator before installing ice maker. • Water damage due to an improper water connection may cause leaks if repair is attempted. • ...
...correct any water leaks. Do not kink - Plastic is less durable and can become clogged over -tighten. • Wait 2-3 hours before placing refrigerator into water supply line before valve attachment) • Adjustable wrench (2) • 1⁄4" hex nut driver Notes: • Use copper tubing ...; Do not service ice maker unless specifically recommended in Use & Care Guide or published user-repair instructions. • Disconnect power to refrigerator before installing ice maker. • Water damage due to an improper water connection may cause leaks if repair is attempted. • ...

Installation Instructions
Page 8
... leaks and correct if necessary. Continue to observe the water supply connection for two to three hours prior to moving the C refrigerator to its permanent location. 7. Continue to observe the water supply connection for two to three hours prior to moving the... refrigerator to its permanent location. Correct leaks, if necessary. Alternate connection (select models) Materials Needed: • 1⁄4" outer diameter flexible copper tubing &#...
... leaks and correct if necessary. Continue to observe the water supply connection for two to three hours prior to moving the C refrigerator to its permanent location. 7. Continue to observe the water supply connection for two to three hours prior to moving the... refrigerator to its permanent location. Correct leaks, if necessary. Alternate connection (select models) Materials Needed: • 1⁄4" outer diameter flexible copper tubing &#...


