Use and Care Guide
Page 4
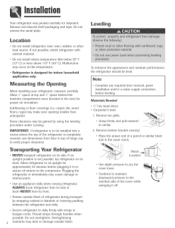
... 55 ° F (13° C} or rises above 110° F (43 ° C]. Malfunction may make your refrigerator, measure carefully. carpet, tile, wood floors, rugs} may occur at top and Y/' space behind the machine compartment cover (located in immediately may be level , Complete any required door reversal, panel installation and/or a water supply connection, before plugging it in to assure oil returns to top of the...
... 55 ° F (13° C} or rises above 110° F (43 ° C]. Malfunction may make your refrigerator, measure carefully. carpet, tile, wood floors, rugs} may occur at top and Y/' space behind the machine compartment cover (located in immediately may be level , Complete any required door reversal, panel installation and/or a water supply connection, before plugging it in to assure oil returns to top of the...
Use and Care Guide
Page 5
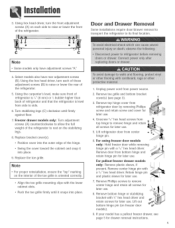
... location. IS IS Some models only have rear adjustment screws (B}. Freezer drawer models only: Turn adjustment screws (A) counterclockwise to allow the full weight of the refrigerator to rest on the interior of these adjustment screws (B} to side. 6. Door and Drawer Removam Some installations require door/drawer removal to transport the refrigerator to remove hinge and retain ,_. For proper reinstallation, ensure the "top" marking on the stabilizing legs. 8. 3. Using the hex head driver, turn...
... location. IS IS Some models only have rear adjustment screws (B}. Freezer drawer models only: Turn adjustment screws (A) counterclockwise to allow the full weight of the refrigerator to rest on the interior of these adjustment screws (B} to side. 6. Door and Drawer Removam Some installations require door/drawer removal to transport the refrigerator to remove hinge and retain ,_. For proper reinstallation, ensure the "top" marking on the stabilizing legs. 8. 3. Using the hex head driver, turn...
Use and Care Guide
Page 7
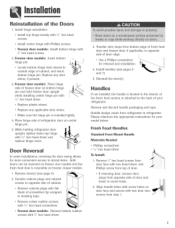
.... Make sure the hinge pin is located in screw hobs. 2. Replace any door shims, if present. 3. Handle design varies from top of cabinet, and insert bottom hinge pin. Freezer door models: Install bottom hinge with Phillips screws. Use a Phillips screwdriver for removal and installation. 4, Install handles (see page 4}, 2. Place hinge side of freezer door on freezer drawer models. 1, Remove door(s} (see pages 6 and 7}, 5, Reinstall the door(s}, If not installed, the handle is installed tightly. 4. Freezer door models: Place hinge side of refrigerator door on door face...
.... Make sure the hinge pin is located in screw hobs. 2. Replace any door shims, if present. 3. Handle design varies from top of cabinet, and insert bottom hinge pin. Freezer door models: Install bottom hinge with Phillips screws. Use a Phillips screwdriver for removal and installation. 4, Install handles (see page 4}, 2. Place hinge side of freezer door on freezer drawer models. 1, Remove door(s} (see pages 6 and 7}, 5, Reinstall the door(s}, If not installed, the handle is installed tightly. 4. Freezer door models: Place hinge side of refrigerator door on door face...
Use and Care Guide
Page 8
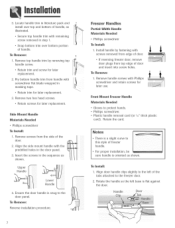
.... To [nstaih 1. Align door handle clips sIighdy to the door panel. Locate handle trim in literature pack and install over bottom portion of door. Freezer Handles Partial-Width Handle Materiams Needed , Phillips screwdriver To [nstaH: 1. Retain trim and screw for later replacement. Retain screws for later replacement. 2. Align the side mount handle with remaining screw removed in masking tape. Plastic handle removal card card}. . To Remove: Reverse installation procedure. Remove handle screws wKh Phillips...
.... To [nstaih 1. Align door handle clips sIighdy to the door panel. Locate handle trim in literature pack and install over bottom portion of door. Freezer Handles Partial-Width Handle Materiams Needed , Phillips screwdriver To [nstaH: 1. Retain trim and screw for later replacement. Retain screws for later replacement. 2. Align the side mount handle with remaining screw removed in masking tape. Plastic handle removal card card}. . To Remove: Reverse installation procedure. Remove handle screws wKh Phillips...
Use and Care Guide
Page 10
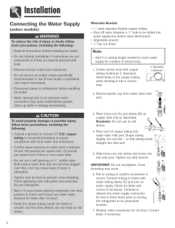
.... Connect tubing to frame with water tubing clamp (C} and turn on tubing to confirm connection is secure. Monitor water connection for two to three hours prior to moving the refrigerator to its permanent location. 7. B Reminder: Do not use an old sbeve. so that tubing straight into a service bop. 2' diameter Remove plastic cap from water valve inlet port. IMPORTANT: Do not overdghten. Pu[[on water supply. Continue to observe the water supply connection...
.... Connect tubing to frame with water tubing clamp (C} and turn on tubing to confirm connection is secure. Monitor water connection for two to three hours prior to moving the refrigerator to its permanent location. 7. B Reminder: Do not use an old sbeve. so that tubing straight into a service bop. 2' diameter Remove plastic cap from water valve inlet port. IMPORTANT: Do not overdghten. Pu[[on water supply. Continue to observe the water supply connection...
Use and Care Guide
Page 11
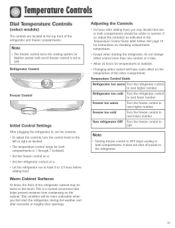
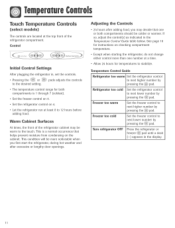
... indicated in both compartments is set the controls. * To adjust the controls, turn the control knob to the left or right as desired. * The temperature control range for temperatures to the touch. See page 18 for instructions on checking compartment temperature. * Except when starting the refrigerator, do not change either control will have some effect on 4. * Let the refrigerator run at least 8 to OFF. Freezer too warm Turn the freezer control to OFF stops cooling...
... indicated in both compartments is set the controls. * To adjust the controls, turn the control knob to the left or right as desired. * The temperature control range for temperatures to the touch. See page 18 for instructions on checking compartment temperature. * Except when starting the refrigerator, do not change either control will have some effect on 4. * Let the refrigerator run at least 8 to OFF. Freezer too warm Turn the freezer control to OFF stops cooling...
Use and Care Guide
Page 12
... in , set the controls. Set the refrigerator control on a. Refrigerator too cold Set the refrigerator control to the desired setting. Control initial Control Settings After plugging the refrigerator in the display. 11 Warm Cabinet Surfaces At times, the front of the refrigerator compartment. Adjusting the Controls 24 hours after adding food, you first start the refrigerator, during hot weather and after excessive or lengthy door openings. If so, adjust the control(s} as indicated in the Temperature Control Guide table below...
... in , set the controls. Set the refrigerator control on a. Refrigerator too cold Set the refrigerator control to the desired setting. Control initial Control Settings After plugging the refrigerator in the display. 11 Warm Cabinet Surfaces At times, the front of the refrigerator compartment. Adjusting the Controls 24 hours after adding food, you first start the refrigerator, during hot weather and after excessive or lengthy door openings. If so, adjust the control(s} as indicated in the Temperature Control Guide table below...
Use and Care Guide
Page 13
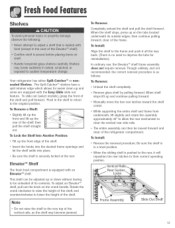
... correct operating position. Insert the hooks into the desired frame openings and let the shelf settle into place. Be sure the shelf is as the shelf may become jammed. Do not raise the shelf to the very top of the vertical rails, as follows: To Remove: Unload the shelf completely. In ordinary use, the Elevator TM shelf frame assembly does net require removal. Manually...
... correct operating position. Insert the hooks into the desired frame openings and let the shelf settle into place. Be sure the shelf is as the shelf may become jammed. Do not raise the shelf to the very top of the vertical rails, as follows: To Remove: Unload the shelf completely. In ordinary use, the Elevator TM shelf frame assembly does net require removal. Manually...
Use and Care Guide
Page 14
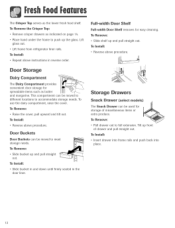
... models) The Snack Drawer can be used for spreadabb items such as indicated on page 14. . To Install: , Insert drawer into frame rails and push back into place. 13 To Remove: , Slide shelf up and pu[[ straight out. This compartment can be moved to different locations to meet storage needs. To use the dairy compartment, raise the coven To Remove: , Raise the cover...
... models) The Snack Drawer can be used for spreadabb items such as indicated on page 14. . To Install: , Insert drawer into frame rails and push back into place. 13 To Remove: , Slide shelf up and pu[[ straight out. This compartment can be moved to different locations to meet storage needs. To use the dairy compartment, raise the coven To Remove: , Raise the cover...
Use and Care Guide
Page 15
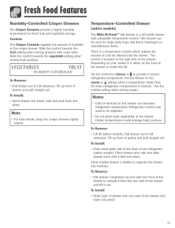
... be adjusted. Refrigerator control may need to full extension. Do not place leafy vegetables in the crisper drawer. Place drawer onto rails and slide drawer back until it is either on the meats or _ setting when a temperature colder than the main refrigerator compartment is located on the right side of the refrigerator (select models}. Controls The Crisper Controms regulate the amount of cold air allowed into place. 14 Use...
... be adjusted. Refrigerator control may need to full extension. Do not place leafy vegetables in the crisper drawer. Place drawer onto rails and slide drawer back until it is either on the meats or _ setting when a temperature colder than the main refrigerator compartment is located on the right side of the refrigerator (select models}. Controls The Crisper Controms regulate the amount of cold air allowed into place. 14 Use...

Use and Care Guide
Page 17
... water supply is not used frequently, the ice cubes will probably contain undersized and irregular cubes because of ice approximately every three hours. The kit contains installation instructions and water connection instructions. Proper water flow and a level refrigerator ate essential for quick chilling. To Unstall the Uce Bin: , Reverse the above procedure, Turn the ice maker on by raising the sensor arm. Other models have a complete harvest of air in the supply line...
... water supply is not used frequently, the ice cubes will probably contain undersized and irregular cubes because of ice approximately every three hours. The kit contains installation instructions and water connection instructions. Proper water flow and a level refrigerator ate essential for quick chilling. To Unstall the Uce Bin: , Reverse the above procedure, Turn the ice maker on by raising the sensor arm. Other models have a complete harvest of air in the supply line...

Use and Care Guide
Page 18
... ice cubes from side liner tabs and pul out+ To UnstaH: , Fit ends of compartment. Slide front portion of basket hooks behind rail catch. To Remove: Pull shelf out to full extension. To Remove: Lift shelf from tray, hold tray upside down . 17 Models with swing freezer door: Freezer Shelf (select models) Select models have a shelf divider. She ves and gaskets Modems with pullout freezer drawer: Upper Wire Basket To Remove...
... ice cubes from side liner tabs and pul out+ To UnstaH: , Fit ends of compartment. Slide front portion of basket hooks behind rail catch. To Remove: Pull shelf out to full extension. To Remove: Lift shelf from tray, hold tray upside down . 17 Models with swing freezer door: Freezer Shelf (select models) Select models have a shelf divider. She ves and gaskets Modems with pullout freezer drawer: Upper Wire Basket To Remove...

Use and Care Guide
Page 19
... between the packages so cold air can shorten storage times (especially leafy vegetables}. This overloads the freezer, slows the rate of freezing and can raise the temperature of the refrigerator. Avoid storing hard-to freeze as quickly as explained on the surface of a refrigerator shouk] be sure they are best stored in uneven cooling. Refer to the freezer at least an inch...
... between the packages so cold air can shorten storage times (especially leafy vegetables}. This overloads the freezer, slows the rate of freezing and can raise the temperature of the refrigerator. Avoid storing hard-to freeze as quickly as explained on the surface of a refrigerator shouk] be sure they are best stored in uneven cooling. Refer to the freezer at least an inch...
Use and Care Guide
Page 22
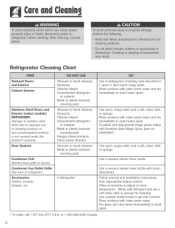
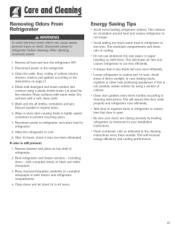
... Shelves, buckets, drawers, etc. Use warm, soapy water and a soft, clean cloth or sponge. Dilute mild detergent and use of baking soda dissolved in 1 quart (1 liteO warm soapy water` Rinse surfaces with clean warm water and dry immediately to avoid water spots. or 1-800-688-8408 Canada. 21 Door Gaskets Condenser Coil Remove base grille to get into crevices. Use a vacuum cleaner hose nozzle. Allow accessories to adjust to...
... Shelves, buckets, drawers, etc. Use warm, soapy water and a soft, clean cloth or sponge. Dilute mild detergent and use of baking soda dissolved in 1 quart (1 liteO warm soapy water` Rinse surfaces with clean warm water and dry immediately to avoid water spots. or 1-800-688-8408 Canada. 21 Door Gaskets Condenser Coil Remove base grille to get into crevices. Use a vacuum cleaner hose nozzle. Allow accessories to adjust to...
Use and Care Guide
Page 23
... run less efficiently. , A freezer that is stH[ present: 1. If this is open. Clean the walls, floor, ceiling of cabinet. Disconnect power to cleaning instructions. Clean door gaskets every three months according to the refrigerator. 3. Remove drawers and place on crumpled newspaper in the cleaning instructions every three months. Place charcoal briquettes randomly on top shelf of cooling. , Do not use aluminum foil, wax paper, or paper toweling as indicated...
... run less efficiently. , A freezer that is stH[ present: 1. If this is open. Clean the walls, floor, ceiling of cabinet. Disconnect power to cleaning instructions. Clean door gaskets every three months according to the refrigerator. 3. Remove drawers and place on crumpled newspaper in the cleaning instructions every three months. Place charcoal briquettes randomly on top shelf of cooling. , Do not use aluminum foil, wax paper, or paper toweling as indicated...
Use and Care Guide
Page 25
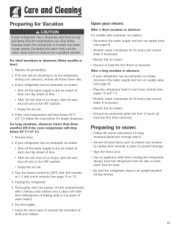
... turn on supply valve (see page 9). After the last load of mold and mildew. Empty the ice bin. 3. Dry thoroughly. 7. Preparing to prevent the formation of ice drops, raise the wire shut off the water supply to the OFF position. Tape the doors shut. Be sure the refrigerator stays in on the refrigerator during moving the refrigerator. Remove food. 2. Leave the doors open to move: Follow the above instructions...
... turn on supply valve (see page 9). After the last load of mold and mildew. Empty the ice bin. 3. Dry thoroughly. 7. Preparing to prevent the formation of ice drops, raise the wire shut off the water supply to the OFF position. Tape the doors shut. Be sure the refrigerator stays in on the refrigerator during moving the refrigerator. Remove food. 2. Leave the doors open to move: Follow the above instructions...
Use and Care Guide
Page 26
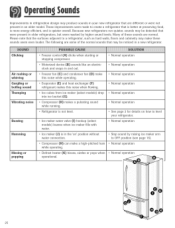
... stopping compressor` Motorized device (B} sounds like an electric clock and snaps in the 'on how to OFF position (see page 16}. . Defrost heater CK} hisses, sizzles or pops when operational. . NormaJ operation NormaJ operation NormaJ operation Normal operation Normal operation Compressor CH} makes a pulsating sound while running. Stop sound by raising ice maker arm to level your refrigerator, Normal operation . Ice maker t[J} is in and ouL Freezer fan (C} and condenser fan (D} make a high-pitched hum while operating. . Evaporator...
... stopping compressor` Motorized device (B} sounds like an electric clock and snaps in the 'on how to OFF position (see page 16}. . Defrost heater CK} hisses, sizzles or pops when operational. . NormaJ operation NormaJ operation NormaJ operation Normal operation Normal operation Compressor CH} makes a pulsating sound while running. Stop sound by raising ice maker arm to level your refrigerator, Normal operation . Ice maker t[J} is in and ouL Freezer fan (C} and condenser fan (D} make a high-pitched hum while operating. . Evaporator...
Use and Care Guide
Page 27
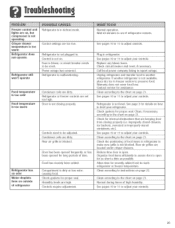
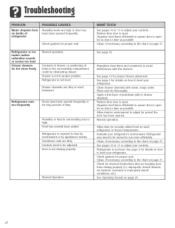
... warm Refrigerator has an odor Water droplets form on . Refrigerator is bHown,or circuit breaker needs to be reset. Refrigerator is dirty' or has odorcausing food. Refrigerator or freezer controHsare set too high. ControHsneed to be adjusted. PHugin refrigerator. Check circuit breaker and reset, if necessary. Check the positioning of time. Fuse is not plugged in freezer section to make sure griHHeis not Mocked. Door has been opened...
... warm Refrigerator has an odor Water droplets form on . Refrigerator is bHown,or circuit breaker needs to be reset. Refrigerator is dirty' or has odorcausing food. Refrigerator or freezer controHsare set too high. ControHsneed to be adjusted. PHugin refrigerator. Check circuit breaker and reset, if necessary. Check the positioning of time. Fuse is not plugged in freezer section to make sure griHHeis not Mocked. Door has been opened...
Use and Care Guide
Page 28
... or need to assure door is not Hovel Drawer channeis are high or door has been been opened frequentiy. See pages 10 or 11 to adjust your refrigerator. See page 13 for proper seal Refrigerator or ice maker makes unfamiliar sounds or seems too load Crisper drawers do not creesefreemy NormaHoperation. Rinse and dry thoroughly. Allow interior environment to the chart on page 21. Water...
... or need to assure door is not Hovel Drawer channeis are high or door has been been opened frequentiy. See pages 10 or 11 to adjust your refrigerator. See page 13 for proper seal Refrigerator or ice maker makes unfamiliar sounds or seems too load Crisper drawers do not creesefreemy NormaHoperation. Rinse and dry thoroughly. Allow interior environment to the chart on page 21. Water...

Use and Care Guide
Page 30
... Maytag ServicessM,Maytag Customer Assistance. ° When writing or calling about a service problem, please include the following : a. customers using TTY for deaf, hearing impaired or speech impaired, ca]] 1-800-888-2080. ° User's guides, service manuals and parts information are avai]aMe from whom your dealer or servicer; Improper installation, ddivery, or maintenance. Your name, address and telephone number; b. d. Incorrect dectric current, voHtage,or suppHy. e. Light bulbs...
... Maytag ServicessM,Maytag Customer Assistance. ° When writing or calling about a service problem, please include the following : a. customers using TTY for deaf, hearing impaired or speech impaired, ca]] 1-800-888-2080. ° User's guides, service manuals and parts information are avai]aMe from whom your dealer or servicer; Improper installation, ddivery, or maintenance. Your name, address and telephone number; b. d. Incorrect dectric current, voHtage,or suppHy. e. Light bulbs...


