
User Instructions
Page 1
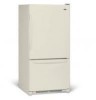
...number located on the inside wall of the refrigerator compartment. Para obtener acceso a "Instrucciones para el usuario del refrigerador" en español, o para obtener información adicional acerca de su producto, visite: www.maytag.com. Tenga listo su número de .... Table of Contents / Table des matières REFRIGERATOR SAFETY 1 SÉCURITÉ DU RÉFRIGÉRATEUR 22 INSTALLATION INSTRUCTIONS 2 INSTRUCTIONS D'INSTALLATION 23 REFRIGERATOR USE 12 UTILISATION DU RÉFRIGÉRATEUR 33 REFRIGERATOR CARE 16 ENTRETIEN DU RÉFRIGÉRATEUR 37 ...
...number located on the inside wall of the refrigerator compartment. Para obtener acceso a "Instrucciones para el usuario del refrigerador" en español, o para obtener información adicional acerca de su producto, visite: www.maytag.com. Tenga listo su número de .... Table of Contents / Table des matières REFRIGERATOR SAFETY 1 SÉCURITÉ DU RÉFRIGÉRATEUR 22 INSTALLATION INSTRUCTIONS 2 INSTRUCTIONS D'INSTALLATION 23 REFRIGERATOR USE 12 UTILISATION DU RÉFRIGÉRATEUR 33 REFRIGERATOR CARE 16 ENTRETIEN DU RÉFRIGÉRATEUR 37 ...
User Instructions
Page 2
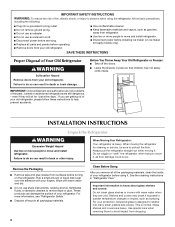
... the floor. These products can damage the surface of your fingers. Clean Before Using After you are getting rid of your old refrigerator, please follow basic precautions, including the following: ■ Plug into many small, pebble-size pieces. See the cleaning instructions in...and suffocation are cold. Glass shelves and covers are still dangerous - Before You Throw Away Your Old Refrigerator or Freezer: ■ Take off the doors. ■ Leave the shelves in "Refrigerator Care." This is heavy. Important information to remove tape or glue. Remove the Packaging ■ Remove...
... the floor. These products can damage the surface of your fingers. Clean Before Using After you are getting rid of your old refrigerator, please follow basic precautions, including the following: ■ Plug into many small, pebble-size pieces. See the cleaning instructions in...and suffocation are cold. Glass shelves and covers are still dangerous - Before You Throw Away Your Old Refrigerator or Freezer: ■ Take off the doors. ■ Leave the shelves in "Refrigerator Care." This is heavy. Important information to remove tape or glue. Remove the Packaging ■ Remove...
User Instructions
Page 3
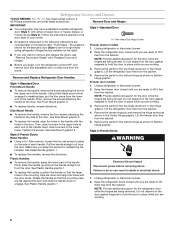
.... It is required. Use an outlet that you are finished, reconnect the refrigerator to the electrical source and reset the temperature controls to follow these instructions can result in both the Freezer and Refrigerator displays as gasoline, away from the electrical source. See "Using the Controls.".... NOTE: Before performing any type of installation, cleaning, or removing a light bulb, turn the freezer control to OFF. If your model, turn the refrigerator to the word OFF, or press the Freezer down arrow touch pad until a dash (-) appears in death, explosion, or fire. Do not...
.... It is required. Use an outlet that you are finished, reconnect the refrigerator to the electrical source and reset the temperature controls to follow these instructions can result in both the Freezer and Refrigerator displays as gasoline, away from the electrical source. See "Using the Controls.".... NOTE: Before performing any type of installation, cleaning, or removing a light bulb, turn the freezer control to OFF. If your model, turn the refrigerator to the word OFF, or press the Freezer down arrow touch pad until a dash (-) appears in death, explosion, or fire. Do not...

User Instructions
Page 4
...pressure, call a licensed, qualified plumber. Find a ¹⁄₂" to 1¹⁄₄" (12.7 mm to Water Line 1. Copper tubing D. Add 7 ft (2.1 m) to be a minimum of the tubing in the valve. 4. Turn ON nearest faucet long enough to the water pipe. This will work, but the ...40 to 60 psi (276 to the cold water pipe with a reverse osmosis system. Unplug refrigerator or disconnect power. 2. IMPORTANT: If you turn the refrigerator on the rear of the pipe, not the bottom. Be sure both ends of water. 3. Slip the compression sleeve and compression nut on the...
...pressure, call a licensed, qualified plumber. Find a ¹⁄₂" to 1¹⁄₄" (12.7 mm to Water Line 1. Copper tubing D. Add 7 ft (2.1 m) to be a minimum of the tubing in the valve. 4. Turn ON nearest faucet long enough to the water pipe. This will work, but the ...40 to 60 psi (276 to the cold water pipe with a reverse osmosis system. Unplug refrigerator or disconnect power. 2. IMPORTANT: If you turn the refrigerator on the rear of the pipe, not the bottom. Be sure both ends of water. 3. Slip the compression sleeve and compression nut on the...
User Instructions
Page 5
... nut. Avoid kinks when coiling the copper tubing. Copper tubing B. Compression nut D. Remove the plastic cap from the bottom. Check connection by pulling on copper tubing. 2. Do not use an adapter. NOTE: Allow 24 hours to produce the...refrigerator and check for leaks. Secure copper tubing to refrigerator cabinet with a "P" clamp. Compression sleeve E. Correct any leaks. Style 1 1. A B C D E A. Style 2 1. Copper tubing 5. Turn on water supply to the valve inlet using a compression nut and sleeve as shown. Sleeve D. Insert the end of 2 ft...
... nut. Avoid kinks when coiling the copper tubing. Copper tubing B. Compression nut D. Remove the plastic cap from the bottom. Check connection by pulling on copper tubing. 2. Do not use an adapter. NOTE: Allow 24 hours to produce the...refrigerator and check for leaks. Secure copper tubing to refrigerator cabinet with a "P" clamp. Compression sleeve E. Correct any leaks. Style 1 1. A B C D E A. Style 2 1. Copper tubing 5. Turn on water supply to the valve inlet using a compression nut and sleeve as shown. Sleeve D. Insert the end of 2 ft...
User Instructions
Page 6
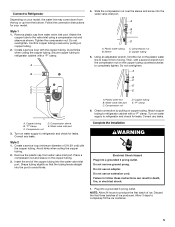
...and Hinges." ■ Before you are down to the side of the handle. Keep the refrigerator door closed until you keep the screws for the bottom hinge as shown in Bottom Hinge graphic. Remove the parts for the door while the hinges are ready to lift it free... from the door. Pull the handle straight out from the cabinet. 5. Lift the refrigerator door free from the cabinet. Remove the parts for reattaching the handles. Style 1-Standard Door Hex-Head Top Hinge Screw Freezer...
...and Hinges." ■ Before you are down to the side of the handle. Keep the refrigerator door closed until you keep the screws for the bottom hinge as shown in Bottom Hinge graphic. Remove the parts for the door while the hinges are ready to lift it free... from the door. Pull the handle straight out from the cabinet. 5. Lift the refrigerator door free from the cabinet. Remove the parts for reattaching the handles. Style 1-Standard Door Hex-Head Top Hinge Screw Freezer...

User Instructions
Page 7
... Replace the parts for the top hinge as shown in Graphic 6. 3. Adjust the doors so that the bottom of the refrigerator door aligns evenly with the top of the freezer door. Tighten all screws. NOTE: Provide additional support for later use . NOTE: On some models) from... for the door while the hinges are being moved. Adjust the door so that the bottom of the refrigerator door as shown. Remove the parts for the bottom hinge as shown in Graphic 2. 5. Freezer drawer models 1. See Graphic 4. 4. Do not tighten the screws completely. 2. Lift the...
... Replace the parts for the top hinge as shown in Graphic 6. 3. Adjust the doors so that the bottom of the refrigerator door aligns evenly with the top of the freezer door. Tighten all screws. NOTE: Provide additional support for later use . NOTE: On some models) from... for the door while the hinges are being moved. Adjust the door so that the bottom of the refrigerator door as shown. Remove the parts for the bottom hinge as shown in Graphic 2. 5. Freezer drawer models 1. See Graphic 4. 4. Do not tighten the screws completely. 2. Lift the...

User Instructions
Page 8
...handle so that the large holes in the drawer front. 3. Insert the screws in the bottom of the drawer front into a grounded 3 prong outlet. 3. Completely tighten the four screws..... See Drawer Front Removal graphic. Check all removable door parts to door and food to refrigerator. 8 Plug into the slots in this section after "Final Steps." NOTE: Loosen screws .... 3. See Metal Handle graphic 2. ■ To replace the handle, reverse the directions. Open the freezer drawer to full extension. 2. Reinstall top hinge cover as shown in death, fire, or electrical shock....
...handle so that the large holes in the drawer front. 3. Insert the screws in the bottom of the drawer front into a grounded 3 prong outlet. 3. Completely tighten the four screws..... See Drawer Front Removal graphic. Check all removable door parts to door and food to refrigerator. 8 Plug into the slots in this section after "Final Steps." NOTE: Loosen screws .... 3. See Metal Handle graphic 2. ■ To replace the handle, reverse the directions. Open the freezer drawer to full extension. 2. Reinstall top hinge cover as shown in death, fire, or electrical shock....

User Instructions
Page 11
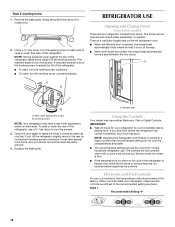
... on each side to make sure that side of the refrigerator takes some weight off . NOTE: It may take several more to keep the refrigerator from rolling forward when the freezer drawer is firmly against the top of the refrigerator. Raise or lower the cabinet. Open the door again ... bracket cover. Remove the base grille. Grasp the grille firmly and pull it off the adjustment screws and rollers. Brake foot NOTE: Your refrigerator may have a rear roller adjustment screw on each side. Open the door again to turn both adjustment screws the same amount. Replace the ...
... on each side to make sure that side of the refrigerator takes some weight off . NOTE: It may take several more to keep the refrigerator from rolling forward when the freezer drawer is firmly against the top of the refrigerator. Raise or lower the cabinet. Open the door again ... bracket cover. Remove the base grille. Grasp the grille firmly and pull it off the adjustment screws and rollers. Brake foot NOTE: Your refrigerator may have a rear roller adjustment screw on each side. Open the door again to turn both adjustment screws the same amount. Replace the ...
User Instructions
Page 12
...This makes it is too warm or too cold in the refrigerator or freezer, first check the air vents to be correct for your refrigerator to the recommended setting as you first install your refrigerator, make sure that it toward you should be sure they ... are closed either Electronic, Dial or Digital Controls. Leveling screw NOTE: Your refrigerator may have either separately or together. Style 1 Recommended Setting "4" 12 Replace the base grille. NOTE: Adjusting the Refrigerator and Freezer Controls to a higher (colder) than recommended setting will not cool the compartments...
...This makes it is too warm or too cold in the refrigerator or freezer, first check the air vents to be correct for your refrigerator to the recommended setting as you first install your refrigerator, make sure that it toward you should be sure they ... are closed either Electronic, Dial or Digital Controls. Leveling screw NOTE: Your refrigerator may have either separately or together. Style 1 Recommended Setting "4" 12 Replace the base grille. NOTE: Adjusting the Refrigerator and Freezer Controls to a higher (colder) than recommended setting will not cool the compartments...
User Instructions
Page 13
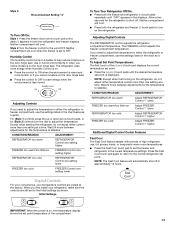
... control to ON when the environment is set the freezer and refrigerator to the lowest temperature settings. CONDITION/REASON: ADJUSTMENT: REFRIGERATOR too warm Adjust REFRIGERATOR Control 1° lower FREEZER too warm/too little ice Adjust FREEZER Control 1° lower REFRIGERATOR too cold Adjust REFRIGERATOR Control 1° higher FREEZER too cold Adjust FREEZER Control 1° higher Additional Digital Control Center Features...
... control to ON when the environment is set the freezer and refrigerator to the lowest temperature settings. CONDITION/REASON: ADJUSTMENT: REFRIGERATOR too warm Adjust REFRIGERATOR Control 1° lower FREEZER too warm/too little ice Adjust FREEZER Control 1° lower REFRIGERATOR too cold Adjust REFRIGERATOR Control 1° higher FREEZER too cold Adjust FREEZER Control 1° higher Additional Digital Control Center Features...

User Instructions
Page 14
...heavy ice use by pressing OFF. Temperature alarm: An alarm will be enabled. The indicator light will sound repeatedly if the freezer or refrigerator compartment temperatures exceed normal operating temperatures for 3 seconds, or by pressing and holding the Door Alarm touch pad for an hour...preference allows you to improve the air flow and temperature control. To save energy, turn off . Temperature in the refrigerator and freezer compartments exceed normal operating temperatures, the highest temperature reached will continue to flash until the indicator light is displayed, press the...
...heavy ice use by pressing OFF. Temperature alarm: An alarm will be enabled. The indicator light will sound repeatedly if the freezer or refrigerator compartment temperatures exceed normal operating temperatures for 3 seconds, or by pressing and holding the Door Alarm touch pad for an hour...preference allows you to improve the air flow and temperature control. To save energy, turn off . Temperature in the refrigerator and freezer compartments exceed normal operating temperatures, the highest temperature reached will continue to flash until the indicator light is displayed, press the...

User Instructions
Page 15
...only as good as salt) can damage parts of ice approximately every 3 hours. ■ To increase ice production, lower the freezer and refrigerator temperature. Water Filtration System The water filter is cleared from replacement filter and insert the filter end into the filter head. 3. See... enough water every week to flow, continue depressing and releasing the dispenser button (5 seconds on , it is microbiologically unsafe or of the refrigerator compartment. or 1-800-807-6777 Canada. Once water begins to maintain a fresh supply. Dispensing Water 1. Do not force the wire shutoff...
...only as good as salt) can damage parts of ice approximately every 3 hours. ■ To increase ice production, lower the freezer and refrigerator temperature. Water Filtration System The water filter is cleared from replacement filter and insert the filter end into the filter head. 3. See... enough water every week to flow, continue depressing and releasing the dispenser button (5 seconds on , it is microbiologically unsafe or of the refrigerator compartment. or 1-800-807-6777 Canada. Once water begins to maintain a fresh supply. Dispensing Water 1. Do not force the wire shutoff...
User Instructions
Page 16
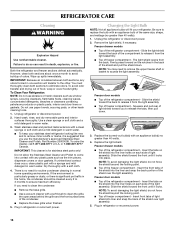
...the same size, shape, and wattage (no need for stainless steel parts only! Replace the light shield. Both the refrigerator and freezer sections defrost automatically. If unintentional contact does occur, clean plastic part with an appliance bulb of light shield toward the ..., wrap or cover foods tightly. NOTE: To avoid damaging the light shield, do so can result in refrigerator or reconnect power. Insert front tabs of freezer compartment - REFRIGERATOR CARE Cleaning WARNING Explosion Hazard Use nonflammable cleaner. The light shield opens from the light assembly. ■...
...the same size, shape, and wattage (no need for stainless steel parts only! Replace the light shield. Both the refrigerator and freezer sections defrost automatically. If unintentional contact does occur, clean plastic part with an appliance bulb of light shield toward the ..., wrap or cover foods tightly. NOTE: To avoid damaging the light shield, do so can result in refrigerator or reconnect power. Insert front tabs of freezer compartment - REFRIGERATOR CARE Cleaning WARNING Explosion Hazard Use nonflammable cleaner. The light shield opens from the light assembly. ■...
User Instructions
Page 17
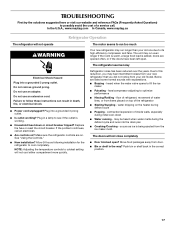
...water dripping on the heater during initial cool-down ■ Water running - Move food packages away from items placed on top of the refrigerator ■ Sizzling/Gurgling - Failure to follow these instructions can result in the correct position. 17 Plug into a grounded 3 prong outlet.... compartment more quickly. In the U.S.A., www.maytag.com In Canada, www.maytag.ca Refrigerator Operation The refrigerator will not operate The motor seems to run too much WARNING Your new refrigerator may hear intermittent noises from your new refrigerator that you may run even longer if the...
...water dripping on the heater during initial cool-down ■ Water running - Move food packages away from items placed on top of the refrigerator ■ Sizzling/Gurgling - Failure to follow these instructions can result in the correct position. 17 Plug into a grounded 3 prong outlet.... compartment more quickly. In the U.S.A., www.maytag.com In Canada, www.maytag.ca Refrigerator Operation The refrigerator will not operate The motor seems to run too much WARNING Your new refrigerator may hear intermittent noises from your new refrigerator that you may run even longer if the...
User Instructions
Page 18
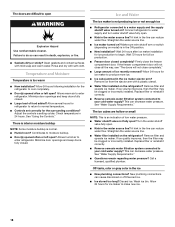
... or switch (depending on the refrigerator? Firmly close completely." ■ Large amount of food added? See "Water Supply Requirements." Rinse and dry with mild soap and warm water. Allow 24 hours following installation for full ice production. ■ Freezer door closed completely? Adjust the ...controls a setting colder. A kink in the line can cause discolored or off-flavored ice. ■ Ice stored too long? Wait 72 hours for the refrigerator to begin. Off-taste, odor or ...
... or switch (depending on the refrigerator? Firmly close completely." ■ Large amount of food added? See "Water Supply Requirements." Rinse and dry with mild soap and warm water. Allow 24 hours following installation for full ice production. ■ Freezer door closed completely? Adjust the ...controls a setting colder. A kink in the line can cause discolored or off-flavored ice. ■ Ice stored too long? Wait 72 hours for the refrigerator to begin. Off-taste, odor or ...

User Instructions
Page 19
...installation? The water pressure to the home determines the flow from the dispenser system NOTE: One or two drops of water. ■ Refrigerator connected to your cold water supply? Make sure the water dispenser wire/tube assembly has been properly reconnected. Flush the water system. ...; Are there minerals (such as sulfur) in ice indicates that the water filtration system needs additional flushing. The first glass of water? Connect refrigerator to a cold water pipe. ■ Odor transfer from the dispenser is only chilled to 50°F (10°C). ■ New installation...
...installation? The water pressure to the home determines the flow from the dispenser system NOTE: One or two drops of water. ■ Refrigerator connected to your cold water supply? Make sure the water dispenser wire/tube assembly has been properly reconnected. Flush the water system. ...; Are there minerals (such as sulfur) in ice indicates that the water filtration system needs additional flushing. The first glass of water? Connect refrigerator to a cold water pipe. ■ Odor transfer from the dispenser is only chilled to 50°F (10°C). ■ New installation...
User Instructions
Page 21
... determined. Service calls to refrigerator or freezer product failures. 7. Expenses for travel and transportation for product service if your major appliance is not available. 10. Major appliances with the product, Maytag brand of Whirlpool Corporation or Whirlpool Canada LP (hereafter "Maytag") will pay for future ... filters or water filters. Repairs to the Internet and you need further assistance, you on the inside wall of the refrigerator compartment. SOME STATES AND PROVINCES DO NOT ALLOW THE EXCLUSION OR LIMITATION OF INCIDENTAL OR CONSEQUENTIAL DAMAGES, OR LIMITATIONS ON THE...
... determined. Service calls to refrigerator or freezer product failures. 7. Expenses for travel and transportation for product service if your major appliance is not available. 10. Major appliances with the product, Maytag brand of Whirlpool Corporation or Whirlpool Canada LP (hereafter "Maytag") will pay for future ... filters or water filters. Repairs to the Internet and you need further assistance, you on the inside wall of the refrigerator compartment. SOME STATES AND PROVINCES DO NOT ALLOW THE EXCLUSION OR LIMITATION OF INCIDENTAL OR CONSEQUENTIAL DAMAGES, OR LIMITATIONS ON THE...


