
User Instructions
Page 1
... manual and on your model and serial number located on the inside wall of the refrigerator compartment. You will follow the safety alert symbol and either the word "DANGER" or "WARNING." Table of Contents / Table des matières REFRIGERATOR SAFETY 1 SÉCURITÉ DU RÉFRIGÉRATEUR 22 INSTALLATION INSTRUCTIONS 2 INSTRUCTIONS D'INSTALLATION 23 REFRIGERATOR USE 12 UTILISATION DU RÉFRIGÉRATEUR 33 REFRIGERATOR CARE...
... manual and on your model and serial number located on the inside wall of the refrigerator compartment. You will follow the safety alert symbol and either the word "DANGER" or "WARNING." Table of Contents / Table des matières REFRIGERATOR SAFETY 1 SÉCURITÉ DU RÉFRIGÉRATEUR 22 INSTALLATION INSTRUCTIONS 2 INSTRUCTIONS D'INSTALLATION 23 REFRIGERATOR USE 12 UTILISATION DU RÉFRIGÉRATEUR 33 REFRIGERATOR CARE...
User Instructions
Page 2
... of your refrigerator before turning on ice maker kit ready models only). Wipe with warm water and dry. ■ Do not use an extension cord. ■ Disconnect power before servicing. ■ Replace all parts and panels before installing ice maker (on the refrigerator. Shelves and covers may not easily climb inside of liquid dish soap over the adhesive with warm water when they will sit for cleaning or service, be sure to sudden temperature changes or impact...
... of your refrigerator before turning on ice maker kit ready models only). Wipe with warm water and dry. ■ Do not use an extension cord. ■ Disconnect power before servicing. ■ Replace all parts and panels before installing ice maker (on the refrigerator. Shelves and covers may not easily climb inside of liquid dish soap over the adhesive with warm water when they will sit for cleaning or service, be sure to sudden temperature changes or impact...
User Instructions
Page 3
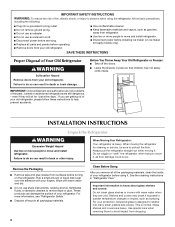
... open. Disconnect the refrigerator from refrigerator. If your refrigerator, allow extra space at the top and behind the refrigerator. Do not use an extension cord. Do not use an extension cord. Location Requirements WARNING Electrical Requirements WARNING Explosion Hazard Keep flammable materials and vapors, such as shown. Failure to allow for the water line connections. NOTE: Before performing any type of installation, cleaning, or removing a light bulb, turn the freezer control...
... open. Disconnect the refrigerator from refrigerator. If your refrigerator, allow extra space at the top and behind the refrigerator. Do not use an extension cord. Do not use an extension cord. Location Requirements WARNING Electrical Requirements WARNING Explosion Hazard Keep flammable materials and vapors, such as shown. Failure to allow for the water line connections. NOTE: Before performing any type of installation, cleaning, or removing a light bulb, turn the freezer control...

User Instructions
Page 4
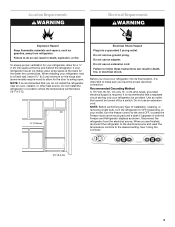
... to the water inlet valve of the refrigerator needs to operate the water dispenser and ice maker. Turn OFF main water supply. Use ¹⁄₄" (6.35 mm) O.D. (outside diameter) copper tubing. Cold water pipe B. Copper tubing D. Do not overtighten or you have questions about your cold water supply, the water pressure to the reverse osmosis system needs to be a minimum of 40 to 60 psi (276 to see whether the sediment filter in...
... to the water inlet valve of the refrigerator needs to operate the water dispenser and ice maker. Turn OFF main water supply. Use ¹⁄₄" (6.35 mm) O.D. (outside diameter) copper tubing. Cold water pipe B. Copper tubing D. Do not overtighten or you have questions about your cold water supply, the water pressure to the reverse osmosis system needs to be a minimum of 40 to 60 psi (276 to see whether the sediment filter in...
User Instructions
Page 5
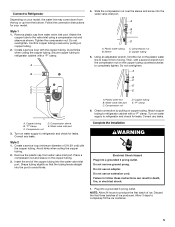
Follow the connection instructions for leaks. Do not overtighten. Avoid kinks when coiling the copper tubing. Do not overtighten. A B C D E A. Copper tubing B. Compression sleeve E. Turn on water supply to refrigerator and check for your model, the water line may come down from the top or up from moving. Remove the plastic cap from water valve inlet port. "P" clamp 6. Complete the Installation WARNING Electrical Shock Hazard Plug into a grounded 3 prong outlet...
Follow the connection instructions for leaks. Do not overtighten. Avoid kinks when coiling the copper tubing. Do not overtighten. A B C D E A. Copper tubing B. Compression sleeve E. Turn on water supply to refrigerator and check for your model, the water line may come down from the top or up from moving. Remove the plastic cap from water valve inlet port. "P" clamp 6. Complete the Installation WARNING Electrical Shock Hazard Plug into a grounded 3 prong outlet...
User Instructions
Page 6
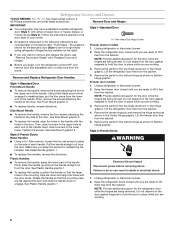
... the handle. Using a flat-blade screw driver wrapped in Bottom Hinge graphic. Style 2-French Doors WARNING ■ To replace the handles, reverse the directions. Remove and Replace Refrigerator Door Handles 4. NOTE: Provide additional support for reattaching the handles. The graphics shown for the standard door (Style 1) are ready to lift it free from the cabinet. Unplug refrigerator or disconnect power. 2. Make sure you begin, turn the refrigerator control OFF, and remove food and adjustable door or utility bins from...
... the handle. Using a flat-blade screw driver wrapped in Bottom Hinge graphic. Style 2-French Doors WARNING ■ To replace the handles, reverse the directions. Remove and Replace Refrigerator Door Handles 4. NOTE: Provide additional support for reattaching the handles. The graphics shown for the standard door (Style 1) are ready to lift it free from the cabinet. Unplug refrigerator or disconnect power. 2. Make sure you begin, turn the refrigerator control OFF, and remove food and adjustable door or utility bins from...

User Instructions
Page 7
... Freezer door models 1. Style 2-French Doors 1. Replace the refrigerator doors. Tighten all screws. See Bottom Hinge graphic. 5. See Bottom Hinge graphic. Refrigerator door 1. Remove the door stop . Set aside the door until bottom hinge is aligned with Front mount handles, replace the handle trim as shown. Keep all screws. See Graphic 5-1. 2. NOTE: Provide additional support for the refrigerator doors while the hinges are not reversing the door, see "Replace Door and Hinges." Before removing the left-hand side door, disconnect the wiring plug located on...
... Freezer door models 1. Style 2-French Doors 1. Replace the refrigerator doors. Tighten all screws. See Bottom Hinge graphic. 5. See Bottom Hinge graphic. Refrigerator door 1. Remove the door stop . Set aside the door until bottom hinge is aligned with Front mount handles, replace the handle trim as shown. Keep all screws. See Graphic 5-1. 2. NOTE: Provide additional support for the refrigerator doors while the hinges are not reversing the door, see "Replace Door and Hinges." Before removing the left-hand side door, disconnect the wiring plug located on...

User Instructions
Page 8
... Hinge graphic. Replace Drawer Front 1. See Drawer Front Replacement graphic. 2. Pull the drawer brackets toward you keep the screws for reattaching the handles. Do not use an adapter. Remove and Replace Drawer Handle Metal Handles ■ Using a Allen wrench, loosen the two set screws located on the side of the freezer compartment. Pull the handle straight out from the drawer. Slide the drawer glides out of each handle. See Drawer Front Replacement graphic. 3. Remove...
... Hinge graphic. Replace Drawer Front 1. See Drawer Front Replacement graphic. 2. Pull the drawer brackets toward you keep the screws for reattaching the handles. Do not use an adapter. Remove and Replace Drawer Handle Metal Handles ■ Using a Allen wrench, loosen the two set screws located on the side of the freezer compartment. Pull the handle straight out from the drawer. Slide the drawer glides out of each handle. See Drawer Front Replacement graphic. 3. Remove...
User Instructions
Page 10
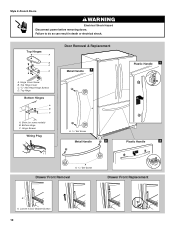
Style 2-French Doors WARNING Electrical Shock Hazard Disconnect power before removing doors. Hinge Screws Wiring Plug Door Removal & Replacement Metal Handle 1 A A. 3/32" Set Screw Metal Handle 2 Plastic Handle 1 Plastic Handle 2 A A. 3/32" Set Screw Drawer Front Removal Drawer Front Replacement A A. Failure to do so can result in death or electrical shock. Hinge Cover Screw B. Bottom Hinge C. Top Hinge Cover C. 5/16" Hex-Head Hinge Screws D. Top Hinge Bottom Hinges A B C A. Shim (on some models) B. Loosen 4 Door Bracket Screws 10 Top Hinges A B C D A.
Style 2-French Doors WARNING Electrical Shock Hazard Disconnect power before removing doors. Hinge Screws Wiring Plug Door Removal & Replacement Metal Handle 1 A A. 3/32" Set Screw Metal Handle 2 Plastic Handle 1 Plastic Handle 2 A A. 3/32" Set Screw Drawer Front Removal Drawer Front Replacement A A. Failure to do so can result in death or electrical shock. Hinge Cover Screw B. Bottom Hinge C. Top Hinge Cover C. 5/16" Hex-Head Hinge Screws D. Top Hinge Bottom Hinges A B C A. Shim (on some models) B. Loosen 4 Door Bracket Screws 10 Top Hinges A B C D A.

User Instructions
Page 11
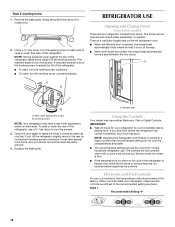
... driver, turn the roller adjustment screw(s) on your model, your model. 5. Raise or lower the cabinet. If not, tilt the refrigerator slightly more easily, follow the instructions for your refrigerator may have two front adjustable rollers (Style 1),or four adjustable rollers (Style 2), or a leveling screw (Style 3) located at the base of the refrigerator takes some weight off the adjustment screws and rollers. Open the door again...
... driver, turn the roller adjustment screw(s) on your model, your model. 5. Raise or lower the cabinet. If not, tilt the refrigerator slightly more easily, follow the instructions for your refrigerator may have two front adjustable rollers (Style 1),or four adjustable rollers (Style 2), or a leveling screw (Style 3) located at the base of the refrigerator takes some weight off the adjustment screws and rollers. Open the door again...
User Instructions
Page 12
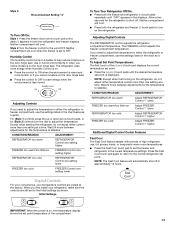
... the leveling screws. Style 1 Recommended Setting "4" 12 Grasp the grille firmly and pull it closes as easily as shown. Using a ¹⁄₄" hex driver, turn both doors are preset at the factory. A A B A. NOTE: Adjusting the Refrigerator and Freezer Controls to turn the screws. This makes it is too warm or too cold in the refrigerator or freezer, first check the air vents to be opened , the hinged seal...
... the leveling screws. Style 1 Recommended Setting "4" 12 Grasp the grille firmly and pull it closes as easily as shown. Using a ¹⁄₄" hex driver, turn both doors are preset at the factory. A A B A. NOTE: Adjusting the Refrigerator and Freezer Controls to turn the screws. This makes it is too warm or too cold in the refrigerator or freezer, first check the air vents to be opened , the hinged seal...
User Instructions
Page 13
... Cool touch pad to set the freezer and refrigerator to help reduce moisture on the door hinge seal. CONDITION/REASON: ADJUSTMENT: REFRIGERATOR too warm REFRIGERATOR Control one setting higher FREEZER too warm/too little ice FREEZER Control one setting higher REFRIGERATOR too cold REFRIGERATOR Control one setting lower FREEZER too cold FREEZER Control one setting lower To Turn Your Refrigerator Off/On: ■ Press both the refrigerator and freezer (-) touch pads to turn the dial to save energy when the environment is displayed. Adjusting Digital Controls The REFRIGERATOR...
... Cool touch pad to set the freezer and refrigerator to help reduce moisture on the door hinge seal. CONDITION/REASON: ADJUSTMENT: REFRIGERATOR too warm REFRIGERATOR Control one setting higher FREEZER too warm/too little ice FREEZER Control one setting higher REFRIGERATOR too cold REFRIGERATOR Control one setting lower FREEZER too cold FREEZER Control one setting lower To Turn Your Refrigerator Off/On: ■ Press both the refrigerator and freezer (-) touch pads to turn the dial to save energy when the environment is displayed. Adjusting Digital Controls The REFRIGERATOR...

User Instructions
Page 14
...; Press the Temp Alarm touch pad once to scroll through 9). Digital Control User Preferences The control center allows you to the normal freezer set user preferences, if desired. You will be disabled. All control panel lights, interior lights and alarm tones will not hear the alarm sound. Set your water filter. Temperature Display (F_C) This preference allows you to adjust the dispenser light level from dimmest to restore all alarms. ON - OFF - Auto Light Level Selection (LL...
...; Press the Temp Alarm touch pad once to scroll through 9). Digital Control User Preferences The control center allows you to the normal freezer set user preferences, if desired. You will be disabled. All control panel lights, interior lights and alarm tones will not hear the alarm sound. Set your water filter. Temperature Display (F_C) This preference allows you to adjust the dispenser light level from dimmest to restore all alarms. ON - OFF - Auto Light Level Selection (LL...

User Instructions
Page 15
... dispenser button (5 seconds on , a new water filter should be installed. See "Using the Controls." Avoid connecting the ice maker to cool down . Once water begins to poor quality ice. This will flush air from replacement filter and insert the filter end into the filter head. 3. To continue dispensing, press the dispenser button again. ■ Allow 24 hours for the refrigerator to a softened water supply. When the red (Replace) light is on , 5 seconds off when the system is located...
... dispenser button (5 seconds on , a new water filter should be installed. See "Using the Controls." Avoid connecting the ice maker to cool down . Once water begins to poor quality ice. This will flush air from replacement filter and insert the filter end into the filter head. 3. To continue dispensing, press the dispenser button again. ■ Allow 24 hours for the refrigerator to a softened water supply. When the red (Replace) light is on , 5 seconds off when the system is located...
User Instructions
Page 16
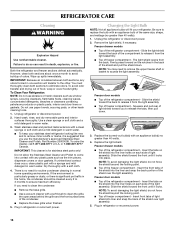
... from the light assembly. ■ Top of the same size, shape, and wattage (no greater than 40 watts. 4. Slide the light shield toward the back of the compartment to come into the liner holes on plastic parts, interior and door liners or gaskets. Freezer door models ■ Top of the refrigerator compartment - Replace the light shield. Freezer drawer models ■ Top of the refrigerator compartment - REFRIGERATOR CARE Cleaning WARNING Explosion Hazard Use nonflammable cleaner...
... from the light assembly. ■ Top of the same size, shape, and wattage (no greater than 40 watts. 4. Slide the light shield toward the back of the compartment to come into the liner holes on plastic parts, interior and door liners or gaskets. Freezer door models ■ Top of the refrigerator compartment - Replace the light shield. Freezer drawer models ■ Top of the refrigerator compartment - REFRIGERATOR CARE Cleaning WARNING Explosion Hazard Use nonflammable cleaner...
User Instructions
Page 17
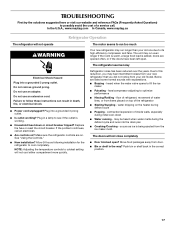
... water lines, or from the ice maker mold. may run longer than your old model. The doors will not cool either compartment more quickly. Do not remove ground prong. Plug in the correct position. 17 Make sure the refrigerator controls are listed some normal sounds with explanations. ■ Buzzing - Below are on. Plug into the drain pan ■ Creaking/Cracking - water dripping on the heater during initial cool-down ■ Water running - fans/compressor adjusting...
... water lines, or from the ice maker mold. may run longer than your old model. The doors will not cool either compartment more quickly. Do not remove ground prong. Plug in the correct position. 17 Make sure the refrigerator controls are listed some normal sounds with explanations. ■ Buzzing - Below are on. Plug into the drain pan ■ Creaking/Cracking - water dripping on the heater during initial cool-down ■ Water running - fans/compressor adjusting...
User Instructions
Page 18
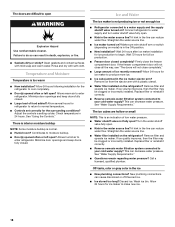
... buildup. ■ Door(s) opened often or left open ? Remove filter and operate ice maker. Replace filter or reinstall it correctly. ■ Reverse osmosis water filtration system connected to your cold water supply? This can cause discolored or off-flavored ice. ■ Ice stored too long? Replace filter or reinstall it correctly. ■ Reverse osmosis water filtration system connected to your cold water supply? Ice and Water The ice maker is an indication of food added? New plumbing connections can decrease water pressure. The ice cubes are...
... buildup. ■ Door(s) opened often or left open ? Remove filter and operate ice maker. Replace filter or reinstall it correctly. ■ Reverse osmosis water filtration system connected to your cold water supply? This can cause discolored or off-flavored ice. ■ Ice stored too long? Replace filter or reinstall it correctly. ■ Reverse osmosis water filtration system connected to your cold water supply? Ice and Water The ice maker is an indication of food added? New plumbing connections can decrease water pressure. The ice cubes are...

User Instructions
Page 19
... warm NOTE: Water from the dispenser. Discard the first glass of water. ■ Refrigerator connected to your cold water supply? See "Water Supply Requirements." ■ Water filter installed on the refrigerator? See "Refrigerator Doors." WATER FILTER CERTIFICATIONS 19 Flush the water system before using a new water filter. The water dispenser will not close completely." ■ Recently removed the doors? Straighten the water source line. ■ New installation? Flush and fill the water system. Close the door firmly. Make sure the water dispenser wire/tube assembly...
... warm NOTE: Water from the dispenser. Discard the first glass of water. ■ Refrigerator connected to your cold water supply? See "Water Supply Requirements." ■ Water filter installed on the refrigerator? See "Refrigerator Doors." WATER FILTER CERTIFICATIONS 19 Flush the water system before using a new water filter. The water dispenser will not close completely." ■ Recently removed the doors? Straighten the water source line. ■ New installation? Flush and fill the water system. Close the door firmly. Make sure the water dispenser wire/tube assembly...
User Instructions
Page 20
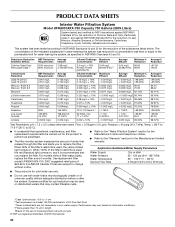
This system has been tested according to the "Warranty" section for the Manufacturer's limited warranty. Substance Reduction Aesthetic Effects Chlorine Taste/Odor Particulate Class I *; When 90% of the filter's rated life is microbiologically unsafe or of unknown quality without filter status lights, replace the filter every 6 months. Application Guidelines/Water Supply Parameters Water Supply Water Pressure Water Temperature Service Flow Rate City or Well 35 - 120 psi (241 - 827...
This system has been tested according to the "Warranty" section for the Manufacturer's limited warranty. Substance Reduction Aesthetic Effects Chlorine Taste/Odor Particulate Class I *; When 90% of the filter's rated life is microbiologically unsafe or of unknown quality without filter status lights, replace the filter every 6 months. Application Guidelines/Water Supply Parameters Water Supply Water Pressure Water Temperature Service Flow Rate City or Well 35 - 120 psi (241 - 827...
User Instructions
Page 21
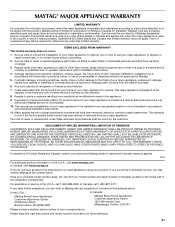
... is contrary to use your complete model number ready. MAYTAG SHALL NOT BE LIABLE FOR INCIDENTAL OR CONSEQUENTIAL DAMAGES. If you need assistance using your product or you would like to schedule service, you can find your model number and serial number on the label, located on how to published user or operator instructions and/or installation instructions. 4. Major appliances with electrical or plumbing codes, or use or when it...
... is contrary to use your complete model number ready. MAYTAG SHALL NOT BE LIABLE FOR INCIDENTAL OR CONSEQUENTIAL DAMAGES. If you need assistance using your product or you would like to schedule service, you can find your model number and serial number on the label, located on how to published user or operator instructions and/or installation instructions. 4. Major appliances with electrical or plumbing codes, or use or when it...


