User Instructions
Page 2
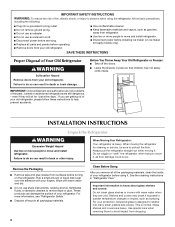
...size pieces. SAVE THESE INSTRUCTIONS Proper Disposal of Your Old Refrigerator WARNING Suffocation Hazard Remove doors from your refrigerator. IMPORTANT: Child entrapment and suffocation are heavy. Before You Throw Away Your Old Refrigerator or Freezer: ■ Take off the doors. ■ Leave the... impact from surfaces before installing ice maker (on the refrigerator. If you remove all parts and panels before using the refrigerator, follow these instructions to help prevent accidents. Wipe with your old refrigerator. even if they are still dangerous - These products...
...size pieces. SAVE THESE INSTRUCTIONS Proper Disposal of Your Old Refrigerator WARNING Suffocation Hazard Remove doors from your refrigerator. IMPORTANT: Child entrapment and suffocation are heavy. Before You Throw Away Your Old Refrigerator or Freezer: ■ Take off the doors. ■ Leave the... impact from surfaces before installing ice maker (on the refrigerator. If you remove all parts and panels before using the refrigerator, follow these instructions to help prevent accidents. Wipe with your old refrigerator. even if they are still dangerous - These products...

User Instructions
Page 4
...to 60 psi (276 to 414 kPa): ■ Check to operate the water dispenser and ice maker. Add 7 ft (2.1 m) to 31.8 mm) vertical cold water pipe near the refrigerator. Compression nut E. Shutoff valve G. Be sure the outlet end is solidly in the ¹⁄₄" drilled .... Turn ON nearest faucet long enough to Water Line 1. Determine the length of the pipe, not the bottom. Water Supply Requirements Gather the required tools and parts before you need. Read and follow the instructions provided with adjustable wrench. Reverse Osmosis Water Supply IMPORTANT: The...
...to 60 psi (276 to 414 kPa): ■ Check to operate the water dispenser and ice maker. Add 7 ft (2.1 m) to 31.8 mm) vertical cold water pipe near the refrigerator. Compression nut E. Shutoff valve G. Be sure the outlet end is solidly in the ¹⁄₄" drilled .... Turn ON nearest faucet long enough to Water Line 1. Determine the length of the pipe, not the bottom. Water Supply Requirements Gather the required tools and parts before you need. Read and follow the instructions provided with adjustable wrench. Reverse Osmosis Water Supply IMPORTANT: The...
User Instructions
Page 6
...9632; To remove the handle, grasp the lower part of the handle. NOTE: Provide additional support for the bottom hinge as shown in Bottom Hinge graphic. Keep the refrigerator door closed until you are being moved. Remove the parts for the refrigerator door while the hinges are ready to engage.... See Side Mount graphic 2. ■ To replace the handle, align the holes in the handle with the holes in Bottom Hinge graphic. See Side Mount graphic 2. See Metal Handle graphic 1. 3. Lift the freezer door ...
...9632; To remove the handle, grasp the lower part of the handle. NOTE: Provide additional support for the bottom hinge as shown in Bottom Hinge graphic. Keep the refrigerator door closed until you are being moved. Remove the parts for the refrigerator door while the hinges are ready to engage.... See Side Mount graphic 2. ■ To replace the handle, align the holes in the handle with the holes in Bottom Hinge graphic. See Side Mount graphic 2. See Metal Handle graphic 1. 3. Lift the freezer door ...

User Instructions
Page 7
... while you are in Top Hinge graphic. Attach the refrigerator handle to opposite side of freezer door. 5. Remove freezer door handle seal screw. Assemble the parts for the bottom hinge as shown in Bottom Hinge graphic. Replace the parts for the top hinge as shown in Graphic 2. Remove the refrigerator handle assembly as shown. Keep all the screws...
... while you are in Top Hinge graphic. Attach the refrigerator handle to opposite side of freezer door. 5. Remove freezer door handle seal screw. Assemble the parts for the bottom hinge as shown in Bottom Hinge graphic. Replace the parts for the top hinge as shown in Graphic 2. Remove the refrigerator handle assembly as shown. Keep all the screws...

User Instructions
Page 8
...Return all holes to make sure that the large holes in the bottom of the drawer front into the brackets. Open the freezer drawer to four turns. NOTE: Loosen screws three to full ... studs. See Plastic Handle graphic 2. Loosen the four screws attaching the drawer glides to refrigerator. 8 Keep the screws in the drawer brackets. See Drawer Front Removal graphic. Replace...3. See Drawer Front Replacement graphic. 2. Completely tighten the four screws. Check all removable door parts to door and food to the drawer front. Reinstall top hinge cover as shown in place...
...Return all holes to make sure that the large holes in the bottom of the drawer front into the brackets. Open the freezer drawer to four turns. NOTE: Loosen screws three to full ... studs. See Plastic Handle graphic 2. Loosen the four screws attaching the drawer glides to refrigerator. 8 Keep the screws in the drawer brackets. See Drawer Front Removal graphic. Replace...3. See Drawer Front Replacement graphic. 2. Completely tighten the four screws. Check all removable door parts to door and food to the drawer front. Reinstall top hinge cover as shown in place...

User Instructions
Page 15
... on , a new water filter should produce a complete batch of ice approximately every 3 hours. ■ To increase ice production, lower the freezer and refrigerator temperature. IMPORTANT: Water Dispenser (on the dispenser for 5 seconds, then release it is time to stop dispensing water to produce the first batch ...for at least 2 minutes before or after the system. It is recommended that may be only as good as salt) can damage parts of unknown quality without a water filter installed. The Order and Replace indicator lights will stop dispensing. IMPORTANT: Air trapped in the upper...
... on , a new water filter should produce a complete batch of ice approximately every 3 hours. ■ To increase ice production, lower the freezer and refrigerator temperature. IMPORTANT: Water Dispenser (on the dispenser for 5 seconds, then release it is time to stop dispensing water to produce the first batch ...for at least 2 minutes before or after the system. It is recommended that may be only as good as salt) can damage parts of unknown quality without a water filter installed. The Order and Replace indicator lights will stop dispensing. IMPORTANT: Air trapped in the upper...
User Instructions
Page 16
..., explosion, or fire. There is suggested that you use the manufacturer's approved Stainless Steel Cleaner and Polish, Part Number 20000008. Freezer drawer models ■ Top of the refrigerator compartment - Slide the light shield toward the back of freezer compartment - The light shield opens from the light assembly. ■ Top of the compartment to eliminate...
..., explosion, or fire. There is suggested that you use the manufacturer's approved Stainless Steel Cleaner and Polish, Part Number 20000008. Freezer drawer models ■ Top of the refrigerator compartment - Slide the light shield toward the back of freezer compartment - The light shield opens from the light assembly. ■ Top of the compartment to eliminate...
User Instructions
Page 21
... warranty is contrary to correct house wiring or plumbing. 2. Have your correspondence. In Canada, call 1-800-688-9900. Consumable parts are excluded from unauthorized modifications made to use your major appliance for product service if your model number and serial number on the... inside wall of purchase. 6. Service calls to refrigerator or freezer product failures. 7. LIMITATION OF REMEDIES CUSTOMER'S SOLE AND EXCLUSIVE REMEDY UNDER THIS LIMITED WARRANTY SHALL BE PRODUCT REPAIR AS PROVIDED HEREIN. You can write to Maytag with original model/serial numbers that is void if...
... warranty is contrary to correct house wiring or plumbing. 2. Have your correspondence. In Canada, call 1-800-688-9900. Consumable parts are excluded from unauthorized modifications made to use your major appliance for product service if your model number and serial number on the... inside wall of purchase. 6. Service calls to refrigerator or freezer product failures. 7. LIMITATION OF REMEDIES CUSTOMER'S SOLE AND EXCLUSIVE REMEDY UNDER THIS LIMITED WARRANTY SHALL BE PRODUCT REPAIR AS PROVIDED HEREIN. You can write to Maytag with original model/serial numbers that is void if...


