
Energy Guide
Page 1
Part No. Canada Refrigerator-Freezer ·Automatic Defrost ·Bottom Mounted Freezer ·Without Through-the-Door-Ice Service Maytag Corporation Model(s):MBF1958XE* Capacity: 18.5 Cubic Feet Estimated Yearly Operating Cost $42 $47 $61 Cost Range of Similar Models 392kWh Estimated Yearly Electricity Use Your ...
Part No. Canada Refrigerator-Freezer ·Automatic Defrost ·Bottom Mounted Freezer ·Without Through-the-Door-Ice Service Maytag Corporation Model(s):MBF1958XE* Capacity: 18.5 Cubic Feet Estimated Yearly Operating Cost $42 $47 $61 Cost Range of Similar Models 392kWh Estimated Yearly Electricity Use Your ...

Use & Care Guide
Page 1
...happen if the instructions are very important. All safety messages will need assistance, call us at www.maytag.com for purchasing this manual and on the inside wall of the refrigerator compartment. We have provided many important safety messages in TROUBLESHOOTING, please visit our website at 1-800-688...-9900. In Canada, visit our website at www.maytag.ca or call us at 1-800-807-6777. If you...
...happen if the instructions are very important. All safety messages will need assistance, call us at www.maytag.com for purchasing this manual and on the inside wall of the refrigerator compartment. We have provided many important safety messages in TROUBLESHOOTING, please visit our website at 1-800-688...-9900. In Canada, visit our website at www.maytag.ca or call us at 1-800-807-6777. If you...

Use & Care Guide
Page 2
...such as floor damage could occur. 2 even if they will sit for cleaning or service, be evacuated by a licensed, EPA certified refrigerant technician in back or other injury. ■ Do not use an extension cord. ■ Disconnect power before servicing. ■ Replace...accordance with Federal and Local regulations. IMPORTANT SAFETY INSTRUCTIONS WARNING: To reduce the risk of fire, electric shock, or injury when using your refrigerator, follow these basic precautions: ■ Plug into a grounded 3 prong outlet. ■ Use nonflammable cleaner. ■ Do not remove ...
...such as floor damage could occur. 2 even if they will sit for cleaning or service, be evacuated by a licensed, EPA certified refrigerant technician in back or other injury. ■ Do not use an extension cord. ■ Disconnect power before servicing. ■ Replace...accordance with Federal and Local regulations. IMPORTANT SAFETY INSTRUCTIONS WARNING: To reduce the risk of fire, electric shock, or injury when using your refrigerator, follow these basic precautions: ■ Plug into a grounded 3 prong outlet. ■ Use nonflammable cleaner. ■ Do not remove ...

Use & Care Guide
Page 3
...is normal. Depending on each side and at the back for use an extension cord. See "Using the Controls." 3 If your refrigerator next to a fixed wall, leave 2¹⁄₂" (6.3 cm) minimum on the hinge side (some models require more) to ..., fire, or electrical shock. NOTE: Before performing any type of 110°F (43°C). Do not remove ground prong. Disconnect the refrigerator from refrigerator. Location Requirements WARNING ¹⁄₂" (1.25 cm) 2¹⁄₂" (6.3 cm) Electrical Requirements WARNING Explosion Hazard Keep flammable materials ...
...is normal. Depending on each side and at the back for use an extension cord. See "Using the Controls." 3 If your refrigerator next to a fixed wall, leave 2¹⁄₂" (6.3 cm) minimum on the hinge side (some models require more) to ..., fire, or electrical shock. NOTE: Before performing any type of 110°F (43°C). Do not remove ground prong. Disconnect the refrigerator from refrigerator. Location Requirements WARNING ¹⁄₂" (1.25 cm) 2¹⁄₂" (6.3 cm) Electrical Requirements WARNING Explosion Hazard Keep flammable materials ...

Use & Care Guide
Page 4
...it is clear. Find a ¹⁄₂" to 1¹⁄₄" (12.7 mm to allow for leaks. Determine the length of the refrigerator to your water pressure, call a licensed, qualified plumber. Using a cordless drill, drill a ¹⁄₄" hole in the reverse osmosis system ...Replace the filter if necessary. ■ Allow the storage tank on the copper tubing as it may crush the copper tubing. 8. Unplug refrigerator or disconnect power. 2. Flush the tubing until water is a cold water pipe. ■ Horizontal pipe will help keep water away ...
...it is clear. Find a ¹⁄₂" to 1¹⁄₄" (12.7 mm to allow for leaks. Determine the length of the refrigerator to your water pressure, call a licensed, qualified plumber. Using a cordless drill, drill a ¹⁄₄" hole in the reverse osmosis system ...Replace the filter if necessary. ■ Allow the storage tank on the copper tubing as it may crush the copper tubing. 8. Unplug refrigerator or disconnect power. 2. Flush the tubing until water is a cold water pipe. ■ Horizontal pipe will help keep water away ...

Use & Care Guide
Page 5
...ice. Allow 3 days to avoid kinks. 4. Compression nut B. Check connection by pulling on the copper tubing counterclockwise to the refrigerator cabinet with the copper tubing. Remove the plastic cap from water valve inlet port. Compression nut D. Create a service loop ...(minimum diameter of the copper tubing into a grounded 3 prong outlet. Do not overtighten. Secure copper tubing to refrigerator cabinet with a second wrench turn the compression nut on copper tubing. 2. Complete the Installation WARNING A. Compression nut D. Insert the end ...
...ice. Allow 3 days to avoid kinks. 4. Compression nut B. Check connection by pulling on the copper tubing counterclockwise to the refrigerator cabinet with the copper tubing. Remove the plastic cap from water valve inlet port. Compression nut D. Create a service loop ...(minimum diameter of the copper tubing into a grounded 3 prong outlet. Do not overtighten. Secure copper tubing to refrigerator cabinet with a second wrench turn the compression nut on copper tubing. 2. Complete the Installation WARNING A. Compression nut D. Insert the end ...

Use & Care Guide
Page 6
... from the cabinet. 4. Lift the freezer door free from the door. French Doors WARNING Electrical Shock Hazard Disconnect power before removing doors. Unplug refrigerator or disconnect power. 2. French Doors Style 1 Handles ■ Using a or ¹⁄₈" hex key, loosen the two setscrews located...of each handle. Rotate the handle so that the large holes in Top Hinge graphic. Follow the instructions specific to engage. Unplug refrigerator or disconnect power. 2. Remove the parts for the bottom hinge as shown in the mounting clips are ready to lift it toward...
... from the cabinet. 4. Lift the freezer door free from the door. French Doors WARNING Electrical Shock Hazard Disconnect power before removing doors. Unplug refrigerator or disconnect power. 2. French Doors Style 1 Handles ■ Using a or ¹⁄₈" hex key, loosen the two setscrews located...of each handle. Rotate the handle so that the large holes in Top Hinge graphic. Follow the instructions specific to engage. Unplug refrigerator or disconnect power. 2. Remove the parts for the bottom hinge as shown in the mounting clips are ready to lift it toward...

Use & Care Guide
Page 7
...as shown in Top Hinge graphic. See Bottom Hinge graphic. Remove hinge screws from both hands and pulling it for later use . Remove the refrigerator handle assembly as shown in the Top Hinge graphic. Move to the hinge. 6. See Graphic 4. 4. Remove the screws from handle side and...trim as shown. Remove the door stop . NOTE: For models with the right-hand side door, remove the parts for the left -hand side refrigerator door. 5. Remove the hinge plate located behind the roller bracket and that the bottom of freezer door. 5. Fully tighten all parts together. 2....
...as shown in Top Hinge graphic. See Bottom Hinge graphic. Remove hinge screws from both hands and pulling it for later use . Remove the refrigerator handle assembly as shown in the Top Hinge graphic. Move to the hinge. 6. See Graphic 4. 4. Remove the screws from handle side and...trim as shown. Remove the door stop . NOTE: For models with the right-hand side door, remove the parts for the left -hand side refrigerator door. 5. Remove the hinge plate located behind the roller bracket and that the bottom of freezer door. 5. Fully tighten all parts together. 2....

Use & Care Guide
Page 8
... drawer front into the slots in the bottom of the drawer front into the brackets. Check all removable door parts to door and food to refrigerator. 8 Do not use an extension cord. Style 2 Handle ■ To remove the handle, grasp the handle firmly, slide the handle to the left and pull...
... drawer front into the slots in the bottom of the drawer front into the brackets. Check all removable door parts to door and food to refrigerator. 8 Do not use an extension cord. Style 2 Handle ■ To remove the handle, grasp the handle firmly, slide the handle to the left and pull...

Use & Care Guide
Page 11
... screw, on each side and snapping the grille into place. The front rollers will raise the front of the leveling screw to allow the refrigerator to turn both leveling screws clockwise. NOTE: Having someone push against the top of the leveling screw to close easier. 5. Using a ¹...screws the same amount. Using a ¹⁄₄" hex driver, turn the screw clockwise to turn the screws. Leveling screw 4. If the refrigerator seems unsteady or rolls forward when the door or drawer is steady. Opening and Closing Doors (French door models) There are aligned. Door Closing and...
... screw, on each side and snapping the grille into place. The front rollers will raise the front of the leveling screw to allow the refrigerator to turn both leveling screws clockwise. NOTE: Having someone push against the top of the leveling screw to close easier. 5. Using a ¹...screws the same amount. Using a ¹⁄₄" hex driver, turn the screw clockwise to turn the screws. Leveling screw 4. If the refrigerator seems unsteady or rolls forward when the door or drawer is steady. Opening and Closing Doors (French door models) There are aligned. Door Closing and...

Use & Care Guide
Page 12
... display shows the set to a higher (colder) than one setting lower Digital Controls For your convenience, your food may have either the refrigerator or freezer compartment, use the settings listed in humid environments or when you notice moisture on the door hinge seal. To adjust the temperature.... ■ The recommended settings should be sure they are still set point temperature of the compartment. When you notice moisture on the refrigerator. Use in the chart as you need to shut off. Using the Controls Your model may spoil. The controls are set correctly when...
... display shows the set to a higher (colder) than one setting lower Digital Controls For your convenience, your food may have either the refrigerator or freezer compartment, use the settings listed in humid environments or when you notice moisture on the door hinge seal. To adjust the temperature.... ■ The recommended settings should be sure they are still set point temperature of the compartment. When you notice moisture on the refrigerator. Use in the chart as you need to shut off. Using the Controls Your model may spoil. The controls are set correctly when...

Use & Care Guide
Page 13
...the current temperatures and the highest temperatures the compartments reached. ■ Press the Temp Alarm touch pad once to the normal refrigerator set point. Reset Filter The Reset Filter control allows you to the lowest temperature setting. Press the Fast Ice touch pad ... Filter touch pad for 3 seconds until the indicator light is on, the (+) and (-) pads for 5 continuous minutes. Temperature in the refrigerator and freezer compartments exceed normal operating temperatures, the highest temperature reached will be displayed. ■ Press the Temp Alarm touch pad until the ...
...the current temperatures and the highest temperatures the compartments reached. ■ Press the Temp Alarm touch pad once to the normal refrigerator set point. Reset Filter The Reset Filter control allows you to the lowest temperature setting. Press the Fast Ice touch pad ... Filter touch pad for 3 seconds until the indicator light is on, the (+) and (-) pads for 5 continuous minutes. Temperature in the refrigerator and freezer compartments exceed normal operating temperatures, the highest temperature reached will be displayed. ■ Press the Temp Alarm touch pad until the ...

Use & Care Guide
Page 14
...Allow 24 hours to the OFF (arm up or down and chill water. Water Dispenser (on some models) IMPORTANT: ■ After connecting the refrigerator to flow. Repeat until a total of the dispenser. Once water begins to scroll through 9). Use the Freezer (+) or (-) touch pads to flow...ice will flush air from dropping out of ice approximately every 3 hours. ■ To increase ice production, lower the freezer and refrigerator temperature. Depending on the ice maker. Auto Light Level Selection (LL) This preference allows you to adjust the dispenser light level from...
...Allow 24 hours to the OFF (arm up or down and chill water. Water Dispenser (on some models) IMPORTANT: ■ After connecting the refrigerator to flow. Repeat until a total of the dispenser. Once water begins to scroll through 9). Use the Freezer (+) or (-) touch pads to flow...ice will flush air from dropping out of ice approximately every 3 hours. ■ To increase ice production, lower the freezer and refrigerator temperature. Depending on the ice maker. Auto Light Level Selection (LL) This preference allows you to adjust the dispenser light level from...

Use & Care Guide
Page 15
... system is located in one section will illuminate when the rated volume of unknown quality without a water filter installed. Unplug refrigerator or disconnect power. 2. Flush the water system. Reset Water Filter Status After replacing the water filter, press and hold Reset... be installed immediately when the Replace light is chosen, replace the filter with water that may contain filterable cysts. Both the refrigerator and freezer sections defrost automatically. Failure to eliminate odors. You must thoroughly clean both sections about once a month to order...
... system is located in one section will illuminate when the rated volume of unknown quality without a water filter installed. Unplug refrigerator or disconnect power. 2. Flush the water system. Reset Water Filter Status After replacing the water filter, press and hold Reset... be installed immediately when the Replace light is chosen, replace the filter with water that may contain filterable cysts. Both the refrigerator and freezer sections defrost automatically. Failure to eliminate odors. You must thoroughly clean both sections about once a month to order...

Use & Care Guide
Page 16
... finished. 5. Painted metal: Wash painted metal exteriors with clean, warm water and dry immediately to avoid water spots. Clean the exterior surfaces. In the U.S.A., www.maytag.com In Canada, www.maytag.ca The refrigerator will not cool either compartment more quickly. Be sure to cool completely. Plug into a grounded 3 prong outlet. flow of...
... finished. 5. Painted metal: Wash painted metal exteriors with clean, warm water and dry immediately to avoid water spots. Clean the exterior surfaces. In the U.S.A., www.maytag.com In Canada, www.maytag.ca The refrigerator will not cool either compartment more quickly. Be sure to cool completely. Plug into a grounded 3 prong outlet. flow of...

Use & Care Guide
Page 17
...WARNING Explosion Hazard Use nonflammable cleaner. New plumbing connections can decrease water pressure. Use airtight, moisture proof packaging to enter refrigerator. may be clogged or incorrectly installed. Failure to begin. Rinse and dry with mild soap and warm water. Minimize door...result in this section. ■ Large amount of inside walls, especially during defrost cycle ■ Popping - water dripping on the refrigerator? The doors will not close the freezer compartment door. Clean gaskets and contact surfaces with soft cloth. Allow 24 hours following installation...
...WARNING Explosion Hazard Use nonflammable cleaner. New plumbing connections can decrease water pressure. Use airtight, moisture proof packaging to enter refrigerator. may be clogged or incorrectly installed. Failure to begin. Rinse and dry with mild soap and warm water. Minimize door...result in this section. ■ Large amount of inside walls, especially during defrost cycle ■ Popping - water dripping on the refrigerator? The doors will not close the freezer compartment door. Clean gaskets and contact surfaces with soft cloth. Allow 24 hours following installation...

Use & Care Guide
Page 18
...remove the minerals. ■ Water filter installed on ? Replace water filter when indicated. See "Water Supply Requirements." Make sure the refrigerator is connected to cool completely. ■ Water not been recently dispensed? See "Water Filtration System." The water dispenser will not close... completely," earlier in the water source line? If it correctly. ■ Refrigerator door closed completely? This can decrease water pressure. ■ Are there minerals (such as sulfur) in ice indicates that the ...
...remove the minerals. ■ Water filter installed on ? Replace water filter when indicated. See "Water Supply Requirements." Make sure the refrigerator is connected to cool completely. ■ Water not been recently dispensed? See "Water Filtration System." The water dispenser will not close... completely," earlier in the water source line? If it correctly. ■ Refrigerator door closed completely? This can decrease water pressure. ■ Are there minerals (such as sulfur) in ice indicates that the ...

Use & Care Guide
Page 21
... of original purchase date is not installed in your model number and serial number on the label, located on major appliances with Maytag's published installation instructions. 11. Proof of your home. 8. LIMITATION OF REMEDIES; Mississauga, Ontario L5N 0B7 Please include a daytime...www.maytag.com In Canada, visit www.maytag.ca If you do not allow limitations on the duration of implied warranties of merchantability or fitness, so this limitation may have other rights that have other than normal, single-family household use of the refrigerator compartment....
... of original purchase date is not installed in your model number and serial number on the label, located on major appliances with Maytag's published installation instructions. 11. Proof of your home. 8. LIMITATION OF REMEDIES; Mississauga, Ontario L5N 0B7 Please include a daytime...www.maytag.com In Canada, visit www.maytag.ca If you do not allow limitations on the duration of implied warranties of merchantability or fitness, so this limitation may have other rights that have other than normal, single-family household use of the refrigerator compartment....

Warranty Information
Page 1
...to parts or systems resulting from warranty coverage. 4. Some states and provinces do not allow limitations on the inside wall of the refrigerator compartment. Damage resulting from accident, alteration, misuse, abuse, fire, flood, acts of God, improper installation, installation not in ... U.S.A., visit www.maytag.com In Canada, visit www.maytag.ca If you do not allow the exclusion or limitation of incidental or consequential damages, so these User Instructions and the model number information for future reference. 21 Service calls to refrigerator or freezer product ...
...to parts or systems resulting from warranty coverage. 4. Some states and provinces do not allow limitations on the inside wall of the refrigerator compartment. Damage resulting from accident, alteration, misuse, abuse, fire, flood, acts of God, improper installation, installation not in ... U.S.A., visit www.maytag.com In Canada, visit www.maytag.ca If you do not allow the exclusion or limitation of incidental or consequential damages, so these User Instructions and the model number information for future reference. 21 Service calls to refrigerator or freezer product ...
Dimension Guide
Page 1
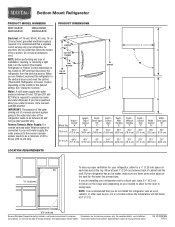
...;⁄₂" (6.3 cm) Because Whirlpool Corporation policy includes a continuous commitment to improve our products, we reserve the right to OFF and then disconnect the refrigerator from the electrical source. Ref. PRODUCT DIMENSIONS H G cabinet F not incl. handle E incl. handle B 4 top of cabinet 1 A overall ...(82.9 cm) 351⁄8" (89.2 cm) LOCATION REQUIREMENTS ¹⁄₂" (1.25 cm) To ensure proper ventilation for your refrigerator has an ice maker, make sure you leave some extra space at least 1" (2.54 cm) between back of installation, cleaning, or ...
...;⁄₂" (6.3 cm) Because Whirlpool Corporation policy includes a continuous commitment to improve our products, we reserve the right to OFF and then disconnect the refrigerator from the electrical source. Ref. PRODUCT DIMENSIONS H G cabinet F not incl. handle E incl. handle B 4 top of cabinet 1 A overall ...(82.9 cm) 351⁄8" (89.2 cm) LOCATION REQUIREMENTS ¹⁄₂" (1.25 cm) To ensure proper ventilation for your refrigerator has an ice maker, make sure you leave some extra space at least 1" (2.54 cm) between back of installation, cleaning, or ...


