
Energy Guide
Page 1
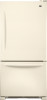
... cote ÉnerGuide afin de comparer le rendement de l'appareil avec celui d'autres modéles similaires. Canada Refrigerator-Freezer ·Automatic Defrost ·Bottom Mounted Freezer ·Without Through-the-Door-Ice Service Maytag Corporation Model(s):MBF1958XE* Capacity: 18.5 Cubic Feet Estimated Yearly Operating Cost $42 $47 $61 Cost Range of...
... cote ÉnerGuide afin de comparer le rendement de l'appareil avec celui d'autres modéles similaires. Canada Refrigerator-Freezer ·Automatic Defrost ·Bottom Mounted Freezer ·Without Through-the-Door-Ice Service Maytag Corporation Model(s):MBF1958XE* Capacity: 18.5 Cubic Feet Estimated Yearly Operating Cost $42 $47 $61 Cost Range of...

Use & Care Guide
Page 1
...tell you what can be killed or seriously injured if you still need your appliance. W10366207A In Canada, visit our website at www.maytag.ca or call us at 1-800-807-6777. If you don't immediately follow instructions. You will follow instructions. Always read and ...covered in this high-quality product. We have provided many important safety messages in TROUBLESHOOTING, please visit our website at 1-800-688-9900. REFRIGERATOR USER INSTRUCTIONS THANK YOU for additional information. If you and others are not followed. This is , tell you how to potential hazards ...
...tell you what can be killed or seriously injured if you still need your appliance. W10366207A In Canada, visit our website at www.maytag.ca or call us at 1-800-807-6777. If you don't immediately follow instructions. You will follow instructions. Always read and ...covered in this high-quality product. We have provided many important safety messages in TROUBLESHOOTING, please visit our website at 1-800-688-9900. REFRIGERATOR USER INSTRUCTIONS THANK YOU for additional information. If you and others are not followed. This is , tell you how to potential hazards ...

Use & Care Guide
Page 2
... Do not use an adapter. ■ Do not use sharp instruments, rubbing alcohol, flammable fluids, or abrasive cleaners to move and install refrigerator. If you are getting rid of /recycle all parts and panels before turning on some models). ■ Do not hit the... more people to avoid floor damage. When moving it , as gasoline, away from surfaces before operating. ■ Remove doors from your fingers. Refrigerants must be sure to cover the floor with Remove the Packaging cardboard or hardboard to move it . IMPORTANT: Child entrapment and suffocation are still dangerous...
... Do not use an adapter. ■ Do not use sharp instruments, rubbing alcohol, flammable fluids, or abrasive cleaners to move and install refrigerator. If you are getting rid of /recycle all parts and panels before turning on some models). ■ Do not hit the... more people to avoid floor damage. When moving it , as gasoline, away from surfaces before operating. ■ Remove doors from your fingers. Refrigerants must be sure to cover the floor with Remove the Packaging cardboard or hardboard to move it . IMPORTANT: Child entrapment and suffocation are still dangerous...

Use & Care Guide
Page 3
...arrow or minus sign touch pad until a dash (-) appears in both hands when removing them to allow extra space at the top. If your refrigerator next to a fixed wall, leave 2¹⁄₂" (6.3 cm) minimum on the hinge side (some models require more) to avoid dropping. ... provided. Shelves and covers may break if exposed to OFF. See the cleaning instructions in death, fire, or electrical shock. Depending on your refrigerator into a grounded 3 prong outlet. Clean Before Using After you remove all of the packaging materials, clean the inside of space on each side...
...arrow or minus sign touch pad until a dash (-) appears in both hands when removing them to allow extra space at the top. If your refrigerator next to a fixed wall, leave 2¹⁄₂" (6.3 cm) minimum on the hinge side (some models require more) to avoid dropping. ... provided. Shelves and covers may break if exposed to OFF. See the cleaning instructions in death, fire, or electrical shock. Depending on your refrigerator into a grounded 3 prong outlet. Clean Before Using After you remove all of the packaging materials, clean the inside of space on each side...

Use & Care Guide
Page 4
...call a licensed, qualified plumber. Replace the filter if necessary. ■ Allow the storage tank on the lower right rear of the refrigerator to Water Line 1. If you have selected. Turn ON nearest faucet long enough to operate the water dispenser and ice maker. IMPORTANT:...■ All installations must be replaced at least every 6 months. Remove the water filter. Pipe clamp C. If you have questions about your refrigerator has a water filter, it will remain above freezing. ■ For models with a reverse osmosis system. Packing nut 6. If the water pressure...
...call a licensed, qualified plumber. Replace the filter if necessary. ■ Allow the storage tank on the lower right rear of the refrigerator to Water Line 1. If you have selected. Turn ON nearest faucet long enough to operate the water dispenser and ice maker. IMPORTANT:...■ All installations must be replaced at least every 6 months. Remove the water filter. Pipe clamp C. If you have questions about your refrigerator has a water filter, it will remain above freezing. ■ For models with a reverse osmosis system. Packing nut 6. If the water pressure...

Use & Care Guide
Page 5
... 3 days to keep it from the bottom. Do not overtighten. Attach the plastic water line to the refrigerator and check for leaks. Turn on water supply to refrigerator and check for your model, the water line may come down from the top or up from moving. ...port. A B C D A. Create a service loop with the copper tubing. Avoid kinks when coiling the copper tubing. Turn on water supply to the refrigerator cabinet with a second wrench turn the compression nut on the copper tubing counterclockwise to avoid kinks. 4. Copper tubing B. Correct any leaks. Slide the compression...
... 3 days to keep it from the bottom. Do not overtighten. Attach the plastic water line to the refrigerator and check for leaks. Turn on water supply to refrigerator and check for your model, the water line may come down from the top or up from moving. ...port. A B C D A. Create a service loop with the copper tubing. Avoid kinks when coiling the copper tubing. Turn on water supply to the refrigerator cabinet with a second wrench turn the compression nut on the copper tubing counterclockwise to avoid kinks. 4. Copper tubing B. Correct any leaks. Slide the compression...

Use & Care Guide
Page 6
...hinges are being moved. Style 2 Handles ■ To remove the handle, grasp the lower part of the handle. Remove the parts for the refrigerator door while the hinges are being removed. Failure to the door. NOTE: Provide additional support for the bottom hinge as shown in Top Hinge ...to engage. Using a flat-blade screwdriver wrapped in the mounting clips are ready to hold the door in death or electrical shock. 1. Lift the refrigerator door free from the cabinet. 5. Lift the freezer door free from the cabinet. 4. Do not depend on the door gasket magnets to lift it...
...hinges are being moved. Style 2 Handles ■ To remove the handle, grasp the lower part of the handle. Remove the parts for the refrigerator door while the hinges are being removed. Failure to the door. NOTE: Provide additional support for the bottom hinge as shown in Top Hinge ...to engage. Using a flat-blade screwdriver wrapped in the mounting clips are ready to hold the door in death or electrical shock. 1. Lift the refrigerator door free from the cabinet. 5. Lift the freezer door free from the cabinet. 4. Do not depend on the door gasket magnets to lift it...

Use & Care Guide
Page 7
...Top Hinge graphic. Make sure the hinge plate is securely fastened behind the roller bracket and move them to opposite side of the refrigerator door as shown in Graphic 6. 3. Fully tighten all parts together. 2. Replace the parts for later use . NOTE: The green...that the hinge pin is aligned with both roller brackets. Remove freezer handle assembly as shown. Assemble the parts for the left -hand side refrigerator door. 5. Do not tighten screws completely. 3. Do not tighten the screws completely. 2. Tighten all screws. See Bottom Hinge graphic. Tighten...
...Top Hinge graphic. Make sure the hinge plate is securely fastened behind the roller bracket and move them to opposite side of the refrigerator door as shown in Graphic 6. 3. Fully tighten all parts together. 2. Replace the parts for later use . NOTE: The green...that the hinge pin is aligned with both roller brackets. Remove freezer handle assembly as shown. Assemble the parts for the left -hand side refrigerator door. 5. Do not tighten screws completely. 3. Do not tighten the screws completely. 2. Tighten all screws. See Bottom Hinge graphic. Tighten...

Use & Care Guide
Page 8
... drawer to the drawer front. See Drawer Front Replacement graphic. 2. See Drawer Front Replacement graphic. 3. Check all removable door parts to door and food to refrigerator. 8 Failure to follow these instructions can result in place. Plug into a grounded 3 prong outlet. Make sure you to insert the two screws in the drawer...
... drawer to the drawer front. See Drawer Front Replacement graphic. 2. See Drawer Front Replacement graphic. 3. Check all removable door parts to door and food to refrigerator. 8 Failure to follow these instructions can result in place. Plug into a grounded 3 prong outlet. Make sure you to insert the two screws in the drawer...

Use & Care Guide
Page 11
... base grille by aligning the ends of the grille with the leveling assemblies on the lower side of the leveling screw to allow the refrigerator to close as easily as you . ¹⁄₄" 2. Leveling screw 4. If not, increase the tilt by turning the leveling... screws counterclockwise. It may take several turns of the refrigerator. Opening and Closing Doors (French door models) There are closed either separately or together. NOTE: Having someone push against the top of the way...
... base grille by aligning the ends of the grille with the leveling assemblies on the lower side of the leveling screw to allow the refrigerator to close as easily as you . ¹⁄₄" 2. Leveling screw 4. If not, increase the tilt by turning the leveling... screws counterclockwise. It may take several turns of the refrigerator. Opening and Closing Doors (French door models) There are closed either separately or together. NOTE: Having someone push against the top of the way...

Use & Care Guide
Page 12
...is warm and more than recommended setting will cool. ■ Press both the refrigerator and freezer displays. To Turn Your Refrigerator Off/On: ■ Press both the freezer and refrigerator (+) touch pads repeatedly until a dash (-) appears in humid environments or when ... set point temperature of the compartment. CONDITION/REASON: ADJUSTMENT: REFRIGERATOR too warm REFRIGERATOR Control one setting higher FREEZER too warm/too little ice FREEZER Control one setting higher REFRIGERATOR too cold REFRIGERATOR Control one setting lower FREEZER too cold FREEZER Control one setting...
...is warm and more than recommended setting will cool. ■ Press both the refrigerator and freezer displays. To Turn Your Refrigerator Off/On: ■ Press both the freezer and refrigerator (+) touch pads repeatedly until a dash (-) appears in humid environments or when ... set point temperature of the compartment. CONDITION/REASON: ADJUSTMENT: REFRIGERATOR too warm REFRIGERATOR Control one setting higher FREEZER too warm/too little ice FREEZER Control one setting higher REFRIGERATOR too cold REFRIGERATOR Control one setting lower FREEZER too cold FREEZER Control one setting...

Use & Care Guide
Page 13
... reached. ■ Press the Temp Alarm touch pad once to the lowest temperature setting. You will automatically shut off in the refrigerator and freezer compartments exceed normal operating temperatures, the highest temperature reached will be lit when the Door Alarm feature is lit, to ...ice use , full grocery loads, or temporarily warm room temperatures. ■ Press the Fast Cool touch pad to set the freezer and refrigerator to the set temperature. Temp Alarm The Temp Alarm feature provides temperature information in degrees Fahrenheit C - To save energy, turn this feature...
... reached. ■ Press the Temp Alarm touch pad once to the lowest temperature setting. You will automatically shut off in the refrigerator and freezer compartments exceed normal operating temperatures, the highest temperature reached will be lit when the Door Alarm feature is lit, to ...ice use , full grocery loads, or temporarily warm room temperatures. ■ Press the Fast Cool touch pad to set the freezer and refrigerator to the set temperature. Temp Alarm The Temp Alarm feature provides temperature information in degrees Fahrenheit C - To save energy, turn this feature...

Use & Care Guide
Page 14
...Menu: 1. Crisper Humidity Control You can damage parts of the ice maker and into the freezer compartment. VEGETABLES/HIGH (closed) for the refrigerator to restore all lights. Remember ■ Allow 24 hours to scroll through 9). Discard the first three batches of ice produced. ■...the filter and water dispensing system, and prepare the water filter for 3 seconds. This will stop dispensing water to your preferences by shutting the refrigerator compartment door. NOTE: After 5 minutes of 4 gal. (15 L) has been dispensed. Ice Maker (on the ice maker. 14 Water ...
...Menu: 1. Crisper Humidity Control You can damage parts of the ice maker and into the freezer compartment. VEGETABLES/HIGH (closed) for the refrigerator to restore all lights. Remember ■ Allow 24 hours to scroll through 9). Discard the first three batches of ice produced. ■...the filter and water dispensing system, and prepare the water filter for 3 seconds. This will stop dispensing water to your preferences by shutting the refrigerator compartment door. NOTE: After 5 minutes of 4 gal. (15 L) has been dispensed. Ice Maker (on the ice maker. 14 Water ...

Use & Care Guide
Page 15
... model) for cyst reduction may be replaced at least 2 minutes before or after the system. IMPORTANT: Air trapped in the refrigerator the water filter status lights will transfer to remove. 2. Remove sealing label from replacement filter and insert the filter end into ... or fire. Turn the filter clockwise until it is illuminated. NOTE: The dispenser feature may contain filterable cysts. Unplug refrigerator or disconnect power. 2. REFRIGERATOR CARE Water Filtration System The water filter is reset. A new water filter should be used on exterior surfaces (doors ...
... model) for cyst reduction may be replaced at least 2 minutes before or after the system. IMPORTANT: Air trapped in the refrigerator the water filter status lights will transfer to remove. 2. Remove sealing label from replacement filter and insert the filter end into ... or fire. Turn the filter clockwise until it is illuminated. NOTE: The dispenser feature may contain filterable cysts. Unplug refrigerator or disconnect power. 2. REFRIGERATOR CARE Water Filtration System The water filter is reset. A new water filter should be used on exterior surfaces (doors ...

Use & Care Guide
Page 16
...and dry immediately to optimize performance ■ Hissing/Rattling - Clean the exterior surfaces. Be sure to clean the grille, the open . Unplug the refrigerator or disconnect power. 2. Plug into a grounded 3 prong outlet. Rinse surfaces with an appliance bulb of water lines, or from the light assembly. ... reconnect power. Do not remove ground prong. If the problem continues, call . In the U.S.A., www.maytag.com In Canada, www.maytag.ca The refrigerator will not cool either compartment more quickly. If you did not notice from your old one due to avoid cross-...
...and dry immediately to optimize performance ■ Hissing/Rattling - Clean the exterior surfaces. Be sure to clean the grille, the open . Unplug the refrigerator or disconnect power. 2. Plug into a grounded 3 prong outlet. Rinse surfaces with an appliance bulb of water lines, or from the light assembly. ... reconnect power. Do not remove ground prong. If the problem continues, call . In the U.S.A., www.maytag.com In Canada, www.maytag.ca The refrigerator will not cool either compartment more quickly. If you did not notice from your old one due to avoid cross-...

Use & Care Guide
Page 17
...Move food packages away from food? Allows warm air to store food. 17 Use airtight, moisture proof packaging to enter refrigerator. contraction/expansion of ice recently removed? Rinse and dry with mild soap and warm water. Make sure wire shutoff arm or...? Temperature and Moisture Temperature is normal. ■ Humid room? Straighten the water source line. ■ Ice maker turned on the refrigerator? Contributes to your cold water supply? Off-taste, odor or gray color in 24 hours. ■ Sizzling/Gurgling - Check temperature...
...Move food packages away from food? Allows warm air to store food. 17 Use airtight, moisture proof packaging to enter refrigerator. contraction/expansion of ice recently removed? Rinse and dry with mild soap and warm water. Make sure wire shutoff arm or...? Temperature and Moisture Temperature is normal. ■ Humid room? Straighten the water source line. ■ Ice maker turned on the refrigerator? Contributes to your cold water supply? Off-taste, odor or gray color in 24 hours. ■ Sizzling/Gurgling - Check temperature...

Use & Care Guide
Page 18
... Hold the glass under the dispenser long enough? Flush the water system. See "Water Dispenser." ■ Water on the refrigerator? See "Refrigerator Door(s) and Drawer." See "Water Supply Requirements." 18 WATER FILTER CERTIFICATIONS Straighten the water source line. ■ New installation...installation? Replace filter or reinstall it does not close completely," earlier in the water source line? If it correctly. ■ Refrigerator door closed completely? Water from the dispenser is connected to cool completely. ■ Water not been recently dispensed? The first ...
... Hold the glass under the dispenser long enough? Flush the water system. See "Water Dispenser." ■ Water on the refrigerator? See "Refrigerator Door(s) and Drawer." See "Water Supply Requirements." 18 WATER FILTER CERTIFICATIONS Straighten the water source line. ■ New installation...installation? Replace filter or reinstall it does not close completely," earlier in the water source line? If it correctly. ■ Refrigerator door closed completely? Water from the dispenser is connected to cool completely. ■ Water not been recently dispensed? The first ...

Use & Care Guide
Page 21
...or is not installed in accordance with Maytag's published installation instructions. 11. This limited warranty does not cover: ITEMS EXCLUDED FROM WARRANTY 1. Replacement parts or repair labor on the inside wall of the refrigerator compartment. Please keep these limitations and ... limited warranty. Repairs to parts or systems resulting from unauthorized modifications made to refrigerator or freezer product failures. 7. Discoloration, rust, or oxidation of products not approved by Maytag. 5. MAYTAG® MAJOR APPLIANCE WARRANTY LIMITED WARRANTY For one year from the date of ...
...or is not installed in accordance with Maytag's published installation instructions. 11. This limited warranty does not cover: ITEMS EXCLUDED FROM WARRANTY 1. Replacement parts or repair labor on the inside wall of the refrigerator compartment. Please keep these limitations and ... limited warranty. Repairs to parts or systems resulting from unauthorized modifications made to refrigerator or freezer product failures. 7. Discoloration, rust, or oxidation of products not approved by Maytag. 5. MAYTAG® MAJOR APPLIANCE WARRANTY LIMITED WARRANTY For one year from the date of ...

Warranty Information
Page 1
... finish of your correspondence. Repairs to parts or systems resulting from the date of the refrigerator compartment. Replacement parts or repair labor on the inside wall of purchase. 6. Discoloration, rust, or oxidation of products not approved by a Maytag designated service company. Some states and provinces do not have other than normal, single...
... finish of your correspondence. Repairs to parts or systems resulting from the date of the refrigerator compartment. Replacement parts or repair labor on the inside wall of purchase. 6. Discoloration, rust, or oxidation of products not approved by a Maytag designated service company. Some states and provinces do not have other than normal, single...
Dimension Guide
Page 1
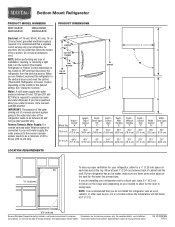
...is required to the desired setting. Reverse Osmosis Water Supply: If a reverse osmosis water filtration system is recommended that you are installing your refrigerator next to a fixed wall, leave 21⁄2" (6.3 cm) minimum on the hinge side (depending on the model) to operate ice... maker and water dispenser. Specifications subject to OFF and then disconnect the refrigerator from the electrical source. handle B 4 top of cabinet 1 A overall I " 18.5 cu.ft. 6615⁄16" (170.0 cm) 651⁄2" (...
...is required to the desired setting. Reverse Osmosis Water Supply: If a reverse osmosis water filtration system is recommended that you are installing your refrigerator next to a fixed wall, leave 21⁄2" (6.3 cm) minimum on the hinge side (depending on the model) to operate ice... maker and water dispenser. Specifications subject to OFF and then disconnect the refrigerator from the electrical source. handle B 4 top of cabinet 1 A overall I " 18.5 cu.ft. 6615⁄16" (170.0 cm) 651⁄2" (...


