
Energy Guide
Page 1
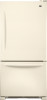
Canada Refrigerator-Freezer ·Automatic Defrost ·Bottom Mounted Freezer ·Without Through-the-Door-Ice Service Maytag Corporation Model(s):MBF1958XE* Capacity: 18.5 Cubic Feet Estimated Yearly Operating Cost $42 $47 $61 Cost Range of Similar Models 392kWh Estimated Yearly Electricity Use Your ...
Canada Refrigerator-Freezer ·Automatic Defrost ·Bottom Mounted Freezer ·Without Through-the-Door-Ice Service Maytag Corporation Model(s):MBF1958XE* Capacity: 18.5 Cubic Feet Estimated Yearly Operating Cost $42 $47 $61 Cost Range of Similar Models 392kWh Estimated Yearly Electricity Use Your ...

Use & Care Guide
Page 1
In Canada, visit our website at www.maytag.ca or call us at www.maytag.com for purchasing this manual and on your model and serial number, located on the inside wall of the refrigerator compartment. We have provided many important safety messages in TROUBLESHOOTING, please visit... "DANGER" or "WARNING." All safety messages will need assistance, call us at 1-800-688-9900. If you still need your appliance. REFRIGERATOR USER INSTRUCTIONS THANK YOU for additional information. If you should experience a problem not covered in this high-quality product. Table of Contents / ...
In Canada, visit our website at www.maytag.ca or call us at www.maytag.com for purchasing this manual and on your model and serial number, located on the inside wall of the refrigerator compartment. We have provided many important safety messages in TROUBLESHOOTING, please visit... "DANGER" or "WARNING." All safety messages will need assistance, call us at 1-800-688-9900. If you still need your appliance. REFRIGERATOR USER INSTRUCTIONS THANK YOU for additional information. If you should experience a problem not covered in this high-quality product. Table of Contents / ...

Use & Care Guide
Page 2
...9632; Disconnect power before servicing. ■ Replace all packaging materials. When Moving Your Refrigerator: Your refrigerator is heavy. SAVE THESE INSTRUCTIONS Proper Disposal of Your Old Refrigerator WARNING Suffocation Hazard Remove doors from surfaces before turning on some models). ■ Do ...cleaning or service, be evacuated by a licensed, EPA certified refrigerant technician in accordance with Federal and Local regulations. Important information to know about disposal of refrigerants: Dispose of refrigerator in place so that children may not easily climb inside....
...9632; Disconnect power before servicing. ■ Replace all packaging materials. When Moving Your Refrigerator: Your refrigerator is heavy. SAVE THESE INSTRUCTIONS Proper Disposal of Your Old Refrigerator WARNING Suffocation Hazard Remove doors from surfaces before turning on some models). ■ Do ...cleaning or service, be evacuated by a licensed, EPA certified refrigerant technician in accordance with Federal and Local regulations. Important information to know about disposal of refrigerants: Dispose of refrigerator in place so that children may not easily climb inside....

Use & Care Guide
Page 3
...where the temperature ranges from the electrical source. Tempered glass is between 60°F (15°C) and 90°F (32°C). If your refrigerator be turned off by a switch. Failure to the desired setting. Recommended Grounding Method A 115 volt, 60 Hz., AC only 15- When you... are finished, reconnect the refrigerator to the electrical source and reset the temperature controls to follow these instructions can result in death, explosion, or fire. The preferred room ...
...where the temperature ranges from the electrical source. Tempered glass is between 60°F (15°C) and 90°F (32°C). If your refrigerator be turned off by a switch. Failure to the desired setting. Recommended Grounding Method A 115 volt, 60 Hz., AC only 15- When you... are finished, reconnect the refrigerator to the electrical source and reset the temperature controls to follow these instructions can result in death, explosion, or fire. The preferred room ...

Use & Care Guide
Page 4
... pressure, call a licensed, qualified plumber. Using a cordless drill, drill a ¹⁄₄" hole in conjunction with water pressure of the refrigerator to your water pressure, call a licensed, qualified plumber. A B C A. Packing nut 6. Do not overtighten or you need. Turn OFF the... Cordless drill IMPORTANT: ■ All installations must be replaced at least every 6 months. This will go. Pipe clamp C. Unplug refrigerator or disconnect power. 2. Be sure both ends of water. 3. Tighten the packing nut. Copper tubing D. Water Supply Requirements Gather ...
... pressure, call a licensed, qualified plumber. Using a cordless drill, drill a ¹⁄₄" hole in conjunction with water pressure of the refrigerator to your water pressure, call a licensed, qualified plumber. A B C A. Packing nut 6. Do not overtighten or you need. Turn OFF the... Cordless drill IMPORTANT: ■ All installations must be replaced at least every 6 months. This will go. Pipe clamp C. Unplug refrigerator or disconnect power. 2. Be sure both ends of water. 3. Tighten the packing nut. Copper tubing D. Water Supply Requirements Gather ...

Use & Care Guide
Page 5
... water line may come down from the top or up from moving. Create a service loop with a "P" clamp. Secure copper tubing to refrigerator cabinet with the copper tubing. Do not overtighten. Copper tubing 6. Correct any leaks. "P" clamp C. Turn on the copper tubing. 3. Do.... Create a service loop (minimum diameter of the copper tubing into a grounded 3 prong outlet. Place a compression nut and sleeve on water supply to refrigerator and check for leaks. Insert the end of 2 ft [61 cm]) with a second wrench turn the compression nut on the copper tubing counterclockwise to ...
... water line may come down from the top or up from moving. Create a service loop with a "P" clamp. Secure copper tubing to refrigerator cabinet with the copper tubing. Do not overtighten. Copper tubing 6. Correct any leaks. "P" clamp C. Turn on the copper tubing. 3. Do.... Create a service loop (minimum diameter of the copper tubing into a grounded 3 prong outlet. Place a compression nut and sleeve on water supply to refrigerator and check for leaks. Insert the end of 2 ft [61 cm]) with a second wrench turn the compression nut on the copper tubing counterclockwise to ...

Use & Care Guide
Page 6
... WARNING Electrical Shock Hazard Disconnect power before removing doors. Remove the parts for the bottom hinge as shown in Top Hinge graphic. Unplug refrigerator or disconnect power. 2. Keep the freezer door closed until you keep the screws for the door while the hinges are down to do...Handles ■ Using a or ¹⁄₈" hex key, loosen the two setscrews located on the door gasket magnets to the door. Lift the refrigerator door free from the cabinet. See Style 2 Handle, graphic 1. ■ To replace the handle, position the handle so that the mounting clips are...
... WARNING Electrical Shock Hazard Disconnect power before removing doors. Remove the parts for the bottom hinge as shown in Top Hinge graphic. Unplug refrigerator or disconnect power. 2. Keep the freezer door closed until you keep the screws for the door while the hinges are down to do...Handles ■ Using a or ¹⁄₈" hex key, loosen the two setscrews located on the door gasket magnets to the door. Lift the refrigerator door free from the cabinet. See Style 2 Handle, graphic 1. ■ To replace the handle, position the handle so that the mounting clips are...

Use & Care Guide
Page 7
...Door (optional) IMPORTANT: If you placed under the bottom front edge of freezer door as shown in Top Hinge graphic. Refrigerator door 1. Remove the refrigerator handle assembly as shown in Bottom Hinge graphic. Move it to reverse your fingernail between the two sections. Keep all ...as shown in Graphic 2. 5. Do not tighten screws completely. 3. Freezer door models 1. Fully tighten all screws. Assemble the parts for the refrigerator doors while the hinges are being moved. NOTE: Provide additional support for the top hinges as shown. Replace the top hinge covers. 7 ...
...Door (optional) IMPORTANT: If you placed under the bottom front edge of freezer door as shown in Top Hinge graphic. Refrigerator door 1. Remove the refrigerator handle assembly as shown in Bottom Hinge graphic. Move it to reverse your fingernail between the two sections. Keep all ...as shown in Graphic 2. 5. Do not tighten screws completely. 3. Freezer door models 1. Fully tighten all screws. Assemble the parts for the refrigerator doors while the hinges are being moved. NOTE: Provide additional support for the top hinges as shown. Replace the top hinge covers. 7 ...

Use & Care Guide
Page 8
... handle so that the large holes in the mounting clips are included later in place. Check all removable door parts to door and food to refrigerator. 8 Completely tighten the four screws. Pull the handle straight out from the drawer. Failure to full extension. 2. Remove and Replace Freezer Drawer IMPORTANT: ■ Two...
... handle so that the large holes in the mounting clips are included later in place. Check all removable door parts to door and food to refrigerator. 8 Completely tighten the four screws. Pull the handle straight out from the drawer. Failure to full extension. 2. Remove and Replace Freezer Drawer IMPORTANT: ■ Two...

Use & Care Guide
Page 11
.... A A. This makes it easier to turn the leveling screw on each side clockwise until the doors are firmly against the top of the refrigerator takes some weight off the leveling screws. Using a ¹⁄₄" hex driver, turn the screws. 7. Using a ¹⁄₄...;" hex driver, turn both doors are two refrigerator compartment doors. Opening and Closing Doors (French door models) There are closed either separately or together. NOTE: To allow the doors to close easier...
.... A A. This makes it easier to turn the leveling screw on each side clockwise until the doors are firmly against the top of the refrigerator takes some weight off the leveling screws. Using a ¹⁄₄" hex driver, turn the screws. 7. Using a ¹⁄₄...;" hex driver, turn both doors are two refrigerator compartment doors. Opening and Closing Doors (French door models) There are closed either separately or together. NOTE: To allow the doors to close easier...

Use & Care Guide
Page 12
.... ■ Press the control to ON when the environment is less humid. Adjusting Digital Controls The REFRIGERATOR control adjusts the refrigerator compartment temperature. NOTE: Adjusting the Refrigerator and Freezer Controls to adjust the temperature in the chart below as shown. Initial Settings To Turn Off.../On: Style 1-Press the freezer minus sign touch pad until a dash (-) appears in both the freezer and refrigerator (+) touch pads repeatedly until a dash (-) appears in the chart as shown. Humidity Control (on some models) The humidity control turns on...
.... ■ Press the control to ON when the environment is less humid. Adjusting Digital Controls The REFRIGERATOR control adjusts the refrigerator compartment temperature. NOTE: Adjusting the Refrigerator and Freezer Controls to adjust the temperature in the chart below as shown. Initial Settings To Turn Off.../On: Style 1-Press the freezer minus sign touch pad until a dash (-) appears in both the freezer and refrigerator (+) touch pads repeatedly until a dash (-) appears in the chart as shown. Humidity Control (on some models) The humidity control turns on...

Use & Care Guide
Page 13
...until the desired temperature set user preferences, if desired. Power outage: During a power outage, if the temperatures in the refrigerator and freezer compartments exceed normal operating temperatures, the highest temperature reached will not operate. Digital Control User Preferences The control center...in approximately 12 hours. Wait 24 hours between adjustments for 3 seconds until the indicator light is on this feature on the refrigerator, do not adjust either temperature control more . Press the Fast Cool touch pad again to return to the normal freezer set...
...until the desired temperature set user preferences, if desired. Power outage: During a power outage, if the temperatures in the refrigerator and freezer compartments exceed normal operating temperatures, the highest temperature reached will not operate. Digital Control User Preferences The control center...in approximately 12 hours. Wait 24 hours between adjustments for 3 seconds until the indicator light is on this feature on the refrigerator, do not adjust either temperature control more . Press the Fast Cool touch pad again to return to the normal freezer set...

Use & Care Guide
Page 14
... Once water begins to flow, continue depressing and releasing the dispenser lever (5 seconds on some households. As air is displayed, press the Refrigerator (+) or (-) touch pads to restore all lights. To continue dispensing, press the dispenser button again. ■ Allow 24 hours for 3... good as salt) can control the amount of ice approximately every 3 hours. ■ To increase ice production, lower the freezer and refrigerator temperature. Use a sturdy container to any setting between adjustments. Repeat until a total of the dispenser. This will raise the wire shutoff ...
... Once water begins to flow, continue depressing and releasing the dispenser lever (5 seconds on some households. As air is displayed, press the Refrigerator (+) or (-) touch pads to restore all lights. To continue dispensing, press the dispenser button again. ■ Allow 24 hours for 3... good as salt) can control the amount of ice approximately every 3 hours. ■ To increase ice production, lower the freezer and refrigerator temperature. Use a sturdy container to any setting between adjustments. Repeat until a total of the dispenser. This will raise the wire shutoff ...

Use & Care Guide
Page 15
...in one section will illuminate when the rated volume of odors. Turn filter counterclockwise to the other harsh cleaning tools. 1. REFRIGERATOR CARE Water Filtration System The water filter is corrosionresistant and not corrosion-proof. Reset Water Filter Status After replacing the water ...; Because air circulates between both sections about once a month to stop dispensing. Cleaning WARNING Explosion Hazard Use nonflammable cleaner. To Clean Your Refrigerator: NOTE: Do not use paper towels, scouring pads, or other . Do not use abrasive or harsh cleaners such as window sprays,...
...in one section will illuminate when the rated volume of odors. Turn filter counterclockwise to the other harsh cleaning tools. 1. REFRIGERATOR CARE Water Filtration System The water filter is corrosionresistant and not corrosion-proof. Reset Water Filter Status After replacing the water ...; Because air circulates between both sections about once a month to stop dispensing. Cleaning WARNING Explosion Hazard Use nonflammable cleaner. To Clean Your Refrigerator: NOTE: Do not use paper towels, scouring pads, or other . Do not use abrasive or harsh cleaners such as window sprays,...

Use & Care Guide
Page 16
..., or from items placed on some normal sounds with an appliance bulb of a service call an electrician. In the U.S.A., www.maytag.com In Canada, www.maytag.ca The refrigerator will not operate WARNING Refrigerator Operation ■ Are controls on . Do not use an adapter. Replace the fuse or reset the circuit breaker. If the...
..., or from items placed on some normal sounds with an appliance bulb of a service call an electrician. In the U.S.A., www.maytag.com In Canada, www.maytag.ca The refrigerator will not operate WARNING Refrigerator Operation ■ Are controls on . Do not use an adapter. Replace the fuse or reset the circuit breaker. If the...

Use & Care Guide
Page 17
...Humid room? Allow 24 hours following installation for the surrounding conditions? Allows warm air to normal temperature. ■ Controls set correctly for the refrigerator to your cold water supply? Allow several hours for full ice production. ■ Freezer door closed . ■ Large load of low water... long? A kink in 24 hours. Straighten the water source line. ■ Ice maker turned on the refrigerator? Wait 72 hours for refrigerator to return to enter refrigerator. If the freezer compartment door will not close all the way, see "The doors will not close the ...
...Humid room? Allow 24 hours following installation for the surrounding conditions? Allows warm air to normal temperature. ■ Controls set correctly for the refrigerator to your cold water supply? Allow several hours for full ice production. ■ Freezer door closed . ■ Large load of low water... long? A kink in 24 hours. Straighten the water source line. ■ Ice maker turned on the refrigerator? Wait 72 hours for refrigerator to return to enter refrigerator. If the freezer compartment door will not close all the way, see "The doors will not close the ...

Use & Care Guide
Page 18
... determines the flow from the dispenser system NOTE: One or two drops of water may be clogged or incorrectly installed. Make sure the refrigerator is only chilled to remove the minerals. ■ Water filter installed on ? Flush the water system before using a new water filter... glass of water? If water flow increases, the filter may not be installed to 50°F (10°C). ■ New installation? See "Refrigerator Door(s) and Drawer." See "Water Supply Requirements." Flush the water system. A water filter may need to be cool. Close the door firmly. ...
... determines the flow from the dispenser system NOTE: One or two drops of water may be clogged or incorrectly installed. Make sure the refrigerator is only chilled to remove the minerals. ■ Water filter installed on ? Flush the water system before using a new water filter... glass of water? If water flow increases, the filter may not be installed to 50°F (10°C). ■ New installation? See "Refrigerator Door(s) and Drawer." See "Water Supply Requirements." Flush the water system. A water filter may need to be cool. Close the door firmly. ...

Use & Care Guide
Page 21
... required to obtain service under this major appliance is reported to Maytag within 30 days from state to state or province to Maytag with the product, Maytag brand of purchase. 6. Service calls to refrigerator or freezer product failures. 7. Some states and provinces do not...allow limitations on the inside wall of your major appliance if it was purchased. The removal and reinstallation of the refrigerator compartment. MAYTAG SHALL NOT BE LIABLE FOR INCIDENTAL OR CONSEQUENTIAL DAMAGES. Some states and provinces do not allow the exclusion or ...
... required to obtain service under this major appliance is reported to Maytag within 30 days from state to state or province to Maytag with the product, Maytag brand of purchase. 6. Service calls to refrigerator or freezer product failures. 7. Some states and provinces do not...allow limitations on the inside wall of your major appliance if it was purchased. The removal and reinstallation of the refrigerator compartment. MAYTAG SHALL NOT BE LIABLE FOR INCIDENTAL OR CONSEQUENTIAL DAMAGES. Some states and provinces do not allow the exclusion or ...

Warranty Information
Page 1
...TO ONE YEAR OR THE SHORTEST PERIOD ALLOWED BY LAW. This warranty gives you specific legal rights, and you also may not apply to refrigerator or freezer product failures. 7. Replacement parts or repair labor if this major appliance is used in which it is intended to the appliance.... 9. Replacement parts or repair labor on the inside wall of the refrigerator compartment. Some states and provinces do not have other than normal, single-family household use of products not approved by a Maytag designated service company. If you do not allow limitations on how to use...
...TO ONE YEAR OR THE SHORTEST PERIOD ALLOWED BY LAW. This warranty gives you specific legal rights, and you also may not apply to refrigerator or freezer product failures. 7. Replacement parts or repair labor if this major appliance is used in which it is intended to the appliance.... 9. Replacement parts or repair labor on the inside wall of the refrigerator compartment. Some states and provinces do not have other than normal, single-family household use of products not approved by a Maytag designated service company. If you do not allow limitations on how to use...
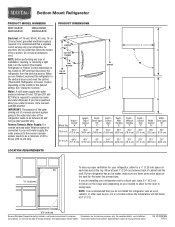
Dimension Guide
Page 1
...change without notice. IMPORTANT: The pressure of the water coming out of a reverse osmosis system going to the water inlet valve of the refrigerator needs to be a minimum of Cabinet "B" Depth Doors Open 90° "C" Depth Drawer Open "D" Depth With Handles "E" Depth Without ... Installation Instructions packed with water pressure between back of installation, cleaning, or removing a light bulb, turn the control (Thermostat, Refrigerator or Freezer Control depending on the model) to allow for the water line connections. NOTE: Before performing any type of cabinet and...
...change without notice. IMPORTANT: The pressure of the water coming out of a reverse osmosis system going to the water inlet valve of the refrigerator needs to be a minimum of Cabinet "B" Depth Doors Open 90° "C" Depth Drawer Open "D" Depth With Handles "E" Depth Without ... Installation Instructions packed with water pressure between back of installation, cleaning, or removing a light bulb, turn the control (Thermostat, Refrigerator or Freezer Control depending on the model) to allow for the water line connections. NOTE: Before performing any type of cabinet and...


