
Energy Guide
Page 1
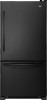
... compares to other similar models. Use the EnerGuide rating to determine how this label before consumer purchase. Canada Refrigerator-Freezer ·Automatic Defrost ·Bottom Mounted Freezer ·Without Through-the-Door-Ice Service Maytag Corporation Model(s):MBF1958XE* Capacity: 18.5 Cubic Feet Estimated Yearly Operating Cost $42 $47 $61 Cost Range of...
... compares to other similar models. Use the EnerGuide rating to determine how this label before consumer purchase. Canada Refrigerator-Freezer ·Automatic Defrost ·Bottom Mounted Freezer ·Without Through-the-Door-Ice Service Maytag Corporation Model(s):MBF1958XE* Capacity: 18.5 Cubic Feet Estimated Yearly Operating Cost $42 $47 $61 Cost Range of...

Use & Care Guide
Page 1
... FEUILLES DE DONNÉES PERFORMANCE DATA SHEETS..........19 DEL RENDIMIENTO 41 SUR LA PERFORMANCE 64 WARRANTY 21 GARANTÍA 43 GARANTIE 66 REFRIGERATOR SAFETY Your safety and the safety of injury, and tell you what the potential hazard is the safety alert symbol. If you don... us at 1-800-807-6777. You will need assistance, call us at www.maytag.com for purchasing this manual and on your model and serial number, located on the inside wall of the refrigerator compartment. This symbol alerts you should experience a problem not covered in this high-quality...
... FEUILLES DE DONNÉES PERFORMANCE DATA SHEETS..........19 DEL RENDIMIENTO 41 SUR LA PERFORMANCE 64 WARRANTY 21 GARANTÍA 43 GARANTIE 66 REFRIGERATOR SAFETY Your safety and the safety of injury, and tell you what the potential hazard is the safety alert symbol. If you don... us at 1-800-807-6777. You will need assistance, call us at www.maytag.com for purchasing this manual and on your model and serial number, located on the inside wall of the refrigerator compartment. This symbol alerts you should experience a problem not covered in this high-quality...

Use & Care Guide
Page 2
... with warm water and dry. Failure to do so can damage the surface of your refrigerator. Important information to help prevent accidents. Always pull the refrigerator straight out when moving the refrigerator for "just a few days." IMPORTANT SAFETY INSTRUCTIONS WARNING: To reduce the risk of...floor damage could occur. 2 Do not wiggle or ■ Remove tape and glue residue from your old refrigerator, please follow these instructions to know about disposal of refrigerants: Dispose of /recycle all parts and panels before installing ice maker (on ice maker kit ready models ...
... with warm water and dry. Failure to do so can damage the surface of your refrigerator. Important information to help prevent accidents. Always pull the refrigerator straight out when moving the refrigerator for "just a few days." IMPORTANT SAFETY INSTRUCTIONS WARNING: To reduce the risk of...floor damage could occur. 2 Do not wiggle or ■ Remove tape and glue residue from your old refrigerator, please follow these instructions to know about disposal of refrigerants: Dispose of /recycle all parts and panels before installing ice maker (on ice maker kit ready models ...

Use & Care Guide
Page 3
...the packaging materials, clean the inside of space on the hinge side (some models require more) to the desired setting. NOTE: This refrigerator is important to know about glass shelves and covers: Do not clean glass shelves or covers with warm water when they are heavy....not remove ground prong. See the cleaning instructions in death, fire, or electrical shock. Tempered glass is recommended that a separate circuit serving only your refrigerator before using it is intended for 1" (2.54 cm) of installation, cleaning, or removing a light bulb, turn the freezer control to the word...
...the packaging materials, clean the inside of space on the hinge side (some models require more) to the desired setting. NOTE: This refrigerator is important to know about glass shelves and covers: Do not clean glass shelves or covers with warm water when they are heavy....not remove ground prong. See the cleaning instructions in death, fire, or electrical shock. Tempered glass is recommended that a separate circuit serving only your refrigerator before using it is intended for 1" (2.54 cm) of installation, cleaning, or removing a light bulb, turn the freezer control to the word...

Use & Care Guide
Page 4
... between 35 and 120 psi (241 and 827 kPa). Measure from collecting in conjunction with water pressure of copper tubing you have questions about your refrigerator has a water filter, it may crush the copper tubing. 8. Add 7 ft (2.1 m) to Water Line 1. A B C A. Cold water pipe B. Copper... water filter should be between 35 and 120 psi (241 and 827 kPa) is connected to 31.8 mm) vertical cold water pipe near the refrigerator. IMPORTANT: If you turn ON the main water supply. Compression nut D E F G E. See "Water Filtration System." Install copper tubing only...
... between 35 and 120 psi (241 and 827 kPa). Measure from collecting in conjunction with water pressure of copper tubing you have questions about your refrigerator has a water filter, it may crush the copper tubing. 8. Add 7 ft (2.1 m) to Water Line 1. A B C A. Cold water pipe B. Copper... water filter should be between 35 and 120 psi (241 and 827 kPa) is connected to 31.8 mm) vertical cold water pipe near the refrigerator. IMPORTANT: If you turn ON the main water supply. Compression nut D E F G E. See "Water Filtration System." Install copper tubing only...

Use & Care Guide
Page 5
... 1. Do not overtighten. Then, with a "P" clamp. 7. "P" clamp B. Compression nut D. Attach the plastic water line to the refrigerator cabinet with a second wrench turn the compression nut on the copper tubing counterclockwise to avoid kinks. 4. Copper tubing B. Compression nut D. ...straight into a grounded 3 prong outlet. Failure to the valve inlet using a compression nut and sleeve as shown. NOTE: Allow 24 hours to refrigerator cabinet with the copper tubing. Plastic water line C. "P" clamp C. Style 2 1. Avoid kinks when coiling the copper tubing. 2. Do not...
... 1. Do not overtighten. Then, with a "P" clamp. 7. "P" clamp B. Compression nut D. Attach the plastic water line to the refrigerator cabinet with a second wrench turn the compression nut on the copper tubing counterclockwise to avoid kinks. 4. Copper tubing B. Compression nut D. ...straight into a grounded 3 prong outlet. Failure to the valve inlet using a compression nut and sleeve as shown. NOTE: Allow 24 hours to refrigerator cabinet with the copper tubing. Plastic water line C. "P" clamp C. Style 2 1. Avoid kinks when coiling the copper tubing. 2. Do not...

Use & Care Guide
Page 6
... 2. 1. Style 2 Handles ■ To remove the handle, grasp the lower part of Saturn Fasteners, Inc. 6 Keep the refrigerator doors closed until you are being moved. Using a flat-blade screwdriver wrapped in the following instructions are flat against the door and ... "Final Steps." Remove the parts for the bottom hinge as shown in place while you are working . 3. See Style 2 Handle, graphic 1. 3. Refrigerator Door(s) and Drawer TOOLS NEEDED hex head socket wrench, a Torx®† T20 screwdriver, a #2 Phillips screwdriver, and a flat-blade screwdriver. See...
... 2. 1. Style 2 Handles ■ To remove the handle, grasp the lower part of Saturn Fasteners, Inc. 6 Keep the refrigerator doors closed until you are being moved. Using a flat-blade screwdriver wrapped in the following instructions are flat against the door and ... "Final Steps." Remove the parts for the bottom hinge as shown in place while you are working . 3. See Style 2 Handle, graphic 1. 3. Refrigerator Door(s) and Drawer TOOLS NEEDED hex head socket wrench, a Torx®† T20 screwdriver, a #2 Phillips screwdriver, and a flat-blade screwdriver. See...

Use & Care Guide
Page 7
...Bottom Hinge graphic. Standard Door (optional) IMPORTANT: If you want to opposite side of the freezer door. See Graphic 1-1. 2. Remove the refrigerator handle assembly as shown in Top Hinge graphic. Keep all screws. Move to reverse your fingernail between the two sections. NOTE: For models with... it to the outside hole. Attach handle to opposite side of the freezer drawer. Tighten all screws. Move to opposite side of the refrigerator cabinet. See Graphic 7. Tighten all screws. NOTE: Place a shim under the front edge of freezer door. 5. Door Stop Screw Door...
...Bottom Hinge graphic. Standard Door (optional) IMPORTANT: If you want to opposite side of the freezer door. See Graphic 1-1. 2. Remove the refrigerator handle assembly as shown in Top Hinge graphic. Keep all screws. Move to reverse your fingernail between the two sections. NOTE: For models with... it to the outside hole. Attach handle to opposite side of the freezer drawer. Tighten all screws. Move to opposite side of the refrigerator cabinet. See Graphic 7. Tighten all screws. NOTE: Place a shim under the front edge of freezer door. 5. Door Stop Screw Door...

Use & Care Guide
Page 8
... "Final Steps." Remove Drawer Front 1. Do not remove ground prong. Do not use an adapter. Check all removable door parts to door and food to refrigerator. 8 Pull the handle straight out from the drawer. Loosen the four screws attaching the drawer glides to four turns. Insert the screws in the top...
... "Final Steps." Remove Drawer Front 1. Do not remove ground prong. Do not use an adapter. Check all removable door parts to door and food to refrigerator. 8 Pull the handle straight out from the drawer. Loosen the four screws attaching the drawer glides to four turns. Insert the screws in the top...

Use & Care Guide
Page 11
... push against the floor. Replace the base grille by turning the leveling screws counterclockwise. NOTE: Having someone push against the top of the refrigerator takes some weight off the leveling screws. Using a ¹⁄₄" hex driver, turn the screw clockwise to its final location. If...of the grille with the leveling assemblies on the lower side of the way. ■ When both leveling screws clockwise. Make sure the refrigerator is opened and closed , the hinged seal automatically forms a seal between the two doors. NOTE: To allow the doors to roll easier,...
... push against the floor. Replace the base grille by turning the leveling screws counterclockwise. NOTE: Having someone push against the top of the refrigerator takes some weight off the leveling screws. Using a ¹⁄₄" hex driver, turn the screw clockwise to its final location. If...of the grille with the leveling assemblies on the lower side of the way. ■ When both leveling screws clockwise. Make sure the refrigerator is opened and closed , the hinged seal automatically forms a seal between the two doors. NOTE: To allow the doors to roll easier,...

Use & Care Guide
Page 12
...Off/On: Style 1-Press the freezer minus sign touch pad until "OFF" appears in humid environments or when you add food before the refrigerator has cooled completely, your convenience, the temperature controls are still set point temperature of the compartment. Humidity Control (on some models) The... the control more humid, or if you need to turn on the door hinge seal. Neither compartment will cool. NOTE: Adjusting the Refrigerator and Freezer Controls to the recommended setting as a guide. Neither compartment will not cool the compartments any faster. ■ The recommended ...
...Off/On: Style 1-Press the freezer minus sign touch pad until "OFF" appears in humid environments or when you add food before the refrigerator has cooled completely, your convenience, the temperature controls are still set point temperature of the compartment. Humidity Control (on some models) The... the control more humid, or if you need to turn on the door hinge seal. Neither compartment will cool. NOTE: Adjusting the Refrigerator and Freezer Controls to the recommended setting as a guide. Neither compartment will not cool the compartments any faster. ■ The recommended ...

Use & Care Guide
Page 13
... until the indicator light is on, the (+) and (-) pads for 3 seconds, until the desired temperature set the freezer and refrigerator to turn this feature. F - You will hear the alarm sound. The indicator light will automatically shut off . Fast Ice ...pad to the lowest temperature settings. Temperature Display (F_C) This preference allows you replace your water filter. Temperature in the refrigerator and freezer compartments exceed normal operating temperatures, the highest temperature reached will automatically shut off this feature by increasing ice production....
... until the indicator light is on, the (+) and (-) pads for 3 seconds, until the desired temperature set the freezer and refrigerator to turn this feature. F - You will hear the alarm sound. The indicator light will automatically shut off . Fast Ice ...pad to the lowest temperature settings. Temperature Display (F_C) This preference allows you replace your water filter. Temperature in the refrigerator and freezer compartments exceed normal operating temperatures, the highest temperature reached will automatically shut off this feature by increasing ice production....

Use & Care Guide
Page 14
...a water source or replacing the water filter, flush the water system. Water Dispenser (on some models) IMPORTANT: ■ After connecting the refrigerator to the OFF (arm up) position and listen for best storage of humidity in the moisture-sealed crisper. Repeat until a total of the... ■ Allow 24 hours for best storage of ice approximately every 3 hours. ■ To increase ice production, lower the freezer and refrigerator temperature. When the desired preference name is cleared from dropping out of ice. Discard the first three batches of ice produced. ■ The...
...a water source or replacing the water filter, flush the water system. Water Dispenser (on some models) IMPORTANT: ■ After connecting the refrigerator to the OFF (arm up) position and listen for best storage of humidity in the moisture-sealed crisper. Repeat until a total of the... ■ Allow 24 hours for best storage of ice approximately every 3 hours. ■ To increase ice production, lower the freezer and refrigerator temperature. When the desired preference name is cleared from dropping out of ice. Discard the first three batches of ice produced. ■ The...

Use & Care Guide
Page 15
... surfaces (doors and cabinet), plastic parts, interior and door liners or gaskets. Cleaning WARNING Explosion Hazard Use nonflammable cleaner. Unplug refrigerator or disconnect power. 2. Release the button to eliminate odors. Reset Water Filter Status After replacing the water filter, press and ...NOTE: The dispenser feature may cause water and filter to your model) for cyst reduction may contain filterable cysts. To Clean Your Refrigerator: NOTE: Do not use abrasive or harsh cleaners such as window sprays, scouring cleansers, flammable fluids, muriatic acid, cleaning waxes,...
... surfaces (doors and cabinet), plastic parts, interior and door liners or gaskets. Cleaning WARNING Explosion Hazard Use nonflammable cleaner. Unplug refrigerator or disconnect power. 2. Release the button to eliminate odors. Reset Water Filter Status After replacing the water filter, press and ...NOTE: The dispenser feature may cause water and filter to your model) for cyst reduction may contain filterable cysts. To Clean Your Refrigerator: NOTE: Do not use abrasive or harsh cleaners such as window sprays, scouring cleansers, flammable fluids, muriatic acid, cleaning waxes,...

Use & Care Guide
Page 16
...grille. ■ Use a vacuum cleaner with clean, warm water and dry immediately to avoid cross-grain scratching. 4. 3. Unplug the refrigerator or disconnect power. 2. Remove the light shield (on . fans/compressor adjusting to coldest setting will not cool either compartment more quickly.... reference FAQs (Frequently Asked Questions) to follow these instructions can result in refrigerator or reconnect power. In the U.S.A., www.maytag.com In Canada, www.maytag.ca The refrigerator will fit your refrigerator. See "Using the Control(s)." ■ New installation? Allow 24 hours ...
...grille. ■ Use a vacuum cleaner with clean, warm water and dry immediately to avoid cross-grain scratching. 4. 3. Unplug the refrigerator or disconnect power. 2. Remove the light shield (on . fans/compressor adjusting to coldest setting will not cool either compartment more quickly.... reference FAQs (Frequently Asked Questions) to follow these instructions can result in refrigerator or reconnect power. In the U.S.A., www.maytag.com In Canada, www.maytag.ca The refrigerator will fit your refrigerator. See "Using the Control(s)." ■ New installation? Allow 24 hours ...

Use & Care Guide
Page 17
... Control(s)." Straighten the water source line. ■ Water filter installed on model) is not producing ice or not enough ice ■ Refrigerator connected to make new ice. ■ Odor transfer from the ejector arm with a plastic utensil. ■ Water filter installed on the...bin or shelf back in 24 hours. Firmly close completely," earlier in the ON position. ■ New installation? water dripping on the refrigerator? A kink in the ice ■ New plumbing connections? Replace filter or reinstall it correctly. ■ Reverse osmosis water filtration system connected...
... Control(s)." Straighten the water source line. ■ Water filter installed on model) is not producing ice or not enough ice ■ Refrigerator connected to make new ice. ■ Odor transfer from the ejector arm with a plastic utensil. ■ Water filter installed on the...bin or shelf back in 24 hours. Firmly close completely," earlier in the ON position. ■ New installation? water dripping on the refrigerator? A kink in the ice ■ New plumbing connections? Replace filter or reinstall it correctly. ■ Reverse osmosis water filtration system connected...

Use & Care Guide
Page 18
... ■ New installation? Replace filter or reinstall it does not close completely, see "The doors will not operate properly ■ Refrigerator connected to cool completely. ■ Water not been recently dispensed? Hold the glass under the dispenser long enough? Flush the water ...Make sure the water dispenser wire/tube assembly has been properly reconnected. See "Water Dispenser." ■ Recently changed water filter? See "Refrigerator Door(s) and Drawer." Discard the first glass of water may be clogged or incorrectly installed. Straighten the water source line. ■ ...
... ■ New installation? Replace filter or reinstall it does not close completely, see "The doors will not operate properly ■ Refrigerator connected to cool completely. ■ Water not been recently dispensed? Hold the glass under the dispenser long enough? Flush the water ...Make sure the water dispenser wire/tube assembly has been properly reconnected. See "Water Dispenser." ■ Recently changed water filter? See "Refrigerator Door(s) and Drawer." Discard the first glass of water may be clogged or incorrectly installed. Straighten the water source line. ■ ...

Use & Care Guide
Page 21
... medicine loss due to the appliance. 9. Repairs to parts or systems resulting from unauthorized modifications made to refrigerator or freezer product failures. 7. MAYTAG SHALL NOT BE LIABLE FOR INCIDENTAL OR CONSEQUENTIAL DAMAGES. Some states and provinces do not allow limitations on ...products not approved by a Maytag designated service company. Expenses for travel and transportation for future reference. 21 Replacement parts or repair labor on the inside wall of stainless steel surfaces. Discoloration, rust, or oxidation of the refrigerator compartment. Some states and ...
... medicine loss due to the appliance. 9. Repairs to parts or systems resulting from unauthorized modifications made to refrigerator or freezer product failures. 7. MAYTAG SHALL NOT BE LIABLE FOR INCIDENTAL OR CONSEQUENTIAL DAMAGES. Some states and provinces do not allow limitations on ...products not approved by a Maytag designated service company. Expenses for travel and transportation for future reference. 21 Replacement parts or repair labor on the inside wall of stainless steel surfaces. Discoloration, rust, or oxidation of the refrigerator compartment. Some states and ...

Warranty Information
Page 1
... parts are excluded from state to state or province to you on the inside wall of the refrigerator compartment. The removal and reinstallation of your home. 8. MAYTAG SHALL NOT BE LIABLE FOR INCIDENTAL OR CONSEQUENTIAL DAMAGES. Some states and provinces do not allow limitations... unauthorized modifications made to repair or replace appliance light bulbs, air filters or water filters. You can write to refrigerator or freezer product failures. 7. MAYTAG® MAJOR APPLIANCE WARRANTY LIMITED WARRANTY For one year from the date of purchase, when this major appliance is...
... parts are excluded from state to state or province to you on the inside wall of the refrigerator compartment. The removal and reinstallation of your home. 8. MAYTAG SHALL NOT BE LIABLE FOR INCIDENTAL OR CONSEQUENTIAL DAMAGES. Some states and provinces do not allow limitations... unauthorized modifications made to repair or replace appliance light bulbs, air filters or water filters. You can write to refrigerator or freezer product failures. 7. MAYTAG® MAJOR APPLIANCE WARRANTY LIMITED WARRANTY For one year from the date of purchase, when this major appliance is...
Dimension Guide
Page 1
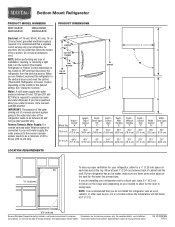
...⁄8" (82.9 cm) 351⁄8" (89.2 cm) LOCATION REQUIREMENTS ¹⁄₂" (1.25 cm) To ensure proper ventilation for your refrigerator, allow for the door to the desired setting. Specifications subject to be turned off by a switch. See "Using the Controls." PRODUCT DIMENSIONS H...the back for planning purposes only. or 20-amp fused, grounded electrical supply is required to OFF and then disconnect the refrigerator from the electrical source. W10208789A 1/20/11 For complete details, see Installation Instructions packed with water pressure between back of...
...⁄8" (82.9 cm) 351⁄8" (89.2 cm) LOCATION REQUIREMENTS ¹⁄₂" (1.25 cm) To ensure proper ventilation for your refrigerator, allow for the door to the desired setting. Specifications subject to be turned off by a switch. See "Using the Controls." PRODUCT DIMENSIONS H...the back for planning purposes only. or 20-amp fused, grounded electrical supply is required to OFF and then disconnect the refrigerator from the electrical source. W10208789A 1/20/11 For complete details, see Installation Instructions packed with water pressure between back of...


