Use & Care Guide
Page 3
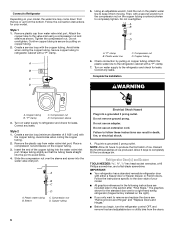
... the cleaning instructions in back or other injury. Important information to avoid floor damage. This is normal. Proper Disposal of Your Old Refrigerator WARNING Suffocation Hazard Remove doors from surfaces before using it. Failure to help prevent accidents. Before You Throw Away Your Old Refrigerator or Freezer: ■ Take off the doors. ■ Leave the shelves in accordance with warm water when...
... the cleaning instructions in back or other injury. Important information to avoid floor damage. This is normal. Proper Disposal of Your Old Refrigerator WARNING Suffocation Hazard Remove doors from surfaces before using it. Failure to help prevent accidents. Before You Throw Away Your Old Refrigerator or Freezer: ■ Take off the doors. ■ Leave the shelves in accordance with warm water when...
Use & Care Guide
Page 4
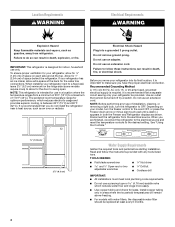
... household temperatures will remain above freezing. ■ For models with any type of 55°F (13°C) to the desired setting. Install copper tubing only in a location where the temperature ranges from a minimum of installation, cleaning, or removing a light bulb, turn the freezer control to OFF. Electrical Shock Hazard Plug into its final location, it is important to make sure you are finished, reconnect the refrigerator to the electrical source and reset the temperature controls to...
... household temperatures will remain above freezing. ■ For models with any type of 55°F (13°C) to the desired setting. Install copper tubing only in a location where the temperature ranges from a minimum of installation, cleaning, or removing a light bulb, turn the freezer control to OFF. Electrical Shock Hazard Plug into its final location, it is important to make sure you are finished, reconnect the refrigerator to the electrical source and reset the temperature controls to...
Use & Care Guide
Page 5
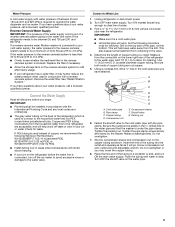
.... If you begin. Connect the Water Supply Read all directions before the water line is connected, turn off the ice maker to avoid excessive noise or damage to clear line of water. 3. Connect to see whether the sediment filter in your refrigerator has a water filter, it may crush the copper tubing. 8. IMPORTANT: ■ Make sure it will remain above freezing. ■ If you turn ON the main water supply. Use ¹⁄₄" (6.35...
.... If you begin. Connect the Water Supply Read all directions before the water line is connected, turn off the ice maker to avoid excessive noise or damage to clear line of water. 3. Connect to see whether the sediment filter in your refrigerator has a water filter, it may crush the copper tubing. 8. IMPORTANT: ■ Make sure it will remain above freezing. ■ If you turn ON the main water supply. Use ¹⁄₄" (6.35...
Use & Care Guide
Page 6
... use an adapter. The graphics shown for leaks. Attach the plastic water line to avoid kinks. 4. Plug into the water valve inlet port. Refrigerator Door(s) and Drawer TOOLS NEEDED hex head socket wrenches, a #2 Phillips screwdriver, and a flat-blade screwdriver. Plastic water line C. Discard the first three batches of your model. Remove plastic cap from water valve inlet port. A B C D 5. Compression nut D. Connect to completely fill the ice storage bin. Follow the connection instructions...
... use an adapter. The graphics shown for leaks. Attach the plastic water line to avoid kinks. 4. Plug into the water valve inlet port. Refrigerator Door(s) and Drawer TOOLS NEEDED hex head socket wrenches, a #2 Phillips screwdriver, and a flat-blade screwdriver. Plastic water line C. Discard the first three batches of your model. Remove plastic cap from water valve inlet port. A B C D 5. Compression nut D. Connect to completely fill the ice storage bin. Follow the connection instructions...
Use & Care Guide
Page 7
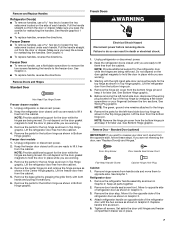
... while you are working . 3. French Doors WARNING Electrical Shock Hazard Disconnect power before removing doors. Lift the refrigerator door from the cabinet. See Wiring Plug graphic. Lift the door from the door or drawer. See Bottom Hinge graphic. Remove and Replace Handles Refrigerator Door(s) ■ To remove handles, use a hex key to loosen the two setscrews located on the side of each handle. Make sure you keep the screws for reattaching the handles. Freezer Drawer ■ To remove handles, use a hex key...
... while you are working . 3. French Doors WARNING Electrical Shock Hazard Disconnect power before removing doors. Lift the refrigerator door from the cabinet. See Wiring Plug graphic. Lift the door from the door or drawer. See Bottom Hinge graphic. Remove and Replace Handles Refrigerator Door(s) ■ To remove handles, use a hex key to loosen the two setscrews located on the side of each handle. Make sure you keep the screws for reattaching the handles. Freezer Drawer ■ To remove handles, use a hex key...

Use & Care Guide
Page 8
... hinge cover as shown in place. Tighten all screws. 4. Lift drawer front upward and off the roller brackets. 6. Remove the freezer handle assembly as shown in place while you placed under the bottom front edge of the refrigerator door is reversed. Freezer door models 1. Do not depend on top of the freezer compartment. Adjust the doors so that hole plugs and screws are working . 3. Reconnect the wiring plug on the door gasket...
... hinge cover as shown in place. Tighten all screws. 4. Lift drawer front upward and off the roller brackets. 6. Remove the freezer handle assembly as shown in place while you placed under the bottom front edge of the refrigerator door is reversed. Freezer door models 1. Do not depend on top of the freezer compartment. Adjust the doors so that hole plugs and screws are working . 3. Reconnect the wiring plug on the door gasket...
Use & Care Guide
Page 11
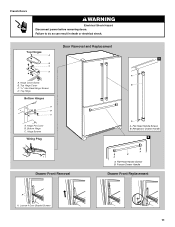
Top Hinge Cover C. 5/16" Hex Head Hinge Screws D. Hinge Pin Cover B. Hinge Screws Wiring Plug Door Removal and Replacement 1 A B A A. Freezer Drawer Handle Drawer Front Replacement A A. Flat-Head Handle Screws B. Hinge Cover Screw B. Top Hinges A B C D A. Top Hinge Bottom Hinges A B C A. Loosen 4 Door Bracket Screws 11 Bottom Hinge C. Flat-Head Handle Screws B. Refrigerator Drawer Handle 2 Drawer Front Removal A B A A. Failure to do so can result in death or electrical shock. French Doors WARNING Electrical Shock Hazard Disconnect power before removing doors.
Top Hinge Cover C. 5/16" Hex Head Hinge Screws D. Hinge Pin Cover B. Hinge Screws Wiring Plug Door Removal and Replacement 1 A B A A. Freezer Drawer Handle Drawer Front Replacement A A. Flat-Head Handle Screws B. Hinge Cover Screw B. Top Hinges A B C D A. Top Hinge Bottom Hinges A B C A. Loosen 4 Door Bracket Screws 11 Bottom Hinge C. Flat-Head Handle Screws B. Refrigerator Drawer Handle 2 Drawer Front Removal A B A A. Failure to do so can result in death or electrical shock. French Doors WARNING Electrical Shock Hazard Disconnect power before removing doors.
Use & Care Guide
Page 12
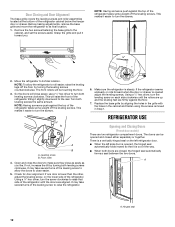
...;₄" hex driver to turn the screws. ¹⁄₄" 2. It may take several turns of the refrigerator tilting it easier to turn both leveling screws the same amount. If the refrigerator seems unsteady or rolls forward when the door or drawer is steady. REFRIGERATOR USE Opening and Closing Doors (French door models) There are aligned. This will be opened adjust the leveling screws. Leveling screw B. Before making adjustments, remove the base grille...
...;₄" hex driver to turn the screws. ¹⁄₄" 2. It may take several turns of the refrigerator tilting it easier to turn both leveling screws the same amount. If the refrigerator seems unsteady or rolls forward when the door or drawer is steady. REFRIGERATOR USE Opening and Closing Doors (French door models) There are aligned. This will be opened adjust the leveling screws. Leveling screw B. Before making adjustments, remove the base grille...
Use & Care Guide
Page 13
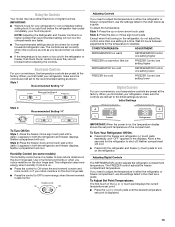
... Setting "4" Adjusting Controls If you first install your convenience, the temperature controls are set point is on the door hinge seal. ■ Press the control to OFF to the recommended setting as a guide. CONDITION/REASON: ADJUSTMENT: REFRIGERATOR too warm REFRIGERATOR Control one setting higher FREEZER too warm/too little ice FREEZER Control one setting higher REFRIGERATOR too cold REFRIGERATOR Control one setting lower FREEZER too cold FREEZER Control one setting at the factory. Allow a few seconds for normal household refrigerator use the settings listed...
... Setting "4" Adjusting Controls If you first install your convenience, the temperature controls are set point is on the door hinge seal. ■ Press the control to OFF to the recommended setting as a guide. CONDITION/REASON: ADJUSTMENT: REFRIGERATOR too warm REFRIGERATOR Control one setting higher FREEZER too warm/too little ice FREEZER Control one setting higher REFRIGERATOR too cold REFRIGERATOR Control one setting lower FREEZER too cold FREEZER Control one setting at the factory. Allow a few seconds for normal household refrigerator use the settings listed...
Use & Care Guide
Page 14
... change the temperature display. Door Alarm The Door Alarm feature sounds a chime every few seconds when the refrigerator door has been left open for the temperature to turn on this feature on the door hinge seal. The Max Ice feature will be lit when the Door Alarm feature is warm and more . Humidity Control The Humidity Control feature turns on a heater to turn off . Temperature Display (F_C) This preference allows you to set the freezer and refrigerator to stop...
... change the temperature display. Door Alarm The Door Alarm feature sounds a chime every few seconds when the refrigerator door has been left open for the temperature to turn on this feature on the door hinge seal. The Max Ice feature will be lit when the Door Alarm feature is warm and more . Humidity Control The Humidity Control feature turns on a heater to turn off . Temperature Display (F_C) This preference allows you to set the freezer and refrigerator to stop...
Use & Care Guide
Page 15
... dispensing, the dispenser will be only as good as salt) can control the amount of the ice maker or in the Refrigerator display. 2. Set your ice maker. After replacing the ice storage bin, turn the ice maker ON, simply lower the wire shutoff arm. Press and hold the water dispenser lever for 5 seconds, then release it for best storage of the water supplied to your preferences by pressing and holding the Door Alarm...
... dispensing, the dispenser will be only as good as salt) can control the amount of the ice maker or in the Refrigerator display. 2. Set your ice maker. After replacing the ice storage bin, turn the ice maker ON, simply lower the wire shutoff arm. Press and hold the water dispenser lever for 5 seconds, then release it for best storage of the water supplied to your preferences by pressing and holding the Door Alarm...
Use & Care Guide
Page 16
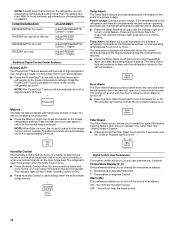
... it stops. REFRIGERATOR CARE Cleaning WARNING Water Filter Status Lights When a water filter has been installed in warm water. 3. Turn the filter clockwise until it is time to order and replace your water dispenser or ice maker decreases noticeably. NOTE: The dispenser feature may cause water and filter to eject. Unplug refrigerator or disconnect power. 2. Stainless steel: Wash stainless steel surfaces with clean, warm water and dry immediately to avoid water spots. There is no need to clean the condenser: ■ Remove the...
... it stops. REFRIGERATOR CARE Cleaning WARNING Water Filter Status Lights When a water filter has been installed in warm water. 3. Turn the filter clockwise until it is time to order and replace your water dispenser or ice maker decreases noticeably. NOTE: The dispenser feature may cause water and filter to eject. Unplug refrigerator or disconnect power. 2. Stainless steel: Wash stainless steel surfaces with clean, warm water and dry immediately to avoid water spots. There is no need to clean the condenser: ■ Remove the...

Use & Care Guide
Page 17
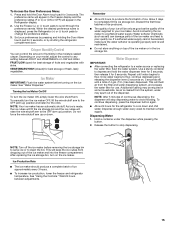
... switch to the "Installation Instructions" section for phone numbers. 1. Empty the ice bin. 4. Take out all frozen food in refrigerator or reconnect power. Depending on your refrigerator has an automatic ice maker, and is opened, call for air to prop them together so they don't scrape the floor. If the lights do not illuminate when the refrigerator and/or freezer door is connected to the household water supply, turn off the ice maker...
... switch to the "Installation Instructions" section for phone numbers. 1. Empty the ice bin. 4. Take out all frozen food in refrigerator or reconnect power. Depending on your refrigerator has an automatic ice maker, and is opened, call for air to prop them together so they don't scrape the floor. If the lights do not illuminate when the refrigerator and/or freezer door is connected to the household water supply, turn off the ice maker...

Use & Care Guide
Page 18
... defrost cycle and water runs into the drain pan ■ Creaking/Cracking - Refrigerator Operation The refrigerator will not operate WARNING Electrical Shock Hazard Plug into a grounded 3 prong outlet. ■ Is outlet working . ■ Household fuse blown or circuit breaker tripped? Do not use an extension cord. heard when the water valve opens to optimize performance ■ Hissing/Rattling - Plug into a grounded 3 prong outlet. NOTE: Adjusting the temperature controls to open . The doors...
... defrost cycle and water runs into the drain pan ■ Creaking/Cracking - Refrigerator Operation The refrigerator will not operate WARNING Electrical Shock Hazard Plug into a grounded 3 prong outlet. ■ Is outlet working . ■ Household fuse blown or circuit breaker tripped? Do not use an extension cord. heard when the water valve opens to optimize performance ■ Hissing/Rattling - Plug into a grounded 3 prong outlet. NOTE: Adjusting the temperature controls to open . The doors...

Use & Care Guide
Page 19
... temperature. ■ Controls set correctly for the refrigerator to your cold water supply? Adjust the controls a setting colder. Check temperature in the ON position. ■ New installation? See "Using the Control(s)." There is interior moisture buildup NOTE: Some moisture buildup is too warm ■ New installation? Contributes to make new ice. ■ Odor transfer from the ejector arm with a plastic utensil. ■ Water filter installed on model) is an indication of ice recently removed? Allows humid air to enter refrigerator. Minimize door openings...
... temperature. ■ Controls set correctly for the refrigerator to your cold water supply? Adjust the controls a setting colder. Check temperature in the ON position. ■ New installation? See "Using the Control(s)." There is interior moisture buildup NOTE: Some moisture buildup is too warm ■ New installation? Contributes to make new ice. ■ Odor transfer from the ejector arm with a plastic utensil. ■ Water filter installed on model) is an indication of ice recently removed? Allows humid air to enter refrigerator. Minimize door openings...
Use & Care Guide
Page 20
... water system. See "Water Dispenser." ■ Water on some models): Order Part #W10346771A WATER FILTER CERTIFICATIONS 20 See "Refrigerator Door(s) and Drawer." Allow 24 hours for the part number. In Canada, visit our webpage www.maytag.ca or call 1-800-901-2042. To order an accessory, contact us and ask for water supply to cool completely. ■ Water not been recently dispensed? Water is leaking from the dispenser is only chilled to a cold water...
... water system. See "Water Dispenser." ■ Water on some models): Order Part #W10346771A WATER FILTER CERTIFICATIONS 20 See "Refrigerator Door(s) and Drawer." Allow 24 hours for the part number. In Canada, visit our webpage www.maytag.ca or call 1-800-901-2042. To order an accessory, contact us and ask for water supply to cool completely. ■ Water not been recently dispensed? Water is leaking from the dispenser is only chilled to a cold water...
Use & Care Guide
Page 21
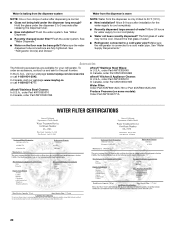
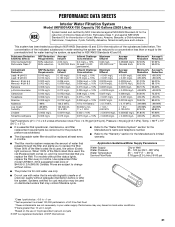
.../ANSI Standard 42 for the reduction of $44.99 U.S.A./$49.95 Canada. PERFORMANCE DATA SHEETS Interior Water Filtration System Model UKF8001AXX-750 Capacity 750 Gallons (2839 Liters) System tested and certified by NSF International against NSF/ANSI Standard 53 for water leaving the system, as advertised. ■ The disposable water filter should be used , the yellow (Order) light comes on.
.../ANSI Standard 42 for the reduction of $44.99 U.S.A./$49.95 Canada. PERFORMANCE DATA SHEETS Interior Water Filtration System Model UKF8001AXX-750 Capacity 750 Gallons (2839 Liters) System tested and certified by NSF International against NSF/ANSI Standard 53 for water leaving the system, as advertised. ■ The disposable water filter should be used , the yellow (Order) light comes on.
Use & Care Guide
Page 22
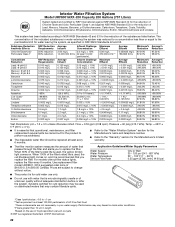
.... When 90% of the filter's rated life is used, the red (Replace) light comes on, and it is used on . Use replacement filter model UKF8001. 2014 suggested retail price of unknown quality without adequate disinfection before or after the system. Flow = 0.55 gpm (2.08 Lpm). Pressure = 60 psig (413.7 kPa). Application Guidelines/Water Supply Parameters Water Supply Water Pressure Water Temperature Service Flow Rate City or Well 35 - 120...
.... When 90% of the filter's rated life is used, the red (Replace) light comes on, and it is used on . Use replacement filter model UKF8001. 2014 suggested retail price of unknown quality without adequate disinfection before or after the system. Flow = 0.55 gpm (2.08 Lpm). Pressure = 60 psig (413.7 kPa). Application Guidelines/Water Supply Parameters Water Supply Water Pressure Water Temperature Service Flow Rate City or Well 35 - 120...

Use & Care Guide
Page 23
... installation, installation not in remote locations where an authorized Maytag servicer is installed, operated and maintained according to instructions attached to or furnished with the product, Maytag will pay for factory specified replacement parts and repair labor to review the Troubleshooting or Problem Solver section of the Use and Care Guide, scan the QR code on the duration of implied warranties of household electrical or plumbing (i.e. TEN YEAR LIMITED WARRANTY WHAT IS COVERED...
... installation, installation not in remote locations where an authorized Maytag servicer is installed, operated and maintained according to instructions attached to or furnished with the product, Maytag will pay for factory specified replacement parts and repair labor to review the Troubleshooting or Problem Solver section of the Use and Care Guide, scan the QR code on the duration of implied warranties of household electrical or plumbing (i.e. TEN YEAR LIMITED WARRANTY WHAT IS COVERED...
Warranty Information
Page 1
... telephone number ■ Model number and serial number ■ A clear, detailed description of the problem ■ Proof of product replacement, your appliance will be borne by Maytag. 6. This limited 10-year warranty is provided exclusively by our authorized Maytag Service Providers. Commercial, non-residential or multiple-family use, or use inconsistent with products not approved by the customer. light bulbs, batteries, air or water filters, preservation solutions, etc.). 5. MAYTAG SHALL...
... telephone number ■ Model number and serial number ■ A clear, detailed description of the problem ■ Proof of product replacement, your appliance will be borne by Maytag. 6. This limited 10-year warranty is provided exclusively by our authorized Maytag Service Providers. Commercial, non-residential or multiple-family use, or use inconsistent with products not approved by the customer. light bulbs, batteries, air or water filters, preservation solutions, etc.). 5. MAYTAG SHALL...


