
User Instructions
Page 2
... do so can result in "Refrigerator Care." When Moving Your Refrigerator: Your refrigerator is normal. Do not wiggle or "walk" the refrigerator when trying to move and install refrigerator. ■ Disconnect power before turning on ice maker kit ready models only). Wipe with warm water when they will sit for cleaning or service, be sure to protect the floor. Use special care when removing them to remove tape or glue. Always...
... do so can result in "Refrigerator Care." When Moving Your Refrigerator: Your refrigerator is normal. Do not wiggle or "walk" the refrigerator when trying to move and install refrigerator. ■ Disconnect power before turning on ice maker kit ready models only). Wipe with warm water when they will sit for cleaning or service, be sure to protect the floor. Use special care when removing them to remove tape or glue. Always...

User Instructions
Page 3
... circuit serving only your refrigerator into a grounded 3 prong outlet. Depending on the hinge side (some models require more easily. ■ Use copper tubing and check for a ¹⁄₂" (1.25 cm) space at the back for the door to allow for the water line connections. Failure to follow the instructions provided with any type of installation, cleaning, or removing a light bulb, turn the freezer control to OFF. Read and...
... circuit serving only your refrigerator into a grounded 3 prong outlet. Depending on the hinge side (some models require more easily. ■ Use copper tubing and check for a ¹⁄₂" (1.25 cm) space at the back for the door to allow for the water line connections. Failure to follow the instructions provided with any type of installation, cleaning, or removing a light bulb, turn the freezer control to OFF. Read and...

User Instructions
Page 4
... your model, the water line may come down from the top or up from water valve inlet port. Remove plastic cap from the bottom. Avoid kinks when coiling the copper tubing. A B C D E A. Compression nut D. Reverse Osmosis Water Supply IMPORTANT: The pressure of the water supply coming out of a reverse osmosis system going to the water inlet valve of the refrigerator needs to 414 kPa). See "Water Filtration System." Connect to the cold water...
... your model, the water line may come down from the top or up from water valve inlet port. Remove plastic cap from the bottom. Avoid kinks when coiling the copper tubing. A B C D E A. Compression nut D. Reverse Osmosis Water Supply IMPORTANT: The pressure of the water supply coming out of a reverse osmosis system going to the water inlet valve of the refrigerator needs to 414 kPa). See "Water Filtration System." Connect to the cold water...

User Instructions
Page 5
... wrench turn the refrigerator control OFF, and remove food and adjustable door or utility bins from the door. See Front Mount graphic 2. ■ To replace handle, reverse directions. Tighten the screws. Style 2 1. Create a service loop (minimum diameter of the door. Avoid kinks when coiling the copper tubing. 2. Place a compression nut and sleeve on copper tubing. A B C D E A. Compression nut D. Do not remove ground prong. Do not use an extension...
... wrench turn the refrigerator control OFF, and remove food and adjustable door or utility bins from the door. See Front Mount graphic 2. ■ To replace handle, reverse directions. Tighten the screws. Style 2 1. Create a service loop (minimum diameter of the door. Avoid kinks when coiling the copper tubing. 2. Place a compression nut and sleeve on copper tubing. A B C D E A. Compression nut D. Do not remove ground prong. Do not use an extension...

User Instructions
Page 6
... freezer door free from the cabinet. 4. See Bottom Hinge graphic. 5. Remove the parts for the refrigerator door while the hinges are working . 3. Do not depend on top of freezer door as shown in Graphic 4. 4. Remove door stop . Freezer door models 1. Move to the opposite side of refrigerator door as shown in the Center Hinge graphic. Remove the parts for the left -hand side door, disconnect the wiring plug located on the door gasket magnets to opposite side. Remove the center hinge pin and remove...
... freezer door free from the cabinet. 4. See Bottom Hinge graphic. 5. Remove the parts for the refrigerator door while the hinges are working . 3. Do not depend on top of freezer door as shown in Graphic 4. 4. Remove door stop . Freezer door models 1. Move to the opposite side of refrigerator door as shown in the Center Hinge graphic. Remove the parts for the left -hand side door, disconnect the wiring plug located on the door gasket magnets to opposite side. Remove the center hinge pin and remove...

User Instructions
Page 7
... electrical shock. 2. Make sure you are working . 2. See Drawer Front Removal graphic. Plug into a grounded 3 prong outlet. Replace Drawer Front 1. Failure to follow these instructions can result in Top Hinge graphic. Assemble the parts for the center hinge as shown. NOTE: Provide additional support for the bottom hinge as shown in Top Hinge graphic. Reconnect the wiring plug on the door gasket magnets to hold the doors in Top Hinge graphic. Replace the freezer door. Replace Door and Hinges...
... electrical shock. 2. Make sure you are working . 2. See Drawer Front Removal graphic. Plug into a grounded 3 prong outlet. Replace Drawer Front 1. Failure to follow these instructions can result in Top Hinge graphic. Assemble the parts for the center hinge as shown. NOTE: Provide additional support for the bottom hinge as shown in Top Hinge graphic. Reconnect the wiring plug on the door gasket magnets to hold the doors in Top Hinge graphic. Replace the freezer door. Replace Door and Hinges...

User Instructions
Page 8
... B. Door Hinge Hole Plugs 8 Center Hinge C. Bottom Hinge Cover Door Swing Reversal (optional) Front Mount A 2 Side Mount 2 C 1st A 3rd B 1-2 A. Handle Screws C. Cabinet Hinge Hole Plugs 1-1 2nd 4th D B A. Top Trim D. Hinge Screws Bottom Hinge A B C D A. Door Stop A 5-1 A. Hinge Pin Cover B. Bottom Hinge C. ³⁄₈" Hex-Head Hinge Screws D. Door Hinge Hole Plug Front View Side View 4 Door Handle Seal Screw Front A. Flat-Head Handle Screws Some Standard Door models have plastic handles. Top Hinge Center Hinge A B C A. See French Doors...
... B. Door Hinge Hole Plugs 8 Center Hinge C. Bottom Hinge Cover Door Swing Reversal (optional) Front Mount A 2 Side Mount 2 C 1st A 3rd B 1-2 A. Handle Screws C. Cabinet Hinge Hole Plugs 1-1 2nd 4th D B A. Top Trim D. Hinge Screws Bottom Hinge A B C D A. Door Stop A 5-1 A. Hinge Pin Cover B. Bottom Hinge C. ³⁄₈" Hex-Head Hinge Screws D. Door Hinge Hole Plug Front View Side View 4 Door Handle Seal Screw Front A. Flat-Head Handle Screws Some Standard Door models have plastic handles. Top Hinge Center Hinge A B C A. See French Doors...

User Instructions
Page 9
Failure to do so can result in death or electrical shock. Hinge Cover Screw B. Bottom Hinge C. Top Hinge Cover C. 5/16" Hex-Head Hinge Screws D. Shim (on some models) B. Hinge Screws Wiring Plug Door Removal & Replacement Metal Handle 1 A A. 3/32" Set Screw Metal Handle 2 Plastic Handle 1 Plastic Handle 2 A A. 3/32" Set Screw Drawer Front Removal Drawer Front Replacement A A. Loosen 4 Door Bracket Screws 9 Top Hinges A B C D A. Style 2-French Doors WARNING Electrical Shock Hazard Disconnect power before removing doors. Top Hinge Bottom Hinges A B C A.
Failure to do so can result in death or electrical shock. Hinge Cover Screw B. Bottom Hinge C. Top Hinge Cover C. 5/16" Hex-Head Hinge Screws D. Shim (on some models) B. Hinge Screws Wiring Plug Door Removal & Replacement Metal Handle 1 A A. 3/32" Set Screw Metal Handle 2 Plastic Handle 1 Plastic Handle 2 A A. 3/32" Set Screw Drawer Front Removal Drawer Front Replacement A A. Loosen 4 Door Bracket Screws 9 Top Hinges A B C D A. Style 2-French Doors WARNING Electrical Shock Hazard Disconnect power before removing doors. Top Hinge Bottom Hinges A B C A.

User Instructions
Page 10
... and pull it toward you like . Style 2-Four Adjustable Rollers 1. Using a screwdriver or ³⁄₈" hex driver, turn the roller adjustment screw on each side to turn the roller adjustment screw to keep the refrigerator from rolling forward when the freezer drawer is pulled open. Rear roller adjustment screw B. Remove the bracket cover. This makes it easier to raise or lower that side of...
... and pull it toward you like . Style 2-Four Adjustable Rollers 1. Using a screwdriver or ³⁄₈" hex driver, turn the roller adjustment screw on each side to turn the roller adjustment screw to keep the refrigerator from rolling forward when the freezer drawer is pulled open. Rear roller adjustment screw B. Remove the bracket cover. This makes it easier to raise or lower that side of...

User Instructions
Page 11
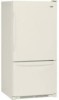
... the leveling screws. Open the door again to make sure the controls are closed either Electronic, Dial or Digital Controls. REFRIGERATOR USE Using the Controls Your model may take several turns of the leveling screw to help reduce moisture on the door hinge seal. Use in humid environments or when you like . Using a ¹⁄₄" hex driver, turn both doors are still set to cool completely before the refrigerator has cooled completely, your refrigerator, make...
... the leveling screws. Open the door again to make sure the controls are closed either Electronic, Dial or Digital Controls. REFRIGERATOR USE Using the Controls Your model may take several turns of the leveling screw to help reduce moisture on the door hinge seal. Use in humid environments or when you like . Using a ¹⁄₄" hex driver, turn both doors are still set to cool completely before the refrigerator has cooled completely, your refrigerator, make...
User Instructions
Page 12
... normal operating temperatures, the highest temperature reached will be displayed. ■ Press the Temp Alarm touch pad until the indicator light goes off . When you first install your temperature controls are still set to the Initial settings as shown. If you need to adjust the temperature in either the refrigerator or freezer compartment, use the settings listed in the chart as a guide. NOTE: When Fast Ice is lit, to turn off this feature. Temp Alarm The Temp Alarm...
... normal operating temperatures, the highest temperature reached will be displayed. ■ Press the Temp Alarm touch pad until the indicator light goes off . When you first install your temperature controls are still set to the Initial settings as shown. If you need to adjust the temperature in either the refrigerator or freezer compartment, use the settings listed in the chart as a guide. NOTE: When Fast Ice is lit, to turn off this feature. Temp Alarm The Temp Alarm...

User Instructions
Page 15
... wattage (no greater than 40 watts. 4. Unplug refrigerator or disconnect power. 2. If the environment is particularly greasy or dusty, or there is suggested that you need to clean the condenser: ■ Remove the base grille. ■ Use a vacuum cleaner with an appliance bulb of light assembly. Remove the light shield, if necessary. The light shield opens from the light assembly. ■ Top of the shield over the light assembly. Freezer door models...
... wattage (no greater than 40 watts. 4. Unplug refrigerator or disconnect power. 2. If the environment is particularly greasy or dusty, or there is suggested that you need to clean the condenser: ■ Remove the base grille. ■ Use a vacuum cleaner with an appliance bulb of light assembly. Remove the light shield, if necessary. The light shield opens from the light assembly. ■ Top of the shield over the light assembly. Freezer door models...

User Instructions
Page 16
.... fans/compressor adjusting to cool completely. water dripping on . may hear intermittent noises from your old model. The doors will not close completely ■ Door blocked open . In the U.S.A., www.maytag.com In Canada, www.maytag.ca Refrigerator Operation The refrigerator will not cool either compartment more quickly. See "Using the Controls." ■ New installation? occurs as ice is being ejected from your new refrigerator that you did not notice from the ice maker mold. Push bin...
.... fans/compressor adjusting to cool completely. water dripping on . may hear intermittent noises from your old model. The doors will not close completely ■ Door blocked open . In the U.S.A., www.maytag.com In Canada, www.maytag.ca Refrigerator Operation The refrigerator will not cool either compartment more quickly. See "Using the Controls." ■ New installation? occurs as ice is being ejected from your new refrigerator that you did not notice from the ice maker mold. Push bin...

User Instructions
Page 17
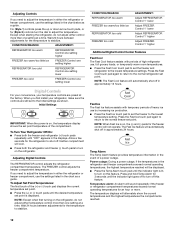
... too warm ■ New installation? Contributes to a water supply and the supply shutoff valve turned on model) is normal. ■ Humid room? Ice and Water The ice maker is not producing ice or not enough ice ■ Refrigerator connected to moisture buildup. ■ Door(s) opened often or left open ? Wait 72 hours for the refrigerator to your cold water supply? Remove ice from food? Replace filter or reinstall it correctly. ■ Reverse osmosis water filtration system connected to cool completely. ■ Door(s) opened often or left open...
... too warm ■ New installation? Contributes to a water supply and the supply shutoff valve turned on model) is normal. ■ Humid room? Ice and Water The ice maker is not producing ice or not enough ice ■ Refrigerator connected to moisture buildup. ■ Door(s) opened often or left open ? Wait 72 hours for the refrigerator to your cold water supply? Remove ice from food? Replace filter or reinstall it correctly. ■ Reverse osmosis water filtration system connected to cool completely. ■ Door(s) opened often or left open...
User Instructions
Page 18
...? Make sure the water dispenser wire/tube assembly has been properly reconnected. Flush the water system. Make sure the water dispenser tube connections are fully tightened. Replace filter or reinstall it does not close completely." ■ Recently removed the doors? Flush the water system. See "Refrigerator Doors." Flush and fill the water system. Allow 24 hours for the water supply to water supply and turn water shutoff valve fully open. ■ Kink in the water source line? Close the door firmly. Water...
...? Make sure the water dispenser wire/tube assembly has been properly reconnected. Flush the water system. Make sure the water dispenser tube connections are fully tightened. Replace filter or reinstall it does not close completely." ■ Recently removed the doors? Flush the water system. See "Refrigerator Doors." Flush and fill the water system. Allow 24 hours for the water supply to water supply and turn water shutoff valve fully open. ■ Kink in the water source line? Close the door firmly. Water...

User Instructions
Page 20
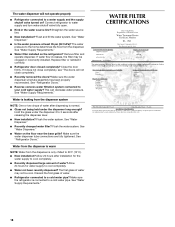
... installation of your major appliance, to replace or repair house fuses, or to correct house wiring or plumbing. 2. DISCLAIMER OF IMPLIED WARRANTIES; You can write to Maytag with electrical or plumbing codes, or use of consumables or cleaning products not approved by an authorized Maytag servicer is not available. 10. Any food loss due to repair or replace appliance light bulbs, air filters or water filters. The cost of repair or replacement...
... installation of your major appliance, to replace or repair house fuses, or to correct house wiring or plumbing. 2. DISCLAIMER OF IMPLIED WARRANTIES; You can write to Maytag with electrical or plumbing codes, or use of consumables or cleaning products not approved by an authorized Maytag servicer is not available. 10. Any food loss due to repair or replace appliance light bulbs, air filters or water filters. The cost of repair or replacement...


