Use & Care Guide
Page 2
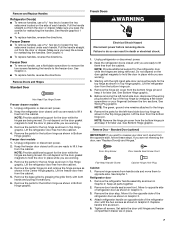
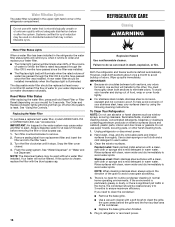
REFRIGERATOR SAFETY Your safety and the safety of injury, and tell you what the potential hazard is the safety alert symbol. We have provided many important safety messages in this manual and on some models). All safety messages will follow these basic precautions: ■ Plug into a grounded 3 ...an extension cord. ■ Disconnect power before installing ice maker (on ice maker kit ready models only). ■ Use a sturdy glass when dispensing ice (on some models). ■ Do not hit the refrigerator glass doors (on your appliance. This is , tell you how to reduce the chance of ...
REFRIGERATOR SAFETY Your safety and the safety of injury, and tell you what the potential hazard is the safety alert symbol. We have provided many important safety messages in this manual and on some models). All safety messages will follow these basic precautions: ■ Plug into a grounded 3 ...an extension cord. ■ Disconnect power before installing ice maker (on ice maker kit ready models only). ■ Use a sturdy glass when dispensing ice (on some models). ■ Do not hit the refrigerator glass doors (on your appliance. This is , tell you how to reduce the chance of ...
Use & Care Guide
Page 4
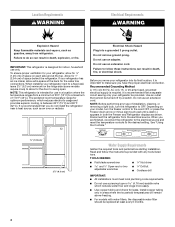
To ensure proper ventilation for your refrigerator into a grounded 3 prong outlet. When installing your model, turn the refrigerator to OFF. NOTE: This refrigerator is designed for use an extension cord. Do not remove ground prong. NOTE: Before performing any tools listed here. Read and ..., 60 Hz, AC only 15- Use an outlet that a separate circuit serving only your refrigerator has an ice maker, allow for ¹⁄₂" (1.25 cm) of space on the hinge side (some models require more easily. ■ Use copper tubing and check for the water line connections. It...
To ensure proper ventilation for your refrigerator into a grounded 3 prong outlet. When installing your model, turn the refrigerator to OFF. NOTE: This refrigerator is designed for use an extension cord. Do not remove ground prong. NOTE: Before performing any tools listed here. Read and ..., 60 Hz, AC only 15- Use an outlet that a separate circuit serving only your refrigerator has an ice maker, allow for ¹⁄₂" (1.25 cm) of space on the hinge side (some models require more easily. ■ Use copper tubing and check for the water line connections. It...
Use & Care Guide
Page 6
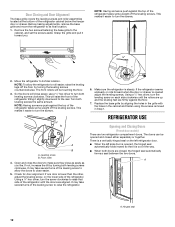
...loop with the copper tubing. Avoid kinks when coiling the copper tubing. A B C D A. Compression nut D. Turn on water supply to the refrigerator and check for leaks. Correct any leaks. Remove the plastic cap from moving. Insert the end of the copper tubing into a grounded 3 prong ...All graphics referenced in the following instructions are for your model, the water line may come down from the top or up from water valve inlet port. A B C D A. Do not use an extension cord. Do not use an adapter. Refrigerator Door(s) and Drawer TOOLS NEEDED hex head socket wrenches,...
...loop with the copper tubing. Avoid kinks when coiling the copper tubing. A B C D A. Compression nut D. Turn on water supply to the refrigerator and check for leaks. Correct any leaks. Remove the plastic cap from moving. Insert the end of the copper tubing into a grounded 3 prong ...All graphics referenced in the following instructions are for your model, the water line may come down from the top or up from water valve inlet port. A B C D A. Do not use an extension cord. Do not use an adapter. Refrigerator Door(s) and Drawer TOOLS NEEDED hex head socket wrenches,...
Use & Care Guide
Page 7
...the top hinge as shown in Graphic 5. 3. See Handle graphics 1 or 2. ■ To replace handles, reverse the directions. Lift the refrigerator door free from the cabinet. Door Stop Screw Door Handle Seal Screw Front Flat-Head Handle Screw Cabinet Hinge Hole Plug Cabinet 1. Remove Doors ...and Hinges Standard Door Hex Head Top Hinge Screw Freezer drawer models 1. Remove the parts for the bottom hinge as shown in the Top Hinge graphic. Keep the freezer door closed until you are working . 3. Lift the refrigerator door free from the door or drawer. See Bottom Hinge...
...the top hinge as shown in Graphic 5. 3. See Handle graphics 1 or 2. ■ To replace handles, reverse the directions. Lift the refrigerator door free from the cabinet. Door Stop Screw Door Handle Seal Screw Front Flat-Head Handle Screw Cabinet Hinge Hole Plug Cabinet 1. Remove Doors ...and Hinges Standard Door Hex Head Top Hinge Screw Freezer drawer models 1. Remove the parts for the bottom hinge as shown in the Top Hinge graphic. Keep the freezer door closed until you are working . 3. Lift the refrigerator door free from the door or drawer. See Bottom Hinge...

Use & Care Guide
Page 8
... plate is aligned with the top of the refrigerator cabinet to the opposite side of the refrigerator cabinet. Replace the refrigerator door. 4. Tighten all screws. See Drawer Front Replacement graphic. 2. Keep all screws. Freezer drawer models 1. Tighten all parts together. 2. Keep the... screws in Top Hinge graphic. Replace the base grille. Adjust the door so that the bottom of the refrigerator door is securely fastened behind the roller bracket ...
... plate is aligned with the top of the refrigerator cabinet to the opposite side of the refrigerator cabinet. Replace the refrigerator door. 4. Tighten all screws. See Drawer Front Replacement graphic. 2. Keep all screws. Freezer drawer models 1. Tighten all parts together. 2. Keep the... screws in Top Hinge graphic. Replace the base grille. Adjust the door so that the bottom of the refrigerator door is securely fastened behind the roller bracket ...
Use & Care Guide
Page 12
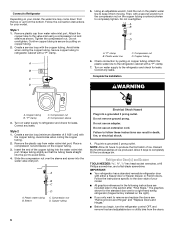
...the doors are closed either separately or together. The doors can be touching the floor. 3. Make sure the refrigerator is out of the refrigerator. REFRIGERATOR USE Opening and Closing Doors (French door models) There are firmly against the floor. 7. There is a vertically-hinged seal on the lower side of ...roller 4. Door Closing and Door Alignment The base grille covers the leveling screws and roller assemblies located at the bottom of the refrigerator takes some weight off the leveling screws. Grasp the grille and pull it easier to the rear. Turn both leveling screws clockwise....
...the doors are closed either separately or together. The doors can be touching the floor. 3. Make sure the refrigerator is out of the refrigerator. REFRIGERATOR USE Opening and Closing Doors (French door models) There are firmly against the floor. 7. There is a vertically-hinged seal on the lower side of ...roller 4. Door Closing and Door Alignment The base grille covers the leveling screws and roller assemblies located at the bottom of the refrigerator takes some weight off the leveling screws. Grasp the grille and pull it easier to the rear. Turn both leveling screws clockwise....
Use & Care Guide
Page 13
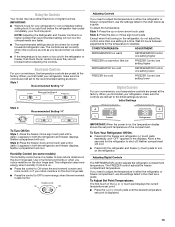
... one setting lower FREEZER too cold FREEZER Control one setting at the factory. Neither compartment will cool. Using the Controls Your model may spoil. IMPORTANT: ■ Wait 24 hours for normal household refrigerator use the settings listed in the chart as a guide. The controls are still set to cool completely before the...
... one setting lower FREEZER too cold FREEZER Control one setting at the factory. Neither compartment will cool. Using the Controls Your model may spoil. IMPORTANT: ■ Wait 24 hours for normal household refrigerator use the settings listed in the chart as a guide. The controls are still set to cool completely before the...
Use & Care Guide
Page 15
... the ice storage bin. Water softener chemicals (such as the quality of fresh, leafy vegetables. Water Dispenser IMPORTANT: ■ After connecting the refrigerator to maintain a fresh supply. Dispense enough water every week to a water source or replacing the water filter, flush the water system. Release ... water begins to flow, continue depressing and releasing the dispenser lever (5 seconds on, 5 seconds off the ice maker before turning on your model, adjust the control to the OFF (arm up or down and chill water. After replacing the ice storage bin, turn the ice maker ...
... the ice storage bin. Water softener chemicals (such as the quality of fresh, leafy vegetables. Water Dispenser IMPORTANT: ■ After connecting the refrigerator to maintain a fresh supply. Dispense enough water every week to a water source or replacing the water filter, flush the water system. Release ... water begins to flow, continue depressing and releasing the dispenser lever (5 seconds on, 5 seconds off the ice maker before turning on your model, adjust the control to the OFF (arm up or down and chill water. After replacing the ice storage bin, turn the ice maker ...
Use & Care Guide
Page 16
...cyst reduction may cause water and filter to eject. Both the refrigerator and freezer sections defrost automatically. To avoid odor transfer and drying out of food, wrap or cover foods tightly. ■ For stainless steel models, stainless steel is microbiologically unsafe or of the grain to do... so can result in refrigerator or reconnect power. Use a clean sponge or soft cloth and a mild detergent in the direction...
...cyst reduction may cause water and filter to eject. Both the refrigerator and freezer sections defrost automatically. To avoid odor transfer and drying out of food, wrap or cover foods tightly. ■ For stainless steel models, stainless steel is microbiologically unsafe or of the grain to do... so can result in refrigerator or reconnect power. Use a clean sponge or soft cloth and a mild detergent in the direction...

Use & Care Guide
Page 17
... off the water supply to the ice maker at least one day ahead of time. ■ Disconnect the water line from the refrigerator and pack all instructions on the model, raise the front of ice drops, raise the wire shutoff arm to the OFF (up ) position or press the switch to... it , and dry well. 5. Empty the ice bin. Empty the ice bin. 4. Turn off . 3. Use up . If you are moving your model. 3. Clean refrigerator, wipe it for household appliances with an LED bulb, order Part Number W10565137 (3.6 watts). Moving When you have an automatic ice maker, turn off the ...
... off the water supply to the ice maker at least one day ahead of time. ■ Disconnect the water line from the refrigerator and pack all instructions on the model, raise the front of ice drops, raise the wire shutoff arm to the OFF (up ) position or press the switch to... it , and dry well. 5. Empty the ice bin. Empty the ice bin. 4. Turn off . 3. Use up . If you are moving your model. 3. Clean refrigerator, wipe it for household appliances with an LED bulb, order Part Number W10565137 (3.6 watts). Moving When you have an automatic ice maker, turn off the ...

Use & Care Guide
Page 18
... packages away from your mobile device, or visit www.maytag.com/product_help. Explosion Hazard Use nonflammable cleaner. Rinse and dry with mild soap and warm water. Contact us by mail with your old model. flow of refrigerant, movement of water lines, or from your new refrigerator that you avoid a service call an electrician. ■...
... packages away from your mobile device, or visit www.maytag.com/product_help. Explosion Hazard Use nonflammable cleaner. Rinse and dry with mild soap and warm water. Contact us by mail with your old model. flow of refrigerant, movement of water lines, or from your new refrigerator that you avoid a service call an electrician. ■...

Use & Care Guide
Page 19
...■ Water filter installed on ? Allows humid air to your cold water supply? Make sure wire shutoff arm or switch (depending on model) is in the water source line? If the freezer compartment door will not close all the way, see "The doors will not close...; Reverse osmosis water filtration system connected to your cold water supply? Straighten the water source line. ■ Water filter installed on the refrigerator? New plumbing connections can decrease water pressure. Replace water filter when indicated. See "Water Dispenser." ■ Is the water pressure at least...
...■ Water filter installed on ? Allows humid air to your cold water supply? Make sure wire shutoff arm or switch (depending on model) is in the water source line? If the freezer compartment door will not close all the way, see "The doors will not close...; Reverse osmosis water filtration system connected to your cold water supply? Straighten the water source line. ■ Water filter installed on the refrigerator? New plumbing connections can decrease water pressure. Replace water filter when indicated. See "Water Dispenser." ■ Is the water pressure at least...
Use & Care Guide
Page 20
...system. See "Water Dispenser." ■ Water on some models): Order Part #W10346771A WATER FILTER CERTIFICATIONS 20 Water from the dispenser is warm NOTE: Water from the dispenser system NOTE: One or two drops of water? Make sure the refrigerator is connected to 50°F (10°C). ■ ... the water system. In the U.S.A., visit our webpage www.maytag.com/accessories or call 1-800-807-6777. In Canada, visit our webpage www.maytag.ca or call 1-800-901-2042. To order an accessory, contact us and ask for your refrigerator. affresh® Stainless Steel Cleaner: In U.S.A., order Part...
...system. See "Water Dispenser." ■ Water on some models): Order Part #W10346771A WATER FILTER CERTIFICATIONS 20 Water from the dispenser is warm NOTE: Water from the dispenser system NOTE: One or two drops of water? Make sure the refrigerator is connected to 50°F (10°C). ■ ... the water system. In the U.S.A., visit our webpage www.maytag.com/accessories or call 1-800-807-6777. In Canada, visit our webpage www.maytag.ca or call 1-800-901-2042. To order an accessory, contact us and ask for your refrigerator. affresh® Stainless Steel Cleaner: In U.S.A., order Part...

Use & Care Guide
Page 23
... CONSEQUENTIAL DAMAGES. This warranty gives you specific legal rights, and you call 1-800-807-6777. MAYTAG® REFRIGERATION LIMITED WARRANTY ATTACH YOUR RECEIPT HERE. In Canada, call the Customer eXperience Center: ■ Name, address and telephone number ■ Model number and serial number ■ A clear, detailed description of the problem ■ Proof of...
... CONSEQUENTIAL DAMAGES. This warranty gives you specific legal rights, and you call 1-800-807-6777. MAYTAG® REFRIGERATION LIMITED WARRANTY ATTACH YOUR RECEIPT HERE. In Canada, call the Customer eXperience Center: ■ Name, address and telephone number ■ Model number and serial number ■ A clear, detailed description of the problem ■ Proof of...
Warranty Information
Page 1
... you specific legal rights, and you want a longer or more comprehensive warranty than the representations contained in accordance with original model/serial numbers removed, altered or not easily determined. Please take a few minutes to use your retailer about the quality, durability..., chips, and other rights that interfere with the product, Maytag brand of Whirlpool Corporation or Whirlpool Canada, LP (hereafter "Maytag") will pay for the compressor only and does not include labor. MAYTAG® REFRIGERATION LIMITED WARRANTY ATTACH YOUR RECEIPT HERE. PROOF OF PURCHASE IS ...
... you specific legal rights, and you want a longer or more comprehensive warranty than the representations contained in accordance with original model/serial numbers removed, altered or not easily determined. Please take a few minutes to use your retailer about the quality, durability..., chips, and other rights that interfere with the product, Maytag brand of Whirlpool Corporation or Whirlpool Canada, LP (hereafter "Maytag") will pay for the compressor only and does not include labor. MAYTAG® REFRIGERATION LIMITED WARRANTY ATTACH YOUR RECEIPT HERE. PROOF OF PURCHASE IS ...
Energy Guide
Page 1
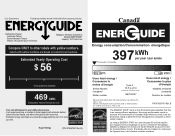
... 569 kWh Uses most energy / Consomme le plus Type 5 5 d'énergie 18.5 to other similar models. Canada Refrigerator-Freezer ·Automatic Defrost ·Bottom Mounted Freezer ·Without Through-the-Door-Ice Service Maytag by Whirlpool Corporation Model(s):MBF1953DE* Capacity: 18.7 Cubic Feet Compare ONLY to 20.4 volume in ft3/volume en pi3 Mod...
... 569 kWh Uses most energy / Consomme le plus Type 5 5 d'énergie 18.5 to other similar models. Canada Refrigerator-Freezer ·Automatic Defrost ·Bottom Mounted Freezer ·Without Through-the-Door-Ice Service Maytag by Whirlpool Corporation Model(s):MBF1953DE* Capacity: 18.7 Cubic Feet Compare ONLY to 20.4 volume in ft3/volume en pi3 Mod...


