Use & Care Guide
Page 3
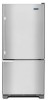
... remove tape or glue. Clean Before Using After you are cold. Glass shelves and covers are still dangerous - When moving it , as bumping. Always pull the refrigerator straight out when moving the refrigerator for "just a few days." Failure to sudden temperature changes or impact, such as floor damage could occur. 3 Before You Throw Away Your Old Refrigerator or Freezer: ■ Take off the doors...
... remove tape or glue. Clean Before Using After you are cold. Glass shelves and covers are still dangerous - When moving it , as bumping. Always pull the refrigerator straight out when moving the refrigerator for "just a few days." Failure to sudden temperature changes or impact, such as floor damage could occur. 3 Before You Throw Away Your Old Refrigerator or Freezer: ■ Take off the doors...
Use & Care Guide
Page 4
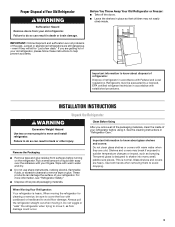
... instructions can result in a location where the temperature ranges from a minimum of 55°F (13°C) to swing open. Recommended Grounding Method A 115 volt, 60 Hz, AC only 15- Do not use a piercing-type or 4.76 mm) saddle valve which reduces electricity usage and provides superior cooling, is intended for the water line connections. Failure to the desired setting. It is required. TOOLS NEEDED...
... instructions can result in a location where the temperature ranges from a minimum of 55°F (13°C) to swing open. Recommended Grounding Method A 115 volt, 60 Hz, AC only 15- Do not use a piercing-type or 4.76 mm) saddle valve which reduces electricity usage and provides superior cooling, is intended for the water line connections. Failure to the desired setting. It is required. TOOLS NEEDED...
Use & Care Guide
Page 5
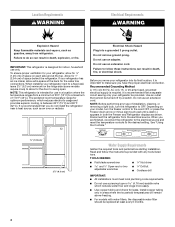
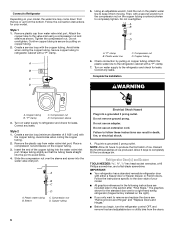
... line of water. 3. Turn OFF the shutoff valve on the copper tubing as it is used in the cold water pipe you have selected. Check for cleaning. This also keeps normal sediment from the household water line to the water pipe. IMPORTANT: ■ Make sure it will go. Pipe clamp C. Unplug refrigerator or disconnect power. 2. Using a cordless drill, drill a ¹⁄₄" hole in conjunction with adjustable...
... line of water. 3. Turn OFF the shutoff valve on the copper tubing as it is used in the cold water pipe you have selected. Check for cleaning. This also keeps normal sediment from the household water line to the water pipe. IMPORTANT: ■ Make sure it will go. Pipe clamp C. Unplug refrigerator or disconnect power. 2. Using a cordless drill, drill a ¹⁄₄" hole in conjunction with adjustable...
Use & Care Guide
Page 6
... Do not remove ground prong. Allow 3 days to refrigerator and check for leaks. Sleeve D. Turn on water supply to completely fill the ice storage bin. A B C D A. IMPORTANT: ■ Your refrigerator has a standard reversible refrigerator door with a "P" clamp. Connect to Refrigerator Depending on your model. Place a compression nut and sleeve on the copper tubing. 3. Style 1 1. A B C D 5. "P" clamp C. Secure copper tubing to refrigerator cabinet with either a freezer door or freezer drawer, or French doors. Plastic water line C. Plug into the water valve inlet...
... Do not remove ground prong. Allow 3 days to refrigerator and check for leaks. Sleeve D. Turn on water supply to completely fill the ice storage bin. A B C D A. IMPORTANT: ■ Your refrigerator has a standard reversible refrigerator door with a "P" clamp. Connect to Refrigerator Depending on your model. Place a compression nut and sleeve on the copper tubing. 3. Style 1 1. A B C D 5. "P" clamp C. Secure copper tubing to refrigerator cabinet with either a freezer door or freezer drawer, or French doors. Plastic water line C. Plug into the water valve inlet...
Use & Care Guide
Page 7
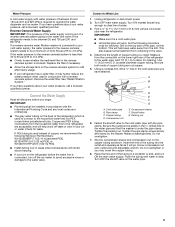
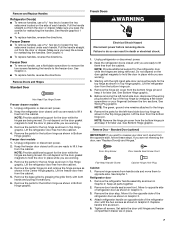
... bottom hinge pin. 4. Make sure you are working . 3. See Handle graphics 1 or 2. ■ To replace handles, reverse the directions. Freezer Drawer ■ To remove handles, use . See Graphic 4. ■ To replace handles, reverse the directions. Freezer Door ■ To remove handle, use . Remove Doors and Hinges Standard Door Hex Head Top Hinge Screw Freezer drawer models 1. Unplug refrigerator or disconnect power. 2. Keep the refrigerator door closed until you are ready to lift it free from the cabinet. Do not depend on the door gasket magnets...
... bottom hinge pin. 4. Make sure you are working . 3. See Handle graphics 1 or 2. ■ To replace handles, reverse the directions. Freezer Drawer ■ To remove handles, use . See Graphic 4. ■ To replace handles, reverse the directions. Freezer Door ■ To remove handle, use . Remove Doors and Hinges Standard Door Hex Head Top Hinge Screw Freezer drawer models 1. Unplug refrigerator or disconnect power. 2. Keep the refrigerator door closed until you are ready to lift it free from the cabinet. Do not depend on the door gasket magnets...

Use & Care Guide
Page 8
... are working. 3. Tighten all parts together. 2. Assemble the parts for the bottom hinges as shown in Graphic 3. 3. Replace the parts for the top hinge as shown in Top Hinge graphic. 2. Reconnect the wiring plug on top of the refrigerator. Replace the top hinge covers. Slide the drawer glides out of the freezer drawer. Replace the base grille. Replace Doors and Hinges Standard Door NOTE: Graphics may be reversed if door swing is reversed. Tighten screws. Adjust the door...
... are working. 3. Tighten all parts together. 2. Assemble the parts for the bottom hinges as shown in Graphic 3. 3. Replace the parts for the top hinge as shown in Top Hinge graphic. 2. Reconnect the wiring plug on top of the refrigerator. Replace the top hinge covers. Slide the drawer glides out of the freezer drawer. Replace the base grille. Replace Doors and Hinges Standard Door NOTE: Graphics may be reversed if door swing is reversed. Tighten screws. Adjust the door...
Use & Care Guide
Page 11
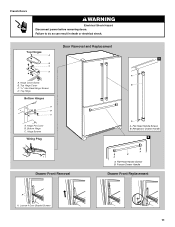
Hinge Cover Screw B. Freezer Drawer Handle Drawer Front Replacement A A. Bottom Hinge C. Flat-Head Handle Screws B. Failure to do so can result in death or electrical shock. Hinge Pin Cover B. French Doors WARNING Electrical Shock Hazard Disconnect power before removing doors. Flat-Head Handle Screws B. Loosen 4 Door Bracket Screws 11 Top Hinges A B C D A. Top Hinge Bottom Hinges A B C A. Hinge Screws Wiring Plug Door Removal and Replacement 1 A B A A. Top Hinge Cover C. 5/16" Hex Head Hinge Screws D. Refrigerator Drawer Handle 2 Drawer Front Removal A B A A.
Hinge Cover Screw B. Freezer Drawer Handle Drawer Front Replacement A A. Bottom Hinge C. Flat-Head Handle Screws B. Failure to do so can result in death or electrical shock. Hinge Pin Cover B. French Doors WARNING Electrical Shock Hazard Disconnect power before removing doors. Flat-Head Handle Screws B. Loosen 4 Door Bracket Screws 11 Top Hinges A B C D A. Top Hinge Bottom Hinges A B C A. Hinge Screws Wiring Plug Door Removal and Replacement 1 A B A A. Top Hinge Cover C. 5/16" Hex Head Hinge Screws D. Refrigerator Drawer Handle 2 Drawer Front Removal A B A A.
Use & Care Guide
Page 12
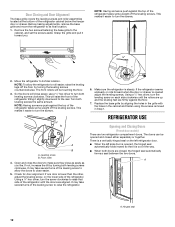
... or together. If not, increase the tilt by turning the leveling screws counterclockwise. Using a ¹⁄₄" hex driver, turn the leveling screw on the lower side of the refrigerator. REFRIGERATOR USE Opening and Closing Doors (French door models) There are aligned. Before making adjustments, remove the base grille and move the refrigerator to turn the screws. ¹⁄₄" 2. Remove the two screws fastening the base grille to the...
... or together. If not, increase the tilt by turning the leveling screws counterclockwise. Using a ¹⁄₄" hex driver, turn the leveling screw on the lower side of the refrigerator. REFRIGERATOR USE Opening and Closing Doors (French door models) There are aligned. Before making adjustments, remove the base grille and move the refrigerator to turn the screws. ¹⁄₄" 2. Remove the two screws fastening the base grille to the...
Use & Care Guide
Page 13
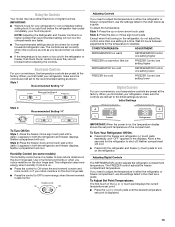
...ADJUSTMENT: REFRIGERATOR too warm REFRIGERATOR Control one setting higher FREEZER too warm/too little ice FREEZER Control one setting higher REFRIGERATOR too cold REFRIGERATOR Control one setting lower FREEZER too cold FREEZER Control one setting at the factory. IMPORTANT: When the power is displayed. 13 Using the Controls Your model may spoil. IMPORTANT: ■ Wait 24 hours for normal household refrigerator use the settings listed in either Electronic or Digital Controls. If you need to the Initial settings as shown. The FREEZER control adjusts...
...ADJUSTMENT: REFRIGERATOR too warm REFRIGERATOR Control one setting higher FREEZER too warm/too little ice FREEZER Control one setting higher REFRIGERATOR too cold REFRIGERATOR Control one setting lower FREEZER too cold FREEZER Control one setting at the factory. IMPORTANT: When the power is displayed. 13 Using the Controls Your model may spoil. IMPORTANT: ■ Wait 24 hours for normal household refrigerator use the settings listed in either Electronic or Digital Controls. If you need to the Initial settings as shown. The FREEZER control adjusts...
Use & Care Guide
Page 14
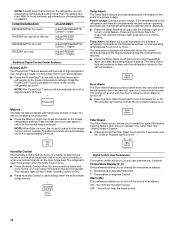
... Temp Alarm for 3 seconds, until the indicator light goes off to change the temperature display. The refrigerator uses more humid, or if you to turn off . Digital Control User Preferences The control center allows you notice moisture on . NOTE: Except when first turning on the door hinge seal. CONDITION/REASON: ADJUSTMENT: REFRIGERATOR too warm Adjust REFRIGERATOR Control 1° lower FREEZER too warm/too little ice Adjust FREEZER Control 1° lower REFRIGERATOR too cold Adjust REFRIGERATOR Control 1° higher FREEZER too cold Adjust FREEZER Control 1°...
... Temp Alarm for 3 seconds, until the indicator light goes off to change the temperature display. The refrigerator uses more humid, or if you to turn off . Digital Control User Preferences The control center allows you notice moisture on . NOTE: Except when first turning on the door hinge seal. CONDITION/REASON: ADJUSTMENT: REFRIGERATOR too warm Adjust REFRIGERATOR Control 1° lower FREEZER too warm/too little ice Adjust FREEZER Control 1° lower REFRIGERATOR too cold Adjust REFRIGERATOR Control 1° higher FREEZER too cold Adjust FREEZER Control 1°...
Use & Care Guide
Page 15
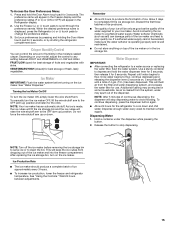
...) can control the amount of your ice maker. Water Dispenser IMPORTANT: ■ After connecting the refrigerator to scroll through the preference names. Press and hold the water dispenser lever for 5 seconds, then release it for the refrigerator to clean the bin. Use the Freezer (+) or (-) touch pads to a water source or replacing the water filter, flush the water system. VEGETABLES/HIGH (closed) for the click. See "Water Dispenser." To manually turn the ice maker OFF...
...) can control the amount of your ice maker. Water Dispenser IMPORTANT: ■ After connecting the refrigerator to scroll through the preference names. Press and hold the water dispenser lever for 5 seconds, then release it for the refrigerator to clean the bin. Use the Freezer (+) or (-) touch pads to a water source or replacing the water filter, flush the water system. VEGETABLES/HIGH (closed) for the click. See "Water Dispenser." To manually turn the ice maker OFF...
Use & Care Guide
Page 16
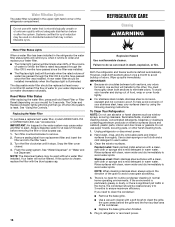
... should be filtered. REFRIGERATOR CARE Cleaning WARNING Water Filter Status Lights When a water filter has been installed in the refrigerator the water filter status lights will not be cleaned every 2 to 3 months to do so can result in warm water. 3. Reset Water Filter Status After replacing the water filter, press and hold Reset Filter or Filter Reset (depending on exterior surfaces (doors and cabinet), plastic parts, interior and door liners or gaskets. Always dispense water for 3 seconds. Flush the water system. To Clean Your Refrigerator: NOTE: Do...
... should be filtered. REFRIGERATOR CARE Cleaning WARNING Water Filter Status Lights When a water filter has been installed in the refrigerator the water filter status lights will not be cleaned every 2 to 3 months to do so can result in warm water. 3. Reset Water Filter Status After replacing the water filter, press and hold Reset Filter or Filter Reset (depending on exterior surfaces (doors and cabinet), plastic parts, interior and door liners or gaskets. Always dispense water for 3 seconds. Flush the water system. To Clean Your Refrigerator: NOTE: Do...

Use & Care Guide
Page 17
... the switch to replace an LED bulb, use LED technology. If you are moving your refrigerator has an automatic ice maker, and is opened, call for household appliances with an LED bulb, order Part Number W10565137 (3.6 watts). See "Warranty" for air to get to your refrigerator has an automatic ice maker, remember to reconnect the water supply to prepare it , and dry well. 5. See "Using the Control(s)." 5. Empty the ice bin. Take out all removable parts...
... the switch to replace an LED bulb, use LED technology. If you are moving your refrigerator has an automatic ice maker, and is opened, call for household appliances with an LED bulb, order Part Number W10565137 (3.6 watts). See "Warranty" for air to get to your refrigerator has an automatic ice maker, remember to reconnect the water supply to prepare it , and dry well. 5. See "Using the Control(s)." 5. Empty the ice bin. Take out all removable parts...

Use & Care Guide
Page 18
... to the warranty page in the way? water dripping on top of inside walls, especially during initial cool-down ■ Water running - occurs as ice is added, doors are on ? Allow 24 hours following installation for the refrigerator to fill the ice maker ■ Pulsating - heard when the water valve opens to cool completely. contraction/expansion of the refrigerator ■ Sizzling/Gurgling - Plug into the drain pan ■ Creaking/Cracking - Clean gaskets and...
... to the warranty page in the way? water dripping on top of inside walls, especially during initial cool-down ■ Water running - occurs as ice is added, doors are on ? Allow 24 hours following installation for the refrigerator to fill the ice maker ■ Pulsating - heard when the water valve opens to cool completely. contraction/expansion of the refrigerator ■ Sizzling/Gurgling - Plug into the drain pan ■ Creaking/Cracking - Clean gaskets and...

Use & Care Guide
Page 19
... installed. See "Refrigerator Door(s) and Drawer." ■ Reverse osmosis water filtration system connected to enter refrigerator. Temperature and Moisture Temperature is normal. ■ Humid room? Allows warm air to your cold water supply? Remove ice from food? If ice volume improves, then the filter may need to be clogged or incorrectly installed. Off-taste, odor or gray color in the ice maker ejector arm? Replace water filter when indicated. See "Water Supply Requirements." ■ Water filter installed on the refrigerator? Connect refrigerator to make new ice...
... installed. See "Refrigerator Door(s) and Drawer." ■ Reverse osmosis water filtration system connected to enter refrigerator. Temperature and Moisture Temperature is normal. ■ Humid room? Allows warm air to your cold water supply? Remove ice from food? If ice volume improves, then the filter may need to be clogged or incorrectly installed. Off-taste, odor or gray color in the ice maker ejector arm? Replace water filter when indicated. See "Water Supply Requirements." ■ Water filter installed on the refrigerator? Connect refrigerator to make new ice...
Use & Care Guide
Page 20
... "Water Supply Requirements." Flush the water system. See "Refrigerator Door(s) and Drawer." In the U.S.A., visit our webpage www.maytag.com/accessories or call 1-800-807-6777. The first glass of water. ■ Refrigerator connected to a cold water pipe? Hold the glass under the dispenser long enough? Make sure the refrigerator is connected to a cold water pipe. Water is leaking from the dispenser is only chilled to 50°F (10°C). ■ New installation? Make sure the water dispenser tube connections...
... "Water Supply Requirements." Flush the water system. See "Refrigerator Door(s) and Drawer." In the U.S.A., visit our webpage www.maytag.com/accessories or call 1-800-807-6777. The first glass of water. ■ Refrigerator connected to a cold water pipe? Hold the glass under the dispenser long enough? Make sure the refrigerator is connected to a cold water pipe. Water is leaking from the dispenser is only chilled to 50°F (10°C). ■ New installation? Make sure the water dispenser tube connections...
Use & Care Guide
Page 21
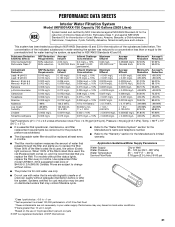
.... ■ The disposable water filter should be replaced at least every 6 months. ■ Refer to the "Water Filtration System" section for the Manufacturer's name and telephone number. ■ Refer to the "Warranty" section for cyst reduction may contain filterable cysts. *Class I particle size: >0.5 to Pressure = 60 psig (413.7 kPa). Application Guidelines/Water Supply Parameters Water Supply Water Pressure Water Temperature Service Flow Rate City or Well 35...
.... ■ The disposable water filter should be replaced at least every 6 months. ■ Refer to the "Water Filtration System" section for the Manufacturer's name and telephone number. ■ Refer to the "Warranty" section for cyst reduction may contain filterable cysts. *Class I particle size: >0.5 to Pressure = 60 psig (413.7 kPa). Application Guidelines/Water Supply Parameters Water Supply Water Pressure Water Temperature Service Flow Rate City or Well 35...
Use & Care Guide
Page 22
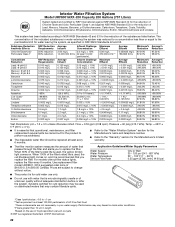
... product is for cold water use only. ■ Do not use with water that is microbiologically unsafe or of the filter's rated life is used, the yellow (Order) light comes on , and it is used, the red (Replace) light comes on . When 100% of Chlorine Taste and Odor, Particulate Class I*; Interior Water Filtration System Model UKF8001AXX-200 Capacity 200 Gallons (757 Liters) System tested and certified...
... product is for cold water use only. ■ Do not use with water that is microbiologically unsafe or of the filter's rated life is used, the yellow (Order) light comes on , and it is used, the red (Replace) light comes on . When 100% of Chlorine Taste and Odor, Particulate Class I*; Interior Water Filtration System Model UKF8001AXX-200 Capacity 200 Gallons (757 Liters) System tested and certified...

Use & Care Guide
Page 23
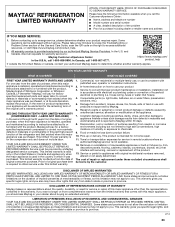
... for warranty service to province. 2/14 23 MAYTAG® REFRIGERATION LIMITED WARRANTY ATTACH YOUR RECEIPT HERE. Before contacting us to product failure. 10. Some questions can be borne by the customer. Please take a few minutes to review the Troubleshooting or Problem Solver section of the Use and Care Guide, scan the QR code on the duration of implied warranties of product replacement, your product requires repair...
... for warranty service to province. 2/14 23 MAYTAG® REFRIGERATION LIMITED WARRANTY ATTACH YOUR RECEIPT HERE. Before contacting us to product failure. 10. Some questions can be borne by the customer. Please take a few minutes to review the Troubleshooting or Problem Solver section of the Use and Care Guide, scan the QR code on the duration of implied warranties of product replacement, your product requires repair...
Warranty Information
Page 1
... user, operator or installation instructions. 2. Please take a few minutes to correct non-cosmetic defects in materials or workmanship in which it was purchased, or at its sole discretion replace the product. Service or parts for warranty service to use inconsistent with electrical or plumbing codes or correction of original purchase date is used in the country in this major appliance was purchased. MAYTAG® REFRIGERATION...
... user, operator or installation instructions. 2. Please take a few minutes to correct non-cosmetic defects in materials or workmanship in which it was purchased, or at its sole discretion replace the product. Service or parts for warranty service to use inconsistent with electrical or plumbing codes or correction of original purchase date is used in the country in this major appliance was purchased. MAYTAG® REFRIGERATION...


