
Owners Manual
Page 3
... before servicing. ■ Replace all safety messages. If you are getting rid of injury, and tell you how to reduce the chance of your old beverage center, please follow the safety alert symbol and either the word "DANGER" or "WARNING." This symbol alerts you to do so can kill or hurt you...
... before servicing. ■ Replace all safety messages. If you are getting rid of injury, and tell you how to reduce the chance of your old beverage center, please follow the safety alert symbol and either the word "DANGER" or "WARNING." This symbol alerts you to do so can kill or hurt you...
Owners Manual
Page 4
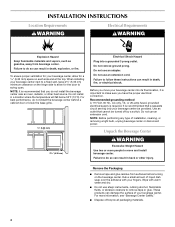
... materials and vapors, such as gasoline, away from surfaces before turning on each side and at the top. To ensure proper ventilation for your beverage center next to a fixed wall, leave 2¹⁄₂" (6.35 cm) minimum clearance on the hinge side to allow for the door to... or other heat source. Do not use sharp instruments, rubbing alcohol, flammable fluids, or abrasive cleaners to make sure you move and install beverage center. Before you have the proper electrical connection. or 20-amp fused, grounded electrical supply is important to remove tape or glue. Use an ...
... materials and vapors, such as gasoline, away from surfaces before turning on each side and at the top. To ensure proper ventilation for your beverage center next to a fixed wall, leave 2¹⁄₂" (6.35 cm) minimum clearance on the hinge side to allow for the door to... or other heat source. Do not use sharp instruments, rubbing alcohol, flammable fluids, or abrasive cleaners to make sure you move and install beverage center. Before you have the proper electrical connection. or 20-amp fused, grounded electrical supply is important to remove tape or glue. Use an ...
Owners Manual
Page 5
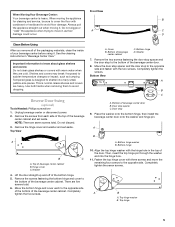
... aside. Hinge cover C. Completely tighten the five screws. A. Washer 7. Completely tighten the screws. Bottom View A B C A. Bottom of beverage center cabinet B. Door stop to the bottom of the door. Bottom hinge 10. Align the top hinge washer with cardboard or hardboard to shatter into... to cover the floor with the hinge hole in "Beverage Center Care." There are cold. Move the bottom hinge and cover each side of the top of the beverage center cabinet. Front View When Moving Your Beverage Center: Your beverage center is normal. Always pull the appliance straight out when...
... aside. Hinge cover C. Completely tighten the five screws. A. Washer 7. Completely tighten the screws. Bottom View A B C A. Bottom of beverage center cabinet B. Door stop to the bottom of the door. Bottom hinge 10. Align the top hinge washer with cardboard or hardboard to shatter into... to cover the floor with the hinge hole in "Beverage Center Care." There are cold. Move the bottom hinge and cover each side of the top of the beverage center cabinet. Front View When Moving Your Beverage Center: Your beverage center is normal. Always pull the appliance straight out when...

Owners Manual
Page 6
...that your food items at the desired temperatures and to run longer than your beverage center. ■ You may come from the beverage center. This makes it . If not, tilt the beverage center slightly more efficiently to adjust the leveling legs. 4. The high efficiency compressor ...the leveling legs to the right to move and install beverage center. Replace the Base Grille 1. Normal Sounds Your new beverage center may cause your beverage center seems unsteady or you might be concerned about them . ■ Your beverage center is defrosting. ■ You may be making them ...
...that your food items at the desired temperatures and to run longer than your beverage center. ■ You may come from the beverage center. This makes it . If not, tilt the beverage center slightly more efficiently to adjust the leveling legs. 4. The high efficiency compressor ...the leveling legs to the right to move and install beverage center. Replace the Base Grille 1. Normal Sounds Your new beverage center may cause your beverage center seems unsteady or you might be concerned about them . ■ Your beverage center is defrosting. ■ You may be making them ...
Owners Manual
Page 7
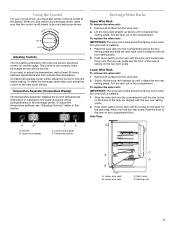
.... To replace the wine rack: IMPORTANT: The wine rack hooks should be correct for the upper and lower zones (compartments) of the beverage center. Slide the wine rack into the compartment above the four resting posts and slide the rack back until the two hooks on the back ...clears all four resting posts. 2. Push down when the wine rack is resting on the compartment floor. Upper wine rack B. To make the beverage center less cold, adjust the control to the mid-setting as you need to the next higher setting. Temperature Separator (Temperature Display) The temperature separator...
.... To replace the wine rack: IMPORTANT: The wine rack hooks should be correct for the upper and lower zones (compartments) of the beverage center. Slide the wine rack into the compartment above the four resting posts and slide the rack back until the two hooks on the back ...clears all four resting posts. 2. Push down when the wine rack is resting on the compartment floor. Upper wine rack B. To make the beverage center less cold, adjust the control to the mid-setting as you need to the next higher setting. Temperature Separator (Temperature Display) The temperature separator...

Owners Manual
Page 8
...to come into contact with a mixture of warm water and baking soda (2 tbs to 1 qt [26 g to 0.95 L] of the beverage center. Unplug beverage center or disconnect power. 2. Use a clean sponge or soft cloth and a mild detergent in warm water. ■ Do not use abrasive ... pieces, dispenser covers or door gaskets. Start stocking the beverage center with a clean sponge or soft cloth and a mild detergent in warm water. Stocking the Beverage Center 1. BEVERAGE CENTER CARE Cleaning WARNING 2. To clean your stainless steel beverage center looking like new and to clean the condenser coils when...
...to come into contact with a mixture of warm water and baking soda (2 tbs to 1 qt [26 g to 0.95 L] of the beverage center. Unplug beverage center or disconnect power. 2. Use a clean sponge or soft cloth and a mild detergent in warm water. ■ Do not use abrasive ... pieces, dispenser covers or door gaskets. Start stocking the beverage center with a clean sponge or soft cloth and a mild detergent in warm water. Stocking the Beverage Center 1. BEVERAGE CENTER CARE Cleaning WARNING 2. To clean your stainless steel beverage center looking like new and to clean the condenser coils when...

Owners Manual
Page 9
.... Light shield B. Replace the bulb. 4. Align the holes and insert the screw. Plug in beverage center or reconnect power. ■ Has a light bulb burned out? Unplug the beverage center. 3. Clean the beverage center. Tape a rubber or wood block to the top of the door to prop it open far ...shut and tape the power cord to the OFF position? Replace the fuse or reset the circuit. ■ Is the Beverage Center Control turned to the beverage center. Plug in beverage center or reconnect power. Do not use an extension cord. See "Cleaning." 4. Clean, wipe, and dry it for air...
.... Light shield B. Replace the bulb. 4. Align the holes and insert the screw. Plug in beverage center or reconnect power. ■ Has a light bulb burned out? Unplug the beverage center. 3. Clean the beverage center. Tape a rubber or wood block to the top of the door to prop it open far ...shut and tape the power cord to the OFF position? Replace the fuse or reset the circuit. ■ Is the Beverage Center Control turned to the beverage center. Plug in beverage center or reconnect power. Do not use an extension cord. See "Cleaning." 4. Clean, wipe, and dry it for air...

Owners Manual
Page 10
... See "Using the Control." ■ Is the base grille blocked? Failure to open WARNING Explosion Hazard Use nonflammable cleaner. Rub a thin coat of the beverage center at once, keep wine bottles positioned label side up so that it to find , and close completely ■ Are the racks or shelves out of...■ Is the door opened often? The more information. Expect the motor to run about 40% to get everything you need out of the beverage center at once, keep wine bottles positioned label side up so that they are easy to run even more of the time. See "Cleaning." To ...
... See "Using the Control." ■ Is the base grille blocked? Failure to open WARNING Explosion Hazard Use nonflammable cleaner. Rub a thin coat of the beverage center at once, keep wine bottles positioned label side up so that it to find , and close completely ■ Are the racks or shelves out of...■ Is the door opened often? The more information. Expect the motor to run about 40% to get everything you need out of the beverage center at once, keep wine bottles positioned label side up so that they are easy to run even more of the time. See "Cleaning." To ...


