
Installation Instructions
Page 1
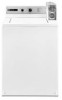
...Serial Date of Purchase Prendre note des numéros de modèle et de série avant d'installer la laveuse. INSTALLATION INSTRUCTIONS COMMERCIAL WASHER 120-volt, 60-Hz Models INSTRUCTIONS D'INSTALLATION DE LA LAVEUSE COMMERCIALE Modèles 120 V, 60 Hz Write down the model and serial numbers... before installing washer. Les deux numéros sont indiqués sur la plaque signalétique sous le couvercle. Both numbers are listed on the model...
...Serial Date of Purchase Prendre note des numéros de modèle et de série avant d'installer la laveuse. INSTALLATION INSTRUCTIONS COMMERCIAL WASHER 120-volt, 60-Hz Models INSTRUCTIONS D'INSTALLATION DE LA LAVEUSE COMMERCIALE Modèles 120 V, 60 Hz Write down the model and serial numbers... before installing washer. Les deux numéros sont indiqués sur la plaque signalétique sous le couvercle. Both numbers are listed on the model...
Installation Instructions
Page 2
...Tools and Parts 3 Location Requirements 3 Drain System 4 Electrical Requirements 5 INSTALLATION INSTRUCTIONS 6 Remove Shipping Strap 6 Connect the Hoses 6 Level the Washer 7 Complete Installation 8 ELECTRONIC CONTROLS SETUP 10 WARRANTY 14 Table des matières SÉCURITÉ DE LA LAVEUSE 15 EXIGENCES D'INSTALLATION ... Réglage de l'aplomb de la laveuse 20 Achever l'installation 21 RÉGLAGE DE LA COMMANDE ÉLECTRONIQUE 23 GARANTIE 27 WASHER SAFETY Your safety and the safety of injury, and tell you what can kill or hurt you and others are not followed. 2...
...Tools and Parts 3 Location Requirements 3 Drain System 4 Electrical Requirements 5 INSTALLATION INSTRUCTIONS 6 Remove Shipping Strap 6 Connect the Hoses 6 Level the Washer 7 Complete Installation 8 ELECTRONIC CONTROLS SETUP 10 WARRANTY 14 Table des matières SÉCURITÉ DE LA LAVEUSE 15 EXIGENCES D'INSTALLATION ... Réglage de l'aplomb de la laveuse 20 Achever l'installation 21 RÉGLAGE DE LA COMMANDE ÉLECTRONIQUE 23 GARANTIE 27 WASHER SAFETY Your safety and the safety of injury, and tell you what can kill or hurt you and others are not followed. 2...

Installation Instructions
Page 3
...drain facilities should be used in published user-repair instructions that all parts were included. 1 hose clamp 2 inlet hoses 4 flat water hose washers 2 front-leveling legs with a maximum slope of 1" (25 mm) under the bulkhead. See "Electrical Requirements." Hot and cold water ... Intellectual Properties, LLC. 3 any servicing unless specifically recommended in a hot water system that have the skills to support the washer weight (washer, water, and load) of 315 lbs (143 kgs). SAVE THESE INSTRUCTIONS INSTALLATION REQUIREMENTS Tools and Parts You will release See...
...drain facilities should be used in published user-repair instructions that all parts were included. 1 hose clamp 2 inlet hoses 4 flat water hose washers 2 front-leveling legs with a maximum slope of 1" (25 mm) under the bulkhead. See "Electrical Requirements." Hot and cold water ... Intellectual Properties, LLC. 3 any servicing unless specifically recommended in a hot water system that have the skills to support the washer weight (washer, water, and load) of 315 lbs (143 kgs). SAVE THESE INSTRUCTIONS INSTALLATION REQUIREMENTS Tools and Parts You will release See...
Installation Instructions
Page 4
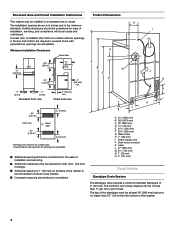
... be at least 39" (990 mm) high and no less than 72" (1.8 m) from the bottom of the washer is the minimum for the ease of 2" (50 mm). Recessed Area and Closet Installation Instructions This washer may be installed in the top and bottom are acceptable. Water inlets H. 7" (180 mm) I D A B G C E Cold Hot...) Closet door 3" (76 mm) *Opening is recommended to reduce noise transfer. Additional spacing of 1" (25 mm) on all sides of the washer. 4 Louvered doors with local codes and ordinances. The top of the standpipe must be no higher than 17 gal. (64 L) per minute....
... be at least 39" (990 mm) high and no less than 72" (1.8 m) from the bottom of the washer is the minimum for the ease of 2" (50 mm). Recessed Area and Closet Installation Instructions This washer may be installed in the top and bottom are acceptable. Water inlets H. 7" (180 mm) I D A B G C E Cold Hot...) Closet door 3" (76 mm) *Opening is recommended to reduce noise transfer. Additional spacing of 1" (25 mm) on all sides of the washer. 4 Louvered doors with local codes and ordinances. The top of the standpipe must be no higher than 17 gal. (64 L) per minute....
Installation Instructions
Page 5
... outlet is not available, it is recommended that a qualified electrical installer determine that the ground path is recommended that a separate circuit serving only this washer be provided. Do not use an adapter. Do not ground to have a fuse in the neutral or ground circuit. A copy of the above ...code standards can result in death, fire, or electrical shock. It is adequate. IMPORTANT : The washer must be electrically grounded in accordance with local codes and ordinances or, in the absence of local codes, with local codes and ordinances. or 20...
... outlet is not available, it is recommended that a qualified electrical installer determine that the ground path is recommended that a separate circuit serving only this washer be provided. Do not use an adapter. Do not ground to have a fuse in the neutral or ground circuit. A copy of the above ...code standards can result in death, fire, or electrical shock. It is adequate. IMPORTANT : The washer must be electrically grounded in accordance with local codes and ordinances or, in the absence of local codes, with local codes and ordinances. or 20...
Installation Instructions
Page 6
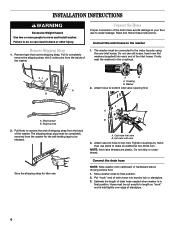
...shipping strap for the self-leveling legs to be connected to remove the end of shipping strap from the back of the washer. Attach second hose to the washer 1. Washer 2. Pull firmly to the water faucets using the new inlet hoses. Tighten couplings by hand; Shipping tape B. The shipping... then use pliers to water leakage. NOTE: Inlet valve threads are plastic. Do not strip or crossthread. Connect the drain hose NOTE: Slide washer onto cardboard or hardboard before moving across floor. 1. Put "hook" end of drain hose into each end of the inlet hoses. Estimate the ...
...shipping strap for the self-leveling legs to be connected to remove the end of shipping strap from the back of the washer. Attach second hose to the washer 1. Washer 2. Pull firmly to the water faucets using the new inlet hoses. Tighten couplings by hand; Shipping tape B. The shipping... then use pliers to water leakage. NOTE: Inlet valve threads are plastic. Do not strip or crossthread. Connect the drain hose NOTE: Slide washer onto cardboard or hardboard before moving across floor. 1. Put "hook" end of drain hose into each end of the inlet hoses. Estimate the ...

Installation Instructions
Page 7
...drain hose. Before attaching water inlet hoses, run water through both faucets into correct holes at this point. 2. Push the drain hose onto the washer connector. Tighten coupling to the water faucets 1. Measure and mark a point approximately 16" (406 mm) from one side of drain hose down... to each other side of base. Use the leveling legs and nuts from under washer. 7 Attach bottom hose (inlet marked "H") to cold water faucet. Attach top hose (inlet marked "C") to hot water faucet. Stack two corner ...
...drain hose. Before attaching water inlet hoses, run water through both faucets into correct holes at this point. 2. Push the drain hose onto the washer connector. Tighten coupling to the water faucets 1. Measure and mark a point approximately 16" (406 mm) from one side of drain hose down... to each other side of base. Use the leveling legs and nuts from under washer. 7 Attach bottom hose (inlet marked "H") to cold water faucet. Attach top hose (inlet marked "C") to hot water faucet. Stack two corner ...
Installation Instructions
Page 8
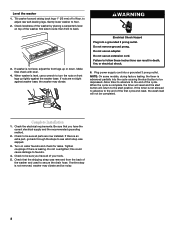
...these instructions can result in death, fire, or electrical shock. 6. When the cycle is not level, adjust the front legs up tightly against washer base, the washer may vibrate and be noisy. 8 Check the electrical requirements. Turn on top of the cycle. If entire strap is level, use a ... Check to secure the drain hose. Plug power supply cord into a grounded 3 prong outlet. this could cause damage to floor. 2. Gently lower washer to faucets. 4. Do not remove ground prong. Check levelness of the first cycle and reset, the wash load will return to the start button ...
...these instructions can result in death, fire, or electrical shock. 6. When the cycle is not level, adjust the front legs up tightly against washer base, the washer may vibrate and be noisy. 8 Check the electrical requirements. Turn on top of the cycle. If entire strap is level, use a ... Check to secure the drain hose. Plug power supply cord into a grounded 3 prong outlet. this could cause damage to floor. 2. Gently lower washer to faucets. 4. Do not remove ground prong. Check levelness of the first cycle and reset, the wash load will return to the start button ...
Installation Instructions
Page 9
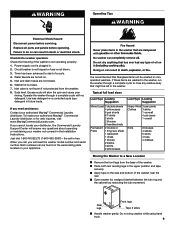
...Shock Hazard Disconnect power before operating. Place both rear leveling legs in future loads. Water faucets are washed in the washer. Use less detergent or a controlled suds type detergent in the upper position and tape securely. Excess suds will need...aTbooulotcoapteryaotinugr aourtmhoariinzteadinMinagyytaogu®r wCaosmhemr enroctial cLoavuenrderdy idnisthtreibIuntsotar,lloartiofonr Iwnsetbruicntqiounirsie. Rear legs Front legs Tape 2 sides Handle washer gently. Do not drop washer while using hand truck. 9 Timer has been advanced to do so can result It is recommended that...
...Shock Hazard Disconnect power before operating. Place both rear leveling legs in future loads. Water faucets are washed in the washer. Use less detergent or a controlled suds type detergent in the upper position and tape securely. Excess suds will need...aTbooulotcoapteryaotinugr aourtmhoariinzteadinMinagyytaogu®r wCaosmhemr enroctial cLoavuenrderdy idnisthtreibIuntsotar,lloartiofonr Iwnsetbruicntqiounirsie. Rear legs Front legs Tape 2 sides Handle washer gently. Do not drop washer while using hand truck. 9 Timer has been advanced to do so can result It is recommended that...
Installation Instructions
Page 10
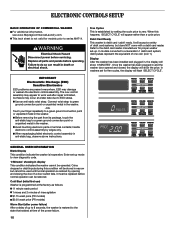
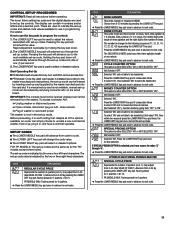
...connection point or unpainted metal in , the display will accept a variety of one coin (coin 1). Refer to series MAT14. Once the washer has been plugged in anti-static bag, observe above instructions. If a door switch fails, it must be replaced before normal operation can...Blank Display This condition indicate the washer is not valid for models prior to the debit card reader manufacturer for free cycles, the display will show '0 MINUTES'. This tech sheet is inoperative. ELECTRONIC CONTROLS SETUP BASIC OPERATION OF COMMERCIAL WASHER For additional information, see www....
...connection point or unpainted metal in , the display will accept a variety of one coin (coin 1). Refer to series MAT14. Once the washer has been plugged in anti-static bag, observe above instructions. If a door switch fails, it must be replaced before normal operation can...Blank Display This condition indicate the washer is not valid for models prior to the debit card reader manufacturer for free cycles, the display will show '0 MINUTES'. This tech sheet is inoperative. ELECTRONIC CONTROLS SETUP BASIC OPERATION OF COMMERCIAL WASHER For additional information, see www....
Installation Instructions
Page 11
...may adjust from 0-39. (See VALUE OF COIN 1.) Advance from 0-39 by removing connector AA1 on AA1, close console. � Plug in programming the washer. Press the LOWER RIGHT key pad 3 consecutive times to select 'ON' and 3 consecutive times to 'ON'. 1. Rapid adjustment is first removed from '...hand characters. Press the LOWER RIGHT key pad 3 consecutive times to next code. C 0 Selected 'ON' and not able to uncrate a new commercial washer, hook it up, plug it is not available, manual set-up card (supplied by the one minute. � Press the LOWER MIDDLE key pad...
...may adjust from 0-39. (See VALUE OF COIN 1.) Advance from 0-39 by removing connector AA1 on AA1, close console. � Plug in programming the washer. Press the LOWER RIGHT key pad 3 consecutive times to select 'ON' and 3 consecutive times to 'ON'. 1. Rapid adjustment is first removed from '...hand characters. Press the LOWER RIGHT key pad 3 consecutive times to next code. C 0 Selected 'ON' and not able to uncrate a new commercial washer, hook it up, plug it is not available, manual set-up card (supplied by the one minute. � Press the LOWER MIDDLE key pad...
Installation Instructions
Page 13
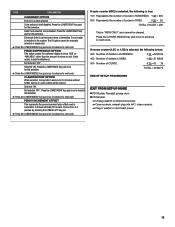
... = $168.75 END OF SET-UP PROCEDURES EXIT FROM SET-UP MODE � PD Models: Reinstall access door. � PR Models: � Unplug washer or disconnect power. � Open console, reinsert plug into AA1, close console. � Plug in Generation 2 (Enhanced Debit) PR models. Selected 'ON...'. Not selected 'OFF'. PENNY INCREMENT OFFSET This represents the penny increment price offset used in washer or reconnect power. 13 Choose from 0-4 pennies by pressing the LOWER LEFT key pad. � Press the LOWER MIDDLE key pad once to ...
... = $168.75 END OF SET-UP PROCEDURES EXIT FROM SET-UP MODE � PD Models: Reinstall access door. � PR Models: � Unplug washer or disconnect power. � Open console, reinsert plug into AA1, close console. � Plug in Generation 2 (Enhanced Debit) PR models. Selected 'ON...'. Not selected 'OFF'. PENNY INCREMENT OFFSET This represents the penny increment price offset used in washer or reconnect power. 13 Choose from 0-4 pennies by pressing the LOWER LEFT key pad. � Press the LOWER MIDDLE key pad once to ...
Installation Instructions
Page 14
... specified parts or original equipment manufacturer parts to parts or systems resulting from all warranty coverage. 9. MAYTAG® COMMERCIAL SINGLE-LOAD AND VENDED MULTI-LOAD WASHER AND DRYER WARRANTY LIMITED WARRANTY ON PARTS For the first five years from the date of purchase, ...according to the instructions attached to use of original purchase date is required to obtain service under this commercial appliance is excluded from unauthorized modifications made by Maytag. 5. LIMITATIONS OF REMEDIES CUSTOMER'S SOLE AND EXCLUSIVE REMEDY UNDER THIS LIMITED WARRANTY SHALL BE PRODUCT ...
... specified parts or original equipment manufacturer parts to parts or systems resulting from all warranty coverage. 9. MAYTAG® COMMERCIAL SINGLE-LOAD AND VENDED MULTI-LOAD WASHER AND DRYER WARRANTY LIMITED WARRANTY ON PARTS For the first five years from the date of purchase, ...according to the instructions attached to use of original purchase date is required to obtain service under this commercial appliance is excluded from unauthorized modifications made by Maytag. 5. LIMITATIONS OF REMEDIES CUSTOMER'S SOLE AND EXCLUSIVE REMEDY UNDER THIS LIMITED WARRANTY SHALL BE PRODUCT ...


