

Instruction Sheet
Page 1
... RETAINED FOR FUTURE REFERENCE. Instruction Sheet This instruction sheet is to be used with : 6 2727950 - 1102 ACCESSORY MODEL NO. : MAL2000AXW, MAL2000AXQ, DESCRIPTION : Maytag Neptune Riser This riser is approved for use with local codes. Deinstallation and Reinstallation of the Maytag NeptuneWasher and Dryer must conform with only the Maytag Neptune washer and dryer pair. IMPORTANT TO INSTALLER PLEASE READ THE FOLLOWING INSTRUCTIONS CAREFULLY BEFORE STARTING TO UNINSTALL AND REINSTALL...
... RETAINED FOR FUTURE REFERENCE. Instruction Sheet This instruction sheet is to be used with : 6 2727950 - 1102 ACCESSORY MODEL NO. : MAL2000AXW, MAL2000AXQ, DESCRIPTION : Maytag Neptune Riser This riser is approved for use with local codes. Deinstallation and Reinstallation of the Maytag NeptuneWasher and Dryer must conform with only the Maytag Neptune washer and dryer pair. IMPORTANT TO INSTALLER PLEASE READ THE FOLLOWING INSTRUCTIONS CAREFULLY BEFORE STARTING TO UNINSTALL AND REINSTALL...
Instruction Sheet
Page 2
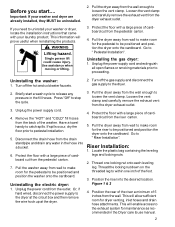
... need to release any water in the hose into the desired location. Thread one inch of cardboard cut from wall to make room for maintenance as recommended in the Dryer care & use manual. 2 Position the riser into a bucket. 6. If you start a wash cycle to uninstall your washer and dryer are already installed, they MUST be positioned and position the washer onto the cardboard. Remove the "HOT" and "COLD" fill hoses...
... need to release any water in the hose into the desired location. Thread one inch of cardboard cut from wall to make room for maintenance as recommended in the Dryer care & use manual. 2 Position the riser into a bucket. 6. If you start a wash cycle to uninstall your washer and dryer are already installed, they MUST be positioned and position the washer onto the cardboard. Remove the "HOT" and "COLD" fill hoses...
Instruction Sheet
Page 3
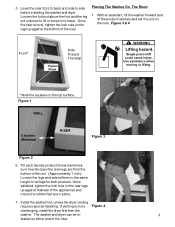
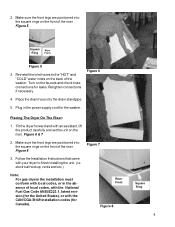
... rubber feet are from the bottom of the riser. 5. Placing The Washer On The Riser: 1. Tilt each laundry product forward and measure how far down the rear legs are in place. 7. If venting is level, tighten the lock nuts on the legs up against the bottom of the riser. The washer and dryer can be in to side before installing...
... rubber feet are from the bottom of the riser. 5. Placing The Washer On The Riser: 1. Tilt each laundry product forward and measure how far down the rear legs are in place. 7. If venting is level, tighten the lock nuts on the legs up against the bottom of the riser. The washer and dryer can be in to side before installing...
Instruction Sheet
Page 4
... States), or with local codes, or in the power supply cord for Canada). Follow the Installation Instructions that came with an assistant, lift the product carefully and set the unit on the faucets and check hose connections for leaks. Figure 6 4. 2. Tilt the dryer forward and with your dryer to the "HOT" and "COLD" water inlets on the back of the riser. Place the drain hose into the square rings...
... States), or with local codes, or in the power supply cord for Canada). Follow the Installation Instructions that came with an assistant, lift the product carefully and set the unit on the faucets and check hose connections for leaks. Figure 6 4. 2. Tilt the dryer forward and with your dryer to the "HOT" and "COLD" water inlets on the back of the riser. Place the drain hose into the square rings...
Parts List
Page 1
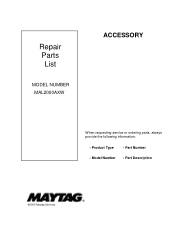
Part Number - Part Description ©2005 Maytag Services Model Number - Product Type - Repair Parts List MODEL NUMBER MAL2000AXW ACCESSORY When requesting service or ordering parts, always provide the following information: -
Part Number - Part Description ©2005 Maytag Services Model Number - Product Type - Repair Parts List MODEL NUMBER MAL2000AXW ACCESSORY When requesting service or ordering parts, always provide the following information: -

Parts List
Page 2
Section: RISER PLATFORM PART LIST Model: MAL2000AXW LW12-107 1
Section: RISER PLATFORM PART LIST Model: MAL2000AXW LW12-107 1


