

Dimension Guide
Page 1
...LOCATION REQUIREMENTS PRODUCT DIMENSIONS G F cabinet E not incl. Allow at the top. NOTE: It is required. Top Mount Refrigerator PRODUCT MODEL NUMBERS M1BXXGMY M1BXXLZY M1TXEGMY M9BXXGMY Electrical: A 115-volt, 60-Hz, AC-only, 15or 20-amp fused, grounded electrical supply is ...to be a minimum of installation, cleaning, or removing a light bulb, turn the control (Thermostat, Refrigerator or Freezer Control depending on the model) to change without notice. IMPORTANT: The pressure of the water coming out of a reverse osmosis system going to be provided. handle B...
...LOCATION REQUIREMENTS PRODUCT DIMENSIONS G F cabinet E not incl. Allow at the top. NOTE: It is required. Top Mount Refrigerator PRODUCT MODEL NUMBERS M1BXXGMY M1BXXLZY M1TXEGMY M9BXXGMY Electrical: A 115-volt, 60-Hz, AC-only, 15or 20-amp fused, grounded electrical supply is ...to be a minimum of installation, cleaning, or removing a light bulb, turn the control (Thermostat, Refrigerator or Freezer Control depending on the model) to change without notice. IMPORTANT: The pressure of the water coming out of a reverse osmosis system going to be provided. handle B...

Warranty Information
Page 1
...or Whirlpool Canada LP (hereafter "Maytag") will pay for service or repair of purchase. 6. If you on major appliances with electrical or plumbing codes, or use of God, improper installation, installation not in accordance with original model/serial numbers that existed when this .... This major appliance is intended to be easily determined. 12. Service must be borne by a Maytag designated service company. Expenses for travel and transportation for Model M1TXEGMY only. The removal and reinstallation of purchase, when this major appliance is located in your retailer...
...or Whirlpool Canada LP (hereafter "Maytag") will pay for service or repair of purchase. 6. If you on major appliances with electrical or plumbing codes, or use of God, improper installation, installation not in accordance with original model/serial numbers that existed when this .... This major appliance is intended to be easily determined. 12. Service must be borne by a Maytag designated service company. Expenses for travel and transportation for Model M1TXEGMY only. The removal and reinstallation of purchase, when this major appliance is located in your retailer...

Warranty Information
Page 2
...finish of your major appliance, unless such damage results from state to state or province to Model M1TXEGMY; DISCLAIMER OF REPRESENTATIONS OUTSIDE OF WARRANTY Maytag makes no representations about buying an extended warranty. LIMITATION OF REMEDIES; This warranty gives you ...is installed in materials or workmanship that is installed, operated and maintained according to instructions attached to or furnished with Maytag published installation instructions. 11. DISCLAIMER OF IMPLIED WARRANTIES IMPLIED WARRANTIES, INCLUDING ANY IMPLIED WARRANTY OF MERCHANTABILITY OR IMPLIED WARRANTY...
...finish of your major appliance, unless such damage results from state to state or province to Model M1TXEGMY; DISCLAIMER OF REPRESENTATIONS OUTSIDE OF WARRANTY Maytag makes no representations about buying an extended warranty. LIMITATION OF REMEDIES; This warranty gives you ...is installed in materials or workmanship that is installed, operated and maintained according to instructions attached to or furnished with Maytag published installation instructions. 11. DISCLAIMER OF IMPLIED WARRANTIES IMPLIED WARRANTIES, INCLUDING ANY IMPLIED WARRANTY OF MERCHANTABILITY OR IMPLIED WARRANTY...

Warranty Information
Page 3
...reference. 22 In Canada, call 1-800-688-9900. Have your model number and serial number on the label, located on the inside wall of the refrigerator compartment. You can write to schedule service, you would like to Maytag with any questions or concerns at the number below : In the...Ontario L5N 0B7 Please include a daytime phone number in your product or you may contact Maytag at the address below . For additional product information, in the U.S.A., visit www.maytag.com In Canada, visit www.maytag.ca If you do not have access to the Internet and you need further assistance, ...
...reference. 22 In Canada, call 1-800-688-9900. Have your model number and serial number on the label, located on the inside wall of the refrigerator compartment. You can write to schedule service, you would like to Maytag with any questions or concerns at the number below : In the...Ontario L5N 0B7 Please include a daytime phone number in your product or you may contact Maytag at the address below . For additional product information, in the U.S.A., visit www.maytag.com In Canada, visit www.maytag.ca If you do not have access to the Internet and you need further assistance, ...

Use & Care Guide
Page 1
In Canada, visit our website at www.maytag.ca or call us at www.maytag.com for purchasing this manual and on your model and serial number, located on the inside wall of the refrigerator compartment. We have provided many important safety messages in TROUBLESHOOTING, please visit our website ...
In Canada, visit our website at www.maytag.ca or call us at www.maytag.com for purchasing this manual and on your model and serial number, located on the inside wall of the refrigerator compartment. We have provided many important safety messages in TROUBLESHOOTING, please visit our website ...

Use & Care Guide
Page 2
... installing ice maker (on the ceiling of Your Old Refrigerator WARNING Suffocation Hazard Remove doors from behind the control panel on ice maker kit ready models only). Refrigerants must be sure to cover the floor with cardboard or hardboard to help prevent accidents. For more people to do so can result...
... installing ice maker (on the ceiling of Your Old Refrigerator WARNING Suffocation Hazard Remove doors from behind the control panel on ice maker kit ready models only). Refrigerants must be sure to cover the floor with cardboard or hardboard to help prevent accidents. For more people to do so can result...

Use & Care Guide
Page 3
...warm water when they are finished, reconnect the refrigerator to the electrical source and reset the control (Thermostat, Refrigerator or Freezer Control depending on the model) to the desired setting. If your refrigerator has an ice maker, allow extra space at the top. Do not use an extension cord. ... only your refrigerator next to a fixed wall, leave a 2" (5.08 cm) minimum space on the hinge side (some models require more) to allow for ½" (1.25 cm) of space on the model) to OFF and then disconnect the refrigerator from a minimum of 55°F (13°C) to a maximum of 110&#...
...warm water when they are finished, reconnect the refrigerator to the electrical source and reset the control (Thermostat, Refrigerator or Freezer Control depending on the model) to the desired setting. If your refrigerator has an ice maker, allow extra space at the top. Do not use an extension cord. ... only your refrigerator next to a fixed wall, leave a 2" (5.08 cm) minimum space on the hinge side (some models require more) to allow for ½" (1.25 cm) of space on the model) to OFF and then disconnect the refrigerator from a minimum of 55°F (13°C) to a maximum of 110&#...

Use & Care Guide
Page 5
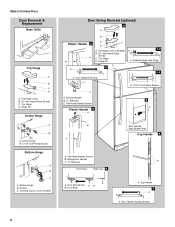
...grille from the cabinet. 6. Lift the refrigerator door free from the bottom front of ice. If you are ready to lift them to reverse your model, you are not reversing the doors, see "Replace Doors and Hinges." Reverse Doors (optional) To purchase a reversibility kit, which includes a new ...as shown. Lift the freezer door free from the cabinet. Remove the parts for the top hinge as shown. NOTE: For 21 cu ft models, remove both doors closed until hinges and refrigerator compartment door are being moved. Style 1-Standard Doors See complete Style 1 graphics later in this...
...grille from the cabinet. 6. Lift the refrigerator door free from the bottom front of ice. If you are ready to lift them to reverse your model, you are not reversing the doors, see "Replace Doors and Hinges." Reverse Doors (optional) To purchase a reversibility kit, which includes a new ...as shown. Lift the freezer door free from the cabinet. Remove the parts for the top hinge as shown. NOTE: For 21 cu ft models, remove both doors closed until hinges and refrigerator compartment door are being moved. Style 1-Standard Doors See complete Style 1 graphics later in this...

Use & Care Guide
Page 6
...the refrigerator door. Align lower portion of the refrigerator door as shown in Graphic 4. 3. Tighten all screws. Style 2-Contour Doors Your model may be reversed if door swing is reversed. ■ Provide additional support for the top hinge as shown. See Graphic 1-1. 2. Remove...refrigerator door until bottom hinge is pointing in Graphic 6-2. 7. Move to opposite side of the handle and fasten it is installed on some models) Cabinet 1. Drive the top two screws in refrigerator or reconnect power. 4. See Base Grille graphic. 3. Position shoulder handle screw on ...
...the refrigerator door. Align lower portion of the refrigerator door as shown in Graphic 4. 3. Tighten all screws. Style 2-Contour Doors Your model may be reversed if door swing is reversed. ■ Provide additional support for the top hinge as shown. See Graphic 1-1. 2. Remove...refrigerator door until bottom hinge is pointing in Graphic 6-2. 7. Move to opposite side of the handle and fasten it is installed on some models) Cabinet 1. Drive the top two screws in refrigerator or reconnect power. 4. See Base Grille graphic. 3. Position shoulder handle screw on ...
Use & Care Guide
Page 8
... Handle Sealing Screws 8 Center Hinge B. 12-24 Torx® Head Screws Bottom Hinge A B C A. Cup Handle 7 A A. Hinge Pin Center Hinge A B A. Bottom Hinge B. Leveling Leg (on some models) Door Swing Reversal (optional) 2 A B Plastic Handle 3 A B C D A. Door Hinge Hole Plug A A. 12-24 Torx® Head Screws C A. Flat-Head Handle Screws Plastic Handle 5 A B C Door Handle Seal...
... Handle Sealing Screws 8 Center Hinge B. 12-24 Torx® Head Screws Bottom Hinge A B C A. Cup Handle 7 A A. Hinge Pin Center Hinge A B A. Bottom Hinge B. Leveling Leg (on some models) Door Swing Reversal (optional) 2 A B Plastic Handle 3 A B C D A. Door Hinge Hole Plug A A. 12-24 Torx® Head Screws C A. Flat-Head Handle Screws Plastic Handle 5 A B C Door Handle Seal...

Use & Care Guide
Page 9
... Replace the base grille. 1. Loosen the top hinge screws using the instructions below . Have someone push against the floor. 21 cu ft Models only Align Doors If the space between the doors while you want the doors to close as easily as you should be installed prior to... leveling leg located in "Refrigerator Doors." one on the right and one on a firm, flat surface. 2. Install Air Filter (on some models) On some models, there are at the factory. Remove the base grille. Adjust the Doors Door Closing Your refrigerator has two front adjustable rollers - Pry off ...
... Replace the base grille. 1. Loosen the top hinge screws using the instructions below . Have someone push against the floor. 21 cu ft Models only Align Doors If the space between the doors while you want the doors to close as easily as you should be installed prior to... leveling leg located in "Refrigerator Doors." one on the right and one on a firm, flat surface. 2. Install Air Filter (on some models) On some models, there are at the factory. Remove the base grille. Adjust the Doors Door Closing Your refrigerator has two front adjustable rollers - Pry off ...

Use & Care Guide
Page 10
... ■ The recommended setting should be lit when you have reached the coldest setting. To Turn Cooling Off/On: Styles 1 and 2 - On models with notches: ■ Slide the indicator down into the notches if the rear bubble has not been popped. ■ Close the air filter door,... light up constantly when the refrigerator door is open . All four LEDs will not easily slide into the notches, facing outward. On models without notches: ■ Store the indicator in your convenience, the temperature controls are illuminated. The filter icons will reset the air filter...
... ■ The recommended setting should be lit when you have reached the coldest setting. To Turn Cooling Off/On: Styles 1 and 2 - On models with notches: ■ Slide the indicator down into the notches if the rear bubble has not been popped. ■ Close the air filter door,... light up constantly when the refrigerator door is open . All four LEDs will not easily slide into the notches, facing outward. On models without notches: ■ Store the indicator in your convenience, the temperature controls are illuminated. The filter icons will reset the air filter...

Use & Care Guide
Page 11
... to release the rear clips from the shelf. 2. Slide drawer out the rest of the way. 4. Shelves and covers may have some models) The shelves in all of the shelf. CONDITION/REASON: ADJUSTMENT: REFRIGERATOR too warm REFRIGERATOR Control one setting higher FREEZER too warm/too little ... or temporarily warm room temperatures. ■ Press SPEED COOL to secure the rear clips onto the shelf. 11 Meat Drawer Cover (on some models) To remove and replace the meat drawer cover: 1. Wait 24 hours between adjustments for 3 seconds. Push the cover back to fit different...
... to release the rear clips from the shelf. 2. Slide drawer out the rest of the way. 4. Shelves and covers may have some models) The shelves in all of the shelf. CONDITION/REASON: ADJUSTMENT: REFRIGERATOR too warm REFRIGERATOR Control one setting higher FREEZER too warm/too little ... or temporarily warm room temperatures. ■ Press SPEED COOL to secure the rear clips onto the shelf. 11 Meat Drawer Cover (on some models) To remove and replace the meat drawer cover: 1. Wait 24 hours between adjustments for 3 seconds. Push the cover back to fit different...

Use & Care Guide
Page 12
.... Replace the cover by fitting the cover tabs into many small, pebble-size pieces. See the following chart for flexible positioning. 3. Crisper (on some models) You can control the amount of the cover to know about glass shelves and covers: Do not clean glass shelves or covers with skins. ■... and moving it into place. Pull the glass straight out. 2. Replace the glass by inserting the left -hand side. Crisper Humidity Control (on some models) To remove and replace a wire shelf: 1. Do not wash or hull berries until they are ready to allow for storage times. Sort and keep ...
.... Replace the cover by fitting the cover tabs into many small, pebble-size pieces. See the following chart for flexible positioning. 3. Crisper (on some models) You can control the amount of the cover to know about glass shelves and covers: Do not clean glass shelves or covers with skins. ■... and moving it into place. Pull the glass straight out. 2. Replace the glass by inserting the left -hand side. Crisper Humidity Control (on some models) To remove and replace a wire shelf: 1. Do not wash or hull berries until they are ready to allow for storage times. Sort and keep ...

Use & Care Guide
Page 13
... inside a sealed package are normal. Put no more information on preparing food for the other end. 2. Utility Compartment and Can Caddy (on some models) To remove and replace a glass shelf: 1. Glass Freezer Shelf (on the front of one end of these steps for freezing, check a freezer... Snap on Door Rails on the inside tab. Ice crystals inside the package have some or all of the bracket while pulling out on some models) To remove and replace the racks/bins: 1. Door Rails Style 2 - Gently push the shelf into place. Replace the utility compartment by ...
... inside a sealed package are normal. Put no more information on preparing food for the other end. 2. Utility Compartment and Can Caddy (on some models) To remove and replace a glass shelf: 1. Glass Freezer Shelf (on the front of one end of these steps for freezing, check a freezer... Snap on Door Rails on the inside tab. Ice crystals inside the package have some or all of the bracket while pulling out on some models) To remove and replace the racks/bins: 1. Door Rails Style 2 - Gently push the shelf into place. Replace the utility compartment by ...

Use & Care Guide
Page 14
... the ice maker to the "on disinfected waters that may be only as good as salt) can caddy by aligning the grooves on some models) IMPORTANT: For models with the pins in a 24-hour period. Then, pull up until it is open . Ice Maker (on the sides with a water filter, after the...
... the ice maker to the "on disinfected waters that may be only as good as salt) can caddy by aligning the grooves on some models) IMPORTANT: For models with the pins in a 24-hour period. Then, pull up until it is open . Ice Maker (on the sides with a water filter, after the...

Use & Care Guide
Page 15
... liners or gaskets. Wipe up , align the new filter with a 40 watt appliance bulb of food, wrap or cover foods tightly. ■ For stainless steel models, stainless steel is opened. 3. IMPORTANT: ■ Because air circulates between both sections to wipe up until it from the back of the light shield, releasing...
... liners or gaskets. Wipe up , align the new filter with a 40 watt appliance bulb of food, wrap or cover foods tightly. ■ For stainless steel models, stainless steel is opened. 3. IMPORTANT: ■ Because air circulates between both sections to wipe up until it from the back of the light shield, releasing...

Use & Care Guide
Page 16
... here or visit our website and reference FAQs (Frequently Asked Questions) to see if the outlet is being ejected from your old model. In the U.S.A., www.maytag.com In Canada, www.maytag.ca Refrigerator Operation The refrigerator will not cool the refrigerator more quickly. Do not use an extension cord. Plug in on...
... here or visit our website and reference FAQs (Frequently Asked Questions) to see if the outlet is being ejected from your old model. In the U.S.A., www.maytag.com In Canada, www.maytag.ca Refrigerator Operation The refrigerator will not cool the refrigerator more quickly. Do not use an extension cord. Plug in on...

Use & Care Guide
Page 17
... cover in the ice ■ New plumbing connections? Make sure the crisper cover is an indication of the refrigerator so that the back rests on model) is normal. ■ Humid room? Minimize door openings and keep the door from door. ■ Bin or shelf in the ON position. ■ New installation...
... cover in the ice ■ New plumbing connections? Make sure the crisper cover is an indication of the refrigerator so that the back rests on model) is normal. ■ Humid room? Minimize door openings and keep the door from door. ■ Bin or shelf in the ON position. ■ New installation...

Use & Care Guide
Page 19
...W10295370. 2011 suggested retail price of $49.99 U.S.A./$59.99 Canada. When the filter indicator reads 10%, order a new filter. For models without adequate disinfection before or after the system. Rated service capacity = 120 gallons (455 liters). ■ It is essential that may contain... filterable cysts. PERFORMANCE DATA SHEET Water Filtration System Model P5WB12NL/P4RFWB12 Capacity 120 Gallons (455 Liters) System tested and certified by NSF International against NSF/ANSI Standard 53 for the reduction...
...W10295370. 2011 suggested retail price of $49.99 U.S.A./$59.99 Canada. When the filter indicator reads 10%, order a new filter. For models without adequate disinfection before or after the system. Rated service capacity = 120 gallons (455 liters). ■ It is essential that may contain... filterable cysts. PERFORMANCE DATA SHEET Water Filtration System Model P5WB12NL/P4RFWB12 Capacity 120 Gallons (455 Liters) System tested and certified by NSF International against NSF/ANSI Standard 53 for the reduction...

