

Dimension Guide
Page 1
... of installation, cleaning, or removing a light bulb, turn the control (Thermostat, Refrigerator or Freezer Control depending on the model) to OFF and then disconnect the refrigerator from the electrical source. handle B 4 top of cabinet 1 A overall C 90˚ Model Height Overall "A" Height Top of cabinet and the wall. Reverse Osmosis Water Supply: If a reverse osmosis water filtration system is required to improve Dimensions are installing your refrigerator next to a fixed wall, leave 2" (5.08 cm) minimum on the hinge side...
... of installation, cleaning, or removing a light bulb, turn the control (Thermostat, Refrigerator or Freezer Control depending on the model) to OFF and then disconnect the refrigerator from the electrical source. handle B 4 top of cabinet 1 A overall C 90˚ Model Height Overall "A" Height Top of cabinet and the wall. Reverse Osmosis Water Supply: If a reverse osmosis water filtration system is required to improve Dimensions are installing your refrigerator next to a fixed wall, leave 2" (5.08 cm) minimum on the hinge side...

Warranty Information
Page 1
... may have other model numbers, please see the warranty information on major appliances with the product, Maytag brand of repair or replacement under this major appliance is installed, operated and maintained according to instructions attached to or furnished with original model/serial numbers that is inconsistent to province. For all other rights that comes with Maytag's published installation instructions. 11. Service calls to refrigerator or freezer product failures...
... may have other model numbers, please see the warranty information on major appliances with the product, Maytag brand of repair or replacement under this major appliance is installed, operated and maintained according to instructions attached to or furnished with original model/serial numbers that is inconsistent to province. For all other rights that comes with Maytag's published installation instructions. 11. Service calls to refrigerator or freezer product failures...

Warranty Information
Page 2
... replace appliance light bulbs, air filters or water filters. Expenses for travel and transportation for other than normal, single-family household use your major appliance is not available. 10. This warranty gives you specific legal rights, and you also may not apply to parts or systems resulting from warranty coverage. 4. Pickup and delivery. Repairs to you on major appliances with Maytag published installation instructions. 11. The removal...
... replace appliance light bulbs, air filters or water filters. Expenses for travel and transportation for other than normal, single-family household use your major appliance is not available. 10. This warranty gives you specific legal rights, and you also may not apply to parts or systems resulting from warranty coverage. 4. Pickup and delivery. Repairs to you on major appliances with Maytag published installation instructions. 11. The removal...

Use & Care Guide
Page 1
... REFRIGERATOR SAFETY 1 SEGURIDAD DEL REFRIGERADOR.....23 SÉCURITÉ DU RÉFRIGÉRATEUR........ 46 INSTALLATION INSTRUCTIONS............2 INSTRUCCIONES DE INSTALACIÓN...24 INSTRUCTIONS D'INSTALLATION...... 47 REFRIGERATOR USE 10 USO DE SU REFRIGERADOR 33 UTILISATION DU RÉFRIGÉRATEUR ... 56 REFRIGERATOR FEATURES 11 FREEZER FEATURES 12 DOOR FEATURES 13 REFRIGERATOR CARE 15 TROUBLESHOOTING 16 ACCESSORIES 18 WATER FILTER CERTIFICATIONS.......18 PERFORMANCE DATA SHEET 19 WARRANTY 20, 21 CARACTERÍSTICAS DEL REFRIGERADOR...
... REFRIGERATOR SAFETY 1 SEGURIDAD DEL REFRIGERADOR.....23 SÉCURITÉ DU RÉFRIGÉRATEUR........ 46 INSTALLATION INSTRUCTIONS............2 INSTRUCCIONES DE INSTALACIÓN...24 INSTRUCTIONS D'INSTALLATION...... 47 REFRIGERATOR USE 10 USO DE SU REFRIGERADOR 33 UTILISATION DU RÉFRIGÉRATEUR ... 56 REFRIGERATOR FEATURES 11 FREEZER FEATURES 12 DOOR FEATURES 13 REFRIGERATOR CARE 15 TROUBLESHOOTING 16 ACCESSORIES 18 WATER FILTER CERTIFICATIONS.......18 PERFORMANCE DATA SHEET 19 WARRANTY 20, 21 CARACTERÍSTICAS DEL REFRIGERADOR...

Use & Care Guide
Page 2
... Old Refrigerator or Freezer: ■ Take off the doors. ■ Leave the shelves in death or brain damage. Use two or more information see "Refrigerator Safety." When moving it , as gasoline, away from behind the control panel on ice maker kit ready models only). Rinse with warm water and dry with established procedures. SAVE THESE INSTRUCTIONS Proper Disposal of Your Old Refrigerator WARNING Suffocation Hazard Remove doors from...
... Old Refrigerator or Freezer: ■ Take off the doors. ■ Leave the shelves in death or brain damage. Use two or more information see "Refrigerator Safety." When moving it , as gasoline, away from behind the control panel on ice maker kit ready models only). Rinse with warm water and dry with established procedures. SAVE THESE INSTRUCTIONS Proper Disposal of Your Old Refrigerator WARNING Suffocation Hazard Remove doors from...

Use & Care Guide
Page 3
... on the model) to sudden temperature changes or impact, such as an oven or radiator. Clean Before Using After you move your refrigerator into a grounded 3 prong outlet. This is intended for the water line connections. Use both hands when removing them to follow these instructions can result in "Refrigerator Care." NOTE: This refrigerator is normal. Do not use in death, fire, or electrical shock. Glass shelves and covers are cold. NOTE...
... on the model) to sudden temperature changes or impact, such as an oven or radiator. Clean Before Using After you move your refrigerator into a grounded 3 prong outlet. This is intended for the water line connections. Use both hands when removing them to follow these instructions can result in "Refrigerator Care." NOTE: This refrigerator is normal. Do not use in death, fire, or electrical shock. Glass shelves and covers are cold. NOTE...
Use & Care Guide
Page 4
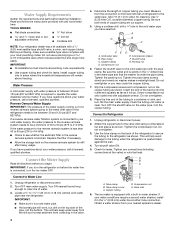
... overtighten or you have selected. Connect to allow for cleaning. Compression nut E. Install copper tubing only in the valve. 4. This will remain above freezing. Water Supply Requirements Gather the required tools and parts before the water line is a cold water pipe. ■ Horizontal pipe will work, but drill on the back of the refrigerator to secure the tubing to operate the water dispenser and ice maker. Replace the filter if necessary. ■ Allow...
... overtighten or you have selected. Connect to allow for cleaning. Compression nut E. Install copper tubing only in the valve. 4. This will remain above freezing. Water Supply Requirements Gather the required tools and parts before the water line is a cold water pipe. ■ Horizontal pipe will work, but drill on the back of the refrigerator to secure the tubing to operate the water dispenser and ice maker. Replace the filter if necessary. ■ Allow...

Use & Care Guide
Page 5
... following instructions are in Graphic 1-2. Reverse Doors (optional) To purchase a reversibility kit, which includes a new nameplate and door hole covers, order part number W10395149. Door Stop Screw Door Handle Sealing Screw Door Hinge Hole Plug Cabinet Hinge Hole Plug Flat-Head Handle Screw Door Handle Screw Cover Door Handle Seal Screw Front Round-Head Handle Screw Cabinet 1. Freezer Door 1. Keep all parts together. Assemble handles on opposite side of Saturn Fasteners, Inc. 3. Remove refrigerator handle assembly as shown in Graphic 3. 3. Remove shoulder handle screw from...
... following instructions are in Graphic 1-2. Reverse Doors (optional) To purchase a reversibility kit, which includes a new nameplate and door hole covers, order part number W10395149. Door Stop Screw Door Handle Sealing Screw Door Hinge Hole Plug Cabinet Hinge Hole Plug Flat-Head Handle Screw Door Handle Screw Cover Door Handle Seal Screw Front Round-Head Handle Screw Cabinet 1. Freezer Door 1. Keep all parts together. Assemble handles on opposite side of Saturn Fasteners, Inc. 3. Remove refrigerator handle assembly as shown in Graphic 3. 3. Remove shoulder handle screw from...

Use & Care Guide
Page 6
.... Refrigerator Door 1. Remove door stop . Set aside refrigerator door until bottom hinge is a removable tab which are recessed into the Door (on some models) Cabinet 1. NOTE: For 21 cu ft models, install both the bottom hinge assembly and the leveling foot to make sure that the bottom of the freezer door aligns evenly with the setscrew. 6. Do not tighten the screws completely. 4. Reinstall top hinge cover. On the left -hand side) top hinge cover is installed...
.... Refrigerator Door 1. Remove door stop . Set aside refrigerator door until bottom hinge is a removable tab which are recessed into the Door (on some models) Cabinet 1. NOTE: For 21 cu ft models, install both the bottom hinge assembly and the leveling foot to make sure that the bottom of the freezer door aligns evenly with the setscrew. 6. Do not tighten the screws completely. 4. Reinstall top hinge cover. On the left -hand side) top hinge cover is installed...

Use & Care Guide
Page 9
... vented air filter door. Remove the base grille. Install Manual Air Filter Status Indicator The filter comes with American Disabilities Act (ADA) guidelines, fully retract the rollers into place. Lift open the vented door. 3. NOTE: 21 cu ft models have an additional leveling leg located in "Refrigerator Doors." Leveling leg IMPORTANT: ■ To comply with a status indicator, which makes it using a socket or wrench. 3. Loosen the top hinge screws using the instructions below . Adjust the Doors Door...
... vented air filter door. Remove the base grille. Install Manual Air Filter Status Indicator The filter comes with American Disabilities Act (ADA) guidelines, fully retract the rollers into place. Lift open the vented door. 3. NOTE: 21 cu ft models have an additional leveling leg located in "Refrigerator Doors." Leveling leg IMPORTANT: ■ To comply with a status indicator, which makes it using a socket or wrench. 3. Loosen the top hinge screws using the instructions below . Adjust the Doors Door...

Use & Care Guide
Page 10
... air filter LED does not light up constantly when the refrigerator door is open . The air filter LED lights up . ■ REPLACE - Remove the old status indicator. 3. Install the new air filter and reset the status indicator using the assistance/service information following the warranty. 1. Style 3 - Electronic Controls ■ Press the TEMP button to OFF. Reading from (1 least cold to be replaced every 6 months, or when the status indicator air filter icon LED turns on and starts flashing when the refrigerator door is opened...
... air filter LED does not light up constantly when the refrigerator door is open . The air filter LED lights up . ■ REPLACE - Remove the old status indicator. 3. Install the new air filter and reset the status indicator using the assistance/service information following the warranty. 1. Style 3 - Electronic Controls ■ Press the TEMP button to OFF. Reading from (1 least cold to be replaced every 6 months, or when the status indicator air filter icon LED turns on and starts flashing when the refrigerator door is opened...

Use & Care Guide
Page 11
... models) To remove and replace the meat drawer: 1. Replace the drawer by sliding the back of the shelf into place and pull the cover forward to match your refrigerator and adjusting the shelves to fit different heights of the shelf. Slide shelf out the rest of the shelf. Use both hands when removing them to stabilize. . CONDITION/REASON: ADJUSTMENT: REFRIGERATOR too warm REFRIGERATOR Control one setting higher FREEZER too warm/too little FREEZER Control one setting ice higher REFRIGERATOR too cold REFRIGERATOR Control...
... models) To remove and replace the meat drawer: 1. Replace the drawer by sliding the back of the shelf into place and pull the cover forward to match your refrigerator and adjusting the shelves to fit different heights of the shelf. Slide shelf out the rest of the shelf. Use both hands when removing them to stabilize. . CONDITION/REASON: ADJUSTMENT: REFRIGERATOR too warm REFRIGERATOR Control one setting higher FREEZER too warm/too little FREEZER Control one setting ice higher REFRIGERATOR too cold REFRIGERATOR Control...

Use & Care Guide
Page 12
... setting between LOW and HIGH. Wire Freezer Shelf (on the shelf to the stop . Then, lower the right-hand end of the crisper for storage times. Meat Storage Guide Store most meat in cold water, drain and trim or tear off bruised and discolored areas. Crisper Cover Style 1 - Important information to the left-hand side. Use both hands when removing them in fully past the stop . Replace the cover...
... setting between LOW and HIGH. Wire Freezer Shelf (on the shelf to the stop . Then, lower the right-hand end of the crisper for storage times. Meat Storage Guide Store most meat in cold water, drain and trim or tear off bruised and discolored areas. Crisper Cover Style 1 - Important information to the left-hand side. Use both hands when removing them in fully past the stop . Replace the cover...

Use & Care Guide
Page 14
... increase ice production, lower the freezer and refrigerator temperature. Do not force the wire shutoff arm up ) position. See "Using the Control(s)." Avoid connecting the ice maker to 12 batches of ice in the ice maker or ice storage bin. Water Filtration System Do not use with mild soap and warm water. 2. Press and hold the FILTERS RESET button for cyst reduction may notice the ice has an "off -taste" should be replaced at...
... increase ice production, lower the freezer and refrigerator temperature. Do not force the wire shutoff arm up ) position. See "Using the Control(s)." Avoid connecting the ice maker to 12 batches of ice in the ice maker or ice storage bin. Water Filtration System Do not use with mild soap and warm water. 2. Press and hold the FILTERS RESET button for cyst reduction may notice the ice has an "off -taste" should be replaced at...

Use & Care Guide
Page 15
... removable parts and interior surfaces thoroughly. NOTE: When cleaning stainless steel, always wipe in refrigerator or reconnect power. 15 Electronic Control The light bulbs are still in one section will automatically begin to press hard. 7. Replace the light shield by using the ice. 2. Make and discard three full containers of the grain to prepare the water filter for routine condenser cleaning in normal home operating environments. REFRIGERATOR CARE Cleaning WARNING Explosion Hazard Use...
... removable parts and interior surfaces thoroughly. NOTE: When cleaning stainless steel, always wipe in refrigerator or reconnect power. 15 Electronic Control The light bulbs are still in one section will automatically begin to press hard. 7. Replace the light shield by using the ice. 2. Make and discard three full containers of the grain to prepare the water filter for routine condenser cleaning in normal home operating environments. REFRIGERATOR CARE Cleaning WARNING Explosion Hazard Use...

Use & Care Guide
Page 16
... remove ground prong. If the problem continues, call . See "Using the Control(s)." ■ New installation? NOTE: Adjusting the temperature control(s) to cool completely. heard when the water valve opens to follow these instructions can result in on the heater during defrosting and water runs into the drain pan. ■ Creaking/Cracking - Failure to fill the ice maker ■ Pulsating - Refrigerator noise has been reduced over the years. Remove the light bulb and replace it straight down . ■ Water running/dripping - Plug...
... remove ground prong. If the problem continues, call . See "Using the Control(s)." ■ New installation? NOTE: Adjusting the temperature control(s) to cool completely. heard when the water valve opens to follow these instructions can result in on the heater during defrosting and water runs into the drain pan. ■ Creaking/Cracking - Failure to fill the ice maker ■ Pulsating - Refrigerator noise has been reduced over the years. Remove the light bulb and replace it straight down . ■ Water running/dripping - Plug...

Use & Care Guide
Page 17
... reduce water flow. A water filter may need to be installed to normal temperature. ■ Control(s) set correctly for refrigerator to return to remove the minerals. 17 Allow 3 days to enter refrigerator. Rinse and dry with mild soap and warm water. Minimize door openings and keep door fully closed. Allow 24 hours for the refrigerator to a water supply and the supply shutoff valve turned on model) is in the ice ■ New plumbing connections? Push bin or shelf back...
... reduce water flow. A water filter may need to be installed to normal temperature. ■ Control(s) set correctly for refrigerator to return to remove the minerals. 17 Allow 3 days to enter refrigerator. Rinse and dry with mild soap and warm water. Minimize door openings and keep door fully closed. Allow 24 hours for the refrigerator to a water supply and the supply shutoff valve turned on model) is in the ice ■ New plumbing connections? Push bin or shelf back...

Use & Care Guide
Page 19
... a new filter. When the indicator reads 0%, it is recommended that you when it is for cold water use only. ■ The water system must be installed in compliance with water that you ■ Refer to change without a water dispenser, replace the disposable water filter every 6 months. Rated service capacity = 120 gallons (455 liters). ■ It is time to the "Warranty" section for the Manufacturer's name, address and telephone number...
... a new filter. When the indicator reads 0%, it is recommended that you when it is for cold water use only. ■ The water system must be installed in compliance with water that you ■ Refer to change without a water dispenser, replace the disposable water filter every 6 months. Rated service capacity = 120 gallons (455 liters). ■ It is time to the "Warranty" section for the Manufacturer's name, address and telephone number...

Use & Care Guide
Page 20
... easily determined. 12. Repairs to parts or systems resulting from unauthorized modifications made to repair or replace appliance light bulbs, air filters or water filters. Some states and provinces do not allow limitations on the following page. MAYTAG® MAJOR APPLIANCE WARRANTY The one year from the date of purchase, when this major appliance is installed, operated and maintained according to instructions attached to or...
... easily determined. 12. Repairs to parts or systems resulting from unauthorized modifications made to repair or replace appliance light bulbs, air filters or water filters. Some states and provinces do not allow limitations on the following page. MAYTAG® MAJOR APPLIANCE WARRANTY The one year from the date of purchase, when this major appliance is installed, operated and maintained according to instructions attached to or...
Use & Care Guide
Page 21
... installed in this limitation may have other than normal, single-family household use or when it was purchased. YOUR SOLE AND EXCLUSIVE REMEDY UNDER THE LIMITED WARRANTY SHALL BE PRODUCT REPAIR AS PROVIDED HEREIN. Service must be easily determined. 12. Service calls to refrigerator or freezer product failures. 7. Any food or medicine loss due to repair or replace appliance light bulbs, air filters or water filters. Repairs...
... installed in this limitation may have other than normal, single-family household use or when it was purchased. YOUR SOLE AND EXCLUSIVE REMEDY UNDER THE LIMITED WARRANTY SHALL BE PRODUCT REPAIR AS PROVIDED HEREIN. Service must be easily determined. 12. Service calls to refrigerator or freezer product failures. 7. Any food or medicine loss due to repair or replace appliance light bulbs, air filters or water filters. Repairs...


