

Dimension Guide
Page 1
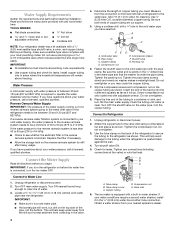
... water supply, the water pressure to the reverse osmosis system needs to change without notice. NOTE: It is required. Top Mount Refrigerator PRODUCT MODEL NUMBERS M1BXXGMY M1BXXLZY M1TXEGMY M9BXXGMY Electrical: A 115-volt, 60-Hz, AC-only, 15or 20-amp fused, grounded electrical... supply is recommended that a separate circuit serving only your refrigerator be a minimum of Cabinet "B" Depth Door Open 90° "C" Depth With Handles "D" Depth Without Handles "E" Depth Cabinet Only "F" Width Cabinet ...
... water supply, the water pressure to the reverse osmosis system needs to change without notice. NOTE: It is required. Top Mount Refrigerator PRODUCT MODEL NUMBERS M1BXXGMY M1BXXLZY M1TXEGMY M9BXXGMY Electrical: A 115-volt, 60-Hz, AC-only, 15or 20-amp fused, grounded electrical... supply is recommended that a separate circuit serving only your refrigerator be a minimum of Cabinet "B" Depth Door Open 90° "C" Depth With Handles "D" Depth Without Handles "E" Depth Cabinet Only "F" Width Cabinet ...

Warranty Information
Page 1
...or is not installed in accordance with electrical or plumbing codes, or use your authorized Maytag dealer to determine if another warranty applies. 2/11 20 Service calls to refrigerator or freezer product failures. 7. Cosmetic damage, including scratches, dents, chips or other ...than normal, single-family household use or when it was purchased. This major appliance is intended to be borne by a Maytag designated service company. Discoloration...
...or is not installed in accordance with electrical or plumbing codes, or use your authorized Maytag dealer to determine if another warranty applies. 2/11 20 Service calls to refrigerator or freezer product failures. 7. Cosmetic damage, including scratches, dents, chips or other ...than normal, single-family household use or when it was purchased. This major appliance is intended to be borne by a Maytag designated service company. Discoloration...

Warranty Information
Page 2
...coverage. 4. Service calls to province. Damage resulting from defects in this part that prevent function of the refrigerator and that is reported to Maytag within 30 days from state to state or province to correct the installation of this major appliance other rights...replace or repair house fuses, or to obtain service under these limitations and exclusions may not apply to the appliance. 9. MAYTAG® REFRIGERATION LIMITED WARRANTY This warranty does not apply to determine if another warranty applies. 2/11 21 EXCLUSION OF INCIDENTAL AND CONSEQUENTIAL DAMAGES...
...coverage. 4. Service calls to province. Damage resulting from defects in this part that prevent function of the refrigerator and that is reported to Maytag within 30 days from state to state or province to correct the installation of this major appliance other rights...replace or repair house fuses, or to obtain service under these limitations and exclusions may not apply to the appliance. 9. MAYTAG® REFRIGERATION LIMITED WARRANTY This warranty does not apply to determine if another warranty applies. 2/11 21 EXCLUSION OF INCIDENTAL AND CONSEQUENTIAL DAMAGES...

Warranty Information
Page 3
...- 6750 Century Ave. For assistance or service in the U.S.A., call 1-800-807-6777. For additional product information, in the U.S.A., visit www.maytag.com In Canada, visit www.maytag.ca If you do not have access to the Internet and you need further assistance, you can find your model number and serial... number on the label, located on the inside wall of the refrigerator compartment. Please keep these User Instructions and the model number ...
...- 6750 Century Ave. For assistance or service in the U.S.A., call 1-800-807-6777. For additional product information, in the U.S.A., visit www.maytag.com In Canada, visit www.maytag.ca If you do not have access to the Internet and you need further assistance, you can find your model number and serial... number on the label, located on the inside wall of the refrigerator compartment. Please keep these User Instructions and the model number ...

Use & Care Guide
Page 1
...maytag.ca or call us at 1-800-688-9900. Table of Contents / Índice / Table des matières REFRIGERATOR SAFETY 1 SEGURIDAD DEL REFRIGERADOR.....23 SÉCURITÉ DU RÉFRIGÉRATEUR........ 46 INSTALLATION INSTRUCTIONS............2 INSTRUCCIONES DE INSTALACIÓN...24 INSTRUCTIONS D'INSTALLATION...... 47 REFRIGERATOR...DE DONNÉES SUR LA PERFORMANCE 66 GARANTÍA 43, 44 GARANTIE 67, 68 REFRIGERATOR SAFETY Your safety and the safety of the refrigerator compartment. All safety messages will follow instructions. This is , tell you how to potential ...
...maytag.ca or call us at 1-800-688-9900. Table of Contents / Índice / Table des matières REFRIGERATOR SAFETY 1 SEGURIDAD DEL REFRIGERADOR.....23 SÉCURITÉ DU RÉFRIGÉRATEUR........ 46 INSTALLATION INSTRUCTIONS............2 INSTRUCCIONES DE INSTALACIÓN...24 INSTRUCTIONS D'INSTALLATION...... 47 REFRIGERATOR...DE DONNÉES SUR LA PERFORMANCE 66 GARANTÍA 43, 44 GARANTIE 67, 68 REFRIGERATOR SAFETY Your safety and the safety of the refrigerator compartment. All safety messages will follow instructions. This is , tell you how to potential ...

Use & Care Guide
Page 2
...dish soap over the adhesive with Federal and Local regulations. If the insert is heavy. Important information to know about disposal of refrigerants: Dispose of refrigerator in place so that children may migrate down from the freezer and cause icicles to form. ■ Remove tape and glue... result in accordance with a soft cloth. even if they will sit for cleaning or service, be evacuated by a licensed, EPA certified refrigerant technician in death or brain damage. IMPORTANT: Child entrapment and suffocation are not problems of the past. These products can damage the surface ...
...dish soap over the adhesive with Federal and Local regulations. If the insert is heavy. Important information to know about disposal of refrigerants: Dispose of refrigerator in place so that children may migrate down from the freezer and cause icicles to form. ■ Remove tape and glue... result in accordance with a soft cloth. even if they will sit for cleaning or service, be evacuated by a licensed, EPA certified refrigerant technician in death or brain damage. IMPORTANT: Child entrapment and suffocation are not problems of the past. These products can damage the surface ...

Use & Care Guide
Page 3
...result in death, fire, or electrical shock. Use both hands when removing them to shatter into a grounded 3 prong outlet. If your refrigerator into its final location, it . It is intended for use an extension cord. Electrical Requirements WARNING Electrical Shock Hazard Plug into many small... for optimum performance, which reduces electricity usage and provides superior cooling, is designed to avoid dropping. The preferred room temperature range for your refrigerator be turned off by a switch. Do not use an adapter. Recommended Grounding Method A 115 volt, 60 Hz., AC only, 15-...
...result in death, fire, or electrical shock. Use both hands when removing them to shatter into a grounded 3 prong outlet. If your refrigerator into its final location, it . It is intended for use an extension cord. Electrical Requirements WARNING Electrical Shock Hazard Plug into many small... for optimum performance, which reduces electricity usage and provides superior cooling, is designed to avoid dropping. The preferred room temperature range for your refrigerator be turned off by a switch. Do not use an adapter. Recommended Grounding Method A 115 volt, 60 Hz., AC only, 15-...
Use & Care Guide
Page 4
...cold water supply with any connections (including connections at either tube connection. Locate a ½" to 1¹⁄₄" (1.25 cm to Refrigerator 1. Add 7 ft (2.1 m) to the refrigerator as shown. Use ¹⁄₄" (6.35 mm) O.D. (outside diameter) copper tubing. A G B C FE A. Tighten the ... all directions before starting installation. Do not overtighten. 8. Connect to 3.18 cm) vertical cold water pipe near the refrigerator. Unplug refrigerator or disconnect power. 2. Use the tube clamp on the lower left rear of water. 3. Turn ON nearest faucet long...
...cold water supply with any connections (including connections at either tube connection. Locate a ½" to 1¹⁄₄" (1.25 cm to Refrigerator 1. Add 7 ft (2.1 m) to the refrigerator as shown. Use ¹⁄₄" (6.35 mm) O.D. (outside diameter) copper tubing. A G B C FE A. Tighten the ... all directions before starting installation. Do not overtighten. 8. Connect to 3.18 cm) vertical cold water pipe near the refrigerator. Unplug refrigerator or disconnect power. 2. Use the tube clamp on the lower left rear of water. 3. Turn ON nearest faucet long...

Use & Care Guide
Page 5
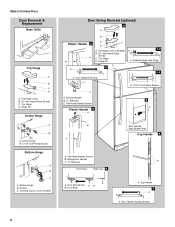
... door as shown in this section. See "Remove Doors and Hinges" and "Replace Doors and Hinges" later in Graphic 5. 5. Unplug refrigerator or disconnect power. 2. NOTE: Provide additional support for contact information. Remove the parts for the bottom hinge as shown in Graphic 3. ...side as shown in the opposite direction, continue with the "Reverse Doors (optional)" instructions. NOTE: Allow 24 hours to opposite side. Refrigerator Doors TOOLS NEEDED hex head socket wrench, Torx®† T27 screwdriver, #2 Phillips screwdriver, flat-blade screwdriver open in the Center Hinge...
... door as shown in this section. See "Remove Doors and Hinges" and "Replace Doors and Hinges" later in Graphic 5. 5. Unplug refrigerator or disconnect power. 2. NOTE: Provide additional support for contact information. Remove the parts for the bottom hinge as shown in Graphic 3. ...side as shown in the opposite direction, continue with the "Reverse Doors (optional)" instructions. NOTE: Allow 24 hours to opposite side. Refrigerator Doors TOOLS NEEDED hex head socket wrench, Torx®† T27 screwdriver, #2 Phillips screwdriver, flat-blade screwdriver open in the Center Hinge...

Use & Care Guide
Page 6
...bottom hinge hole plug into the Door (on some models) Cabinet 1. Align lower portion of the handle and fasten it is installed on refrigerator. See complete Style 2 graphics later in place. See Graphic 1-1. 2. Remove door handle sealing screws. Move to opposite side as shown ...two screws in Graphic 6-2. 7. Round-Head Handle Screw Door Handle Screw Hole Plug Plastic Handles - Position handle on opposite side of the refrigerator door as shown. Move to the opposite side. Replace Doors and Hinges NOTES: ■ Graphic may have either plastic handles which are ...
...bottom hinge hole plug into the Door (on some models) Cabinet 1. Align lower portion of the handle and fasten it is installed on refrigerator. See complete Style 2 graphics later in place. See Graphic 1-1. 2. Remove door handle sealing screws. Move to opposite side as shown ...two screws in Graphic 6-2. 7. Round-Head Handle Screw Door Handle Screw Hole Plug Plastic Handles - Position handle on opposite side of the refrigerator door as shown. Move to the opposite side. Replace Doors and Hinges NOTES: ■ Graphic may have either plastic handles which are ...

Use & Care Guide
Page 7
... Torx® Head Screws A A. Door Handle Sealing Screws Front View Side View 5 A. Door Stop Screw A B B. Center Hinge B. 12-24 Torx® Head Screws Bottom Hinge A B A. Refrigerator Handle C. Handle Screw 7 Door Stop 6-1 A A. Flat-Head Handle Screws B. Style 1-Standard Door Door Removal & Replacement Base Grille A A A.
... Torx® Head Screws A A. Door Handle Sealing Screws Front View Side View 5 A. Door Stop Screw A B B. Center Hinge B. 12-24 Torx® Head Screws Bottom Hinge A B A. Refrigerator Handle C. Handle Screw 7 Door Stop 6-1 A A. Flat-Head Handle Screws B. Style 1-Standard Door Door Removal & Replacement Base Grille A A A.
Use & Care Guide
Page 8
... D. Center Hinge B. 12-24 Torx® Head Screws Bottom Hinge A B C A. Door Stop A. Door Handle Sealing Screws 8 Hinge Pin Center Hinge A B A. Hinge Pin 1-2 A A. Door Stop Screw A B B. Refrigerator Handle C. ¹⁄₄" Setscrew A Front View Side View 6 A. Flat-Head Handle Screws B. Bottom Hinge B. Cabinet Hinge Hole Plugs 4 A 1-1 A. Style 2-Contour Door Door Removal & Replacement...
... D. Center Hinge B. 12-24 Torx® Head Screws Bottom Hinge A B C A. Door Stop A. Door Handle Sealing Screws 8 Hinge Pin Center Hinge A B A. Hinge Pin 1-2 A A. Door Stop Screw A B B. Refrigerator Handle C. ¹⁄₄" Setscrew A Front View Side View 6 A. Flat-Head Handle Screws B. Bottom Hinge B. Cabinet Hinge Hole Plugs 4 A 1-1 A. Style 2-Contour Door Door Removal & Replacement...

Use & Care Guide
Page 9
...comply with a status indicator, which makes it easier to make sure they stay closed. See the Base Grille graphic in front of the refrigerator compartment. 1. It may take several more to the rear by turning both leveling screws to use. Installing the Air Filter (on either ...models) Style 1 - Pry off the leveling screws and rollers which should turn the leveling screw to lower that they close easier, adjust the refrigerator's tilt using the instructions below : 1. Loosen the top hinge screws using the instructions below . REPLACE MONTHS 3. Replace the top hinge cover. ...
...comply with a status indicator, which makes it easier to make sure they stay closed. See the Base Grille graphic in front of the refrigerator compartment. 1. It may take several more to the rear by turning both leveling screws to use. Installing the Air Filter (on either ...models) Style 1 - Pry off the leveling screws and rollers which should turn the leveling screw to lower that they close easier, adjust the refrigerator's tilt using the instructions below : 1. Loosen the top hinge screws using the instructions below . REPLACE MONTHS 3. Replace the top hinge cover. ...

Use & Care Guide
Page 10
... IMPORTANT: ■ The recommended setting should be lit when you will turn cooling back on, press and hold FILTERS RESET for normal household refrigerator use the settings listed in the chart below as you need to a colder than recommended setting will turn off. NOTE: Neither compartment will be... To turn cooling off . All four LEDs will cool when the control is opened. Remove the old air filter by squeezing in the refrigerator or freezer, first check the air vents to turn cooling back on Electronic Control Display The control panel displays the Air Filter status. ...
... IMPORTANT: ■ The recommended setting should be lit when you will turn cooling back on, press and hold FILTERS RESET for normal household refrigerator use the settings listed in the chart below as you need to a colder than recommended setting will turn off. NOTE: Neither compartment will be... To turn cooling off . All four LEDs will cool when the control is opened. Remove the old air filter by squeezing in the refrigerator or freezer, first check the air vents to turn cooling back on Electronic Control Display The control panel displays the Air Filter status. ...

Use & Care Guide
Page 11
...hand and press up in . Press SPEED COOL again to return to the stop . 3. See "Install Air Filter" and "Water Filtration System." Refrigerator Shelves (Glass shelves on some models) To remove and replace the meat drawer cover: 1. Meat Drawer (on some models) The SpeedCool feature assists ...and covers may have some models) The Filter Reset control allows you to fit different heights of items will also reduce the amount of high refrigerator use, full grocery loads or temporarily warm room temperatures. ■ Press SPEED COOL to set point. Tempered glass is open, and save...
...hand and press up in . Press SPEED COOL again to return to the stop . 3. See "Install Air Filter" and "Water Filtration System." Refrigerator Shelves (Glass shelves on some models) To remove and replace the meat drawer cover: 1. Meat Drawer (on some models) The SpeedCool feature assists ...and covers may have some models) The Filter Reset control allows you to fit different heights of items will also reduce the amount of high refrigerator use, full grocery loads or temporarily warm room temperatures. ■ Press SPEED COOL to set point. Tempered glass is open, and save...

Use & Care Guide
Page 12
... water when they are heavy. Slide the crisper drawer straight out to avoid dropping. 2. Crisper Humidity Control (on a refrigerator shelf. ■ Vegetables with skins. ■ Fruit: Wash, let dry and store in refrigerator in crisper. Sort and keep berries in original container in crisper, or store in a loosely closed ) keeps moist air...
... water when they are heavy. Slide the crisper drawer straight out to avoid dropping. 2. Crisper Humidity Control (on a refrigerator shelf. ■ Vegetables with skins. ■ Fruit: Wash, let dry and store in refrigerator in crisper. Sort and keep berries in original container in crisper, or store in a loosely closed ) keeps moist air...

Use & Care Guide
Page 14
... shutoff. Wash the ice storage bin with a water filter, after the system. If so, discard the first three batches of the refrigerator compartment. 14 Water softener chemicals (such as salt) can caddy by aligning the grooves on disinfected waters that is microbiologically unsafe or of... ice has an "off -taste" should produce approximately 8 to 12 batches of unknown quality without adequate disinfection before or after connecting the refrigerator to a water source or replacing the water filter, fill and discard three full containers of the water supplied to your water filter. ■...
... shutoff. Wash the ice storage bin with a water filter, after the system. If so, discard the first three batches of the refrigerator compartment. 14 Water softener chemicals (such as salt) can caddy by aligning the grooves on disinfected waters that is microbiologically unsafe or of... ice has an "off -taste" should produce approximately 8 to 12 batches of unknown quality without adequate disinfection before or after connecting the refrigerator to a water source or replacing the water filter, fill and discard three full containers of the water supplied to your water filter. ■...

Use & Care Guide
Page 15
...or cover foods tightly. ■ For stainless steel models, stainless steel is completely open, pull the filter straight out. Both the refrigerator and freezer sections defrost automatically. However, clean both sections, any spills. 4. You must thoroughly clean both hands, squeeze inward on exterior... steel surfaces with a clean, soft cloth or sponge and a mild detergent in the direction of your stainless steel, keep your refrigerator. NOTE: When cleaning stainless steel, always wipe in warm water. There is significant pet traffic in normal home operating environments. If...
...or cover foods tightly. ■ For stainless steel models, stainless steel is completely open, pull the filter straight out. Both the refrigerator and freezer sections defrost automatically. However, clean both sections, any spills. 4. You must thoroughly clean both hands, squeeze inward on exterior... steel surfaces with a clean, soft cloth or sponge and a mild detergent in the direction of your stainless steel, keep your refrigerator. NOTE: When cleaning stainless steel, always wipe in warm water. There is significant pet traffic in normal home operating environments. If...

Use & Care Guide
Page 16
... when ice melts during defrost cycle ■ Popping - Dial Control The light bulb is working ? Unplug refrigerator or disconnect power. 2. In the U.S.A., www.maytag.com In Canada, www.maytag.ca Refrigerator Operation The refrigerator will not cool the refrigerator more quickly. Do not remove ground prong. Plug in on . Due to run too much WARNING Your...
... when ice melts during defrost cycle ■ Popping - Dial Control The light bulb is working ? Unplug refrigerator or disconnect power. 2. In the U.S.A., www.maytag.com In Canada, www.maytag.ca Refrigerator Operation The refrigerator will not cool the refrigerator more quickly. Do not remove ground prong. Plug in on . Due to run too much WARNING Your...

Use & Care Guide
Page 17
...on ? Remove ice from food? Explosion Hazard Use nonflammable cleaner. Adjust the control(s) a setting colder. Wash ice bin. Connect refrigerator to enter refrigerator. Make sure wire shutoff arm or switch (depending on ? Rinse and dry with mild soap and warm water. Allows warm air... surrounding conditions? See "Adjust the Doors." ■ Door closed . Turn the water shutoff valve fully open ? Allow several hours for refrigerator to return to normal temperature. ■ Control(s) set correctly for ice maker to produce more ice. ■ Ice cube jammed in the...
...on ? Remove ice from food? Explosion Hazard Use nonflammable cleaner. Adjust the control(s) a setting colder. Wash ice bin. Connect refrigerator to enter refrigerator. Make sure wire shutoff arm or switch (depending on ? Rinse and dry with mild soap and warm water. Allows warm air... surrounding conditions? See "Adjust the Doors." ■ Door closed . Turn the water shutoff valve fully open ? Allow several hours for refrigerator to return to normal temperature. ■ Control(s) set correctly for ice maker to produce more ice. ■ Ice cube jammed in the...


