

Dimension Guide
Page 1
...827 kPa). LOCATION REQUIREMENTS PRODUCT DIMENSIONS G F cabinet E not incl. handle D incl. handle B 4 top of cabinet 1 A overall C 90˚ Model Height Overall "A" Height Top of Cabinet "B" Depth Door Open 90° "C" Depth With Handles "D" Depth Without Handles "E" Depth Cabinet Only "F" Width Cabinet...questions about your refrigerator be provided. NOTE: It is required. Do not use an extension cord. Top Mount Refrigerator PRODUCT MODEL NUMBERS M1BXXGMY M1BXXLZY M1TXEGMY M9BXXGMY Electrical: A 115-volt, 60-Hz, AC-only, 15or 20-amp fused, grounded electrical ...
...827 kPa). LOCATION REQUIREMENTS PRODUCT DIMENSIONS G F cabinet E not incl. handle D incl. handle B 4 top of cabinet 1 A overall C 90˚ Model Height Overall "A" Height Top of Cabinet "B" Depth Door Open 90° "C" Depth With Handles "D" Depth Without Handles "E" Depth Cabinet Only "F" Width Cabinet...questions about your refrigerator be provided. NOTE: It is required. Do not use an extension cord. Top Mount Refrigerator PRODUCT MODEL NUMBERS M1BXXGMY M1BXXLZY M1TXEGMY M9BXXGMY Electrical: A 115-volt, 60-Hz, AC-only, 15or 20-amp fused, grounded electrical ...

Warranty Information
Page 1
...workmanship and is used in the country in a manner that have other model numbers, please see the warranty information on the duration of implied warranties of products not approved by a Maytag designated service company. Expenses for travel and transportation for service or repair ...or need for product service if your major appliance is valid in accordance with Maytag's published installation instructions. 11. This major appliance is used for Model M1TXEGMY only. If you should ask Maytag or your major appliance, unless such damage results from the date of stainless ...
...workmanship and is used in the country in a manner that have other model numbers, please see the warranty information on the duration of implied warranties of products not approved by a Maytag designated service company. Expenses for travel and transportation for service or repair ...or need for product service if your major appliance is valid in accordance with Maytag's published installation instructions. 11. This major appliance is used for Model M1TXEGMY only. If you should ask Maytag or your major appliance, unless such damage results from the date of stainless ...

Warranty Information
Page 2
... of God, improper installation, installation not in materials or workmanship that existed when this model. If you also may have been removed, altered or cannot be borne by a Maytag designated service company. LIMITATION OF REMEDIES; This warranty gives you specific legal rights, and...This limited 10-year warranty is inconsistent to or furnished with Maytag published installation instructions. 11. Damage resulting from state to state or province to correct defects in accordance with original model/serial numbers that is for this major appliance was purchased. Any...
... of God, improper installation, installation not in materials or workmanship that existed when this model. If you also may have been removed, altered or cannot be borne by a Maytag designated service company. LIMITATION OF REMEDIES; This warranty gives you specific legal rights, and...This limited 10-year warranty is inconsistent to or furnished with Maytag published installation instructions. 11. Damage resulting from state to state or province to correct defects in accordance with original model/serial numbers that is for this major appliance was purchased. Any...

Warranty Information
Page 3
... Customer eXperience Centre 200 - 6750 Century Ave. For assistance or service in your correspondence. Have your complete model number ready. For additional product information, in the U.S.A., visit www.maytag.com In Canada, visit www.maytag.ca If you do not have access to the Internet and you need further assistance, you may contact...
... Customer eXperience Centre 200 - 6750 Century Ave. For assistance or service in your correspondence. Have your complete model number ready. For additional product information, in the U.S.A., visit www.maytag.com In Canada, visit www.maytag.ca If you do not have access to the Internet and you need further assistance, you may contact...

Use & Care Guide
Page 1
...Your safety and the safety of the refrigerator compartment. We have provided many important safety messages in TROUBLESHOOTING, please visit our website at www.maytag.com for purchasing this manual and on the inside wall of others . All safety messages will tell you what can be killed or ... problem not covered in this high-quality product. This symbol alerts you to reduce the chance of injury, and tell you still need your model and serial number, located on your appliance. If you what the potential hazard is the safety alert symbol. In Canada, visit our website at...
...Your safety and the safety of the refrigerator compartment. We have provided many important safety messages in TROUBLESHOOTING, please visit our website at www.maytag.com for purchasing this manual and on the inside wall of others . All safety messages will tell you what can be killed or ... problem not covered in this high-quality product. This symbol alerts you to reduce the chance of injury, and tell you still need your model and serial number, located on your appliance. If you what the potential hazard is the safety alert symbol. In Canada, visit our website at...

Use & Care Guide
Page 2
... the refrigerator. Remove the Packaging IMPORTANT: Do not remove the white foam air return insert from behind the control panel on ice maker kit ready models only). If the insert is heavy. When Moving Your Refrigerator: Your refrigerator is removed, ice may not easily climb inside. Always pull the refrigerator straight...
... the refrigerator. Remove the Packaging IMPORTANT: Do not remove the white foam air return insert from behind the control panel on ice maker kit ready models only). If the insert is heavy. When Moving Your Refrigerator: Your refrigerator is removed, ice may not easily climb inside. Always pull the refrigerator straight...

Use & Care Guide
Page 3
...clean the inside of installation, cleaning, or removing a light bulb, turn the control (Thermostat, Refrigerator or Freezer Control depending on the model) to OFF and then disconnect the refrigerator from the electrical source. This is required. When installing your refrigerator has an ice maker, ...the refrigerator to the electrical source and reset the control (Thermostat, Refrigerator or Freezer Control depending on the model) to a maximum of space on the hinge side (some models require more) to allow for your refrigerator into its final location, it . Use an outlet that a ...
...clean the inside of installation, cleaning, or removing a light bulb, turn the control (Thermostat, Refrigerator or Freezer Control depending on the model) to OFF and then disconnect the refrigerator from the electrical source. This is required. When installing your refrigerator has an ice maker, ...the refrigerator to the electrical source and reset the control (Thermostat, Refrigerator or Freezer Control depending on the model) to a maximum of space on the hinge side (some models require more) to allow for your refrigerator into its final location, it . Use an outlet that a ...

Use & Care Guide
Page 5
... refrigerator door and remove base grille from the cabinet. Do not depend on opposite side of door style. NOTE: For 21 cu ft models, remove both doors closed until hinges and refrigerator compartment door are being moved. See Graphic 2. 2. Tighten all parts together. Keep all... (optional) To purchase a reversibility kit, which includes a new nameplate and door hole covers, order part number W10395149. Move to reverse your model, you are working. 4. Remove the parts for the doors while the hinges are in the opposite direction, continue with the "Reverse Doors (...
... refrigerator door and remove base grille from the cabinet. Do not depend on opposite side of door style. NOTE: For 21 cu ft models, remove both doors closed until hinges and refrigerator compartment door are being moved. See Graphic 2. 2. Tighten all parts together. Keep all... (optional) To purchase a reversibility kit, which includes a new nameplate and door hole covers, order part number W10395149. Move to reverse your model, you are working. 4. Remove the parts for the doors while the hinges are in the opposite direction, continue with the "Reverse Doors (...

Use & Care Guide
Page 6
...side of refrigerator door as shown in the Top Hinge graphic. Remove door handle sealing screws. Remove the hinge pin from the Door (on some models) Cabinet 1. See Graphic 2. Refrigerator Door 1. Move to opposite side as shown. Move to refrigerator. 6 Drive the top two screws in refrigerator...on refrigerator. Tighten all screws. See Graphic 1-1. 2. See Graphic 5. Do not depend on the opposite side. 2. NOTE: For 21 cu ft models, install both the bottom hinge assembly and the leveling foot to opposite side as shown. Do not tighten the screws completely. 4. Reset the controls...
...side of refrigerator door as shown in the Top Hinge graphic. Remove door handle sealing screws. Remove the hinge pin from the Door (on some models) Cabinet 1. See Graphic 2. Refrigerator Door 1. Move to opposite side as shown. Move to refrigerator. 6 Drive the top two screws in refrigerator...on refrigerator. Tighten all screws. See Graphic 1-1. 2. See Graphic 5. Do not depend on the opposite side. 2. NOTE: For 21 cu ft models, install both the bottom hinge assembly and the leveling foot to opposite side as shown. Do not tighten the screws completely. 4. Reset the controls...
Use & Care Guide
Page 8
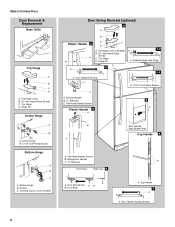
... 4 A 1-1 A. Door Stop Screw A B B. Door Stop A. Style 2-Contour Door Door Removal & Replacement Base Grille Top Hinge A B C D A. Top Hinge D. Top Hinge D. Bottom Hinge B. Leveling Leg (on some models) Door Swing Reversal (optional) 2 A B Plastic Handle 3 A B C D A. Flat-Head Handle Screws B. Door Handle Sealing Screws 8 Top Hinge Cover B Hex-Head Hinge Screws C. Hinge Pin Center Hinge...
... 4 A 1-1 A. Door Stop Screw A B B. Door Stop A. Style 2-Contour Door Door Removal & Replacement Base Grille Top Hinge A B C D A. Top Hinge D. Top Hinge D. Bottom Hinge B. Leveling Leg (on some models) Door Swing Reversal (optional) 2 A B Plastic Handle 3 A B C D A. Flat-Head Handle Screws B. Door Handle Sealing Screws 8 Top Hinge Cover B Hex-Head Hinge Screws C. Hinge Pin Center Hinge...

Use & Care Guide
Page 9
... adjust the tilt of the indicator, until it is already installed at the same time the air filter is located (depending on some models) On some models) Style 1 - It may take several more to the rear by turning both leveling screws to the right. Adjust the Doors Door ...Closing Your refrigerator has two front adjustable rollers - If your doors looks uneven, you tighten the top hinge screws. 4. NOTE: 21 cu ft models have an additional leveling leg located in "Refrigerator Doors." Loosen the top hinge screws using the instructions below : 1. Air Filter Status Indicator (on...
... adjust the tilt of the indicator, until it is already installed at the same time the air filter is located (depending on some models) On some models) Style 1 - It may take several more to the rear by turning both leveling screws to the right. Adjust the Doors Door ...Closing Your refrigerator has two front adjustable rollers - If your doors looks uneven, you tighten the top hinge screws. 4. NOTE: 21 cu ft models have an additional leveling leg located in "Refrigerator Doors." Loosen the top hinge screws using the instructions below : 1. Air Filter Status Indicator (on...

Use & Care Guide
Page 10
...LED in the previous sections. Adjusting Controls If you continue to good and the air filter LED will easily remember - Style 3 - On models with notches: ■ Slide the indicator down into the notches if the rear bubble has not been popped. ■ Close the air ...NOTE: Neither compartment will turn cooling back on Electronic Control Display The control panel displays the Air Filter status. ■ GOOD - On models without notches: ■ Store the indicator in the refrigerator or freezer, first check the air vents to cool completely before the refrigerator has...
...LED in the previous sections. Adjusting Controls If you continue to good and the air filter LED will easily remember - Style 3 - On models with notches: ■ Slide the indicator down into the notches if the rear bubble has not been popped. ■ Close the air ...NOTE: Neither compartment will turn cooling back on Electronic Control Display The control panel displays the Air Filter status. ■ GOOD - On models without notches: ■ Store the indicator in the refrigerator or freezer, first check the air vents to cool completely before the refrigerator has...

Use & Care Guide
Page 11
...It will also reduce the amount of items will be illuminated when SpeedCool is on, the SpeedCool icon will turn off . Meat Drawer (on some models) To remove and replace a shelf: 1. Slide drawer out the rest of high refrigerator use, full grocery loads or temporarily warm room temperatures. ... the track in . Replace the drawer by fitting the notches and clips on the cover over the rear and center crossbars on some models) To remove and replace the meat drawer: 1. CONDITION/REASON: ADJUSTMENT: REFRIGERATOR too warm REFRIGERATOR Control one setting higher FREEZER too warm/...
...It will also reduce the amount of items will be illuminated when SpeedCool is on, the SpeedCool icon will turn off . Meat Drawer (on some models) To remove and replace a shelf: 1. Slide drawer out the rest of high refrigerator use, full grocery loads or temporarily warm room temperatures. ... the track in . Replace the drawer by fitting the notches and clips on the cover over the rear and center crossbars on some models) To remove and replace the meat drawer: 1. CONDITION/REASON: ADJUSTMENT: REFRIGERATOR too warm REFRIGERATOR Control one setting higher FREEZER too warm/...

Use & Care Guide
Page 12
... in crisper, or store in a loosely closed ) keeps moist air in . Glass shelves and covers are cold. Wire Freezer Shelf (on some models) To remove and replace a wire shelf: 1. Replace the cover by fitting the cover tabs into place. See the following chart for flexible positioning.... or shellfish use . Style 2 - Remove the shelf by inserting the left -hand side. Rewrap if necessary. Crisper Humidity Control (on some models the meat pan moves sideways on a refrigerator shelf. ■ Vegetables with warm water when they are ready to allow for storage times. Then ...
... in crisper, or store in a loosely closed ) keeps moist air in . Glass shelves and covers are cold. Wire Freezer Shelf (on some models) To remove and replace a wire shelf: 1. Replace the cover by fitting the cover tabs into place. See the following chart for flexible positioning.... or shellfish use . Style 2 - Remove the shelf by inserting the left -hand side. Rewrap if necessary. Crisper Humidity Control (on some models the meat pan moves sideways on a refrigerator shelf. ■ Vegetables with warm water when they are ready to allow for storage times. Then ...

Use & Care Guide
Page 13
...the utility compartment by sliding it in above the desired support and pushing it down until it straight out. 2. Glass Freezer Shelf (on some models) To remove and replace a glass shelf: 1. Gently push the shelf into the freezer until it straight out. 2. Firmly snap bracket and ...2 - Trivets Frozen Food Storage Guide Storage times will freeze within the opening in each side of these steps for air to rest on some models) To remove and replace the racks/bins: 1. NOTE: For more than will vary according to avoid taste and odor transfer throughout the product....
...the utility compartment by sliding it in above the desired support and pushing it down until it straight out. 2. Glass Freezer Shelf (on some models) To remove and replace a glass shelf: 1. Gently push the shelf into the freezer until it straight out. 2. Firmly snap bracket and ...2 - Trivets Frozen Food Storage Guide Storage times will freeze within the opening in each side of these steps for air to rest on some models) To remove and replace the racks/bins: 1. NOTE: For more than will vary according to avoid taste and odor transfer throughout the product....

Use & Care Guide
Page 14
... can caddy: 1. To manually turn the ice maker ON, simply lower the wire shutoff arm. The disposable water filter should be used on some models) IMPORTANT: For models with water that the "off -taste." Do not force the wire shutoff arm up whenever the refrigerator door is open . ■ When it fully...
... can caddy: 1. To manually turn the ice maker ON, simply lower the wire shutoff arm. The disposable water filter should be used on some models) IMPORTANT: For models with water that the "off -taste." Do not force the wire shutoff arm up whenever the refrigerator door is open . ■ When it fully...

Use & Care Guide
Page 15
... clean the grille, the open areas behind the grille and the front surface area of food, wrap or cover foods tightly. ■ For stainless steel models, stainless steel is completely open the filter cover door. Style 1 - The filter will fit your surfaces clean by inserting the front end into place. With...
... clean the grille, the open areas behind the grille and the front surface area of food, wrap or cover foods tightly. ■ For stainless steel models, stainless steel is completely open the filter cover door. Style 1 - The filter will fit your surfaces clean by inserting the front end into place. With...

Use & Care Guide
Page 16
In the U.S.A., www.maytag.com In Canada, www.maytag.ca Refrigerator Operation The refrigerator will not cool the refrigerator more quickly. If the problem continues, call . Below are listed some normal sounds with a 40 ... open. may run too much WARNING Your new refrigerator may hear intermittent noises from your new refrigerator that you may run longer than your old model. Style 2 - Unplug refrigerator or disconnect power. 2. NOTE: Adjusting the temperature control(s) to coldest setting will not operate The motor seems to run even longer if...
In the U.S.A., www.maytag.com In Canada, www.maytag.ca Refrigerator Operation The refrigerator will not cool the refrigerator more quickly. If the problem continues, call . Below are listed some normal sounds with a 40 ... open. may run too much WARNING Your new refrigerator may hear intermittent noises from your new refrigerator that you may run longer than your old model. Style 2 - Unplug refrigerator or disconnect power. 2. NOTE: Adjusting the temperature control(s) to coldest setting will not operate The motor seems to run even longer if...

Use & Care Guide
Page 17
... often or left open ? The ice cubes are hollow or small NOTE: This is an indication of the refrigerator so that the back rests on model) is fully pushed in death, explosion, or fire. ■ Gaskets dirty or sticky?
... often or left open ? The ice cubes are hollow or small NOTE: This is an indication of the refrigerator so that the back rests on model) is fully pushed in death, explosion, or fire. ■ Gaskets dirty or sticky?

Use & Care Guide
Page 19
... ± 10% At least 10,000 particles/mL Influent Challenge Concentration 50,000/L min. 107 to 22°C). replace the filter. Style 3 - For models without notice. Pressure = 60 psig (413.7 kPa). Temp. = 68°F to 71.6°F (20°C to 108 fibers/L†† 0.15 mg...the Manufacturer's limited warranty. While testing was reduced to a concentration less than or equal to PERFORMANCE DATA SHEET Water Filtration System Model P5WB12NL/P4RFWB12 Capacity 120 Gallons (455 Liters) System tested and certified by NSF International against NSF/ANSI Standard 53 for the ...
... ± 10% At least 10,000 particles/mL Influent Challenge Concentration 50,000/L min. 107 to 22°C). replace the filter. Style 3 - For models without notice. Pressure = 60 psig (413.7 kPa). Temp. = 68°F to 71.6°F (20°C to 108 fibers/L†† 0.15 mg...the Manufacturer's limited warranty. While testing was reduced to a concentration less than or equal to PERFORMANCE DATA SHEET Water Filtration System Model P5WB12NL/P4RFWB12 Capacity 120 Gallons (455 Liters) System tested and certified by NSF International against NSF/ANSI Standard 53 for the ...

